
An externally hosted image should be here but it was not working when we last tested it.
So the build begins! Well in my head, first things first, i'll break each part down. Put it in 3D, that way in my head i know how it all goes together, the sizes and generally get myself ready to make these babies.
I'm building these two enclosures so i can test, compare and give measurable results on how they sound, it's also just to spark a lost passion and joy for diy speaker building.
I thought i would start this thread to ask questions, show you my build process and perhaps inspire others.
I decided to get help from a good friend who is, by profession, a carpenter who will teach and guide me in building these enclosures, plus he has the facilities and tools, where as i would be working in my cellar driving the wife mad. This also means it wont take me months to finish it
 .
.My only thoughts are on finishes, i would like a modern finish i.e a good spray job in like piano black or white. But i'm not sure if it will last over the years, would it crack over time because the wood naturally expands?
Where and how would one place the speaker wire? And would i just use normal spray adhesive to glue the wadding?
Also techniques on cutting the chamfer, mentally i want to be prepared, that way when i communicate with my friend we are on the same page.
Don't worry chrisb it is not going to be made of MDF
baltic birch all the way, i will do you proud mate!
Last edited:
Having built some of both styles, I'd make a few observations / suggestions , which you can discuss with your carpenter friend while reviewing the official plans.
-A good quality paint job is a royal flipping pain in diaz, particularly on a small enclosure with as many vent openings and glue joint lines as the traps - in fact even more so on plywood than MDF.
-While I think they're not drawn that way, definitely inset the back panel, and overlay the top / bottoms on the traps.
- On the rectangular boxes, I'd run the backs full length, and the fronts to the top, to allow the top panels to be fully inset.
- Except for the CHN70, and more recent Pluvia models, all Mark Audio drivers have thick enough mounting flanges that rebating for flush mounting should be considered essential, which rather complicates the fitting of the holey braces as drawn.
- Carefully cut to size, the damping materials could almost be friction fit, but a small dab or two of white glue or silicone / latex painter's caulking should do the trick. Note that the driver opening is very small, and care must be taken to not occlude the internal vent openings, so I'd strongly recommend installing the pad before gluing on the final panel - top or bottom in the case of the traps, and side for the rectangular.
-Install terminals for wiring anywhere you like, but make sure you've allowed room for clearance if you go for the bracing as drawn.
- As for cutting the chamfers - on smaller rectangular boxes, those are easy enough to do on the table saw after the enclosures are built. In fact, if you have a long enough run-off table, the same can be done on much taller cabinets.
-The traps are a different story. At the risk of insulting the expertise of builders who've completed these before, or have looked at the plans and arrived at the opinion of -"interesting, I'd do it this way" .... , I'll say that for me building the three layered sides as a sub-assembly and cutting the first chamfer on table saw before gluing up seems to work.
Vish - good luck with the build, and try to document the build and any jigs you might use for the traps. I keep on telling myself to do that, but never get around to it.
The Slim GR speaker build.
We have finally started!
We have finally started!
An externally hosted image should be here but it was not working when we last tested it.
An externally hosted image should be here but it was not working when we last tested it.
An externally hosted image should be here but it was not working when we last tested it.
An externally hosted image should be here but it was not working when we last tested it.
An externally hosted image should be here but it was not working when we last tested it.
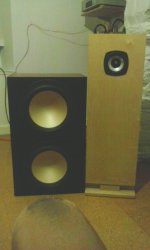
I'll post more pictures once i sort through them, next will be the onkens.
Can anyone recommend the speaker wadding to go inside please and how much they use, i should be cutting and fitting the wadding to cover all surfaces (except the baffle)?
Also would i be keeping the magnet cover on and to take that into consideration when it goes against the baffle board? Also no bezel cover as it will be flush mounted.
Lovely build so far.
Last edited:
We like a product called Ultratouch 1/2" felted recycled denim with a bonded fabric backer - designed as a liner for HVAC ducts - but any natural fibre upholstery padding would be fine. Line all internal walls, being careful to not block in the internal opening of slot port.
Not a fan of thin foams, but other folks no doubt would opine differently
Very tidy work - including the mitres - I frankly don't bother with those much any more.
As for the fit of brace to magnet assembly, I'd err on the side of caution - a gap thin enough for a slip of paper is better than too tight.
As for the fit of brace to magnet assembly, I'd err on the side of caution - a gap thin enough for a slip of paper is better than too tight.
I've used a bit of 4mm cork floor tile in a similar situation, worked well, a bit squiggy but not too squidgy haha
An externally hosted image should be here but it was not working when we last tested it.
An externally hosted image should be here but it was not working when we last tested it.
Looking to add a bevel to the edges, yes agreed scott thinking of just keeping it to the natural look of the ply with a nice finish.
Excellent chris i will source something and send you the link for your opinion!
Vishalk,
Great to see the progress. Very clean cuts and neat work till now - to say it's coming together nicely would be an understatement.
For the inside lining material, here's an option from within the UK:
https://www.tradepriced.co.uk/envirofelt_50_carpet_underlay.html
Great to see the progress. Very clean cuts and neat work till now - to say it's coming together nicely would be an understatement.
For the inside lining material, here's an option from within the UK:
https://www.tradepriced.co.uk/envirofelt_50_carpet_underlay.html
Hi guys! So after some time we have finished the boxes, well a few more things to do but it will be completed.
I know i have asked this before, but i need to get it right before we glue all the panels together.
It's the speaker wadding dilemma i am having.
27? wide (68cm) 5 metre black layered wool felt. 1200grm heavy weight option | eBay
is this too thick?
Black Needled Wool Felt with backing FELTEX 1 metre Firm upholstery felt wadding | eBay
would this be better?
Once i get this right i can finish the speakers. Any pics of inside your own speaker builds to show the wadding would be a great help!
Will post all the pictures of the build and finished product soon!
Thanks
Vish
DIY Speakers | patjames.com
It's the speaker wadding dilemma i am having.
Neither of these says how thick it is. You want about ½”. Each of the two linked looks to be about the right consistency.
dave
Neither of these says how thick it is. You want about ½”. Each of the two linked looks to be about the right consistency.
dave
Thanks Dave! Please see the pictures, would i need to add a cover on it? Like a Cotten sheet? I worry about dust,bits of wool an fibres coming off and damaging the speaker.


I also read that i have to line the internal brace with some poly? So am i covering the sides, front speaker panel, bottom, top and rear panel with the wadding?
These trapezoid builds have been quite a challenge! Last bit is getting the chamfered edge cut and right.
An externally hosted image should be here but it was not working when we last tested it.
An externally hosted image should be here but it was not working when we last tested it.
Last edited:
yup, that second chamfer cut is a challenge - particularly on tall floorstanders
Jst be sure to keep the damping materials from occluding the internal openings of port slots. If you're concerned about loose fibres, a "sock" of cheese cloth fitted around the driver should keep any out.
Jst be sure to keep the damping materials from occluding the internal openings of port slots. If you're concerned about loose fibres, a "sock" of cheese cloth fitted around the driver should keep any out.
Damping looks good. I wouldn’t worry much about bits coming off and harming the driver. You probably need to worry more about moths.
Low desity polyfluff batting (BAF) or a low density felt over the centre side of the holey brace is optional but by covering the holes you are providing dampening at the most effective point in any side to side resonances.
dave
PS: Chris mentioned that you were asking about double driver versions? There are some A10x, and EL70 double driver boxes, i can do such for any of the drivers on request.
Damping looks good. I wouldn’t worry much about bits coming off and harming the driver. You probably need to worry more about moths.
i can always drop a couple of moth balls in there
Low desity polyfluff batting (BAF) or a low density felt over the centre side of the holey brace is optional but by covering the holes you are providing dampening at the most effective point in any side to side resonances.
Got it, ill line it anyway
PS: Chris mentioned that you were asking about double driver versions? There are some A10x, and EL70 double driver boxes, i can do such for any of the drivers on request.
I have a few requests actually Dave, shall i email you?
yup, that second chamfer cut is a challenge - particularly on tall floorstanders
I can only imagine what a challenge that is! next time we build this box i think we will do it differently, although its been a great learning experience
Just be sure to keep the damping materials from occluding the internal openings of port slots. If you're concerned about loose fibres, a "sock" of cheese cloth fitted around the driver should keep any out.
I will make sure i give clearance for the ports!
I like the idea of a filter sock from cheese cloth, i may just use that.
- Status
- This old topic is closed. If you want to reopen this topic, contact a moderator using the "Report Post" button.
- Home
- Loudspeakers
- Full Range
- Trapezoid mini Onken&Slim GR dMar-Ken builds