Vish,
Nice work with the BB ply cabinets. Once you're done with the remaining angle cut, post some more pics. Have you decided on the finish yet?
For the moment i'm just going to sand finish them then decide how i will finish them. Yes once they are finished i will post a great number of pictures!
I am actually attempting to finish them tomorrow, no one has actually replied to me specifically about the wadding. From what i gather i am poly lining the internal brace, wadding the sides, top, bottom and back of the enclosure.
Do i need to wad the front panel? or do i just leave that?
Thanks!
\Do i need to wad the front panel? or do i just leave that?
You should put felt below the driver at least on th efront panel. When Chris builds these he cuts a round hole in the felt and covers the entire baffle on the inside.
dave
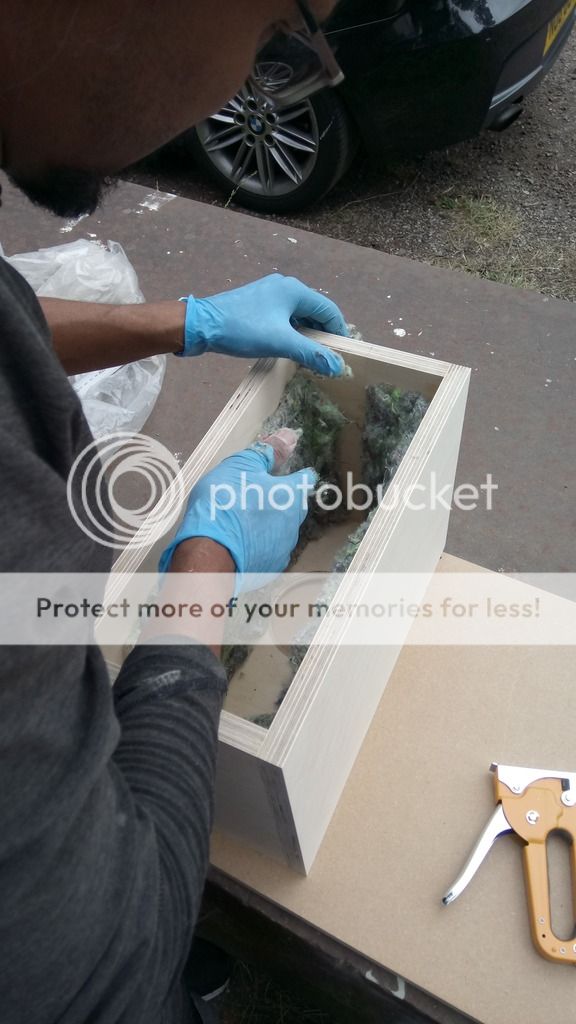
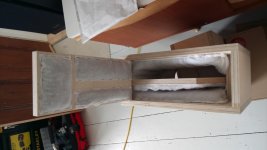
more pics, wadding placement.
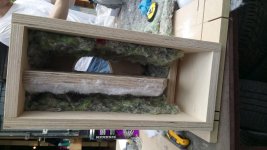
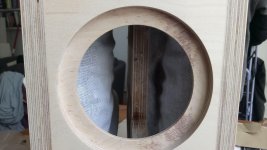
Note the chamfered edge
Guys from this picture can you let me know where you place the wadding? I know the slots need clearance but if i wad the rear panel and the sides it will be tight. Also i'm thinking of using the white poly fill on the trapezoids because its a great deal easier to use! That other stuff is a nightmare!
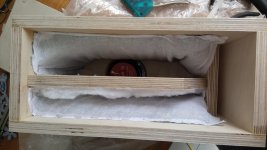
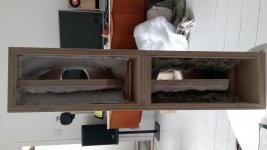
I'll wad the sides here, can i use a thin but on the back panel end to end? or just in the middle? Anyone got pics if the inside of there enclosures?
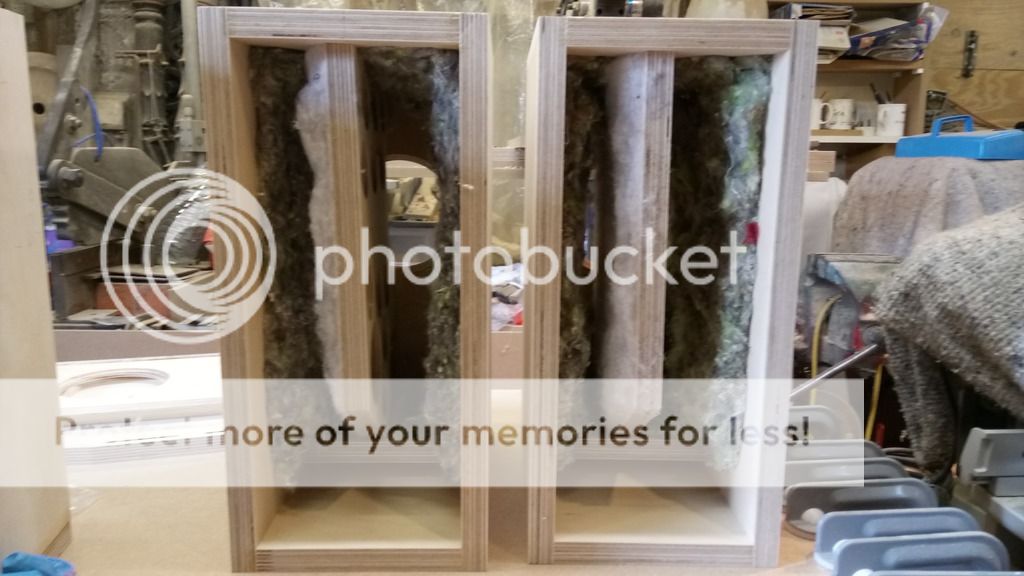
Where else should i be wadding in this picture? Perhaps the bottom of the front speaker panel and the rear panel. Anywhere else?
An externally hosted image should be here but it was not working when we last tested it.
An externally hosted image should be here but it was not working when we last tested it.
Note the chamfered edge
An externally hosted image should be here but it was not working when we last tested it.
An externally hosted image should be here but it was not working when we last tested it.
An externally hosted image should be here but it was not working when we last tested it.
An externally hosted image should be here but it was not working when we last tested it.
Guys from this picture can you let me know where you place the wadding? I know the slots need clearance but if i wad the rear panel and the sides it will be tight. Also i'm thinking of using the white poly fill on the trapezoids because its a great deal easier to use! That other stuff is a nightmare!
An externally hosted image should be here but it was not working when we last tested it.
An externally hosted image should be here but it was not working when we last tested it.
I'll wad the sides here, can i use a thin but on the back panel end to end? or just in the middle? Anyone got pics if the inside of there enclosures?
An externally hosted image should be here but it was not working when we last tested it.
An externally hosted image should be here but it was not working when we last tested it.
An externally hosted image should be here but it was not working when we last tested it.


Where else should i be wadding in this picture? Perhaps the bottom of the front speaker panel and the rear panel. Anywhere else?
An externally hosted image should be here but it was not working when we last tested it.
Last edited:
Hi Vish,
Nice pics - good job with the build!
Thanks zman! finally getting it finished.
excellent work
Thanks Chris
 any notes for me on which panels i should wad? Do i just line every panel making sure not to block ports etc. As you can see in the pics the wool type wadding is thick!
on the trapz should i wad the rear panel and the front speaker panel?
Alpair 7P
Alpair 7P Generation 1 (pair) | KJF Audio
Can i use these versions " Alpair 7P" in either of the enclosures or is it specific for the Alpair 7A Gen. 3?
Alpair 7P Generation 1 (pair) | KJF Audio
Can i use these versions " Alpair 7P" in either of the enclosures or is it specific for the Alpair 7A Gen. 3?
Top, bottom the two inside slot wall panels, front panel notched around driver cut out, and trickiest of all is the narrow section of rear wall either side of vertical divider - most of the others can be friction fit, but those two need some type of adhesive to prevent shifting enough to occlude interior vent openings.
Do i just line every panel making sure not to block ports etc. As you can see in the pics the wool type wadding is thick!
yes. it doesn’t look all that thick & looks lower density than the felt we use so should be thicker.
on the trapz should i wad the rear panel and the front speaker panel?
yes
dave
Can i use these versions " Alpair 7P" in either of the enclosures or is it specific for the Alpair 7A Gen. 3?
They will fit but the Tuning is different. It, IIRC, can also be fitted into a slightly bigger box. The A7p was a bit of a “surprise”, needs a huge amount of break-in and i haven’t completely many of the cabinet drawings for it.
dave

yes. it doesn’t look all that thick & looks lower density than the felt we use so should be thicker.
Initially thick but after glueing and using a few staples it compressed it down, probably why its doesn't look thick.
I do love a challenge, ok i am on it Chris! Moving towards my earlier post showing the tannoys wading.
Top, bottom the two inside slot wall panels, front panel notched around driver cut out, and trickiest of all is the narrow section of rear wall either side of vertical divider - most of the others can be friction fit, but those two need some type of adhesive to prevent shifting enough to occlude interior vent openings.
Wadding Update, Photobucket sucks!
Damn it, the image host i use is now no longer free, photobucket have stopped hosting all images unless myself and millions of other people pay $399 a year.
If you're interested read the article below.
Photobucket replaces millions of images with 'ransom demand' | CSO Online
And i am certainly not going to do this, which means having to replace all the photos by uploading them. Im sure this has effected many forums, even searching on diyaudio im seeing missing images.
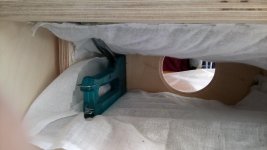
Anyway, here is my update. After finding some time i decided i wasn't happy with the wadding. What made it difficult is my carpenter friend decided to glue up early leaving me with not much space, would've been easier to acoustic wad some of the panels then glue them together.
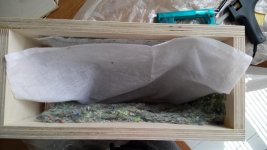
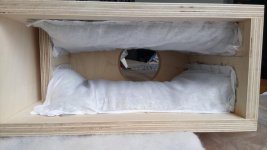
I wasn't happy with my first attempt and wanted to make it better, ChrisB gave me an idea on using MUSLIN/CHEESE cloth. Eureka moment followed from there, with a bit of inspiration from the Tannoy Lancaster's internal wadding i decided to give it a go. I must say i am pleased with the results, it meant i could place more wadding and keep it all together in a neat and tidy way.
Damn it, the image host i use is now no longer free, photobucket have stopped hosting all images unless myself and millions of other people pay $399 a year.
If you're interested read the article below.
Photobucket replaces millions of images with 'ransom demand' | CSO Online
And i am certainly not going to do this, which means having to replace all the photos by uploading them. Im sure this has effected many forums, even searching on diyaudio im seeing missing images.
Anyway, here is my update. After finding some time i decided i wasn't happy with the wadding. What made it difficult is my carpenter friend decided to glue up early leaving me with not much space, would've been easier to acoustic wad some of the panels then glue them together.
I wasn't happy with my first attempt and wanted to make it better, ChrisB gave me an idea on using MUSLIN/CHEESE cloth. Eureka moment followed from there, with a bit of inspiration from the Tannoy Lancaster's internal wadding i decided to give it a go. I must say i am pleased with the results, it meant i could place more wadding and keep it all together in a neat and tidy way.
Attachments


- Status
- This old topic is closed. If you want to reopen this topic, contact a moderator using the "Report Post" button.
- Home
- Loudspeakers
- Full Range
- Trapezoid mini Onken&Slim GR dMar-Ken builds