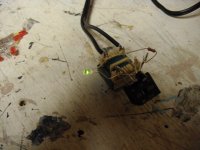
Hey, what do the colors of the film caps mean? On that DAC board I posted, there are orange, maroon, even blue, what's the difference?
Thanks,
- keantoken
Just pretty colors , might be a reason , but I don't know.
OS
Nice discussion.
Why don´t you start a new thread about recycling parts?
I have got lots of experience in this issue, due to be very far from parts warehouses.
Don't forget big UPS's, they've got large heatsinks, MOSFETS (IRFP250, for example), coils, etc.
The best coil I've found is from an IBM PC100 PSU. But inside CRT monitors there is a transformer that can be turned into 2 coils, perfect for a stereo amplifier. Look above the CRT, inside a small plastic case. Just remove the ferrite and tear it in the middle...
All the best,
Max.
Member
Joined 2009
Paid Member
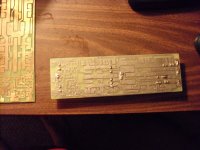
Here is the uber expensive toner sealant and modifier films (below) . I hope these will set this project apart from the norm.The toner transfer sheets cost $1.40 APIECE , but are supposed to float off the toner when soaked in water.
They coat the paper in some water soluble starch which dissolves when wet.
The green film combines with the toner to seal any pinholes and create a bulletproof etch resist. The white film combines in the same manner and makes a tough white finish for the silkscreen side. These products are best used with a laminator and are supposed to make "board house" quality work. I hope they don't lie !! I figure 4-5$ for large boards (PB250) and 2$ for all the voltage boards , not too bad .
I await my laminator (UPS tommorrow)
OS
I tried these films using iron-on which was a complete freakin disaster. I had no laminator. They DO NOT WORK without a laminator.
I too am looking forward to your results with the PCB fab-in-a-box. Hope it all works out as I 'm ready to jump for one too!
I see your recycling foray was a night-time raid I usually go down to my re-cycling centre but haven't been in a couple of years (It doesn't bear thinking about what good stuff has gone to landfill in my absence). I last picked up a Rogers Cadet III, fully working integrated tube amp with 4 ECL86 & 3 ECC807 tubes. 3 Samson 550 solida state amplifiers. All of these have been turned into nice donor cases & parts for a Baby Huey amplifier & BDT preamp (John Swenson design). The 3 Samson cases have become (or are becoming) a Naksa amplifere from Aksa. a Zeus amplifier from Susan Parker & I had intended the last to be a solid state Tabor but don't reckon the heatsink will be large enough. I'm still living off the many parts that these boards have donated. Excellent savings in large transformers & cases.
BTW, I'm glad that shot of you wasn't an up-skirt pic - it was a bit touch & go there for a minute
Great work, BTW, I've admired (& envied) the speed of your progress in all the solid state amplifier arena - you certainly have digested a lot & have done a great service to DIYA in your publishings.
I see your recycling foray was a night-time raid
I usually go down to my re-cycling centre but haven't been in a couple of years (It doesn't bear thinking about what good stuff has gone to landfill in my absence). I last picked up a Rogers Cadet III, fully working integrated tube amp with 4 ECL86 & 3 ECC807 tubes. 3 Samson 550 solida state amplifiers. All of these have been turned into nice donor cases & parts for a Baby Huey amplifier & BDT preamp (John Swenson design). The 3 Samson cases have become (or are becoming) a Naksa amplifere from Aksa. a Zeus amplifier from Susan Parker & I had intended the last to be a solid state Tabor but don't reckon the heatsink will be large enough. I'm still living off the many parts that these boards have donated. Excellent savings in large transformers & cases.BTW, I'm glad that shot of you wasn't an up-skirt pic - it was a bit touch & go there for a minute
Great work, BTW, I've admired (& envied) the speed of your progress in all the solid state amplifier arena - you certainly have digested a lot & have done a great service to DIYA in your publishings.
Nice discussion.
Why don´t you start a new thread about recycling parts?
Perhaps with accompanying wiki project?
I think we could have a thread, where someone posts a picture of a board, asks what this funny part is, or asks what can be taken and what should be left behind. Participants could also exchange recycled parts they need, only for the cost of shipping (great opportunity for harvested chipamps, DACs...?). Sounds like a really good idea to me.
And the wiki could be a list of the most useful components and what appliances they come from (flyback cores is an excellent example). Then it could have a list of color codes and dielectric types or whatnot for the kind of parts usually encountered (difference between orange, maroon, blue and green film caps anyone?).
- keantoken
I too am looking forward to your results with the PCB fab-in-a-box. Hope it all works out as I 'm ready to jump for one too!
Great work, BTW, I've admired (& envied) the speed of your progress in all the solid state amplifier arena - you certainly have digested a lot & have done a great service to DIYA in your publishings.
Thanx , Jkeny ... Fab in a box is alright. It lacks specifics in its instructions. To make a long story short , I bought a $60 laminator for 15$ .. it heated up to 120-130C this was not hot enough for my HP toner (read that it melts at 160-170C). I disabled the T-stat on my laminator (GBC115) it got above 150C and the toner transfer paper worked VERY well ...when fused, the paper floated right off PCB after 10 sec. The green foil is real cool , if your toner is sparse or pitted it welds a green layer just to the existing toner... the bad thing , it melts at 120-130. SO , to use their stuff , you need a REAL good laminator , adjustable t-stat and all. BTW, I fried my laminator. The stupid internal frame was PLASTIC... dang chinese junk. I need an iron or something.
The good news is that the 2 PB250's are done and getting stuffed BUT no GX's before I get an iron. PIX below..
OS
Attachments
So busy in "BUILD" mode... no time to chat and rant..
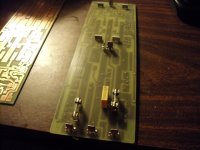
The winner of the toner transfer test is........ THE MAGAZINE PAGE !! A high clay content page from a playboy book or "southern living" brings out the best quality to cost ratio. Below is the best I have done to date , the GX and AX , all tinned and ready to stuff. Better quality than photopaper and about the same as the uber expensive "fab in the box".
The PB250's came out beautiful , they will be very durable and musical power stages. (below ).
The last pix is my "little buddy" .. microwave oven tiny trafo with scrap bridge and cap .. use to test semi's and LED's with some real electrons before they go into the boards , you never can be too careful.
OS
The winner of the toner transfer test is........ THE MAGAZINE PAGE !! A high clay content page from a playboy book
or "southern living" brings out the best quality to cost ratio. Below is the best I have done to date , the GX and AX , all tinned and ready to stuff. Better quality than photopaper and about the same as the uber expensive "fab in the box".The PB250's came out beautiful , they will be very durable and musical power stages. (below ).
The last pix is my "little buddy" .. microwave oven tiny trafo with scrap bridge and cap .. use to test semi's and LED's with some real electrons before they go into the boards , you never can be too careful.
OS
Attachments

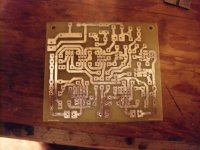
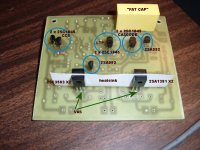
I have to show this to the 2 members that are going down the GX "rabbit hole" with me.
They have PM'ed me with ????'s and the pix below should answer them.
All sections are labeled , VAS trannies are spanned by a thin piece of aluminum that measures roughly 50mm X 15-20mm (Piece of paper). Solder 2sa1381 and 2sc3503 pairs as high as you can to get 15 to 20mm height. Use thermal grease on these 4 semi's, a dab between the LTP and small cascode (in pix). VAS , input pair and cascode will be thermally optimized.
The GX should run VERY cool .... VAS/hawksford cascodes = 6.5ma - 25ma total - the above suggested heatsink should be no more than slightly warm if not ambient. I KNOW this because my supersym has even one more TO-126 and never has a issue.
PS. I just had to put the FAT CAT in (fat cap??)
OS
They have PM'ed me with ????'s
and the pix below should answer them.All sections are labeled , VAS trannies are spanned by a thin piece of aluminum that measures roughly 50mm X 15-20mm (Piece of paper). Solder 2sa1381 and 2sc3503 pairs as high as you can to get 15 to 20mm height. Use thermal grease on these 4 semi's, a dab between the LTP and small cascode (in pix). VAS , input pair and cascode will be thermally optimized.
The GX should run VERY cool .... VAS/hawksford cascodes = 6.5ma - 25ma total - the above suggested heatsink should be no more than slightly warm if not ambient. I KNOW this because my supersym has even one more TO-126 and never has a issue.
PS. I just had to put the FAT CAT in (fat cap??)
OS
Attachments
Last edited:
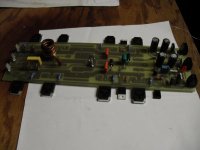
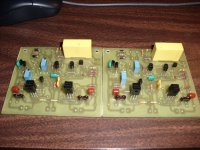
GX1.2VB is born !!
Enough stuffing for tonight. One thing I have to say ,is this sure beats hand drawn projects. Every part fits perfect , boards are more compact and you can really fine tune the layout. (pix below)
REAL SOON I will be a "crankin' this baby. I do want to run these boards in isolation on a test PS first.
OS
Enough stuffing for tonight. One thing I have to say ,is this sure beats hand drawn projects. Every part fits perfect , boards are more compact and you can really fine tune the layout. (pix below)
REAL SOON I will be a "crankin' this baby.
I do want to run these boards in isolation on a test PS first.OS
Attachments
So busy in "BUILD" mode... no time to chat and rant..
The winner of the toner transfer test is........ THE MAGAZINE PAGE !! A high clay content page from a playboy book
.......
OS
Soory,OS, what do you mean THE MAGAZINE PAGE?
Soory,OS, what do you mean THE MAGAZINE PAGE?
You print max density on a clay laden magazine page , iron on to the FR4 , soak in soapy water for a few minutes , perfect board ... every time. Screw the expensive papers, foils ... all a ripoff , just like the borbley magic audiophile garbage.
OS
glossy magazine paper and iron on, was my first attempt at direct trace to PCB.
I have two Brother Laser and this was a failure.
I then tried the recommended Glossy inkjet paper and this was a little better using the later Brother. In the meantime the older broke down.
I seem to have a problem using Brother for this.
I now have a replacement toner for the newer Brother and ready to try again.
I think that there is a problem with Brother printers from reading into this a bit!glossy magazine paper and iron on, was my first attempt at direct trace to PCB.
I have two Brother Laser and this was a failure.
I then tried the recommended Glossy inkjet paper and this was a little better using the later Brother. In the meantime the older broke down.
I seem to have a problem using Brother for this.
I now have a replacement toner for the newer Brother and ready to try again.
Don't you know we can't get Playboy or Hustler magazines in holy, Catholic Ireland so as they say in the Vatican "I'm screwed"
Last edited:
glossy magazine paper and iron on, was my first attempt at direct trace to PCB.
I have two Brother Laser and this was a failure.
I then tried the recommended Glossy inkjet paper and this was a little better using the later Brother. In the meantime the older broke down.
I seem to have a problem using Brother for this.
I now have a replacement toner for the newer Brother and ready to try again.
The problem is the brother.. it's toner melts at over 200C and has too many minerals (rocks in it-siO2). The HP toner melts at 160-165C and when re-fused with a common house hold iron spreads out and forms a pitless perfect etch resist.
If you want to spend 100's of dollars and possibly get better results with the laminator ,or larger production , the "fab in a box" works. I will just get their white RTF for screen printing and might spring for a broken laser printer to modify into a refuser /laminator. I could actually go small scale with the magazine covers- 6 GX's , 2 PB250's or 6 PB60LP's per page.
OS
I think that there is a problem with Brother printers from reading into this a bit!
Don't you know we can't get Playboy or Hustler magazines in holy, Catholic Ireland so as they say in the Vatican "I'm screwed"
ANY clay based glossy publication works , like soldering .. there are a few "tricks" ...
1. after lining artwork up , place iron directly down and press to make it stick to the FR-4 (will smudge if you dont).
2. Then place a piece of plain white paper on top of artwork to slide iron around on.
3. after board heats up and re-fusing is almost done , place iron direct to the glossy magazine page.. you will see the relief of the artwork come "up through" the page.
4 .soak in soapy water for 1 minute , start peeling any paper that is already soft and even peel the first layer of paper off the whole board. rub the rest off with your fingers .. remaining paper will form small balls as it is rubbed.
5. board cleanliness is paramount. Lightly sand with 220-300 grit paper , then clean with pure isopropal alcohol or acetone.
6 . for tinning , I actually use the higher temp. Cu/Sn solder after coating the foil side with a light coating of plumbers flux.
Those boards above have NO , not even one.. jagged line or pit. Perfection.
OS
Thanks for the tips, OS.
Is magazine paper clay based because it has a gloss & this is what I want to go for?
Edit: I see now - you actually mean to use printed magazine pages as the ink will not transfer to the copper. I couldn't get my head around this but do now. Excellent! A free source of paper - I'm in frugophile heaven
Now how do I explain to the wife all the Playboys that I've ordered?
Is magazine paper clay based because it has a gloss & this is what I want to go for?
Edit: I see now - you actually mean to use printed magazine pages as the ink will not transfer to the copper. I couldn't get my head around this but do now. Excellent! A free source of paper - I'm in frugophile heaven
Now how do I explain to the wife all the Playboys that I've ordered
?
Last edited:
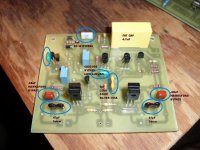
Hey OS, in your picture I see you use blue and beige caps, what kind are these and where do they go in the circuit? - keantoken
A pix is worth many words (below).
EDIT- blue cap at far left is the CCS C-B to ensure stability of high gain CCS (5600pF).
os
Attachments
Last edited:
- Status
- This old topic is closed. If you want to reopen this topic, contact a moderator using the "Report Post" button.
- Home
- Amplifiers
- Solid State
- The MONGREL (supersym II)