The issue with bracing that is perpendicular to the vertical sides is that it willperturb the 1/4 wl standing wave that makes a TL work.
dave
Dave are you saying that my bracing will hurt the performance of the Pensil more than it's helping?
Hi Steven,
Great looking build and very nice work. Noting the side wall (front baffle) mounting thickness of 19-mm (3/4"), theres a higher risk of reflection onto the cone rear. Try to chamfer as much as possible. Maybe you could experiment with some off-cuts first to see much you can chamfer out.
The drivers don't need heavy tightening down. If your using our M4 screws, use a 3.9-mm or 4-mm to mark the hole centres by offering up the driver into the recess, then drill pilot holes to take the screw body. I'm not if the office so can't give you exact screws body dimensions. From my memory, a pilot hole of 2.4-mm is about right but check it.
install the screws without the driver, the threads being made, remove the screws, then install the driver. That way you'll accurately feel the screws getting tight as the driver's fully pulled into the recess. Only a gentle tightening is required. Don't go nuts with a torque screw-driver, do it by hand (see T handle screw-driver pic), you'll feel the tightness allot better this way.
Cheers
Mark.
Thanks for the mounting tips Mark! Also, I plan to take a good portion of the material away by chamfering the cutout with a rasp like zia mentioned. I appreciate the tips and feedback y'all.
Steven
Dave are you saying that my bracing will hurt the performance of the Pensil more than it's helping?
I don't know about that, but it will have some effect on the quantity of bass.
dave
The issue with bracing that is perpendicular to the vertical sides is that it willperturb the 1/4 wl standing wave that makes a TL work.
dave
In my experience, no. I have used as many as three window braces down the length of a pipe win no measurable effect. I do have issues with Steven's bracing scheme. There are not nearly enough braces to support the large panels, particularly in MDF. The top brace should have been the window brace. As thin as it is in MDF, it is doing not much more that squaring the box. I am using braces with circular holes that are at least 1" thick at the thinnest part in plywood. The bottom brace is too far down the cabinet to support the sides, but again it does square the box and that is a good thing.
At this point in construction, what I would do is cut for pieces of at least 3/4"x2" the length being the distance between the two existing braces. Ripping a 1x4 board would work, or cut them from 3/4" plywood. Glue them to all four sides, offset from the center by ~1".
Bob
Thanks for the input Bob. The reasoning behind the bracing being like it is, is to only hold the cabinet square, as well as hold the polyfil in. That's why the bottom is a window, and the top isn't. Also, my original planning for this build was to add mass to the sides and front via decorative hardwood panels attached to the outsides. Perhaps if I hear any excessive panel resonance or ill performance I'll pursue this design again.
Another reason for placement of the bottom window bracing is if I remember correctly at one time Scottmoose said that bracing near the terminus of the enclosure is most critical. I'll post my listening impressions later on this week when the boxes get finished up. Again, I appreciate all the input, guys. This is all a constant learning process for me and I'm very appreciative of everyone's ideas and suggestions.
Thanks,
Steven
I wouldn't necessarily say 'most critical'; depends on the design. If you've got a box with a relatively large vent, as in this case, it certainly doesn't go amiss.
Since you need 1 1/8 - 1 1/4in of MDF to ~equal the stiffness of 3/4in birch ply, depending on grade etc., you may want to consider laminating another 1/2in to the side panels.
Since you need 1 1/8 - 1 1/4in of MDF to ~equal the stiffness of 3/4in birch ply, depending on grade etc., you may want to consider laminating another 1/2in to the side panels.
In my experience, no. I have used as many as three window braces down the length of a pipe win no measurable effect.
I knew you were coming Bob

The other thing that we run into is that, at least for the "push resonances up so high they don't get excited school of boxes", they are not as effective, given that they break the rule: A brace should divide a panel such that the aspect ratio of the subpanels is greater than the aspect ratio of the panelbeing braced.
dave
Vertical Brace and Rear Panel Gasket
Hi Dave, everyone
I'm building my SuperPensil 12.2 for the A12P. First timer here. Hope to post my build soon.
Measuring and cutting the main vertical brace requires surgical precision, as the purpose is to have it tight against the panels and the driver to shunt and dissipate vibration, right?
Question - should I have a gasket for the rear panel? This will affect my brace dimension as I have already put on part of the cleats for the back panel.
Some folks says to glue the back panel permanently after tuning the stuffing.
Others leave the back panel removable, in which case a closed-cell neoprene weather strip gasket may be useful to ensure air tightness.
What do you think?
The issue with bracing that is perpendicular to the vertical sides is that it willperturb the 1/4 wl standing wave that makes a TL work.
dave
Hi Dave, everyone
I'm building my SuperPensil 12.2 for the A12P. First timer here. Hope to post my build soon.
Measuring and cutting the main vertical brace requires surgical precision, as the purpose is to have it tight against the panels and the driver to shunt and dissipate vibration, right?
Question - should I have a gasket for the rear panel? This will affect my brace dimension as I have already put on part of the cleats for the back panel.
Some folks says to glue the back panel permanently after tuning the stuffing.
Others leave the back panel removable, in which case a closed-cell neoprene weather strip gasket may be useful to ensure air tightness.
What do you think?
Having built both the Pensil7 and SuperPensil12P, and similar designs for other drivers, I'd offer some observations :
- The SuperP is quite deep enough that if you run vertical front to back brace as shown in Jeff's posted photos, you could cut the corners of the brace panel at 45` to clear the cleating and it will still have enough contact area to provide the structural bracing and ensure squareness of the adjoining panels
- Yes, this is the most time consuming part to fit tightly - you need to ensure that the driver is installed in the front baffle and tightened just enough to compress the gasket for sealing (approx .5mm by Mark's figures, which I was too lazy to confirm
) , but not too tight to twist the frame - before marking and dry fitting the notched cut-out for magnet. If anything, err on a slight gap between magnet and brace, and use a piece of the weatherstip foam, or bead of duct seal putty.- By the time you're satisfied with the wadding fill levels (i.e. after the several hundred hours for the suspension to fully loosen up) you may have had the back off several times - which can get a bit tiresome. Unless you want a furniture grade finish on the back, I'd be inclined to just use the gasket tape and screws .
A few questions and not meant to inflame, i'm not a engineer however i can't help but think several questionable sceinarios related to bracing such a small light weight wide-bw driver magnet assembly to the cabinet -Having built both the Pensil7 and SuperPensil12P, and similar designs for other drivers, I'd offer some observations :
- you need to ensure that the driver is installed in the front baffle and tightened just enough to compress the gasket for sealing (approx .5mm by Mark's figures, which I was too lazy to confirm
Given the frame is such that over tightening the six point mounting screws result in flex (deformation), then conversely mounting the magnet butt up against a off centered longitudinal brace creates more chances of uneven pressure causing flex/deformation between the frame magnet assembly. Even if spot on +/- tolerances, one must account for, factor in weather related expansion/contraction settling/shifting of the actual wood cabinet itself. I'd imagine a flexing frame at the flange would cause less damage then having the flex come from the magnet assembly where slight shifts could screw with the smallish vc gap alignment.
Additionally, if a gap between the brace and magnet were filled with sealing foam etc. I'd think at some point compression would lessen the implied effectiveness of such design. At best rendering a exercise in futility or possibly exerting uneven pressure to the magnet/frame assembly potentially detrimental flex misalignment problems.
Also i don't understand the point or school of thought regarding a mechanical coupling of the driver magnet to the box, it's contrary to the practice of decoupling a driver from its cabinet so as not to add coloration from the box/driver vibrations resonances. After all Mark designed a elastomer into the flange of the frame, why not go 180º from cabinet coupling/rear brace and further decouple the driver from the cabinet via Well Nut fasteners isolating frame vibrations thus further reducing cabinet coloration?
fair enough -
I'm certainly not an engineer either - and haven't used this particular fastener - but aren't the Well-Nuts designed more for automotive or similar applications where the compressed rubber grommet provide isolation/damping, and might leave a miniscule gap in the air-tight seal required at the perimeter of a loudspeaker flange?
I'd daresay that whether the driver's frame needs to be coupled or isolated from the enclosure / baffle, or the "best / most valid engineering " method to achieve either method are questions on which the consensus implied by "the practice of .." may not exist among DIYers or commercial manufacturers.
In any case, regardless of how rigidly or compliantly you decide to couple the driver to the enclosure and/or bracing , I think it's important that on an enclosure the size and shape of the SuperPensil, some panel wall bracing is important.
Now, let's try to reach agreement on that, and methods to achieve it.
I've found an approach that makes sense, and my enclosures don't honk or buzz, so I'm happy.
I'm certainly not an engineer either - and haven't used this particular fastener - but aren't the Well-Nuts designed more for automotive or similar applications where the compressed rubber grommet provide isolation/damping, and might leave a miniscule gap in the air-tight seal required at the perimeter of a loudspeaker flange?
An externally hosted image should be here but it was not working when we last tested it.
I'd daresay that whether the driver's frame needs to be coupled or isolated from the enclosure / baffle, or the "best / most valid engineering " method to achieve either method are questions on which the consensus implied by "the practice of .." may not exist among DIYers or commercial manufacturers.
In any case, regardless of how rigidly or compliantly you decide to couple the driver to the enclosure and/or bracing , I think it's important that on an enclosure the size and shape of the SuperPensil, some panel wall bracing is important.
Now, let's try to reach agreement on that, and methods to achieve it.
I've found an approach that makes sense, and my enclosures don't honk or buzz, so I'm happy.
Also i don't understand the point or school of thought regarding a mechanical coupling of the driver magnet to the box, it's contrary to the practice of decoupling a driver from its cabinet so as not to add coloration from the box/driver vibrations resonances. After all Mark designed a elastomer into the flange of the frame, why not go 180º from cabinet coupling/rear brace and further decouple the driver from the cabinet via Well Nut fasteners isolating frame vibrations thus further reducing cabinet coloration?
Take your choices. You have a fixed amount of reactivre energy to deal with. You can dissipate it across the entire box (mass & damping) or have it all try to be dissipated in the driver frame. We find that sharing the energy instead of concentrating it improves DDR.
dave
Having built both the Pensil7 and SuperPensil12P... Unless you want a furniture grade finish on the back, I'd be inclined to just use the gasket tape and screws .
Thanks Chris. Gasket for back panel it will be then.
I might just try listening to one box with the braces and the 2nd without to check if I can tell the difference as Bob has suggested.
I would think the braces would add a significant improvement - reason being that when I bang on the sizable side of the SuperPensil cab, there is noticeable ringing. Knocking on the front panel is almost like knocking on granite - no ringing - as I have added a piece of 1" oak (3/4" actual) to the front of the 3/4" BB ply to have a double thick baffle.
Denis
I trust with that thick a baffle you've provide lots of chamfer or radiused relief to the rear side of cut-out - a hole lot easier before assembly than afterwards.
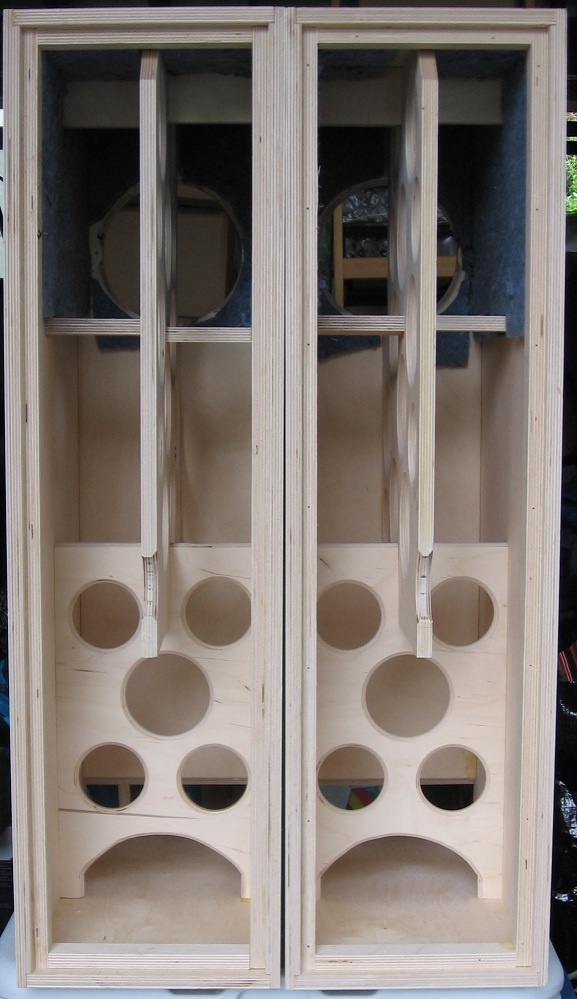
And as the sides on the SP are much larger panels than the front/back, I think lateral bracing of / between those 2 is also very important. The total scheme needn't be as elaborate as this, but I can assure you that these enclosures are fairly stiff.
....I might just try listening to one box with the braces and the 2nd without to check if I can tell the difference as Bob has suggested....
Not with/without braces. That will make an obvious difference. With/without bracing the back of the driver. Do this: Build both boxes identical. You need a stereo pair anyway. In one box, shim the brace so that it applies pressure to the back of the driver. Leave the shim out on the other. Report back.
Bob
Hi Bob, Guys,
I didn't design the driver frames to take a pressure load on the rear of the unit. If this installation rout is used, CARE MUST BE TAKEN TO APPLY ONLY A MARGINAL TOUCH PRESSURE . Apply just enough shimming to make a light interference fit. Better still, use a strip of high density foam (or similar) material between the rear of the driver and the brace. Its got some give in it that should provide the desired attachment while dissipating the stress load.
Those members who are experienced and familiar with Markaudio drivers know how to carefully apply this bracing method. Its important to help those newer members with less experience gain more detail when suggesting installation methods that are outside the driver's design specification.
Thanks
Mark.
Last edited:
- Status
- This old topic is closed. If you want to reopen this topic, contact a moderator using the "Report Post" button.
- Home
- Loudspeakers
- Full Range
- StevenZ's Alpair 12P Build