Hi Audio
Must say the industrial "powerstation"
look reminds me of Mr Tent's open board
CD player. I see yours is a 5502 or similar.
I have just been painting playstations
and keeping the mods inside. Your idea
has opened a new avenue maybe with a
few LEDs could be made to look dramatic
and maybe improving WAF. I have also got a
PSONE case top and maybe will sink it into
a top panel so that the area around the
laser assembly is clean and neat. fill in
the buttons like on that stealth PS1.The
PSONE top panel looks good without a lid
and might work well if you want to run
without a top. It has better aesthetics
than the greystations when topless. Also
I see you can get 3rd party PSONE cases
in the UK in tranparent colours. Its so nice
to see people thinking outside the playstation
box as it were !
Regards
AnthonyPT
http://www.edirectory.co.uk/pf/880/mia/d/playstation+transparent+replacement+cases/pid/4075942 (for PSONE cases)
http://www.edirectory.co.uk/pf/880/default/d/playstation/mt/c/rid/10517
http://www.consoleplus.co.uk/index.php?cName=playstation-psone-other
(Mostly PSX cases but may have PSONE)
http://www.interesting-devices.com/...cat=62&ph=&keywords=&recor=&SearchFor=&PT_ID= (for PS1 cases)
Hi everyone, may I be so bold as to interject? Having a PS1 SCPH 1001 and no electronic / diy skills I saw an advertisement to have it modified here in Canada for $250. My question is will these mods make a real difference or is there something else you would suggest? The ad reads as follows...
Stage "One" PlayStation Mods available at Audio Oasis for $250.00CAD
The purpose of our modifications to Sony's PlayStation is improve clarity,
focus and detail while preserving the musicality and rich tonal balance
inherent in the stock set up. We feel we've more than succeeded in these
goals through a clever, compact,and somewhat unique series of modifications
that result in a stock looking machine, with no outboard gizmo's or fragile
interfaces, that performs way beyond the normal expectations for such a
unit.
We start by dramatically improving both the quality and quantity of
capacitors within the digital power supplies to greatly improve
the regulation and high frequency noise rejection of these sections. The
parts chosen have ultra low impedance and superb high frequency performance
resulting in a much more refined sonic presentation over the standard parts
used. The values have been chosen to optimize performance at any particular
point within the circuit.
An area of improvement often overlooked is that of power supply
decoupling of the DAC itself. The recommendations of the manufacturers are
often ignored at this point in favor of economics. Here we have used a
similar series of "super" electrolytic capacitor, (as mentioned
above), to more effectively decouple the power supplies at this very
critical point in the circuit.
The basic analogue circuit topology used is that of complete minimalism,
All bits and pieces between the DAC and output RCA are carefully removed and
replaced by a stereo pair of output caps and load resistors... that's
it!
The output capacitors are made especially for this machine. These "trick
caps" are miniature, high performance polypropylene capacitors in which
their entire structure and associated lead wires are mechanically damped
with various constraining layers and electrically shielded with copper
foil. Our unique construction allow these superior sounding capacitors to
live within the electrically and mechanically noisy environment of the
machine with no ill sonic effects.
To get the most from our finished machine the laser assembly settings must
be optimized for best sonic performance these we have determined
through careful listening tests and experimentation.
Other enhancements can be made to our system but would not offer the same
bang for the buck as those of our stage "One" mod. These might include:
- further mechanical and electrical damping / shielding (feet, structure,
repackaging, circuit board, isolation, etc...)
- light injection into CD (green, blue, etc...)
- "crazy ***" power supplies (can involve external dohickeys)
- connectors
- power cords and fuses
- remote control
Some or all of things can be done but we feel that, with the exception of
the remote control, they would cost more than the benefits justify.
Anthony
Thanks for links, I'll give the transparent cases a go. IMHO the 5552 sounds the same as the 1002 so those cases will fit OK.
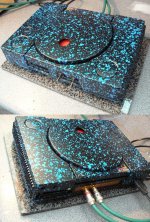
I usually keep all the mods in the case but I thought I'd try some big caps this time and that's how it evolved.
I will make an original case model next with a separate external box for the caps and rca's.
Attached picture of one of my 1002..
Thanks for links, I'll give the transparent cases a go. IMHO the 5552 sounds the same as the 1002 so those cases will fit OK.
I usually keep all the mods in the case but I thought I'd try some big caps this time and that's how it evolved.
I will make an original case model next with a separate external box for the caps and rca's.
Attached picture of one of my 1002..
Attachments
Wow ,
audio1st - fantastic design. Somehow reminds me of the Voight-Com test machine from "blade runner"
diydummy - pretty much all of this work is described in this thread. the only thing alluded to is the DAC decoupling caps, which AFAIK no-one has changed, mainly because these are tiny surface mount cans. Easy to get off, less easy to resolder, but I'd guess they are referring to SM OSCON caps which are available.
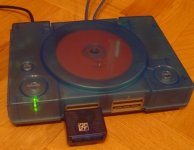
AnthonyPT - thanks for the links - I ordered myself a transparent blue case to go with the remote I have.
I also just spotted this device
http://www.interesting-devices.com/...cat=61&ph=&keywords=&recor=&SearchFor=&PT_ID=
for the money , might be useful for parties where you want 15 hours of music on one CD
audio1st - fantastic design. Somehow reminds me of the Voight-Com test machine from "blade runner"
diydummy - pretty much all of this work is described in this thread. the only thing alluded to is the DAC decoupling caps, which AFAIK no-one has changed, mainly because these are tiny surface mount cans. Easy to get off, less easy to resolder, but I'd guess they are referring to SM OSCON caps which are available.
AnthonyPT - thanks for the links - I ordered myself a transparent blue case to go with the remote I have.
I also just spotted this device
http://www.interesting-devices.com/...cat=61&ph=&keywords=&recor=&SearchFor=&PT_ID=
for the money , might be useful for parties where you want 15 hours of music on one CD
Audio1st - Just wanted to 2nd what others here have said about your PS1. It looks stunning, and very similar to what I'd like to do with mine (if I had the tools and resources!). I was inspired by the 47labs CD player - similar looks.
Bet it sounds fantastic?
Excellent work")
- John
Bet it sounds fantastic?
Excellent work
- John
jives11 said:diydummy - pretty much all of this work is described in this thread. the only thing alluded to is the DAC decoupling caps, which AFAIK no-one has changed, mainly because these are tiny surface mount cans. Easy to get off, less easy to resolder, but I'd guess they are referring to SM OSCON caps which are available.
Thanks Jives,
I'll hold off paying to have it modified until I get a chance to hear what the player sounds like in it's stock form once my new amp and speakers arrive.
John.
Hi John
If you keep your money and fit
isolation feet and a heavy breadboard base
or similar as described in a few places
on this thread then use the AV cable to start with,
you will I hope be surprised how articulate
the 1001/2 and the 5501/2 PS1 units are. Personally
I like metal screws with wafer heads metric 10gx16mm.
Then to get a good seating for all 4 feet I put a small
square of cork with adhesive on top of the breadboard/
isolation board with eggshell foam underneath. Its
an easy start. Just takes removing and putting back
all screws. Video yourself as you go and you
cannot go too far wrong. Good luck. Try and test out the
player with a CD and CDR if you can.
Try tracks at start middle and end of cd. Any friend
with a multimeter, bluetack and electronic interest should be able
to follow Mike_F's clear instruction if you do not feel
up to it yourself.
Regards
AnthonyPT
Blimey now there's an offer! Thank you very much indeed
I've already performed Mick's mods - basically two Black Gate N 4.7uf coming straight from the DAC to the RCA's, with 22k resistors between + and -.
I'd like to try the PSU when funds permit, but it's your '47 Labs' like player which really caught my eye, and I wouldn't expect that to be done for just a bottle of wine ;-)
So far my PS1 has held it's own with a Naim CDI, Shanling CD-T80, Pioneer DV-575A and it's nearly up there with my laptop/itunes/apple lossless/DPA DAC set up. Stunning!
- JohnM
diydummy said:Hi everyone, may I be so bold as to interject? Having a PS1 SCPH 1001 and no electronic / diy skills I saw an advertisement to have it modified here in Canada for $250. My question is will these mods make a real difference or is there something else you would suggest? The ad reads as follows...
Stage "One" PlayStation Mods available at Audio Oasis for $250.00CAD
The purpose of our modifications to Sony's PlayStation is improve clarity,
focus and detail while preserving the musicality and rich tonal balance
inherent in the stock set up. We feel we've more than succeeded in these
goals through a clever, compact,and somewhat unique series of modifications
that result in a stock looking machine, with no outboard gizmo's or fragile
interfaces, that performs way beyond the normal expectations for such a
unit.
We start by dramatically improving both the quality and quantity of
capacitors within the digital power supplies to greatly improve
the regulation and high frequency noise rejection of these sections. The
parts chosen have ultra low impedance and superb high frequency performance
resulting in a much more refined sonic presentation over the standard parts
used. The values have been chosen to optimize performance at any particular
point within the circuit.
An area of improvement often overlooked is that of power supply
decoupling of the DAC itself. The recommendations of the manufacturers are
often ignored at this point in favor of economics. Here we have used a
similar series of "super" electrolytic capacitor, (as mentioned
above), to more effectively decouple the power supplies at this very
critical point in the circuit.
The basic analogue circuit topology used is that of complete minimalism,
All bits and pieces between the DAC and output RCA are carefully removed and
replaced by a stereo pair of output caps and load resistors... that's
it!
The output capacitors are made especially for this machine. These "trick
caps" are miniature, high performance polypropylene capacitors in which
their entire structure and associated lead wires are mechanically damped
with various constraining layers and electrically shielded with copper
foil. Our unique construction allow these superior sounding capacitors to
live within the electrically and mechanically noisy environment of the
machine with no ill sonic effects.
To get the most from our finished machine the laser assembly settings must
be optimized for best sonic performance these we have determined
through careful listening tests and experimentation.
Other enhancements can be made to our system but would not offer the same
bang for the buck as those of our stage "One" mod. These might include:
- further mechanical and electrical damping / shielding (feet, structure,
repackaging, circuit board, isolation, etc...)
- light injection into CD (green, blue, etc...)
- "crazy ***" power supplies (can involve external dohickeys)
- connectors
- power cords and fuses
- remote control
Some or all of things can be done but we feel that, with the exception of
the remote control, they would cost more than the benefits justify.
I just got around to converting 250 Canadian dollars into Pound sterling
(www.xe.com) and it's quite a high price IMHO. I don't begrudge a person an income, but I'd guess there are probably around $40 dollars (Canadian) of parts described in these mods. I'd think it's a couple of hours work maximum.- Whether modding the standard PSU is worthwhile is debatable. I've done it, swapped a couple of Rubycon ZA caps in. Cost about $2.
- The output circuit described sounds exactly like the one on Micks website (http://www.dogbreath.de). It mentions some boutique caps, so the cost of these could be almost anything. I'm still using 3.3uF Polycarbonates which were <$1.
- Adding extra/different Surface mount caps for the dac would seem a very good idea. This would be my preferred next tweak, but for the fact that it's hard to do. Sanyo produce an OSCON cap in a surface mount form factor. This is beyond my soldering skills, but is probably not worth the difference in cost IMHO.
- I've not tweaked the laser adjustments, on the basis that if it ain't broke don't fix it.
- I have damped the metal case work (small piece of car body damping (< $1) and added some individual ferrite's on the 5 power leads. (approx $5).
i think I'd be reluctant to pay this kind of money on the basis that any Playstation is fairly old, and may have had heavy use. You could pay the money and have the device die soon after of natural causes.
I fully agree with what you are saying, Jonathan. Seems that someone is trying to make some money out of this. I am sure that he gets the majority of his ideas from this thread and the rest is using boutique parts instead of the stock stuff. Wheter or not this makes sense is questionable, to my opinion.
Btw. as far as I remember, we once discussed bypassing the DAC supply. Didnt Dommy use ceramics to bypass the stock electrolytics? Also, the corresponding argument in that add may be wrong, I am quite sure that the circuit around the DAC is identical to the manufacturer recommendations in the data sheet.
Mick
Mick_F said:I fully agree with what you are saying, Jonathan. Seems that someone is trying to make some money out of this. I am sure that he gets the majority of his ideas from this thread and the rest is using boutique parts instead of the stock stuff. Wheter or not this makes sense is questionable, to my opinion.
Btw. as far as I remember, we once discussed bypassing the DAC supply. Didnt Dommy use ceramics to bypass the stock electrolytics? Also, the corresponding argument in that add may be wrong, I am quite sure that the circuit around the DAC is identical to the manufacturer recommendations in the data sheet.
Mick
or maybe it is one of us. Now who could use Canadian Dollars ?
Ceramic bypasses would make sense, though the caps are already very close to the DAC leads. I was also impressed to see tiny ceramic surface mounts close to the DAC and also close to where the power edge connector interfaces with the motherboard.
jives11 said:
or maybe it is one of us. Now who could use Canadian Dollars ?
hee hee. Got it

A couple of things :
1) I ordered this from Anthony's link (interesting-devices), and they seem to have different cases for the various models. Some sites sell similar but they are only the later models with no parallel port. Price was £0.99 so around $2 (US) or 1.5 EUR, but with postage and tax was £5
2) Pretty easy to fit. I took the old case off and fitted the parts back into the new. Switched on, green light - good. However the CD would not rotate, not even the little test rotation from turn on. It turned out to be the plastic "pin" which pushes down from the Lid to activate the micro switch on the board. It was not quite long enough, so I stuck a small piece of bitumen on the top of the pin head, and all is well
3) My blue world effect is compromised a bit by the controller connector plastic still being grey and the LED being green. I guess it's possible to change the PSU LED for a blue or white light ? Anyone know a suitable value ?
4) While I was messing with the lid, I tracked down the cause of the "twang" noise you get from the lid eject with either case. The small spring which slowly opens the lid is the culprit, and it rings like a piano chord. I pushed a tiny piece of speaker wadding inside the central coil - the damping springs on a Thorens TD turntable use the same trick. No more buzz when the lid opens. A small detail, but all part of making the whole thing as vibration free as possible.
Hiya!
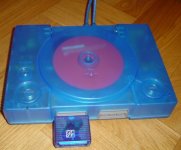
I just fitted the transparent case to my PS1. Same trouble with the pin not being long enough to activate the CD spin safety switch. Actually I think the spring hinge lifts the lid up too much on one side - you can see this by looking at the back of the unit. The lid slopes very slightly.
I'll try your trick if extending the pin slightly!
Regards,
- JohnM
- Home
- Source & Line
- Digital Source
- Playstation as CD-player