Anyway, I check every driver I'm dealing with:
n0 % = 9.6352e-10*Vas*Fs^3*[1/Qes]
Sens [dBa] = 112.018+[10*log10[n0]]
Sens [dBv] = 112.018+[10*log10[9.6352e-10*Vas*Fs^3*8/[Qes*Znom]
Hope I copied this right, it's from an Excel SS done by someone far more math oriented than me.
I hope so Greg or we're both stuffed, since I've got exactly the same math loaded into my Sheet of Many Things.
")
Last edited:
Avebury Resurrection...
I just finished reading an awesome thread that had an awesome project at ended abruptly. So I figured it was time for me to post my Avebury happenings, as I do realize how helpful these building threads can be...
Life has been a roller coaster ride the last couple of years between working like a mad man in the summertime to off set the sheer lack of work (and the accompanying worries) in the winter. It was really a good thing I paid of all my consumer debt, as acquiring a new career these days is a whole new challenge in and of itself, especially in a rural, snowy, and simple life culture like Ironwood, Michigan. Thankfully, years of preparation and grueling job hunting has paid off, and I will be starting a new career at the local hospital that is secure, steady, year-round, and allows many options for advancement. The best part about this journey is I got a good idea of what my daughter will be undertaking as she gets ready to seek out her career in our highly specialized, competitive global market. Got to get her through High School first.
I figure I had better post my audio adventures over the last couple of years, as I may drop out again for awhile when adjusting to my new career.
I have a lot to share, so I will try to be coherent.
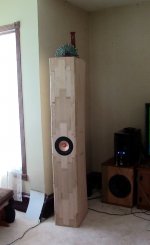
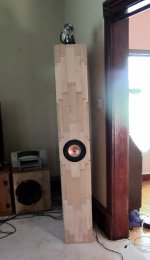
I got the front mosaics to the Aveburys done a year and half ago. I still have a lot of sanding to do on them before I would consider them completed. As it stands now, I will be making a similar mosaic on the back and cutting six inch wide strips 1/4 inch thick of black and white ash for the sides. I have looked into veneer, but the stuff I have access to is pretty thin and low quality. The hardwood Ash I got was a trade for a computer build I did for a friend, so the price was right.
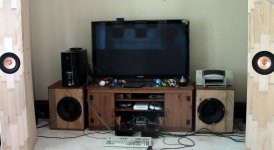
Currently, I am using Avebury in a FAst 4.2 system. The Avebury are the main left and right. The Cheap and Cheerful arrays are back left and right. And I have a pair of Dayton HF 12" subs in experimental 3 cubic foot cabinets
for bass. I am running the system through my on-board computer Realtek Audio card, mainly, as I can run Dolby Digital and DTS soundtracks. I have upgraded my CPU, Graphics Card and now run all software and music off a Solid State hard drive. This all made a significant improvement in the sound (and video) quality in regards to micro details, timing and dynamics, despite the inferior DACs. With the current DACs, it is a toss up. The Realtek offers up to 7.1 channels, where as my M-Audio is over all better, but stereo only. I have acquired a Twisted Pair Buffalo III kit, but I have not assembled yet. I am thinking of making that into a four channel DAC with a MiniSharc DSP board for cross-over and EQ control with a USB controller, so I can run multi-channel from my PC. There is still a lot of design work to consider before building the Buffalo.
Anyway, as it stands, Avebury has a high-pass 12dB/octave cross-over at 80 Hz and the Subs handle 80 Hz on down to 22 Hz in room. Like I say, the M-Audio DAC has a more "resolved" sound and is not as forward as the Realtek, but as the Avebury is no longer asked to do the Sub-sonic stuff, so the mid-range has a tad bit more presence. There is also a lot more headroom. I can pretty much play this set-up as loud as I want. There are only a couple of songs I have that clip the amps with intense mid-range attacks. On the most part, I have to be careful, as for most source material, it is easy to play too loud, as loud is CLEAR. I think I have always associated too loud with distortion, but this is not the case with this system.
All and all, I still prefer the "presence", scale, and encompassing sound of arrays, BUT, there is a "magic" to the layers and layers of dynamics the Alpair 12 possesses. And this will only get better with the Buffalo DAC. Really, the short coming of the Avebury, at least for the sonic bliss I am seeking, it is not an array. My goal is to have the Alpair 12 sound in an array format. May as well Dream Big.
I really like using the subs with Avebury. There is a slight integration hiccup using the subs verses running full-range. I am sure this is caused by the timing between the rear horns and the front-firing subs, BUT this is a compromise that I am personally willing to take. The Alpair is allowed to do what it does best with no IM Distortion what so ever. If you are listening to Jazz trios, then by all mains, run Avebury full-range, but when watching Star Trek, it is time to fire up the subs! I think the bass with the subs is more "relaxed", effortless and lower. Once and a while there is an ill-defined bass rift due to the above integration hiccup, but this is only noticeable with some music. For movies, the subs are the way to go, hands down.
The funny thing about the subs, is I am building them for my brother. He has a dedicated Home Cinema room in his house in Dallas, Texas. I am refining my 777 open baffle system for his mains. I will also by taking the Aveburys down to audition in his room. I am thinking he might like the Avebury in the front with the open baffles in the back for surrounds. It is going to be interesting comparing the two when they are both finished. Thankfully, it is going to be awhile before I can pull away from my new career to deliver and set-up his system in Dallas. So I will get plenty to playtime yet. And even if the whole rig ends up with him, I can fund my upcoming array build, maybe with something like a Fostex FF85w. I think having 25 FF85w's per cabinet would be the cats meow. Either way, it is a win, win.
More to come...
Allen
I just finished reading an awesome thread that had an awesome project at ended abruptly. So I figured it was time for me to post my Avebury happenings, as I do realize how helpful these building threads can be...
Life has been a roller coaster ride the last couple of years between working like a mad man in the summertime to off set the sheer lack of work (and the accompanying worries) in the winter. It was really a good thing I paid of all my consumer debt, as acquiring a new career these days is a whole new challenge in and of itself, especially in a rural, snowy, and simple life culture like Ironwood, Michigan. Thankfully, years of preparation and grueling job hunting has paid off, and I will be starting a new career at the local hospital that is secure, steady, year-round, and allows many options for advancement.
The best part about this journey is I got a good idea of what my daughter will be undertaking as she gets ready to seek out her career in our highly specialized, competitive global market. Got to get her through High School first. I figure I had better post my audio adventures over the last couple of years, as I may drop out again for awhile when adjusting to my new career.
I have a lot to share, so I will try to be coherent.
I got the front mosaics to the Aveburys done a year and half ago. I still have a lot of sanding to do on them before I would consider them completed. As it stands now, I will be making a similar mosaic on the back and cutting six inch wide strips 1/4 inch thick of black and white ash for the sides. I have looked into veneer, but the stuff I have access to is pretty thin and low quality. The hardwood Ash I got was a trade for a computer build I did for a friend, so the price was right.
Currently, I am using Avebury in a FAst 4.2 system. The Avebury are the main left and right. The Cheap and Cheerful arrays are back left and right. And I have a pair of Dayton HF 12" subs in experimental 3 cubic foot cabinets
for bass. I am running the system through my on-board computer Realtek Audio card, mainly, as I can run Dolby Digital and DTS soundtracks. I have upgraded my CPU, Graphics Card and now run all software and music off a Solid State hard drive. This all made a significant improvement in the sound (and video) quality in regards to micro details, timing and dynamics, despite the inferior DACs. With the current DACs, it is a toss up. The Realtek offers up to 7.1 channels, where as my M-Audio is over all better, but stereo only. I have acquired a Twisted Pair Buffalo III kit, but I have not assembled yet. I am thinking of making that into a four channel DAC with a MiniSharc DSP board for cross-over and EQ control with a USB controller, so I can run multi-channel from my PC. There is still a lot of design work to consider before building the Buffalo.
Anyway, as it stands, Avebury has a high-pass 12dB/octave cross-over at 80 Hz and the Subs handle 80 Hz on down to 22 Hz in room. Like I say, the M-Audio DAC has a more "resolved" sound and is not as forward as the Realtek, but as the Avebury is no longer asked to do the Sub-sonic stuff, so the mid-range has a tad bit more presence. There is also a lot more headroom. I can pretty much play this set-up as loud as I want. There are only a couple of songs I have that clip the amps with intense mid-range attacks. On the most part, I have to be careful, as for most source material, it is easy to play too loud, as loud is CLEAR. I think I have always associated too loud with distortion, but this is not the case with this system.
All and all, I still prefer the "presence", scale, and encompassing sound of arrays, BUT, there is a "magic" to the layers and layers of dynamics the Alpair 12 possesses. And this will only get better with the Buffalo DAC. Really, the short coming of the Avebury, at least for the sonic bliss I am seeking, it is not an array. My goal is to have the Alpair 12 sound in an array format. May as well Dream Big.
I really like using the subs with Avebury. There is a slight integration hiccup using the subs verses running full-range. I am sure this is caused by the timing between the rear horns and the front-firing subs, BUT this is a compromise that I am personally willing to take. The Alpair is allowed to do what it does best with no IM Distortion what so ever. If you are listening to Jazz trios, then by all mains, run Avebury full-range, but when watching Star Trek, it is time to fire up the subs! I think the bass with the subs is more "relaxed", effortless and lower. Once and a while there is an ill-defined bass rift due to the above integration hiccup, but this is only noticeable with some music. For movies, the subs are the way to go, hands down.
The funny thing about the subs, is I am building them for my brother. He has a dedicated Home Cinema room in his house in Dallas, Texas. I am refining my 777 open baffle system for his mains. I will also by taking the Aveburys down to audition in his room. I am thinking he might like the Avebury in the front with the open baffles in the back for surrounds. It is going to be interesting comparing the two when they are both finished. Thankfully, it is going to be awhile before I can pull away from my new career to deliver and set-up his system in Dallas. So I will get plenty to playtime yet.
And even if the whole rig ends up with him, I can fund my upcoming array build, maybe with something like a Fostex FF85w. I think having 25 FF85w's per cabinet would be the cats meow. Either way, it is a win, win. More to come...
Allen
Attachments
...upcoming array build, maybe with something like a Fostex FF85wk I think having 25 FF85wk per cabinet would be the cats meow.
It would be VERY interesting
dave
Array Dreams
Thanks Dave, I have been following your projects with the FF85wk, Alpair 7 and even the Vifa NC9FD00-04, and I have realized, like You, there are "un-measurable" aspects to drivers that set them apart. I can EQ my Cheap and Cheerful arrays to the frequency response of the Avebury, but they can not come close to the layers of dynamic detail of Alpair 12. I can build a Vifa array and that probably would outperform the Cheap and Cheerfuls. BUT, first of all, that has been done already, and secondly, if I was to go through the work of building a Baltic Birch cabinet for 25 drivers, with solid wood mosaics, I may as well take the extra step with a higher performing driver. I have a feeling it is going to take some time to build these cabinets, so I can buy the drivers over a period of time.
I do have one inquiry, have You listened to any of the Celestion Array drivers: AN 3510, or AN 2775. The main reason I am considering these is they appear to be built well, especially for line array applications. I may need to have a driver blowout between these and the Fostex.
Now back on topic...
It would be VERY interesting
dave
Thanks Dave, I have been following your projects with the FF85wk, Alpair 7 and even the Vifa NC9FD00-04, and I have realized, like You, there are "un-measurable" aspects to drivers that set them apart. I can EQ my Cheap and Cheerful arrays to the frequency response of the Avebury, but they can not come close to the layers of dynamic detail of Alpair 12. I can build a Vifa array and that probably would outperform the Cheap and Cheerfuls. BUT, first of all, that has been done already, and secondly, if I was to go through the work of building a Baltic Birch cabinet for 25 drivers, with solid wood mosaics, I may as well take the extra step with a higher performing driver. I have a feeling it is going to take some time to build these cabinets, so I can buy the drivers over a period of time.
I do have one inquiry, have You listened to any of the Celestion Array drivers: AN 3510, or AN 2775. The main reason I am considering these is they appear to be built well, especially for line array applications. I may need to have a driver blowout between these and the Fostex.
Now back on topic...
Begining the Mosaic
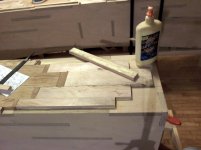
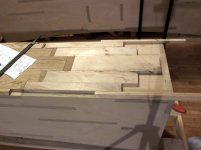
Here is how I went about the mosaics.
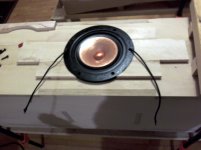
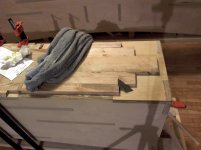
I first cut the arcs out of the pieces to fit around the Alpair. I used a shoe lace so I could remove the Alpair without taking the Avebury cabinets off the clamping stands. Note that I cut the oak pieces to the thickness of the Alpair bezel, now making it flush. This was a very labor intensive method of rebating the driver, but I like the aesthetics...
Here is how I went about the mosaics.
I first cut the arcs out of the pieces to fit around the Alpair. I used a shoe lace so I could remove the Alpair without taking the Avebury cabinets off the clamping stands. Note that I cut the oak pieces to the thickness of the Alpair bezel, now making it flush. This was a very labor intensive method of rebating the driver, but I like the aesthetics...
Last edited:

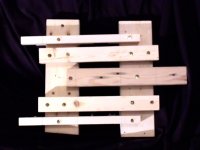
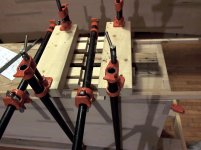
Gluing jig...
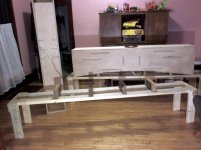
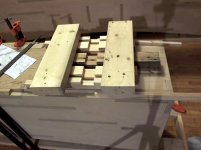
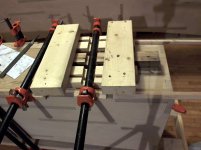
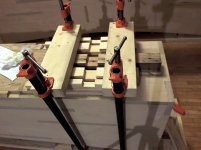
For the remaining tiers of the mosaic, I created this gluing jig. If you have ever glued wide pieces of wood with pipe clamps, You may have noticed that the middle of your board can "bow" in the middle, therefore not gluing flat and tight in the middle. To solve this problem, I varied the thickness of the contact boards, making the middle board the thickest and each successive board a little thinner towards the outer edges. So when the cross member boards bows, due to bearing the pressure of the clamps; the contact boards would be fully engaged to their respective pieces, ensuring a tight fit...
This is clear as mud I am sure. If any one wants more information on what I am trying to explain here, let me know, and maybe I can draw something up that would illustrate this better.
Attachments
Glue Steps 1-4
These next photo groupings show the steps in detail I took to glue each tier down. These first four are dry fitting, applying the glue, aligning the jig and installing the first clamps...
These next photo groupings show the steps in detail I took to glue each tier down. These first four are dry fitting, applying the glue, aligning the jig and installing the first clamps...
Attachments
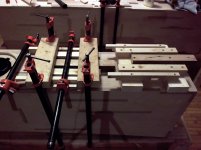
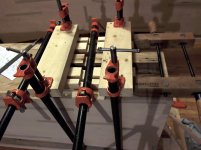
Gluing steps 5-8
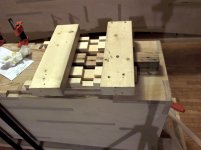
Step 4 above shows that the first order of clamping is making sure the pieces are staying in alignment and snug. Step 5 is the clamping for the downward pressure of gluing the mosaic tier to the cabinet. Step 6 applies more side pressure to prevent the individual pieces from separating. I then waited about 20 minutes for the glue to form that initial bond. I would then remove all the clamps and jig (step 7) and start cleaning excess glue (step 8)...
Step 4 above shows that the first order of clamping is making sure the pieces are staying in alignment and snug. Step 5 is the clamping for the downward pressure of gluing the mosaic tier to the cabinet. Step 6 applies more side pressure to prevent the individual pieces from separating. I then waited about 20 minutes for the glue to form that initial bond. I would then remove all the clamps and jig (step 7) and start cleaning excess glue (step 8)...
Attachments
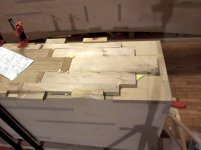

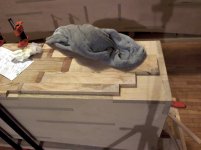
Gluing steps 9-12
After cleaning with the scraper shown above, I would go in with a wet cloth and get as much glue residue as possible. I would dry excess water (step 9), then clean up remaining glue with a utility knife blade (step 10). Once the majority of excess glue was cleaned up, I would replace the jig and clamps (step 11-12). As the pieces where initially "set", I did not need the side pressure clamps until installing the outer most pieces (not shown). I was able to do two of these tiers at one time. I would get four tiers done in one eight hour day. Bear in mind, I was cutting and dry fitting the next tier of pieces when one tier was drying. The whole gluing process for both cabinets took about one week...
After cleaning with the scraper shown above, I would go in with a wet cloth and get as much glue residue as possible. I would dry excess water (step 9), then clean up remaining glue with a utility knife blade (step 10). Once the majority of excess glue was cleaned up, I would replace the jig and clamps (step 11-12). As the pieces where initially "set", I did not need the side pressure clamps until installing the outer most pieces (not shown). I was able to do two of these tiers at one time. I would get four tiers done in one eight hour day. Bear in mind, I was cutting and dry fitting the next tier of pieces when one tier was drying. The whole gluing process for both cabinets took about one week...
Attachments
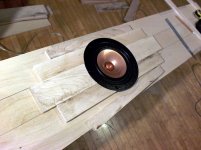
The Call Out resolved...
At one point, Dave called me out on driver rebates. What do You think of my scheme? This is actually what I envisioned from the beginning. It certainly is labor intensive and very time consuming, but I have this thing for making patterns with real wood...
You aren't going to rebate them? Do you have another sceme to to get the fronts flush?
dave
At one point, Dave called me out on driver rebates. What do You think of my scheme? This is actually what I envisioned from the beginning. It certainly is labor intensive and very time consuming, but I have this thing for making patterns with real wood...
Back tweeter adventure...
Okay, so I got that far, and You are wondering what happened since then...
The next step in this process was to finish the back with a similar pattern and install binding posts. However, at the time, I was considering a back tweeter. I could not very well finish the back without knowing if I was to rebate a tweeter or not. And I did not want to sand the fronts until all the clamping was done.
Yet I did manage in between all the work worries, two other audio projects and the computer upgrades, get around to trying a back tweeter. I tried both a Hi-Vi RT1C and a Hi-Vi Pro RT2. I can say the Pro RT2 ate the RT1 for lunch. The RT1 required a 4 kHz cross-over point which I found too high for a back tweeter. I liked the 2 kHz cross-over I could use with the Pro RT2.
I liked the depth and added "air" of a back tweeter. For movies, it really filled in the the centre really nice. BUT (You knew that was coming), two things:
#1 There was a "smearing" of initial attack, esp with percussion music.
#2 The 3D sense of width and back projection was significantly compromised.
Neither of the above points mattered when I was playing 5.1 movies on the 4.2 arrangement. I in fact prefered the back tweeters for movie playback. I liked the stronger centre image in the front and the back speakers filled in the 3D width and back projection.
But with music, which I prefer in a 2.2 configuration, the 3D loss is unacceptable, as is the smeared attack. I believe if I had a bigger room, where the back wave was not confined in between my side walls in the front, I would maintain the 3D sound stage. Likewise, if I could delay the back tweeter slightly, to align it in time with the front, I think I would enjoy the greater frontal depth and airiness it provides.
I tried hooking the tweeter as a dipole and a bipole, and I preferred the bipole wiring. But this was with a 12 dB/octave cross-over, so I was not perfectly aligned in terms of phase either way. This would be a fun experiment to try with a 24 dB/octave cross-over, at least it would be more closely aligned. Now that I am writing this, I think I would still like to try that.
One thing I liked about having the back tweeter, is it fixed the beaming dispersion of the highs. The overall sound quality in the front of my room, where I do my graphic arts and play games with my daughter, is much better. As it stands now, I get too much 80 Hz though 200 Hz bass in the front of the room, due to the rear horns. This is still a pet peeve I have with Avebury. The sub-woofers are more even from the front to the back of the room. As I have mentioned before, I am not interested in speakers that sound good in one listening spot.
But writing this, has got me thinking again about trying the back tweeter with a 24dB/octave cross-over. The Alpair would of course remain full-range, so the tweeter would be 180 degrees out, or dipole, so I could reverse the wires and have bipole. This would be a whole new experiment.
This is why I want the Sharc DSP as part of my Buffalo DAC, as I can experiment with different order cross-overs and time alignment. It is another $500 to get the DSP, USB interface and second IVY output stage for the Buffalo III to get this build going. Once I am settled into my new job, I can get going on this...
You know how it is, the Dreams worth fighting for will always stretch our budgets.
Allen

In addition to finishing all these speakers for my brother's theatre room. I have been working on a couple of other audio projects.
The first one, is I got the Chip Amps done... finally!
Cool!
EnVogue Darling Tube pre-amp...
Boy I really wish I had this done.
I have all the construction work done, but I still need to do the wiring.
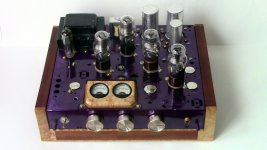
I actually was assembling this chassis for diyaudio member PainoLydia. The chassis is from an old "airline" tube stereo console. The revised circuit was designed by John at Bottlehead.com for the 1626 tube. This is not the typical application for this tube, as it does not provide much gain, but does provide more output current. PainoLydia ended up getting a different audio chain, so this design would no longer serve her system. As I really do not need much gain for the chip amps yet would not mind giving them some more current, we figured that this would be a better match for my system. I had already invested quite a bit of time into this project, so I took a chance and bought it from PainoLydia for the cost of the materials. I will probably start a new thread before I finalize the wiring on this. I read the Morgan Jones stuff, but it is quite overwhelming. I prefer to do the chassis work. I will leave the amp circuit design work to Nelson Pass and John Broskie. My realm is Art and Design, woodworking, stained glass, graphics, photography, video editing, sound production, life coaching and care giving. The only reason I took the plunge on the Buffalo III DAC kit is that it is a proven design; I just assemble, build a designer chassis and enjoy.
Having said all of that, I think this pre-amp will bring both the Chip Amps and SAE amp to a new level. The SAE is sitting in a box right now, awaiting to be shipped out to Ken Ealey for restoration. This is my reward for getting established in my new career. I will let the experts do the electronics. I will continue to hone my skills in Audio Art.
Allen
Boy I really wish I had this done.
I have all the construction work done, but I still need to do the wiring.
I actually was assembling this chassis for diyaudio member PainoLydia. The chassis is from an old "airline" tube stereo console. The revised circuit was designed by John at Bottlehead.com for the 1626 tube. This is not the typical application for this tube, as it does not provide much gain, but does provide more output current. PainoLydia ended up getting a different audio chain, so this design would no longer serve her system. As I really do not need much gain for the chip amps yet would not mind giving them some more current, we figured that this would be a better match for my system. I had already invested quite a bit of time into this project, so I took a chance and bought it from PainoLydia for the cost of the materials. I will probably start a new thread before I finalize the wiring on this. I read the Morgan Jones stuff, but it is quite overwhelming. I prefer to do the chassis work. I will leave the amp circuit design work to Nelson Pass and John Broskie. My realm is Art and Design, woodworking, stained glass, graphics, photography, video editing, sound production, life coaching and care giving.
The only reason I took the plunge on the Buffalo III DAC kit is that it is a proven design; I just assemble, build a designer chassis and enjoy. Having said all of that, I think this pre-amp will bring both the Chip Amps and SAE amp to a new level. The SAE is sitting in a box right now, awaiting to be shipped out to Ken Ealey for restoration. This is my reward for getting established in my new career. I will let the experts do the electronics. I will continue to hone my skills in Audio Art.
Allen
Attachments
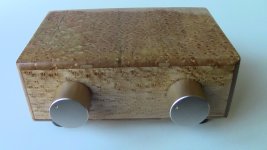
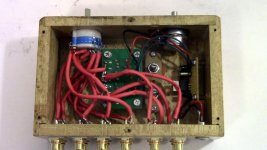
Lightspeed volume control...
I finished the Lightspeed volume control also.
The bummer is one of the Light dependent resisters shorted out inside after a static discharge due to the intensely dry winter we have had. So I am sad to report that this unit is not in service right now. I checked George's website, and there is nothing there. I will try to e-mail him to see if he has any new matched pairs of Light dependent resisters. I can not be bothered to buy 100 of them to test for a matched set. As both the Darling pre-amp above and the Buffalo DAC have built in volume controls, my time would be put to better use finishing one of those...
Attachments
Last post of the Night or is it Day?
My new job is the "graveyard" shift, so that is why I am staying up like this, as I have this whole week to adjust my sleep schedule before this all becomes real.
The final experiment I want to share is using the Avebury as a sub-woofer with the Cheap and Cheerful Arrays. I did this before I had the Dayton HF subs. I reason I tried this, is I saw on the Mark Audio site that Mark designed a new dedicated Mid-bass speaker based off the Alpair 12. As the Avebury cabinet does fill the room with sufficient bass down to 40 Hz, I figured I would entertain the idea. I noticed on other threads, that people where pretty excited to mate the new driver with the Alpair 7 in a FAst set-up. Avebury's main weakness is the IM Distortion. It plays a wide bandwidth and it does it well, it just can not do it all at once. So how does it do, relieving it of some of the bandwidth? The array was not the best candidate for the highs, as at 2 khz and above, there are some bothersome break-up sounds. Relieving the arrays of the bass below 160 Hz and higher caused their upper brake-ups to be pretty noticeable. But one thing I can say, is the Avebury did integrate excellently. Yet in terms of the array, the Dayton HF integrated really well with them also. In other words, the arrays have the right kind of mid-bass to integrate well with different sub-woofer set-ups. The Avebury is more nimble, and I think It would work great crossed at 300 Hz to an Alpair 7 or even a Fostex FF85wk. I could not go that high, but I wanted to. I think one could use first order cross-overs also. And if one uses a 35 Hz or even a 30 Hz low cut filter, one would have some amazing headroom. The Dayton sub has Avebury beat with really low bass - no surprise there. But I would not use the Dayton higher then 80 Hz. If your bass system calls for a cross-over point above 200 hz, I think the Avebury would be a good way to go.
Maybe when I have my driver blow outs between the Fostex and Celestion drivers, I will try the Avebury on bass. I can make some simple first order PLLXO's in front of my power amps. I would be curious to see what sound I prefer: The Avebury on bass with either the FF85wk or AN3510; Or the Dayton on bass with the Avebury running the highs. If I have a back tweeter installed at the time, that will make things that bit more interesting.
Point is, there is some potential for those of You out there considering the new Mark Audio Alpair Midbass in your FAst systems. There is already a lot of potential with the regular Alpair 12. I do not know if one could put the new Midbass driver in the Avebury cabinet. I would check with ScottMoose on this one. If You want to get the most out of your Alpair Mid-bass, the Avebury seems to be a good design.
Well, sleep is starting to take over, so I am calling it a night.
Allen
Return of the Avebury
Hello Everyone,
It has been awhile since to wrote on this thread. It certainly reflects the challenges I was having working nights. I now work until 2:30 am instead of 7:30 am, so things are much improved, esp on the health front. Do not take on a grave yard shift if You are middle aged, the money is not worth it, even if it is a lot (which it was not for me). Since transferring to the earlier night shift, I have been catching up with neglected home improvements, truck repairs, and many other material maintenance issues.
Yet, I have slid in some significant audio projects too. One is my First One amp build. And the second is my Buffalo III DAC build.
You can read about each build here:
First Impressions of First One with Avebury - read down to post 3031:
http://www.diyaudio.com/forums/vend...-mosfet-amplifier-module-303.html#post4746030
First One building adventure with photos:
http://www.diyaudio.com/forums/vend...-mosfet-amplifier-module-305.html#post4751690
Buffalo III building adventure:
http://www.diyaudio.com/forums/twisted-pear/294644-visual-buffalo-iii-building-journey.html
What I can say is the First One amp solved a lot of the distortion issues I was having driving the Avebury to the listening levels I like. I still need a high pass filter below 30 Hz, to prevent the Alpairs from just flopping around below the horn loading frequency. Yet, the bass is still very satisfying and I can feel it. And as I mentioned in post 3031 on the First One thread, is the bass does not drown out the highs and mid-range. I was getting worried that this was a limitation of this system, because none of my other systems did this. No, it just so happens that Avebury needs a passionately designed amp! In fact, I would say any system built with an Alpair 12 driver would benefit from a great amp. I would say the 160 watt/channel First One is just right, but understand, this is less about the watts then it is about how the watts are delivered. First One is a good match.
But even with the First One, I really did not hear the Avebury, until I tried them last weekend with the Buffalo III.
Interestingly enough, I have had the Buffalo III working since Aug 30. Over that time, I was EQing my arrays, looking for their ultimate sound. I could hear it in there, but could not extract it, without also extracting that nasty mid-range shrill. I could tame the shrill, but then I lost the very essence of what I was wanting in the first place! This was very frustrating, because I was feeling like I was so close to what I have always wanted in sound. Do not get me wrong, what the First One and Buffalo combination done for my Cheap and Cheerful Arrays is nothing short of amazing! I got really close to saying "this is good enough". But alas, the "Cheap" aspect of this build reared its ugly head and there is nothing I can do: the shrillness is a result of the driver design. So driver modification is the only path forward. But as many of You know, I feel there are a lot of things to fix with these NFS drivers that I would be better off starting with a better driver anyway, hence the "All Aspiring array project".
That struggle finally brought me back to Avebury. How amazed I was when I first heard them. Sure, I could hear a lot more of my room. But there is something more there, a lot that was not there before, even compared to the initial First One upgrade. The Buffalo III really allows the Alpair 12 to project a massively 3D sound stage. And the highs sound a lot smoother. Un-EQed, on axis, there is definitely too much highs, but in the listening seat, it is pretty balanced. Yet, even on axis, the highs are not bothersome. I am just used to a more balanced response. I can say, the highs in general on my arrays I found very bothersome, so this is a relaxing change. I only thing that bothers me with this system, is there is too much mid-bass and bass. But the good news, is now I know the cause of this. It is indeed the horns causing this. I could tell the mid-bass was very influenced by the room. I liked this "color" before with my chip amps and M-audio DAC, but now that I have a source I really enjoy listening to, I want to hear that now instead of the special effects of my room!
Hello Everyone,
It has been awhile since to wrote on this thread.
It certainly reflects the challenges I was having working nights. I now work until 2:30 am instead of 7:30 am, so things are much improved, esp on the health front. Do not take on a grave yard shift if You are middle aged, the money is not worth it, even if it is a lot (which it was not for me). Since transferring to the earlier night shift, I have been catching up with neglected home improvements, truck repairs, and many other material maintenance issues. Yet, I have slid in some significant audio projects too. One is my First One amp build. And the second is my Buffalo III DAC build.
You can read about each build here:
First Impressions of First One with Avebury - read down to post 3031:
http://www.diyaudio.com/forums/vend...-mosfet-amplifier-module-303.html#post4746030
First One building adventure with photos:
http://www.diyaudio.com/forums/vend...-mosfet-amplifier-module-305.html#post4751690
Buffalo III building adventure:
http://www.diyaudio.com/forums/twisted-pear/294644-visual-buffalo-iii-building-journey.html
What I can say is the First One amp solved a lot of the distortion issues I was having driving the Avebury to the listening levels I like. I still need a high pass filter below 30 Hz, to prevent the Alpairs from just flopping around below the horn loading frequency. Yet, the bass is still very satisfying and I can feel it. And as I mentioned in post 3031 on the First One thread, is the bass does not drown out the highs and mid-range. I was getting worried that this was a limitation of this system, because none of my other systems did this. No, it just so happens that Avebury needs a passionately designed amp! In fact, I would say any system built with an Alpair 12 driver would benefit from a great amp. I would say the 160 watt/channel First One is just right, but understand, this is less about the watts then it is about how the watts are delivered. First One is a good match.
But even with the First One, I really did not hear the Avebury, until I tried them last weekend with the Buffalo III.
Interestingly enough, I have had the Buffalo III working since Aug 30. Over that time, I was EQing my arrays, looking for their ultimate sound. I could hear it in there, but could not extract it, without also extracting that nasty mid-range shrill. I could tame the shrill, but then I lost the very essence of what I was wanting in the first place!
This was very frustrating, because I was feeling like I was so close to what I have always wanted in sound. Do not get me wrong, what the First One and Buffalo combination done for my Cheap and Cheerful Arrays is nothing short of amazing! I got really close to saying "this is good enough". But alas, the "Cheap" aspect of this build reared its ugly head and there is nothing I can do: the shrillness is a result of the driver design. So driver modification is the only path forward. But as many of You know, I feel there are a lot of things to fix with these NFS drivers that I would be better off starting with a better driver anyway, hence the "All Aspiring array project".That struggle finally brought me back to Avebury. How amazed I was when I first heard them. Sure, I could hear a lot more of my room. But there is something more there, a lot that was not there before, even compared to the initial First One upgrade. The Buffalo III really allows the Alpair 12 to project a massively 3D sound stage. And the highs sound a lot smoother. Un-EQed, on axis, there is definitely too much highs, but in the listening seat, it is pretty balanced. Yet, even on axis, the highs are not bothersome. I am just used to a more balanced response. I can say, the highs in general on my arrays I found very bothersome, so this is a relaxing change. I only thing that bothers me with this system, is there is too much mid-bass and bass. But the good news, is now I know the cause of this. It is indeed the horns causing this. I could tell the mid-bass was very influenced by the room. I liked this "color" before with my chip amps and M-audio DAC, but now that I have a source I really enjoy listening to, I want to hear that now instead of the special effects of my room!
- Status
- This old topic is closed. If you want to reopen this topic, contact a moderator using the "Report Post" button.
- Home
- Loudspeakers
- Full Range
- Mikasa, next?