Rob,
Try a slightly bigger tip a little hotter. Assuming that you are soldering from the bottom of the board and that side looks good, I wouldn't sweat it if the top side looks like the right ends of D12 and D14.
Be obsessive about assembly, but don't let analysis paralysis keep you from actually building and enjoying the project.")
Try a slightly bigger tip a little hotter. Assuming that you are soldering from the bottom of the board and that side looks good, I wouldn't sweat it if the top side looks like the right ends of D12 and D14.
Be obsessive about assembly, but don't let analysis paralysis keep you from actually building and enjoying the project.
Hi Tad
I'm on it - working from the center outwards
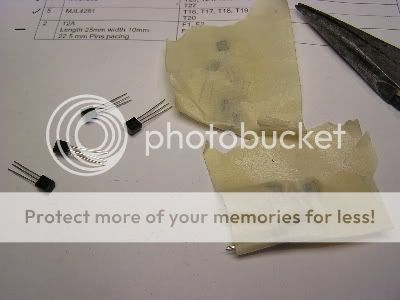
I had placed matched transistors in masking tape packets. Boy was that a dumb idea..
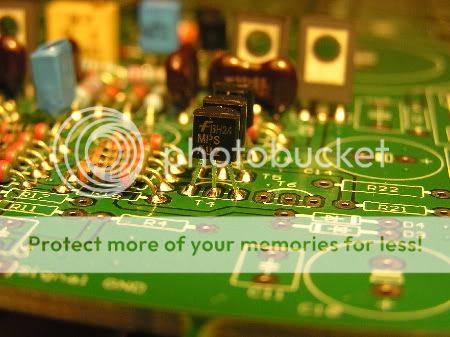
Bob, I'm running my WTCPN with an 800º conical. A screwdriver tip may be more effective on these boards. If I sweat em like copper pipes, it seems to improve wicking.
Digi-key has backordered half of my Mills resistors, I'm stuck waiting patiently. Another setback was my zener matching fubar, I still need to re-measure before completing front ends.
Next steps: complete PS soft start design and order parts. Conrad sinks are waiting for layout, that will have to wait for another day
I'm on it - working from the center outwards
I had placed matched transistors in masking tape packets. Boy was that a dumb idea..
Bob, I'm running my WTCPN with an 800º conical. A screwdriver tip may be more effective on these boards. If I sweat em like copper pipes, it seems to improve wicking.
Digi-key has backordered half of my Mills resistors, I'm stuck waiting patiently. Another setback was my zener matching fubar, I still need to re-measure before completing front ends.
Next steps: complete PS soft start design and order parts. Conrad sinks are waiting for layout, that will have to wait for another day
The two Zener strings do not have to be perfect.
It's easy to select the resistor in the LTP tail if both sets of Zeners add up to exactly 40V.
But the CCS still performs if the voltage is 39.1V or 40.3V. the upper and lower can even be different.
You can trim the resistors to ensure identical currents in both tails.
Measure the installed Zener voltage. Calculate the currents in the two resistor tails.
Which passes the lower current?
Add a large value resistor in parallel to the installed resistor. That large value resistor will be {Zener voltage} / {difference between the tail currents}
It's easier if you leave long legs on these resistors under the PCB. Once the extra resistor is added, cut off the excess legs.
Now that the two tail currents are the same, check the Vdrop across the LTP emitter resistors. If the BJTs have been selected accurately then all four Vre should be identical. They won't be.
Are they all within a spread of <1%. That's good enough.
You can also measure the voltage drop across all four base resistors.
This gives you the base currents and from them you can check the hFE.
The difference between the base currents on the non-inverting side equals the input offset current. Now measure the voltage across Zin resistor. Multiply Zin by the input offset current. these two voltages should be the same. This is the input offset voltage.
This is the voltage that appears at the inverting input if both sides are well matched. Remember that opamp rule. the amplifier uses the feedback to try to make the difference between the two inputs zero by adjusting the output voltage until this condition is met.
rob3262 said:Conrad sinks are waiting for layout, that will have to wait for another day
I hope you used the pattern of the boards to lay out the sinks first. It's a lot easier if you do that BEFORE the boards are populated.
Andrew, outstanding information! I don't know what I don't know, but with the great advice the builders are receiving we will have more than satisfactory results. Thank you.
Pooge, I recall another builder (chas maybe?) ran into the same layout problem with populated boards. Thanks for the heads up.
I am building one board to completion for testing/verifiction. Four boards will have the front end completed for testing, and 1 lone PCB for layout of mounting.
Soon I will be breaking taps... It's tempting to farm out drill & tap to a local machine shop. But what fun would that be?
Pooge, I recall another builder (chas maybe?) ran into the same layout problem with populated boards. Thanks for the heads up.
I am building one board to completion for testing/verifiction. Four boards will have the front end completed for testing, and 1 lone PCB for layout of mounting.
Soon I will be breaking taps...
It's tempting to farm out drill & tap to a local machine shop. But what fun would that be? cutting oil or cutting paste helps stop the tap snagging.
I don't have any to hand, so I tried vegetable oil (that used to be the in thing for lubricating competition engines) due to it's extreme pressure properties.
Sunflower oil and most cooking oils seem to do the job both in drilling and tapping aluminium.
I don't have any to hand, so I tried vegetable oil (that used to be the in thing for lubricating competition engines) due to it's extreme pressure properties.
Sunflower oil and most cooking oils seem to do the job both in drilling and tapping aluminium.
vegetable oil (that used to be the in thing for lubricating competition engines)
Seriously? The stuff smokes when I cook with it, couldn't imagine running it in an engine block
Rob,
Are you using Mills throughout or just for the emitter resistors on the output. I used Mills in the output stage. They were not cheap. I think the money was well spent.
I have found that dish soap like Dawn works very well to tap aluminum. Clean the tap after each hole. The BIG twist here is that most of the holes are blind which makes all of the chips get in the way. No way to wash them through. It is a good idea to run a small countersink over the area afterwards to broach the burr down so the transistors lay flat.
Another little place to pay attention is the signal input pads. You might want to attach wires to this area before mounting the board in the chassis. In my case they became hard to reach. You also have to route past all the high voltage traces to get to the back of the case. Just things to think about NOW while it is still easy to reach.
I use a little 25 watt iron. Where you guys get of with these industrial 800 degree soldering tools. Must be nice. I think we have discussed this before. I try to treat these devices like fragile pieces of glass. As little heat as necessary. Just enough heat to wick the solder up the leads.
Does potting the transformers have any real advantage?
Tad
Hi Tad.
Mills on the emitters, Vishay 1% throughout, Ohmite silicone on the R//L. I like the Mills, when they're available
The 800º isn't the industrial, check out the Weller 260W! Makes easy work when soldering the big bypass caps to the pcb. Heats up in about 12 seconds too. I really can't imagine going at this build with a 25W pencil. You've got talent!

I really appreciate the info on the drill/tap process guys. I haven't done work like this since shop class in high school (just a couple few years ago) One of the daunting tasks left is the whole chassis piece. I'm more than a month out from that part.
Mills on the emitters, Vishay 1% throughout, Ohmite silicone on the R//L. I like the Mills, when they're available
The 800º isn't the industrial, check out the Weller 260W! Makes easy work when soldering the big bypass caps to the pcb. Heats up in about 12 seconds too. I really can't imagine going at this build with a 25W pencil. You've got talent!
I really appreciate the info on the drill/tap process guys. I haven't done work like this since shop class in high school (just a couple few years ago) One of the daunting tasks left is the whole chassis piece. I'm more than a month out from that part.
tryonziess said:Rob,
It is a good idea to run a small countersink over the area afterwards to broach the burr down so the transistors lay flat.
I use a little 25 watt iron. Where you guys get of with these industrial 800 degree soldering tools. Must be nice. I think we have discussed this before. I try to treat these devices like fragile pieces of glass. As little heat as necessary. Just enough heat to wick the solder up the leads.
Tad
DEFINATELY countersink to deburr! Not only for the transistors to lay flat, but to keep from cutting through pad. Also, be careful about applying too much torque to the screws, as too much will lift the surface of the sink.
25 watts is marginal for an iron. A higher wattage is much better. It may sound counter intuitive, but higher wattage will heat the component less. This is because it will heat the solder joint much faster so you can lift the iron off before heat is conducted up the lead to the component. With a small iron, you leave it on forever and heat has plenty of time to conduct up the lead INTO the component and damage it. Good insurance would be to clip an alligator clip to the lead next to the body of the component to draw off any heat travelling up the lead.
I've got a 40W temperature controlled iron from http://www.web-tronics.com/ - similar to the blackjack station for only $45.
I'm using a 2mm chisel tip on this board. The copper is heavy so sucks a lot of heat, making a massive tip essential.
I had some success using bar soap as a lubricant. As soon as you feel the tap starting to bind, back out and clean it. Of course I am using big box store taps. I've got to try some industrial ones with my next McMaster Carr order.
Pooge,
Thanks for that little alligator clip tip. l general can get solder to flow on contact or instantly. Maybe the iron is 40 watts. Anyway it is a very fast process. I use extremely small diameter solder which seems to help. You can solder in five or six resistors in about half a minute. I need the smallest item I can handle when working under my magnifier light. The eyes just ain't what they use to be. Heck even with a small pencil iron I burn the edges of box capacitors on every build. Just old and clumsy.
I think a nice soldering station would be a nice gift to myself. I can say the dog gave it to me. You all are making this a must decision.
Rob, With the price of aluminum at retail it might not be a bad time to start looking for some scrap material. You can find small sheets of 1/8 to 1/4 sheet in dumpsters. Short lengths of angle are tossed out regularly.
I buy most of the screws from Small Parts . com or on ebay. If you use stainless or brass you for sure do not want to buy at Ace or Home Depot. They want 25 -40 cents per screw. OUCH. Small Parts stocks just about every thread and head style you could ever want. They also have major stocks of other cool stuff. Some a little bit more pricey.
Did I mention that old street signs are aluminum. Very heavily tempered. Makes good tops and bottoms for chassis. You will have to be creative with the paint removal if needed. You can find a nice stash after a big storm. You have to make some good from all the destruction. (Please no new ones-- we need those) I sure hope you have access to a table saw. A drill press is nice too and a good assortment of holesaws.
Tad
Table saw - Yes
Drill Press - no (not yet, contemplating. But I do have access)
Now about those taps. The consensus is to avoid big-box. What are some good alternate sources for tools? I don't have a Mac Tool truck running in my neighborhood...
Recycling street signs... those things are heavy guage! Something to look into.
Can someone advise on mounting the large torroids? I have a hardware kit consisting of a long bolt, formed metal plate, and 2 rubber pads. The bolt head will have to come thru the bottom chassis plate, requiring chassis to have feet or standoffs?
I noticed Chas has posted in another thread about a soured deal on some snap-in caps. I had gone thru Digi-key for 6800uF snap ins that seem well suited to the purpose. I really wanted 10000uF's, couldn't locate anything this side of reasonable cost
Your case should have feet anyway, to allow for air circulation. Raising the case up even half an inch gets more air to the heat sinks.
It's a good idea to have some ventilation through the top and bottom of the case to keep the filter caps cool.
Used signs? The streets department is just around the corner...
It's a good idea to have some ventilation through the top and bottom of the case to keep the filter caps cool.
Used signs? The streets department is just around the corner...
Just wash [flux] off when you are finished with some good circuit cleaner or alcohol...
FWIW,
WJH and I both cleaned our boards using the following cleaning instructions, which proved extremely effective:
http://nuxx.net/wiki/Flux_Removal
Lacking an air compressor, we used a can of that commercial
"Dust Air" blower, sourced from Rat Shack.
I had gone thru Digi-key for 6800uF snap ins that seem well suited to the purpose.
Anyone know where to get nice large (low ESR) snap-ins for less than $10+ each?

I can get some good taps from the Matco tool truck on Wednesday. I could pass them on for cost and mailing if anyone wants a few. Typically No. 4-40, No. 6-24/32. There are other sizes but they tend to get mucho more expensive as you go up.
Do not quote me on this but I think they are about 4.00 bucks each. I am VERY pleased at how they cut.
Bob, " Just around the corner." You could get just about any type of aluminum you want from there scrap pile. No one get me wrong. No stealing just recycling. That is what green earth is advocating. And yes some of the signs are quite thick. General purpose domestic signs are about 1/8, 5/32 inch in guage. You will not be able to bend into a 90 degree corner because of the temper.
Tad
- Home
- Group Buys
- Jens Rasmussen Leach clone group buy