staggerlee said:
If I want to build a bad pair of bagpipes, I will do this in the futureSeriously though, when I got around to gluing up, The sound changed dramatically.
How are you gluing up the CC, but allowing it to be removable? I don't understand?
Just like the pictures: edge glue the members, band clamp and when dry after a few days, position the CC and remove the band clamp. I haven't done any of this yet... got a few pieces to go. From one 4x8 sheet and with no mistakes I may need an extra piece. If I'm lucky, there might be a broke box at the Depot with an off-cut from another job. What Dave calls the stiker at top and bottom of the back vent is a foreign piece as well. Get as much 6 3/4 length as you can from one pass at the saw. My front baffle got a little ragged but still useable.
Window insulation film: That's a really nice idea. Thanks!
Not the film (which we call Visqueen) here but the 1/4 foam stuff. Cells in the foam will take up the gaps like glue.
Today I made my spacers out of the scrap of the last of the cuts for the
Harvey.
Also went out and looked at strap clamps. The cheapest one I could find is made by Pony. It had some right angle metal pieces for square jobs and a little teeny wrench. From looking at the packaging I couldn't see or infer how all the pieces worked.
Plus it looked like a gizmo worth about $6 instead of $13.
I'm going to see if an old belt would work.
For now I passed on the purchase-- Everything Pony might be on deal by Christmas.
I'll be starting on just doing the top and bottom and the strikers.
I'll then be able to offload that and set up for the baffle cutouts. I have no drill press.
Be warned: Using a hand drill and hole cutters are cautioned against by the experts! Avoid the method of you can. I only do this once in a blue moon myself.
Try these tie downs. If there is a store near you, you can also save big bucks with sale items. I bought a pack of four, two weeks ago for $7.99.
Also, they had 12" bar clamps on sale for $1.99 each. I bought 6, and should have gotten more. bar clamps. The items are cheaper at their regular stores, and you can sign up to receive their sales fliers, where they have lots of neat things dirt cheap. The tools are not Snap-On, but they are good enough, unless you use them on a daily basis in your profession.
As for the tie-down straps, if you remove the hook and sew the other piece to the rachet, you have a perfect strap wench for your wood working.
Well, as long as we are going down that road, maybe just a bungie wrap would provide a little tension?
I'll check the car stores of ratchet tie downs as well.
Still don't know if Titebond III for this job is required.
I have half a jar of Elmer's Probond left. I want to use a full strength glue at the corners anyway.
I'll check the car stores of ratchet tie downs as well.
Still don't know if Titebond III for this job is required.
I have half a jar of Elmer's Probond left. I want to use a full strength glue at the corners anyway.
No pictures from me-- I don't have a camera. But posting to keep the thread going.
It's a major pain to get holes centered working free hand even with checking and remeasuring.
I of tmy 2 baffle cuts done and chamfered the outermost one. Good thing I checked everything with one of my installed FE127s cuz the cutout was a bit too snug. A small reverse chamfer on the face made room for the shape of the basket.
Next I have to lay the whole works out and see how the puzzle all fits.
Due to imperfections in the material, I'll have to do some fill and shaping with a sander.
What's the news on Bondo? Is that still a preferred material? Elseways I'll be using a can of the regular stuff. I'll prob'ly wind up using a hand block as well.
Spock's brain
I was just thinking about the old Star Trek show where the doctor has to put Spock's brain back together.
Right now I'm evaluating how to do the glue up of the Harvey. I've been noticing some gaps that I think were unavoidable by my cutter.
So maybe doing a mirror assembly of one side first and then the second. I have a dead level surface of particle board that I laid a
square on. And using my try squares 10 in and 4 in to look at how the edge gluing will hold.
Anyway, how's everyone else doing? This thread got kind of old.
I imagine that that the bamboo is "battleship grade."
One thing I noticed is that on the angles, there was some saw burn and unavoidable tear out at the feathered edge of the pieces. This means my cutter sliced the angle as fine as he could. But my materials are not the best. And I don't know how finer saw blades could improve the cuts.
Alternately, for those who can set up a band saw, some of these difficulties might be eliminated.
A ten inch table saw blade can only take so steep of an angle. The front pieces had to be cut separately on the table saw.
Dealing with fine measurements I'm trying to get some wiggle rooom for final placement. I have my spacers jigs made (see above for pictures) but I'm concerned about the front baffle possible being proud of the front face.
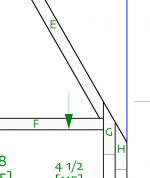
For gluing I'm starting with one of the few square edges at C and D.
Also figuring out how to make some temporary braces for E and F
and going to use a bit of wax paper for catching any glue dribble.
One thing I noticed is that on the angles, there was some saw burn and unavoidable tear out at the feathered edge of the pieces. This means my cutter sliced the angle as fine as he could. But my materials are not the best. And I don't know how finer saw blades could improve the cuts.
Alternately, for those who can set up a band saw, some of these difficulties might be eliminated.
A ten inch table saw blade can only take so steep of an angle. The front pieces had to be cut separately on the table saw.
Dealing with fine measurements I'm trying to get some wiggle rooom for final placement. I have my spacers jigs made (see above for pictures) but I'm concerned about the front baffle possible being proud of the front face.
For gluing I'm starting with one of the few square edges at C and D.
Also figuring out how to make some temporary braces for E and F
and going to use a bit of wax paper for catching any glue dribble.
a problem with measurements
I started glue up today.
While laying out the pieces, I had to get the front face flush to accept the
2 baffle pieces.
When doing this I lost the glue line at E and F.
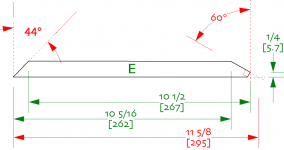
The drawing of E shows a 60d cut. The drawing also shows a back angle which my cutter duly trimmed out.
Dave can you confirm how this is supposed to assemble?
if 'north and south' component E on the compression chamber are parallel to top and bottom then there should be no back cut but just trimmed to 60 with some glue line remaining for F.
The diagram should indicate this.
If I'm in error please advise.
Meanwhile, I'm going to have my guy make some 60d glue blocks to get some glue line and bracing for the rest of the assembly.
I started glue up today.
While laying out the pieces, I had to get the front face flush to accept the
2 baffle pieces.
When doing this I lost the glue line at E and F.
The drawing of E shows a 60d cut. The drawing also shows a back angle which my cutter duly trimmed out.
Dave can you confirm how this is supposed to assemble?
if 'north and south' component E on the compression chamber are parallel to top and bottom then there should be no back cut but just trimmed to 60 with some glue line remaining for F.
The diagram should indicate this.
If I'm in error please advise.
Meanwhile, I'm going to have my guy make some 60d glue blocks to get some glue line and bracing for the rest of the assembly.
loninappleton said:Definitely a right angle and not a back cut on the drawing above.
The Harvey 1v1 cut list shows a backcut. I think the backcut would have been used on Harvey 1.o where the CC was not parallel to the top and bottom.
I will be able to make the adjustment.
The pieces of Harvey 1v1 of sheet 2 are just copy & pasted from sheet 1 and them dimensioned... what do you mean by back cut?
dave
planet10 said:
The pieces of Harvey 1v1 of sheet 2 are just copy & pasted from sheet 1 and them dimensioned... what do you mean by back cut?
dave
Specifically (although I don't have a document number) I know I used what you gave me and the sheet says Sept 13 which I think is right rather than January.
The misunderstanding comes at piece E on the cut list where there is a dotted plumb or flush line on the right side of the image for piece E. The dotted line plus right angle base line is on there. At the tip of the drawn image, a reverse angle (what I've been calling a back cut) is visible. There is no degree of cut given for it-- it's just visible.
I'm seeing my guy today. We may have enough extra pieces to do a recut. Even so, I think I'll want some 60d corner blocks for stability.
Caution: extra pieces are on hand only because I used odds and ends to make sure I had enough length. Braces and some internal parts were cut from scrap. My build is a one-only to test for performance.
loninappleton said:The misunderstanding comes at piece E on the cut list where there is a dotted plumb or flush line on the right side of the image for piece E. The dotted line plus right angle base line is on there. At the tip of the drawn image, a reverse angle (what I've been calling a back cut) is visible. There is no degree of cut given for it-- it's just visible.
The cutback is 30 degrees (90-60=30)
dave
planet10 said:Here is a snapshot with more detail...
dave
That's good detail. But why am I confused? The drawing further up
showed a right angle with no cutback.
I've used that upper drawing with no cutback to have a new piece E. Fortunately the guy does this gratis.
I'll report back on which fit works best. I now can experiment with both. Also using the glue blocks (for the belt and suspenders effect.)
loninappleton said:That's good detail. But why am I confused? The drawing further up
showed a right angle with no cutback.... I now can experiment with both.
Now i'm confused... there is no "both pieces", They are the same... the 2nd detail is a cut and paste from the 1st one rotated "flat" to make it easy to dimension.
dave
planet10 said:
Now i'm confused... there is no "both pieces", They are the same... the 2nd detail is a cut and paste from the 1st one rotated "flat" to make it easy to dimension.
dave
I'm not trying to be thick. I may not be interpreting something correctly not having read many design drawings.
From here I'm going to lay out all the pieces and see if things fall into place.
Frankenharvey
I decided not to do the assembly 'in one' with a band around. From the dry fit process it looked like everything would slide around.
So I'm working from back to front but not gluing to the sides yet.
My wood is not the best so use the good stuff if you can. Even then I'd advise making a practice one of this complexity.
Some voids surfaced in my inexpensive ply. Once the perimeter pieces are assembled and in alignment with the front baffles and everything is stuck together, I'll smooth the exterior surfaces.
Doing this I feel more like Ed "Big Daddy" Roth than Martin King.
They love me at the wood putty store.
Assembly is coming along slowly. I'm closing in on my first complete dry fit.
Dave and others, what is the suggested treatment for the CC (compression chamber)?
In previous builds I have put very little stuff inside my boxes at all.
Here with a smaller volume for CC than MLTL or BIB I don't know what to expect on first listen.
We've seen the foam treatment for the voids at the corners but nothing that I recall for the CC. Filling the volume up with pillow stuffing or the like could hardly be recommended or could it?
Things I have on hand include some billiard felt.
My build has the four inch cut out chamfered. The wider thickness of baffle was cut using a 5 " hole cutter and that was chamfered too.
This was not a smooth transition so I used some fill to shape the wave guide.
The driver is my FE127e in yet another life cycle.
- Status
- This old topic is closed. If you want to reopen this topic, contact a moderator using the "Report Post" button.
- Home
- Loudspeakers
- Full Range
- Harvey Builder's Thread