Todays progress
Todays progress:
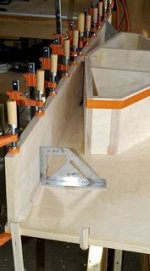
Cut the 4 sides. Typically I will add an 1/8 of an inch to the overall width so that the flush cut router will trim the width to the exact size. But since I'm using 18mm ply the actual dimensions are less than the 14.25 inches called for in the drawings. My cut was 14.25" the router will shave off the extra.
I don't have any deep clamps so the plywood extensions will have to do.
See photos.
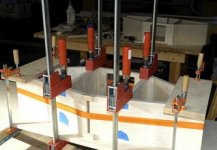
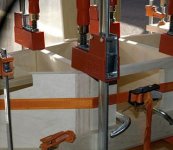
The spacer block jigs really came into their own as the nylon web clamps snugged up the center chambers to force the gap into submission. (3/8")
Since I am squeezing the chambers together there was a bit of diflection on the inner front baffle...I therefore decided to glue up the front baffle after the chambers were in place and glued down. I'll let them take the small bend and fudge the fit a bit with the front baffle.
Todays progress:
Cut the 4 sides. Typically I will add an 1/8 of an inch to the overall width so that the flush cut router will trim the width to the exact size. But since I'm using 18mm ply the actual dimensions are less than the 14.25 inches called for in the drawings. My cut was 14.25" the router will shave off the extra.
I don't have any deep clamps so the plywood extensions will have to do.
See photos.
The spacer block jigs really came into their own as the nylon web clamps snugged up the center chambers to force the gap into submission. (3/8")
Since I am squeezing the chambers together there was a bit of diflection on the inner front baffle...I therefore decided to glue up the front baffle after the chambers were in place and glued down. I'll let them take the small bend and fudge the fit a bit with the front baffle.
Attachments
My thanks for all the great photos.
I'm still playing with making the 3/8 in stops.

Also my timber isn't great. I'm spending considerable time getting the back on straight and pullling some bends out. It's a job for biscuit cutter but I'm using what comes to hand to fix it. It's my winter project. Screwing around is part of it.

I'm still playing with making the 3/8 in stops.
Also my timber isn't great. I'm spending considerable time getting the back on straight and pullling some bends out. It's a job for biscuit cutter but I'm using what comes to hand to fix it. It's my winter project. Screwing around is part of it.
Re: also very handy.
Those are nice. Where did you get the idea? is there a formal set of instructions?
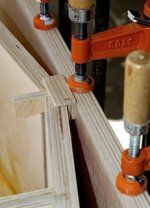
staggerlee said:build yourself an army of cam clamps like these. very cheap to build.
Those are nice. Where did you get the idea? is there a formal set of instructions?
Re: Re: also very handy.
Well, These are big with luthiers, and can be purchased at places like Woodcraft. If you google "cam clamp" you'll find a bunch of homemade ones. The ones I built came out of an article on finewoodworking.com The article is here, but you need to pay to see it.
actually, I just found another one here
John L said:
Those are nice. Where did you get the idea? is there a formal set of instructions?
Well, These are big with luthiers, and can be purchased at places like Woodcraft. If you google "cam clamp" you'll find a bunch of homemade ones. The ones I built came out of an article on finewoodworking.com The article is here, but you need to pay to see it.
actually, I just found another one here
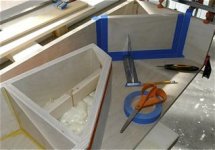
Tuesdays progress
Not much to show for today But the back is on and square and true.
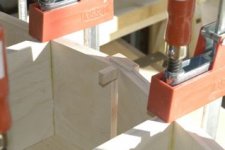
I use the little cutoff blocks from the miters to help the alignment during the glue up. Just a small dab of glue so that after the back is dry you came kick them off with a small chisel and hammer. Place the blocks so they will not be seen when the cab is finished.
On the the back side there is a small lip that will be trimmed with a router. Glue only one side of the small "locater" blocks (the part that will be trimmed off anyway) Dont get glue on the back finish side...The stuff stains and will not sand off no matter what the glue company says.
One detail not be missed:
When your gluing up the back do not use a wooden spacer at the bottom of the glue joint. The excess will be pushed out of the joint and will bond the spacer. I used a 1/4" drill bit for the spacer at the bottom. It will just pop out after the glue dries.
Photos to follow
Not much to show for today But the back is on and square and true.
I use the little cutoff blocks from the miters to help the alignment during the glue up. Just a small dab of glue so that after the back is dry you came kick them off with a small chisel and hammer. Place the blocks so they will not be seen when the cab is finished.
On the the back side there is a small lip that will be trimmed with a router. Glue only one side of the small "locater" blocks (the part that will be trimmed off anyway) Dont get glue on the back finish side...The stuff stains and will not sand off no matter what the glue company says.
One detail not be missed:
When your gluing up the back do not use a wooden spacer at the bottom of the glue joint. The excess will be pushed out of the joint and will bond the spacer. I used a 1/4" drill bit for the spacer at the bottom. It will just pop out after the glue dries.
Photos to follow
Attachments
Phil,
Sounds good but I'm curious about using the Feastrex driver in the Harvey. I thought I remember a comment from Scottmoose in the "spawn" thread where he told another guy that his driver, with an Fs of 100 Hz would not work in this enclosure.
Looks like there is another guy here in my town who wants to build Harveys as well but I'm not sure if he is on this forum or not -- I'm sure you know who I'm talking about.
Anyway, I'd like to hear about the adjustments that had to be made to Harvey for the Feastrex drivers, if somebody could enlighten me.
Thanks,
Jim
Adding the tops and bottoms to Harvey
Fill the great voids...with foam...
You gotta fill in stages and it has to cure. The can says it cures in 3-6 hours...not so... it really takes about a week.
But after the cure, cutoff the excess (a hand saw) then sand flush. I use a 24" x 4" sanding block with 80 grit. Don't cut into the plywood! The blue tape will help to remind you where the plywood is....
Extra bracing to reduce that boxy woody sound.
Attachments
![dsc_0028[1].jpg](/community/data/attachments/89/89406-debb8b1da267efaa57fef517d6831eb6.jpg)
Use blue tape to help keep the glue off
Use Blue tape to help keep the glue off of the finish work. Remember to pull the right after the clamps are all set. Its a real bummer trying to remove the tape after the glue has dried.
When applying the tape you gotta really mash it down.
Sanding:
Sand out the areas before you glue down the inside parts. Its easier to do the sanding now before the parts are joined. I hit the insides with 150 grit then 220.
Attachments
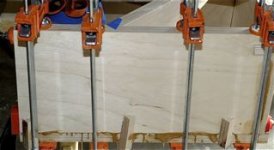
Plenty of clamps
Use lots of clamps
Remember:
You can't be to rich
or
To thin
and you will never have enough clamps...ever.
Honey what do you want for you Birthday???
Uhhhh...clamps
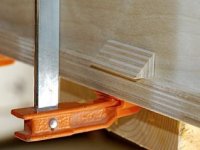
I tack glue the little triangle scraps to help hold all square and true.
After the parts have been clamped and the glue squished out knock the little blocks off. They have done their job.
Clamping dance:
Plan exactly how you are going to clamp. Take the part without glue and clamp it in place. You will be able to adjust exactly how plumb and true it is by adjusting the clamp placement. Mark where the clamp should go so the when you do the glue up you won't be guessing. Glue tip...one word....Titebond III....Google it and see for your self
Use lots of clamps
Remember:
You can't be to rich
or
To thin
and you will never have enough clamps...ever.
Honey what do you want for you Birthday???
Uhhhh...clamps
I tack glue the little triangle scraps to help hold all square and true.
After the parts have been clamped and the glue squished out knock the little blocks off. They have done their job.
Clamping dance:
Plan exactly how you are going to clamp. Take the part without glue and clamp it in place. You will be able to adjust exactly how plumb and true it is by adjusting the clamp placement. Mark where the clamp should go so the when you do the glue up you won't be guessing. Glue tip...one word....Titebond III....Google it and see for your self
Attachments
Extra bracing
Extra bracing from the Compression chamber to the apex of the of the small 2 5/8" block....I'll send a photo.
I use lots of the miter cutoffs where ever I can stick them in.
"Gorilla glue seems to brittle when hard."
Actually these types of glue are very poor in all respects...Fine Woodworking did a study a few months ago...The Gorilla types were the worst of all. The best was Titebond III
Silver ribbon wire...humm nice stuff...But I think Allen Wright has a way better deal.
Time to hit the shop and see how the foam is doing...
And start the Feastrex
Later
There is a guy who cuts all this complicated stuff for me and so it's going a piece at a time.
iwas wondering about assembly of the compression chamber with band clamp.
Would you be doing sub assemblies of the smaller parts at odd angles on a flat surface before 'hugging' up the whole CC? The only joint that looks practical is a butt joint.
I will prefer to test the sound with a dry clamp operation.
loninappleton said:
I will prefer to test the sound with a dry clamp operation.
I actually tried this with an older set of horns i was building. It seemed to be working ok, and i thought it was the coolest thing that i was hearing all these sounds that i never heard before. Turns out, no one else had heard them either, because I went up to the cabinets and compressed them between my arms and the sound started changing dramatically everytime i squeezed!
staggerlee said:
I actually tried this with an older set of horns i was building. It seemed to be working ok, and i thought it was the coolest thing that i was hearing all these sounds that i never heard before. Turns out, no one else had heard them either, because I went up to the cabinets and compressed them between my arms and the sound started changing dramatically every time i squeezed!
So did this work out for better or worse?
I do not do many builds. When I do, I hardly build anything like a battleship. For less complicated builds like the BIB and MLTL, I stuck them together with clear tub caulk.
But for the build of this compression chamber and the fact that it has to be assembled free form, I'll likely use the Titebond III recommended but only for that part.
For seal on a dry clamp job, some window insulation gives a nice draw-down. When ready to seal, it's removable.
I should have nearly all the parts ready to lay out pretty soon now.
The cuts are good and square and I think they will mostly self-level.
loninappleton said:
So did this work out for better or worse?
If I want to build a bad pair of bagpipes, I will do this in the future
 Seriously though, when I got around to gluing up, The sound changed dramatically.
How are you gluing up the CC, but allowing it to be removable? I don't understand?
For seal on a dry clamp job, some window insulation gives a nice draw-down. When ready to seal, it's removable.
Window insulation film: That's a really nice idea. Thanks!
- Status
- This old topic is closed. If you want to reopen this topic, contact a moderator using the "Report Post" button.
- Home
- Loudspeakers
- Full Range
- Harvey Builder's Thread