Tell me about it. Stunning.
I'll be delighted to hear them Marc. I know roughly what to expect from the sound, but it's always good to get confirmation -plus you only ever know about the details when you get to hear them in the wood, so to speak.")
In the back of an Escort? Hmm. You might manage it, with some cunning packing. I've had 70in tall BIBs & the prototype Harvey double horns in my 106 (just), although those are somewhat shallower of course.
I'll be delighted to hear them Marc. I know roughly what to expect from the sound, but it's always good to get confirmation -plus you only ever know about the details when you get to hear them in the wood, so to speak.
In the back of an Escort? Hmm. You might manage it, with some cunning packing. I've had 70in tall BIBs & the prototype Harvey double horns in my 106 (just), although those are somewhat shallower of course.
marce said:I was cogitating the build last night, and have decided on some structural engineering, involving cement sheets etc. Two main reasons, firstly obviousley to reduce resonances
but also, after the work you've all put in designing it, and the work Dave does in customising the drive units,
I'd be a bit apprehensive about cement board -- if properly braced (i may have to add that as mandatory in the drawing, instead of just the comment in the notes), cement board will take you in the wrong direction. An educated guess is that you'll end up with something dead sounding. Have you glued them up yet?
dave
marce said:And here's a pretty rendering of an FT17.
Does inventor not do bezier curves (ie curves are approximated with polygons?)
dave
Hi All,
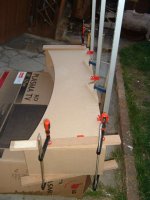
started final assembly the boxes, got one rear and one side in each cabinet glued up, so it finaly feels like I,m getting somewhere, though didn't get as much done as I hoped, some bits had to be re-cut. Final glueing up is so final I spent a good half day convincing myself I was ready to start.
Will get some more photo's sorted soon.
After talking to Dave I'm going to do some study on threads on bracing.
I worry about the flare of the Horn. At the moment it has just been rounded over with a roundover bit.
So again any info would be gratefully recieved. Also how the horn mouth should be lined, if it should.
Hi Dave, inventor does beziers. If you have a dwg of the horn mouth I could use that directly and revolve it
to create the horn mouth. I think putting the bracing on the drawings would be a great help to the end builder
especially those like myself with little experience, it helps avoid ambiguitys and mistakes.
I've printed out the whole of the "Another discussion on what to build loudspeakers of ..." so I shall digest
that over the next couple of days.
Having a proper Monday morning!!!
Cross with myself because as I said earlier had to re-do some pieces, and only because I rushed some parts
thinking I would save time and of course I hav'nt.
marce said:Cross with myself because as I said earlier had to re-do some pieces, and only because I rushed some parts
thinking I would save time and of course I hav'nt.
I know what that's like I have to cut some more to correct my mistakes on the Suzy Chang cabinet... should measure twice and cut once.
we are looking forward to your build. Pictures will be appreciated.
gychang
Hi, I hope to sort out some pictures soon, I'll try tommorow, depend what mood the IT dept is in as they have to get them of my camera, the kids have eaten the USB lead so I have to grovel.
Just had a phone call, my veneer has arrived, so now dying to get home to drool over it.
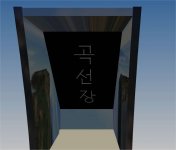
Just working on drawing up the Hangul text you so kindley provided GY. I'm thinking of putting it on the angled deflectors, verticaly. When I get it drawn up I'll post a picture.
When I get time I must learn how to do quotes! OxMike mentioned finish earlier, I am under strict orders to finish these cabinets before I put any drive units in! The finishing part is the part of anything I build that I realy enjoy. Its the part where all your effort and time start to come alive, so hopefully I'll give the speakers the finish they deserve.
Just had a phone call, my veneer has arrived, so now dying to get home to drool over it.
Just working on drawing up the Hangul text you so kindley provided GY. I'm thinking of putting it on the angled deflectors, verticaly. When I get it drawn up I'll post a picture.
When I get time I must learn how to do quotes! OxMike mentioned finish earlier, I am under strict orders to finish these cabinets before I put any drive units in! The finishing part is the part of anything I build that I realy enjoy. Its the part where all your effort and time start to come alive, so hopefully I'll give the speakers the finish they deserve.
This is my initial render of what I planned out over the weekend for the text GY provided me with. I am not shure what colour combination I will finaly go for, as the background is gonna be satin black, I will possibly do the text in a metalic pewter paint.
Going to get some of that plastic they use for stencils and actually cut it out by hand.
Plan to do it on all 4 deflectors.
Going to get some of that plastic they use for stencils and actually cut it out by hand.
Plan to do it on all 4 deflectors.
Attachments
marce said:At the moment it has just been rounded over with a roundover bit.
So again any info would be gratefully recieved. Also how the horn mouth should be lined, if it should.
That round over is as far as you want to go. The abrupt changes are part of the design. No lining in the horn mouths (they are actually BR ports)
inventor does beziers.
I only asked because the FT17 render had some decidely polygonal artifacts in it.
dave
G.Kennedy said:Hemptone FR8C in the Curvy Chang ???
My mind is swimming in a sea of Spawns, but i have the distinct impression that Scott did itemize how the Hamp Acoustics FR8c could be used in Chang. Scott?
dave
Hi Dave,
the artefacts are mainly due to manipulation of the origional image. Autodesk Inventor has two levels of rendering, the basic working display one (the one all these images are screen dumps of, hence some loss of detail, resolution etc) and a full blown rendering studio!!! I am still learning how to effectively use the full blown renderer.
Pause .....
Went away and had a quick play, just got to reduce it to be able to upload.
Done it, will discuss more on renders etc via a PM Dave, unfortenatly tea break over, goto work
Attachments

Personally I'd stick with the Fostex, for a variaty of reasons. There's a straight Chang on the Frugal pages specifically for this unit (no curved version though).
It can be used in the Fostex Curved Chang box by reducing the length of the slot vents to 50mm apiece. It won't give as much LF gain due to the higher Q and Vas, so I've changed the alignment to plump up the midbass a bit. The FR8c is gaining a reputation for a bright sound due to its rising response, which can't be corrected for with a back-loaded cabinet, so I'd get a zobel on it at the very least.
It can be used in the Fostex Curved Chang box by reducing the length of the slot vents to 50mm apiece. It won't give as much LF gain due to the higher Q and Vas, so I've changed the alignment to plump up the midbass a bit. The FR8c is gaining a reputation for a bright sound due to its rising response, which can't be corrected for with a back-loaded cabinet, so I'd get a zobel on it at the very least.


- Status
- This old topic is closed. If you want to reopen this topic, contact a moderator using the "Report Post" button.
- Home
- Loudspeakers
- Full Range
- Curvy Chang thread