Tried a hand adapter with some paint, sort of slops out and is hard to control, designed for a quite thick thixotropic liquid, bit like using a syringe, it started of ok they got a bit tough, applied more pressur, then more then splat, production engineer still scratching his head as to how is hand dispenser has paint all over it.
marce said:I dont think I got the offset quite right, what I did was measure my centre line and use that to line up one edge of the braces, so I think I've only offset half of the material thickness, which now worries me a bit as I have a panel supported by an edge down its center line !
That is how i do it...
Colour choice, Hmmm
High contrast between the cone and the pattern, would be my choice, black cones gold pattern would be my first choice,
I posted that question before i thought. The black (at least most of it) will be going on over top of the EnABLE pattern, so will obscure whatever colour the EnABLE is at least somewhat. I'll have to do some experiments to see what happens (we are in uncharted territories here)
dave
OzMikeH said:The great thing about the solder paste
Would it withstand (and hold) the gloss coat over it?
dave
Dave,
I have used my usual clear flat acrylic paint with a flat black acrylic wall paint overcoat, on the front baffle surfaces of my personal speakers, for years. The boxes are prefabbed and sealed with a commercial material with high gloss and no oder, so I assume polyester resin.
Point being that any overcoat seems to act as a boundary layer enhancement and the pattern works just as well under it as it does when applied and left uncovered. At least on wood baffles, which to my mind are just thicker extensions of the voice coil to air transformer we call speaker cones.
Bud
Hi Dave,
whatever works best sonicaly, comes first.
I was looking at some of the more extreme examples of art deco furniture where the parts (in one case red and yellow) and color scheme/finish screem yuk!, yet somehow they gell to create a pleasing finished article. With the enable pattern visible espec in black'n'white, I was envisioning a sort of Briget Riley Art Deco hybrid design.
A possible problem with solder pastes may be the flux that is part of the mix when applied, I would worry what effect even the mildest of fluxes may have on surfaces. As to varnishing them, I think if the first coat over the pattern was applied without physical contact of the applicator (say dripped out of a pipette) it may be possible.
Art Deco = a Very Good Thing IMHO. Love it. If they could make things attractive back in the 1920s & 30s, one wonders why we so often seem to be unable to do so nowadays. A taste thing I suppose. I blame the brutallist architecture of the 1960s (although admittedly that could work if it was properly implemented. Pity it rarely was).
I agree on the architecture, having attended one of Mr wilsons show case modern comphrehensive schools (Colne Valley High School)
an abomination of Glass, steel and asbestos!
I think Art-Deco's feel is that it is from an age where modern industrialisation was begining yet there was still craftsmen, furniture had a mixture of curves
with hints of the more rigid square shapes that were apearing with the first autmation of assembly techniques. Interestingly if you look at industrial design,
it isn't till the addaption of 3D moddelling that has allowed us to manipulate and manufacture curved surfaces that modern appliances, commercial speaker cab etc
have changed from simple geometric squares circles to the now called ergonomic shapes. Maybe in the future 90's designs will be reffered to as Art-ergo.
Hopefully on monday I will have the cabinets finaly glued up, I finished all the stuffing last night and got most of the cabling done so I've no more excuses.
Finishing will be interesting, as thanks to Daves link to MJL21193's thread, gloss black is back on the menu, now I now I can get that finish using water based products.
Have a good weekend around the world, I'll report back monday.
Finishing will be interesting, as thanks to Daves link to MJL21193's thread, gloss black is back on the menu, now I now I can get that finish using water based products.
Have a good weekend around the world, I'll report back monday.

Got one cabinet fully glued up and one ready to glue up tonight, the curved braces for the sides to add.
It was quite an encouraging weekend as all off a sudden there was two almost finsihed cabinets, all wired up, foam filled behind the deflactors etc, just got to sand and paint (theres an awful lot of painting) instead of piles of wood and bits. Again I have photographed the details etc and will update with pictures in a couple of days.
Must admit I now cant wait to hear them, that 8" cut out looks quite menacing next to a FE166.
Marce, I had a look at your sketch of the steel baffle. Was that dimensioned so the outside is the right size or so the inside is the correct volume?
What do you think of using 1.6mm brushed stainless, stick 18mm panels of plywood on the flat sheet with silicone with gaps in the areas to be bent. After the silicone has cured clamp either side of the gap and bend it by hand, the plywood backing can be used to stick to the side panels of the cabinet.
Stainless is quite springy and should give a nice smooth bend.
Edit: Spoke with my old boss, a sheetmetal guru. He suggests 0.6mm stainless bonded to the ply with contact cement and clamped to death during curing so it doesn't show any lumps or wrinkles.
Attatched marce's brilliant sketch.
Attachments
Hi OzMike,
sorry at the moment no e-mails, intermittent internet.
Did some thinking and a bit more engineering on the steel Curvey Chang, and some reading up on sheet metal design within Inventor.
I have been playing and reading the origional thread that got me thinking, and playing around. I'm redrawing the baffle section using two sheets of aprox 14ga (2mm) with a 12mm gap inbetween, the plan being to use 12mm Au for braces, a 12mm speeker support made out of ply (similar to the lock block on carboard core doors), and the rest of the gap filled with expanding foam, adhesive tape Dow Betamate 4601. This would then provide a much more ridgid structure to mount the speaker, and hopefully have less resonance, or should I say harder to excite. This would also mean that the curve etc which Ron did would not have to be re-calculated etc as it keeps everything nearer the origional dimensions. Could possibly get away with thinner SS with this method, then some realy nice ply sides (archetectural grade) would look quite cool. I'll change some parameters etc and try and get a rough drawing done.
I am realy doing this as an exercise to learn how to use the "sheet metal" option as it has a built in flattening command which I think may be useful in flattening cone patterns to make templates for EnABLE, but having done some initial drawing have realised it it a much simpler build.
Real Curvey Chang build info will be here Thursday (I've ordered the bits for downloading pics of my camera, so I can update reguraly instead of relying on others to download my pics.
My appologies to the Moderators about going off track a bit.
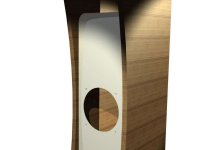
Quick play at what OzMike is proposing, Think it would be an interseting experiment gives a modern 'industrial' look.
Attached a render for you Mike, haven't done the top and back as to get the correct look the laminations on the ply are built up one by one.
Must draw some FE drivers, once I've approximated one the others should scale up and down.
Attached a render for you Mike, haven't done the top and back as to get the correct look the laminations on the ply are built up one by one.
Must draw some FE drivers, once I've approximated one the others should scale up and down.
Attachments

marce said:Quick play at what OzMike is proposing, Think it would be an interseting experiment gives a modern 'industrial' look.
Attached a render for you Mike, haven't done the top and back as to get the correct look the laminations on the ply are built up one by one.
Must draw some FE drivers, once I've approximated one the others should scale up and down.
wow!, very interesting.
since I want to save my back, how about "metal film" just glued on??
http://www.alsacorp.com/products/sheetingfx/shfx_video.htm
gychang
Attachments
marce said:
Sounds a bit expensive; wouldn't it look blingier if you plated the gold on the outside?
Aengus
the plan being to use 12mm Au for braces
Sounds a bit expensive; wouldn't it look blingier if you plated the gold on the outside?
Aengus
Pretty cheap if you use the stainless sheet as a cladding over ply.
The stainless is only structural on the curved corners which could be foam filled anyway. I have been told 0.6mm sheet of stainless is only about a hundred bucks.
The walnut finish on the wood looks good.
The stainless is only structural on the curved corners which could be foam filled anyway. I have been told 0.6mm sheet of stainless is only about a hundred bucks.
The walnut finish on the wood looks good.
- Status
- This old topic is closed. If you want to reopen this topic, contact a moderator using the "Report Post" button.
- Home
- Loudspeakers
- Full Range
- Curvy Chang thread