Time for a beer.


I'll drink to that.
The holes in the coax chamber worked well? Any stuffing in there now?
Any plans on dressing them up a bit? That plywood can look pretty good with some attention - I actually did a finished floor with it a while back that turned out nice.
Attachments
Thanks Michael.Hurray!!
")
Yes, I expanded it another ring so there are 60 holes. No sign of the boxy sound I was worried about. More testing later though.I'll drink to that.
The holes in the coax chamber worked well?
Yes, all around and across the holes. I used 2X4 wall insulation and split it in half.Any stuffing in there now?
No, I only build "industrial" boxes so if they end up in someone else's hands they can do the honours.Any plans on dressing them up a bit?
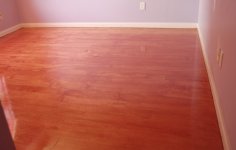
That looks better than nice, you are being modest. You ripped into planks and T&G'd it?That plywood can look pretty good with some attention - I actually did a finished floor with it a while back that turned out nice.
No, I only build test boxes so if they end up in someone else's hands they can do the honours.
That looks better than nice, you are being modest. You ripped into planks and T&G'd it?
See, that's the majority of the fun for me, trying to make them look good. The better they look, the better they sound.
I did the same with my main speakers (opened the back of the mid chamber) and found it needed some stuffing as well. Good to have the flexibility of an active system to fine tune the response.
Thanks again Cal! The strips were ripped square edge and face nailed (with brads) and glued to the plywood subfloor. A lot of work to finish but worth it in the end.
They train Canadian inspectors in Seattle?
Least we are still exporting something
Looks good CalHad a little time today so I loaded the boxes into the truck and took them to the old place and had a go at 'er. Pics of the insulation and then assembled and hooked up. Comments coming up soon. The honey-do list was neglected today so I'm in hiding. She thinks I'm in the bathroom.
Cheers.
OK so now for some thoughts:
All in all I am very pleased.
And that is all that matters !! I'll tip one with that!!
CheersOK so now for some thoughts: ---{{{SNIP}}}---All in all I am very pleased.
Time for a beer.
Cal,
Delighted to hear you're enjoying them so much and your labor provided you with some serious fruit to now enjoy!
Thetubeguy1954 (Tom Scata)
==================================================
"The man that hath no music in himself nor is not moved with concord of
sweet sounds is fit for treasons, stratagems and spoils."
- William Shakespeare
Thanks for the comments guys. I have found something I like. Being fully active makes dialing these things in rather easy. A couple twists of the knobs and voila; audio satisfaction.
Now what am I going to do with these? My speaker room is full and the next project is on deck.
Now what am I going to do with these? My speaker room is full and the next project is on deck.


Regarding the holes I think it is an opportunity for you to experiment. You could try covering some holes with a piece of plywood on the outside- easy to move it to cover more or less.. Maybe drill the whole area first, then cover more or less to compare. Although it seems that you are pretty pleased as it is..
Then if there are extra holes you could just cut a panel to cover them , leaving a cutout in the middle for the remaining holes. Would stiffen the area, so a net improvement in any case.
Then if there are extra holes you could just cut a panel to cover them , leaving a cutout in the middle for the remaining holes. Would stiffen the area, so a net improvement in any case.
- Status
- This old topic is closed. If you want to reopen this topic, contact a moderator using the "Report Post" button.
- Home
- Loudspeakers
- Multi-Way
- Cal's next venture