I never liked the screw tab on the LM3886, they're pretty badly designed to give good uniform pressure.
True. It's more of a triangular distribution of the pressure than a uniform one. That said, you can easily get to the pressures needed for low thermal resistance of the thermal pad even with the factory package.
That said, geeking out in the thermal system is certainly one of the better places to geek out.
Added kapton tape on the bar on the PCB side to avoid any possible shorts.
Probably a good idea.
I like the module setup you have going. I like that you put the Guardian-686 on the heat sink. That's become my favourite mounting method as well.
Tom


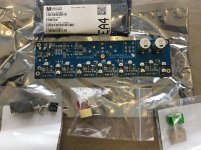
New Mod686 board for sale within EU
Hi there.
I have a spare brand new Mod686 board (20dB version) including components (Neurochrome, Mouser) for sale to be shipped without sales tax or shipping costs within the EU / Switzerland.
See here for details.
Neurochrome Mod686 Brand New shipped within EU
PM me if you are interested or have questions.
BR
BTW. Thanks Tom for letting me post here.
Attachments
Hi Do,
Good to see progress happening on the Mod-686 build!")
I know I'm not very fast but it's coming along!
I like the module setup you have going. I like that you put the Guardian-686 on the heat sink. That's become my favourite mounting method as well.
Thanks! Yes, it also makes it cleaner for the cabling.
Do, very tidy and methodical work - can't wait to see the final result.
Thanks! I will make sure to post pictures as my build progresses.
I wish the RCA connector holes on my backplate were not already drilled when the chassis was bought... I find them too close to the AC on the ISS module... Maybe I will turn the 4 positions connector to the inside so cables going to the transformer stay away from the RCA jack...
I wish the RCA connector holes on my backplate were not already drilled when the chassis was bought... I find them too close to the AC on the ISS module...
Yeah... It would have been nice with the RCAs on the other side of the XLRs.
I also prefer the speaker binding posts to be 3/4" centre-to-centre and side-by-side rather than one atop the other. It puts less torque on spade terminals and such. But that's me.
Maybe I will turn the 4 positions connector to the inside so cables going to the transformer stay away from the RCA jack...
That's worth a try. The connector footprint is asymmetrical so it may not work, but you can always solder the connector on last and see if it'll fit in that orientation. There are also 45º and top entry connectors that'll likely fit that footprint. Those could help (assuming they fit).
Tom
Do,
How tall are the heatsinks you are using? 3U or 4U?
142mm, so roughly 3U
Thanks
Do
Those should work. At 12 A rating per terminal, they're certainly plenty beefy.
Tom
Installed them. They worked beautifully and keep the wire at a good distance now.
Installed them. They worked beautifully and keep the wire at a good distance now.
Do,
Can you share an image please?
Always good to learn about practices that can keep the wiring well connected and tidy!
Do,
Can you share an image please?
Always good to learn about practices that can keep the wiring well connected and tidy!
Sure, I'll do this shortly.
I fitted everything in the chassis and made an aluminum plate to hold the two SMPS for the amp. All that is needed now is power cabling, everything else is done.
Ciao!
Do
Which SMPS did you go with?
Hi Tom,
The SMPS800 that you had suggested. I recapped them completely since only the output caps were of good quality. The cheap Chinese caps were still working properly but for the long run, it is better to use quality caps.
Cresnet uses only quality caps in his designs. All the SMPS I got from him had reputable brands. I still have a few of his SMPS but they are higher voltage and are reserved for other projects.
Today I will test the amp with a scope and output some sinus and square wave before I plug it into the speakers. I will post pictures of the final build shortly.
All the best!
Do
Has anyone that's using the SMPS300RE from Connex happened to measure it's switching frequency, or seen this info published anywhere, by any chance? I haven't been able to find anything in the way of an actual data sheet and couldn't find this info posted on the website anywhere. I'd appreciate any help.
- Home
- Vendor's Bazaar
- Modulus-686: 380W (4Ω); 220W (8Ω) Balanced Composite Power Amp with extremely low THD