Nice update.
Over the holiday, I installed a Dayton IB385-8 Infinite Baffle Subwoofer in my living room. I was initially planning to put it in the fireplace, using the chimney as the back port, but modeling with TL suggested that was not a good idea. So I installed it in a trap door that goes outside to a covered firewood cabinet. It's working great in that configuration, and the Wife Acceptance Factor is much better than the fireplace-mount 🙂
Over the holiday, I installed a Dayton IB385-8 Infinite Baffle Subwoofer in my living room. I was initially planning to put it in the fireplace, using the chimney as the back port, but modeling with TL suggested that was not a good idea. So I installed it in a trap door that goes outside to a covered firewood cabinet. It's working great in that configuration, and the Wife Acceptance Factor is much better than the fireplace-mount 🙂
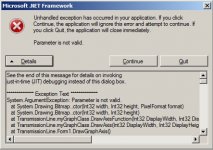
Unhandled exception
I just got an unhandled exception while clicking in the SPL window with the intention of showing some cursor lines. Usually if I click Continue the dialog will go away and I can proceed, but this time the exception just kept coming back.
The details were:
System.OverflowException: Arithmetic operation resulted in an overflow
at TransmissionLine.myGraphClass.DrawCursorLine(Point MousePosition, PictureBox& DisplayBox)
at TransmissionLine.Form1.GraphCursorLines(Point Mouse, PictureBox& myDisplay, myGraphClass& Graph)
at TransmissionLine.Form1.GraphMouseMove(Object sender, MouseEventArgs e)
at System.Windows.Forms.Control.OnMouseMove(MouseEventArgs e)
at System.Windows.Forms.Control.WmMouseMove(Message& m)
at System.Windows.Forms.Control.WndProc(Message& m)
at System.Windows.Forms.Control.ControlNativeWindow.OnMessage(Message& m)
at System.Windows.Forms.Control.ControlNativeWindow.WndProc(Message& m)
at System.Windows.Forms.NativeWindow.Callback(IntPtr hWnd, Int32 msg, IntPtr wparam, IntPtr lparam)
In the status bar at the bottom of the window, it says:
Freq: 0 Hz Value: [Infinite Baffle = 0] [Driver = 0] [Terminus = 0] [System = 0]
The only way to get the exception to stop was to move the exception dialog box out of the SPL window before dismissing it - and then it would reappear as soon as I moved the mouse cursor back into the SPL window, even without any mouse clicks.
I wonder if DrawCursorLine could be dividing by 0?
Aha, here's the clue that should make solving the problem easy!
The exception only happens if the SPL window "Terminus" check box is checked and the enclosure has no open-ended elements. If I uncheck Terminus, the problem goes away and the line cursors appear normally, or if I open-end an element and check Terminus, all is well.
The exception only happens if the SPL window "Terminus" check box is checked and the enclosure has no open-ended elements. If I uncheck Terminus, the problem goes away and the line cursors appear normally, or if I open-end an element and check Terminus, all is well.
I had the same thing happen. 🙁I just got an unhandled exception while clicking in the SPL window with the intention of showing some cursor lines. Usually if I click Continue the dialog will go away and I can proceed, but this time the exception just kept coming back.
I've also had trouble zooming in close on a figure to get the the sides of the elements aligned. If you get too close, the display goes white, and you can't get the figure back no matter how much you zoom. Closing the program doesn't help, I had to restart the computer. Even then it opened with a white window for the default. I was able to zoom out and find the figure, however.
I think some sort of button that restored the display would be a good feature.
... So I installed it in a trap door that goes outside to a covered firewood cabinet. ...
Something like this? 🙂
Infinite Baffle Subwoofer
Wow. When you aren't listening to it, you could use that setup to kill small animals, or at least drive them from the house in abject terror 🙂
My IB sub is nothing special, just a single 15" Dayton IB 385-8. The only thing interesting about it is that I clamped the magnet between two-by-fours and screwed that to the frame of the house so the baffle vibrates less.
It's loud enough and then some with a 200W amp. The room entry point is very near a corner. The only room mode that it seems to excite is the primary resonance of the 35' length of the long narrow room, so there is a 30 Hz peak to deal with. So far I haven't bothered to eq-out the peak, as it is too low to affect the balance of most music. For movies, it's sort of fun having the extra zip to the LF effects.
Now I can't find the figure at all, even with reboots. Do you think if I removed the program and re-installed it, I'd get it back?
Trouble is, without the figure there's no longer any way to select elements, so the program has become useless. 🙁
Trouble is, without the figure there's no longer any way to select elements, so the program has become useless. 🙁
Wow. I hope you don't have neighbors (and have updated your earthquake insurance)?
Hi, that's strange, I have the program running normally, I can maximize and minimize the figure w/o any problem...
Every saved project re-opens normally as well...
Every saved project re-opens normally as well...
Hi,
I get an error to when minimising and maximising, but can continue without problems. Running win7 64bit.
I get an error to when minimising and maximising, but can continue without problems. Running win7 64bit.
Attachments
Last edited:
I got the figure back by re-installing, but now I can't drag it.
I've had errors when minimising the program as well.
I've had errors when minimising the program as well.
Hi,
I get an error to when minimising and maximising, but can continue without problems. Running win7 64bit.
Yep. Same here. 64bit Windows 7. Mine is a laptop at 1366 X 768.
Hi Schmeet,
Are you still working on this excellent piece of SW? Hope you are 😀
I would still love to see an option that allows to sim filters (HP, LP, LT, ..)
Are you still working on this excellent piece of SW? Hope you are 😀
I would still love to see an option that allows to sim filters (HP, LP, LT, ..)
Hi Mark,
I do intend to keep working on it. i have just been extremely busy since Christmas.
Hopefully I can start developing it again sometime soon....
I do intend to keep working on it. i have just been extremely busy since Christmas.
Hopefully I can start developing it again sometime soon....
I was an early adopter, having downloaded the program within a couple of hours of it's introduction in post 1 of this thread. Later the same day I posted links and a strong recommendation in other forums to get the word out. My favorite aspects were the super simple intuitive functionality and how incredibly fast (compared to similar programs) that a simulation could be set up and run in basic mode. Although it lacked variable port location (to simulate mltl with variable port location) I was incredibly excited about this software.
When the basic mode was removed I felt alienated since I felt that the basic mode had enough functionality for most of my transmission line simulation needs and felt that the advanced mode was unnecessarily complex and decidedly unfriendly for beginners to use, and for that reason I went back and retracted by previous strong recommendations. At that time I mostly lost interest in this thread and the tl.app.
It was a few months before I revisited this thread and found that both of my previous requests had been fulfilled in my absense. The program could now auto update, rendering the incredibly annoying "update" button unnecessary, and it was now possible to add a front chamber so that front loaded horns could be simulated! Very exciting news indeed, and because of this I decided to give tl.app another chance despite the lack of a basic mode.
So I read through the whole thread and downloaded the latest version and to say I am extremely impressed is an understatement. You can now accomplish design changes by dragging visual elements in a schematic drawing! Are you kidding me?!? This is truly some next generation stuff, incredibly impressive. I always wondered when someone was going to do this. Not only that, but the program is now so ridiculously easy to use that there's no point in having a basic mode. I didn't even need instructions to use most of the features.
This program is no longer a simple transmission line simulator, it's become a very robust general quarter wave simulator. Some of it's unique features are quite brilliant and the app has the potential to become legendary.
Having said that, the program is still missing a couple of little features, which if included would allow me to stop using Akabak completely and make tl.app my primary simulator for most of my needs. It doesn't make sense to try to bundle every single feature that all the other similar programs provide but with a few small additions and modifications this simulator could be even more useful and user friendly than it already is.
(I haven't verified accuracy of front loaded horn simulations yet but I have no reason to believe I'll be disappointed.)
This is my wishlist in order of importance. (Almost all of these features have been requested previously by other people so I don't feel too bad about asking.)
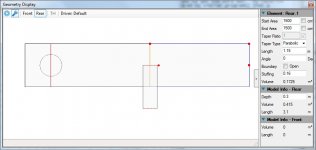
1. Ability to easily move the driver around.
This would require the ability to slide and resize adjoining branch lengths in the same way you can slide and resize elements OR the ability to create an offset driver with segments instead of branches.
In the pic below, the segment split line that defines the port location in this mltl is orange, so the port can be dragged anywhere between the driver location line and the far end of the mltl. I would like to be able to move the driver around in the same fashion without having to manually edit the lengths of both segment 1 and segment 2.
As far as I'm concerned this is incredibly important, otherwise it's still easier to use MJK's worksheets for mltl simulation, which is by far the most common alignment I simulate. I regularly go through 100 or more iterations of driver and port location to find the best spot, the reward for which is nearly ruler flat response with very little stuffing required.
2. Include the ability to apply high and low pass filters.
Ideally, user could select any of the most popular filter types they would be likely to encounter in popular electronics with any slope from 6 - 24 db/oct and possibly even steeper.
3. Include a "multiple speakers" option.
Selecting this option would give the user the option to specify how many speakers the system is comprised of (like a stack of multiple horns for example) and use the number of speakers as a multiplier to internally increase the number of drivers and cross sectional area of each segment.
4. Allow for alternate boundary conditions.
In addition to the default 2 pi boundary condition, it would be nice to also have the option for 1 and 0.5 pi boundaries. I personally don't ever use 4 pi but some people might find it useful.
5. Allow for more taper types.
It would be nice to have the option to select any of the popular flare types, but that may be beyond the scope of the author's intent. I'd like to at least see the option for hyperbolic exponential flare with the ability to specify the flare T. This feature would only appeal to the horn lovers but it sure would be nice.
6. Modify "always on top" behavior of the auxilliary windows.
I'm using a laptop with limited screen resolution and it's impossible to modify the enclosure geometry and see the main window graph at the same time without making both windows impractically small. I have to either close the geometry display window or manually drag it out of the way to see the response graph every time I make a change. Please change this, or at least make "alway on top" a user selectable option.
7. Include a zoom option for users that don't have a mouse.
As I mentioned, I'm using a laptop and as far as I can tell there's no way for me to zoom the geometry display in or out. I'm not going to buy a mouse just for this purpose.
8. Reset the progress bar when task is complete.
The bar at the bottom of the main window is always green when not in use. It should reset to white upon completion of a task.
Attachments
Last edited:
just-a-guy, thanks for your kind words and I'm glad that you have found that the new GUI is easier to use.
I still haven't found time to get back to developing this but I am excited about doing so again. It's been a little while since I have done any coding on this project so I hope it doesn't take much to get back into it.
Life is really hectic at the moment, but I'm hoping to get back on with this project in a month or so.
Fingers crossed..
Pete
Odd behavior report
Most of the time this feature works flawlessly but sometimes it doesn't. It's almost but not completely random when it fails. Sometimes you can simply "undo" and try again and it will work, sometimes it won't. Sometimes it will fail repeatedly no matter how many times I try to "undo" and try again. Sometimes closing the program, opening it again, and trying again will make it work, but sometimes not.
I realize it's not supposed to work unless the adjoining segment ends are exactly the same csa and I've verified that this is not the cause of the issue I'm experiencing, I've made sure to verify that it randomly fails to work even when adjoining segment csa's are identical.
There is one situation I've identified where I can get it to fail about 90 percent of the time. I open the program with the default reverse taper tl loaded. In the geometry display window, I split the single segment into two segments. I use the orange line to change the segment lengths, making one end longer but the other shorter while maintaining the same total length. Then I press CTRL and adjust the csa at the point that the two segments meet. Approximately 9 times out of 10, only the active segment's csa will change, but 10 percent of the time it will adjust both segments like it's supposed to.
I almost didn't bother to mention this since it's easy enough to adjust both segments manually but I thought you might be interested.
And the last update is one I think will help significantly. When you resize an element with the Length Tool 'Handle', if you hold CTRL then it will alter the Start Area of the element in order to maintain the same Flare Constant.
Most of the time this feature works flawlessly but sometimes it doesn't. It's almost but not completely random when it fails. Sometimes you can simply "undo" and try again and it will work, sometimes it won't. Sometimes it will fail repeatedly no matter how many times I try to "undo" and try again. Sometimes closing the program, opening it again, and trying again will make it work, but sometimes not.
I realize it's not supposed to work unless the adjoining segment ends are exactly the same csa and I've verified that this is not the cause of the issue I'm experiencing, I've made sure to verify that it randomly fails to work even when adjoining segment csa's are identical.
There is one situation I've identified where I can get it to fail about 90 percent of the time. I open the program with the default reverse taper tl loaded. In the geometry display window, I split the single segment into two segments. I use the orange line to change the segment lengths, making one end longer but the other shorter while maintaining the same total length. Then I press CTRL and adjust the csa at the point that the two segments meet. Approximately 9 times out of 10, only the active segment's csa will change, but 10 percent of the time it will adjust both segments like it's supposed to.
I almost didn't bother to mention this since it's easy enough to adjust both segments manually but I thought you might be interested.
I have set the +/- buttons to do zoom. Hopefully you have a numpad on your laptop?7. Include a zoom option for users that don't have a mouse.
As I mentioned, I'm using a laptop and as far as I can tell there's no way for me to zoom the geometry display in or out. I'm not going to buy a mouse just for this purpose.
I have set the +/- buttons to do zoom. Hopefully you have a numpad on your laptop?
Unfortunately no. I tried shift and + symbol but it doesn't work.
- Home
- Design & Build
- Software Tools
- Transmission Line Modelling Software