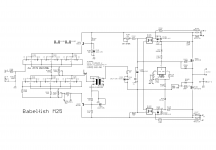
Yup, improved iteration of previously made Babelfish M25
Who remembers - 'twas bstrdzd FW M2 with implementation of XA25 main trick - Square Law arrangement of OS mosfets, in simpler words - mosfets in OS put to work without source resistors
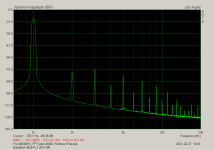
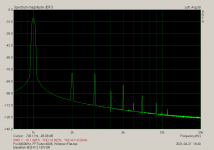
Result - looooow THD of OS, but main difference being broader A Class envelope , most prominent in context of 4R load - where regular M2 is KlunK!ing around 12-13W, while B. M25 doing the same around 40W ...... rest to max being KlunK!
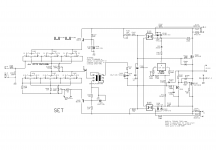
This pcb made for easy implementation of Schade arrangement for one OS mosfet, arbitrary chosen to do that with lower one, even if that is making some problems with choice of small mosfet for source follower/level shifter ....... I need one with lower Ugs treshold ( it adds to Schaded mosfet Igs) , and P channel small mosfets with that are scarce, somewhat
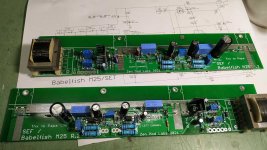
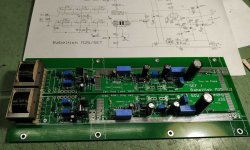
Anyway, find enclosed both schmtcs, full one ( all parts on pcb populated) for SET (Schade Enhanced Thingie) and second - few parts omitted - for Babelfish M25 R.2
note - slight tweaks of THD Spectra, for one's Golden Ears, possible with change of output mosfets - down one can use either IRFP9140 or 9240, up can go IRFP240 or 150
about that later
reminder - extensive ( if crude) explanation of biasing mechanismus posted in LuDEF thread , posts #32-#37, LuDEF
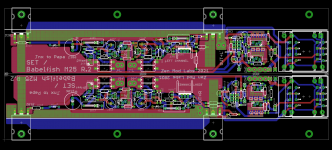
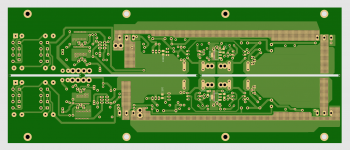
Today - all files for Babelfish M25 R.2 ; anyway - read captions - each file is properly named and have caption
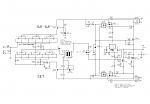
edit on 28.04.2021. - SET amp presented from post #20, there is also full proper schematic pic (here just funny non-working thumbnail)
edit on 13.09.2021 - few general setting procedure tips and tricks:
procedure applies to both Babelfish M25 R.2 and SET amp; as seen from schematics, difference in circuit is small; if you need help how to arrange shortie/jumper for signal path in Babelfish M25 when few SET parts are missing - buzz .... in fact - I'll make few ics tomorrow ( I hope) and put here , showing exactly that missing piece of info
-will not teach ya how to solder everything properly - as always -Assembly of Japanese Bicycle Require Great Peace of Mind
-prior to powering up, be sure that you have trimpots set properly:
P102 (P202) - irrelevant
P101 (P201) - set to max; confirm with ohmmeter across R104 - in vicinity of 28R
P103 (P203) -irrelevant
P104 (P204) - set to min ; confirm with ohmmeter - improvise where to put probes
- jumpers JP101/201 - open/not mounted
-as always - best to work with one channel connected to PSU at time; in fact - first step just one channel , in second step - you can freely leave powered/connected already set first channel
- one VMeter across output ( DC offset) , second VMeter across any of current sense 0R22 resistors; use mini-clips/probes
- no load on output, input shorted to GND
- power up thingie; observe DC offset - it will rise slowly and everything up to several volts is normal in this moment
observe VMeter across 0R22 resistor - it will be Dodo reading for some long time; after 60-90-120sec - if you don't see any substantial reading , start fiddling with P104 (P204), one turn at time; of course - you did remember where you rotate itr to set to min value, now rotate in counter direction; - don't ask me which - I don't care, I can't remember, simply because I'm always trusting in DMM, not in my memory how to orient damn trimpot to have screw in proper place ....... and my logic what needs to be decreased and what needs to be increased is always ooked, vs. overall consensus
allow 30sec or so between 1-turn steps, to observe when and how much mV you're getting across 0R22
goal is , , say for 1A5 of Iq - 1A5 * 0R11 = 165mV
keep fiddling to get mV creeping up, and once when you see steady rise for each turn, set da thingy to - say 140mV
once when you're there - fiddle with P103 to get as close to 0mV of output DC offset
that would be preliminary setting of OS, now to input buffer setting :
- power off , put mVmeter across R106(206) test pins ; put second mV meter on jumper pin marked "B" and GND
power on, fiddle with P101 to set 20mV across R106(206) ; done - fiddle with P102(202) to set as close to 0mV for buffer output offset ( second
mVmeter) ; when done - power off, close jumper
*************** connect second channel to PSU, repeat entire procedure******************
when done with both channels , power on , re-set Iq of both channels to have 1A5 or more ( there is really no need for more - Square Law OS is crazy thing, but do what's shaking your cage most) somewhere in temp equilibrium, check output DC offset
slide of both Iq and DC offset - cold vs. hot - is really minimal, but I'm mentioning thermal equilibrium more thinking of importance of final temperature of heatsinks - observe, observe also temperature of output mosfets , that will give you info/confirmation how good and uniform is thermal interface between mosfets and heatsink
**************
when done, connect signal, speakers, flip da switch, and enjoy
don't forget Da Porn - no Porn, no Glory

Who remembers - 'twas bstrdzd FW M2 with implementation of XA25 main trick - Square Law arrangement of OS mosfets, in simpler words - mosfets in OS put to work without source resistors
Result - looooow THD of OS, but main difference being broader A Class envelope , most prominent in context of 4R load - where regular M2 is KlunK!ing around 12-13W, while B. M25 doing the same around 40W ...... rest to max being KlunK!
This pcb made for easy implementation of Schade arrangement for one OS mosfet, arbitrary chosen to do that with lower one, even if that is making some problems with choice of small mosfet for source follower/level shifter ....... I need one with lower Ugs treshold ( it adds to Schaded mosfet Igs) , and P channel small mosfets with that are scarce, somewhat
Anyway, find enclosed both schmtcs, full one ( all parts on pcb populated) for SET (Schade Enhanced Thingie) and second - few parts omitted - for Babelfish M25 R.2
note - slight tweaks of THD Spectra, for one's Golden Ears, possible with change of output mosfets - down one can use either IRFP9140 or 9240, up can go IRFP240 or 150
about that later
reminder - extensive ( if crude) explanation of biasing mechanismus posted in LuDEF thread , posts #32-#37, LuDEF
Today - all files for Babelfish M25 R.2 ; anyway - read captions - each file is properly named and have caption
edit on 28.04.2021. - SET amp presented from post #20, there is also full proper schematic pic (here just funny non-working thumbnail)
edit on 13.09.2021 - few general setting procedure tips and tricks:
procedure applies to both Babelfish M25 R.2 and SET amp; as seen from schematics, difference in circuit is small; if you need help how to arrange shortie/jumper for signal path in Babelfish M25 when few SET parts are missing - buzz .... in fact - I'll make few ics tomorrow ( I hope) and put here , showing exactly that missing piece of info
-will not teach ya how to solder everything properly - as always -Assembly of Japanese Bicycle Require Great Peace of Mind
-prior to powering up, be sure that you have trimpots set properly:
P102 (P202) - irrelevant
P101 (P201) - set to max; confirm with ohmmeter across R104 - in vicinity of 28R
P103 (P203) -irrelevant
P104 (P204) - set to min ; confirm with ohmmeter - improvise where to put probes
- jumpers JP101/201 - open/not mounted
-as always - best to work with one channel connected to PSU at time; in fact - first step just one channel , in second step - you can freely leave powered/connected already set first channel
- one VMeter across output ( DC offset) , second VMeter across any of current sense 0R22 resistors; use mini-clips/probes
- no load on output, input shorted to GND
- power up thingie; observe DC offset - it will rise slowly and everything up to several volts is normal in this moment
observe VMeter across 0R22 resistor - it will be Dodo reading for some long time; after 60-90-120sec - if you don't see any substantial reading , start fiddling with P104 (P204), one turn at time; of course - you did remember where you rotate itr to set to min value, now rotate in counter direction; - don't ask me which - I don't care, I can't remember, simply because I'm always trusting in DMM, not in my memory how to orient damn trimpot to have screw in proper place ....... and my logic what needs to be decreased and what needs to be increased is always ooked, vs. overall consensus
allow 30sec or so between 1-turn steps, to observe when and how much mV you're getting across 0R22
goal is , , say for 1A5 of Iq - 1A5 * 0R11 = 165mV
keep fiddling to get mV creeping up, and once when you see steady rise for each turn, set da thingy to - say 140mV
once when you're there - fiddle with P103 to get as close to 0mV of output DC offset
that would be preliminary setting of OS, now to input buffer setting :
- power off , put mVmeter across R106(206) test pins ; put second mV meter on jumper pin marked "B" and GND
power on, fiddle with P101 to set 20mV across R106(206) ; done - fiddle with P102(202) to set as close to 0mV for buffer output offset ( second
mVmeter) ; when done - power off, close jumper
*************** connect second channel to PSU, repeat entire procedure******************
when done with both channels , power on , re-set Iq of both channels to have 1A5 or more ( there is really no need for more - Square Law OS is crazy thing, but do what's shaking your cage most) somewhere in temp equilibrium, check output DC offset
slide of both Iq and DC offset - cold vs. hot - is really minimal, but I'm mentioning thermal equilibrium more thinking of importance of final temperature of heatsinks - observe, observe also temperature of output mosfets , that will give you info/confirmation how good and uniform is thermal interface between mosfets and heatsink
**************
when done, connect signal, speakers, flip da switch, and enjoy
don't forget Da Porn - no Porn, no Glory
Attachments
Last edited:


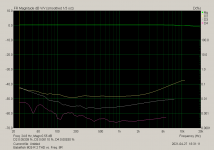
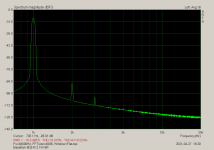
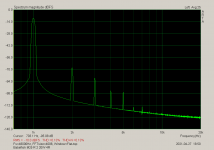
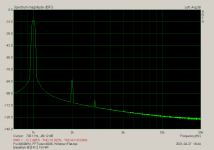
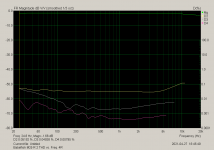
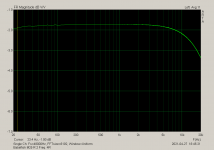
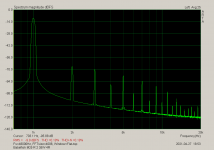
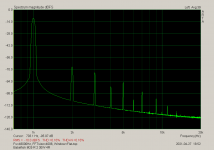
measurements , 8R Load
rails +/-24Vdc, Iq 1A5
rails +/-24Vdc, Iq 1A5
Attachments
-
 Babelfish M25 R.2 THD vs. Freq. 8R.png48.7 KB · Views: 280
 -
 Babelfish M25 R.2 Freq. 8R.png46.2 KB · Views: 345
 -
 Babelfish M25 R.2 25W 8R.png38 KB · Views: 369
 -
 Babelfish M25 R.2 20W 8R.png36 KB · Views: 353
 -
 Babelfish M25 R.2 15W 8R.png34 KB · Views: 339
 -
 Babelfish M25 R.2 10W 8R.png32.9 KB · Views: 347
 -
 Babelfish M25 R.2 5W 8R.png32.1 KB · Views: 412
 -
 Babelfish M25 R.2 1W 8R.png32.1 KB · Views: 1,411
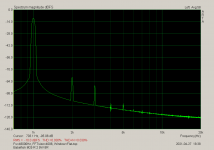
same settings, 4R Load
Attachments


4R Load, rest of files (can't squeeze all in one post)
Attachments
-
 Babelfish M25 R.2 THD vs. Freq. 4R.png48.6 KB · Views: 196
 -
 Babelfish M25 R.2 Freq. 4R.png46.8 KB · Views: 254
 -
 Babelfish M25 R.2 50W 4R.png38.5 KB · Views: 241
 -
 Babelfish M25 R.2 45W 4R.png38.4 KB · Views: 209
 -
 Babelfish M25 R.2 40W 4R.png37.2 KB · Views: 187
 -
 Babelfish M25 R.2 35W 4R.png36.3 KB · Views: 190
 -
 Babelfish M25 R.2 30W 4R.png34.4 KB · Views: 243
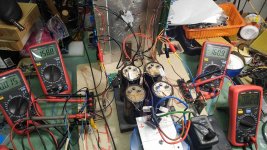
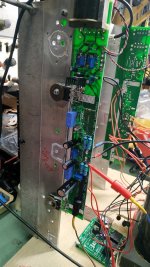
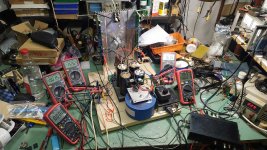
mess porn
Attachments
-
 IMG_20210427_185922.jpg139.7 KB · Views: 480
 -
 IMG_20210427_185911.jpg139.5 KB · Views: 476
 -
 IMG_20210427_185844.jpg79.2 KB · Views: 467
 -
 IMG_20210427_185836.jpg111.1 KB · Views: 477
 -
 IMG_20210427_185829.jpg156.1 KB · Views: 471
 -
 IMG_20210425_194618.jpg114.7 KB · Views: 409
 -
 IMG_20210425_194554.jpg85.7 KB · Views: 431
 -
 IMG_20210425_193756.jpg124.5 KB · Views: 539
 -
 IMG_20210425_193747.jpg127.2 KB · Views: 656
 -
 IMG_20210425_193730.jpg117.8 KB · Views: 590
How it sounds?
Bloody, Jolly good - as your regular M2 ....... Berserked
on eeeny speakers ( not demanding anything from amp) - maybe just little cleaner; if you have speakers, you not even thinking being adequate for 25W A Class amp, this is A Class amp to change your thinking
Have few ( of previous incarnation - Hall chips in biasing mech.) driving Dynaudio Contours, one is driving Guy tall Triangles with trio of 8" woofers per side
Hope tomorrow to post same files for SET amp
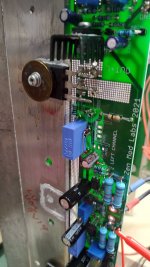
observe that I implemented 2 veeeery secret tricks, how to make amp muchmuch better than schm itself is promissing - I've put one strategically placed Blue LED (Papa's trick) and Cinemags put to sing are my Uncle Bubba Bob's .... so World is my Oyster
Bloody, Jolly good - as your regular M2 ....... Berserked
on eeeny speakers ( not demanding anything from amp) - maybe just little cleaner; if you have speakers, you not even thinking being adequate for 25W A Class amp, this is A Class amp to change your thinking
Have few ( of previous incarnation - Hall chips in biasing mech.) driving Dynaudio Contours, one is driving Guy tall Triangles with trio of 8" woofers per side
Hope tomorrow to post same files for SET amp
observe that I implemented 2 veeeery secret tricks, how to make amp muchmuch better than schm itself is promissing - I've put one strategically placed Blue LED (Papa's trick) and Cinemags put to sing are my Uncle Bubba Bob's .... so World is my Oyster
Last edited:
than the regular M25 R2
different animals
B. M25 R2 is Berserked Magnifier, while SET is (Wanabee)SIT amp for Masses
Schade arranged mosfet is, as Papa did show us with his BAF 2015 amps, emulation of triode-transfer part, in other words - SIT
see here :
BAF Slides Nelson Pass | AudioMaker
The Singing Bush
that means - you can expect much higher THD levels, than is case with B. M25
"observe that I implemented 2 veeeery secret tricks, how to make amp muchmuch better than schm itself is promissing - I've put one strategically placed Blue LED (Papa's trick) and Cinemags put to sing are my Uncle Bubba Bob's .... so World is my Oyster "
When you look really close Bubba Bob sees "property of ZM" written on those Cinemags😉
When you look really close Bubba Bob sees "property of ZM" written on those Cinemags😉

Okay do I need another NP inspired ZM implemented amp? Not going to answer that, because I won’t like the answer.
Do I want another another ZM amp? YES! That’s more the ticket.
Do I want another another ZM amp? YES! That’s more the ticket.


- Home
- Amplifiers
- Pass Labs
- Babelfish M25 R.2/SET amp