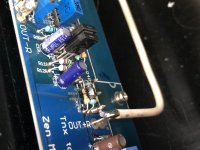
First SissySIT failure? I was playing through my SissySIT for about an hour and fuse blew. Upon checking R20 (100 ohm) Q4 gate resistor was burnt. Looks like it may be Q4, IRFP9140 failure in order to burn R20
Gentlemen,
up to now just one member has sent a pm to show interest in a pair on Cinemags. I think we would need at least 10 pcs in order to get a significat discount. I would be really happy if we could reach that number 🙂
Have a nice evening
Ernst
Sorry, already ordered and paid for mine a month ago. Sad thing is I might even be in the same production batch if you do get a group together.
Last edited:
Here is the picture
it's hard imagining anything else than problem with thermal interface , amp not having any gain (besides xformer) , so no possibility of oscillation
IRFP either wasn't tight enough , or there was a burr somewhere , needing time to dig through isolation
what thermal interface you're using ?
IRFP I'm sending are genuine parts , got from vendor with whom I'm working for more than 20 years , so there is no doubt about that issue as possible culprit
Last edited:
Here is the picture
as I wrote in post #1 :
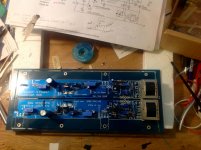
put mosfets on/under the pcb , in exact arrangement with mounting hardware as can be seen in posts #2 and #3 , just bellow this one ; to remind you , exact arrangement is :
heatsink-Keratherm-mosfet-pcb-big washer-smaller washer if needed-springie washer as absolutely necessary part-bolt
tighten with brain , not force , but not skimp on necessary force ; my solution is to always use stainless steel washers and especially Allen bolt , because nowadays that's only way to have certainly mechanically proper part ........ usual steel bolts are more often utter drek than not
from your picture I see that you didn't put big washer ; pcb will sag in time if there is just small washer - as in your case - and pressure on mosfet will decline
depending on thermal interface you used , pressure is more or less important for proper thermal transfer , but is always important
I think ZenMod is right. Most likely a thermal failure. Singapore ambient temp is 30C indoor. May have to install fans. Heatsink looks like not adequate.
Called Cinemag yesterday, immediate, live answer! I was told that normal lead time is around 5 weeks, but production has been upped, so possibly shorter time frame.
I went with High Ni version.
Russellc
I went with High Ni version.
Russellc
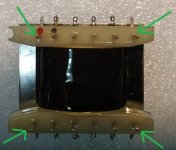
for Cinemags pin 1 and pin2 are closer than other pins , that's how you're recognizing Pin 1
mark it with red dot , cut all 4 corner pins ( not connected ) , place it in pcb
on both pcbs pin 1 is ditto to end of pcb ( not the other way)
easy
mark it with red dot , cut all 4 corner pins ( not connected ) , place it in pcb
on both pcbs pin 1 is ditto to end of pcb ( not the other way)
easy
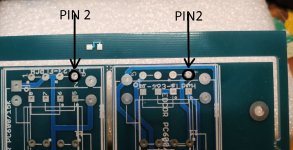
ZM I know where pin 1 was on the CineMags ( I have already cut the 4 corner pins), but I dont know where pin 2 etc go on the PCB. I.e how the trafo should be oriented. On my picture pin 1 is under the C in 4HPC. So my question is actually if the orientation is correct as shown in my picture 🙂
Last edited:
Cinemag CMOQ orientation on pcb
xformer pic :
red dot Pin 1
black dot Pin 2
Pin 1 and Pin 2 are closer together than rest of pins
cut corner pins marked with green arrows
pcb pic - black circle and arrow - Pin 2
edit: link to this post included in post #1
xformer pic :
red dot Pin 1
black dot Pin 2
Pin 1 and Pin 2 are closer together than rest of pins
cut corner pins marked with green arrows
pcb pic - black circle and arrow - Pin 2
edit: link to this post included in post #1
Attachments
Last edited:
Post #62 as BK said. Transformer is placed at the very end of the board. The pins should slide in easily. If they don't, you do not have the transformer placed correctly.
Also what ZM said.
Also what ZM said.
Last edited:
Thanks a lot ZM, BK & Ben I see my orientation is correct.
I have plowed through the tread 3-4 times over the last couple of months, still didnt remember #62 🙂
Now next step is to dissassemble my M2 so I can reuse powersupply and box for Sissy. Need another box and supply so I can compare M2 and Sissy at a later date.
I have plowed through the tread 3-4 times over the last couple of months, still didnt remember #62 🙂
Now next step is to dissassemble my M2 so I can reuse powersupply and box for Sissy. Need another box and supply so I can compare M2 and Sissy at a later date.
Thanks a lot ZM, BK & Ben I see my orientation is correct.
I have plowed through the tread 3-4 times over the last couple of months, still didnt remember #62 🙂
Now next step is to dissassemble my M2 so I can reuse powersupply and box for Sissy. Need another box and supply so I can compare M2 and Sissy at a later date.
I believe pretty much everything is covered in post#1
though , if you cant find it , just ask
I have no problems repeating what's needed ....... better that way than to leave out that gray smoke

Repaired my SissySIT. Unfortunately besides the burnt IRFP9140, the THF51 also burnt together with R20, DZ1 and DZ2. All’s well and singing again. Put bigger washer as ZenMod suggested. I will install heatsink fans for peace of mind.

Just noticed my R4 and R5 are 27, not 39 as change in your notes. Are my critters proper idss or should I change to 39 now?
Also to blind to find RSL or RSR on schematic. Pad by optocoupler. Post 7 and 8 added to confusion!
Russellc
Also to blind to find RSL or RSR on schematic. Pad by optocoupler. Post 7 and 8 added to confusion!
Russellc
Last edited:
yeah , resistor along opto - named Rs as for Rshunt
used in B. M25 , not in Sissy
27 or 39 ..... you have good chance that 27 is enough ..... just later I realized that some JFet triplets are asking for more than 27R
blame on me ........ and (as usually) I'll blame Pa , he didn't taught me well enough
used in B. M25 , not in Sissy
27 or 39 ..... you have good chance that 27 is enough ..... just later I realized that some JFet triplets are asking for more than 27R
blame on me ........ and (as usually) I'll blame Pa , he didn't taught me well enough
Last edited:
- Home
- Amplifiers
- Pass Labs
- Babelfish M25, SissySIT - general building tips and tricks