The container on its own weighs a couple of tonnes, filled with concrete it's around 80t. They are rated for 30t.
I like the way you think - but I don't intend to fill the whole thing with concrete. Building horn framework that can take multiple tons of pressure and doing a pour to fill the entire container = too much cash and effort. Also I don't fancy the stress of needing everything to be right on the pour day.
I was considering plastering a thin layer of cement onto a light frame for most of the horn, and only getting hefty at the throat.
I must be relatively lazy & cost conscious about this, or it will never happen. That is:
For $X I can get a 20' container for storage and general use
OR
For $X+Y I can get a 40' container, split between general use and a silly HiFi.
To 'sell' the idea to myself, I'm trying to keep Y (cash and effort) reasonable. The cash component might be <$1000 since I already have most of the gear I'll need.
Well, yeahI don't intend to fill the whole thing with concrete.
") . I guess it strikes me that 33 cubic metres is quite a space, and convenient that 20 feet is nicely a third of a wavelength at 20Hz. I can't see the point in the 40' option unless you'll build an office in there too
. I guess it strikes me that 33 cubic metres is quite a space, and convenient that 20 feet is nicely a third of a wavelength at 20Hz. I can't see the point in the 40' option unless you'll build an office in there too Well, yeah
With the constrained mouth area, I think 30Hz is about the limit - there would be a bit of ripple if I aimed for 20' & 20Hz.
I can't see the point in the 40' option unless you'll build an office in there too
In general, the 40' containers only cost a little more, so I figure why not?
One place has
$1500 - 20'
$1850 - 40' high cube (nearly triple the volume)
In practice, my decision might come down to what's available locally, since transport adds a big chunk to the price.
To 'sell' the idea to myself, I'm trying to keep Y (cash and effort) reasonable. The cash component might be <$1000 since I already have most of the gear I'll need.
Ugh, the red tape. Stultifying and costly. A shipping container becomes a "shed" when permanently sited, so requires permits. The following is one of the 15 requirements for a building permit (which costs $500).
Provide three (3) copies of plans and elevations to a scale not less than 1:100, specifications and methods to be used in the construction.
...but that is not enough. Yesterday I got this: "We have assessed your Building Permit application and have found that we require a Planning Permit.
Please complete attached forms and return."
This 2nd permit ALSO has a fee. They didn't say how much this one is. I find this obnoxious.
...so now I'm thinking of ways to circumvent the bureaucracy:
1) My first thought was to put the shipping container on wheels, so it magically transforms from "farm shed" to "vehicle".
The problem: 5,000kg castor wheels are very expensive, at $2,500-$3,000 for a set. I'd rather spend the money on wheels than on permits (and support a manufacturer rather than a bureaucracy), but $3,000 is a lot to pay for something I only want symbolically.
2) Forget the shipping container, and do a stealth build.
I could make a quick start by turning a couple of IBCs into PPSL* boxes, since they'd be full ninja and easy to weather proof ...and then I'd work on a bigger version.
I can site it in a well screened spot, almost 300m from any road, so anything vaguely low profile should be OK.
*Intermediate Bulk Containers --> Push Pull Slot Loaded
Attachments

Another layer of red tape was added - the cost of the permits required blew out to >$1500. Sod that*
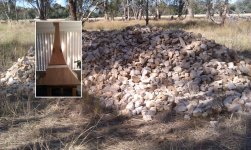
However: there's plenty of stuff in my zone does not require a permit. Earthworks and retaining walls up to 1m are OK ...so I think I'll be doing some earthworks in my spare time, that just happen to form the shape of a bass horn. Keeping this bit <1m won't be too bad.
I'm now planning a 'normal' horn system for midbass and above (meaning: fairly big, but not a permanent / fixed structure). The bass can come later... probably much later.
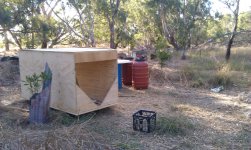
Pictured are my midbass and bass horns, under construction. The bass section obviously has a way to go yet.
The midbass horn is 150cm long. I'm hoping to cover 75Hz-400Hz with this, and >400Hz with compression drivers.
*old Australian joke:
A swagman (roving labourer) is walking down a scorchingly hot road through a vast open plain. The monotony is relieved only by the occasional dead tree and a gate every few kilometres. A grazier pulls up beside him in a large, comfortable car. He offers the swagman a ride.
"You can open your own b|o0dy gates!" says the swaggie, and he keeps on trudging through the dust.
However: there's plenty of stuff in my zone does not require a permit. Earthworks and retaining walls up to 1m are OK ...so I think I'll be doing some earthworks in my spare time, that just happen to form the shape of a bass horn. Keeping this bit <1m won't be too bad.
I'm now planning a 'normal' horn system for midbass and above (meaning: fairly big, but not a permanent / fixed structure). The bass can come later... probably much later.
Pictured are my midbass and bass horns, under construction. The bass section obviously has a way to go yet.
The midbass horn is 150cm long. I'm hoping to cover 75Hz-400Hz with this, and >400Hz with compression drivers.
*old Australian joke:
A swagman (roving labourer) is walking down a scorchingly hot road through a vast open plain. The monotony is relieved only by the occasional dead tree and a gate every few kilometres. A grazier pulls up beside him in a large, comfortable car. He offers the swagman a ride.
"You can open your own b|o0dy gates!" says the swaggie, and he keeps on trudging through the dust.
Attachments
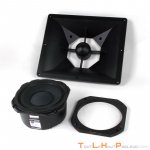
If the horn is to be used up to 800 Hz or so, the throat should be narrowed to around 6 inches wide for better dispersion and phase response, or better yet, use a phase plug as shown in the photos below. When building/testing the Kangaroo Horn in the parking lot of a big-box lumber store with a parking lot adjacent to the St.Paul motel I lived at, I asked an interested shopper to participate in an A/B test with or without the phase plug, the better clarity the phase plug provided was obvious to him. This type of phase plug is similar to the ones Dave Gunness designed for the 10" mids in the EV MT systems from the mid 1980s.
Building midbass horns. I've made up my mind on most things, but still have one question:
My rough prototype gives enough bandwidth.
If I don't need to improve bandwidth, is there any point in using a phase plug? That is: would a square(ish) throat + a phase plug be clearer / have better sound quality, or should I just do another slot throat?
+++
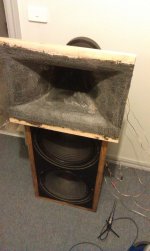
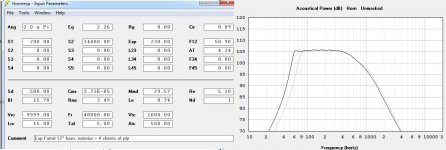
The drivers = Faital 12FH520
Prototype horn was 150cm long, 70x120mouth (it had to fit through a door)
Final horn shall be 230cm long, 120x120mouth (to be built on site)
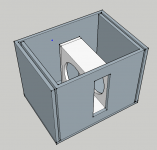
For the final horn, I decided to make the biggest horn I could, with the least work. The outside will be a simple butt joined ply coffin, using uncut (full sheets) ply.
In the picture, the pink lines are the outer box:
FOUR full sheets of 15mm ply.
The blue lines will be the horn curve:
FOUR full sheets of 7mm ply.
...so the horn shape will use a total of 8 ply sheets, but I'll only have to cut two of them - a triumph for laziness.
Pictures:
rough prototype under construction
'sketch' for final horn
what I'm planning to use >500Hz (JBL 2445 in a modified no-name horn off ebay)
Attachments
![IMAG0246[1].jpg](/community/data/attachments/550/550410-5a6bc1125e7bcd9e03dd3df78ce41ad2.jpg)
Do you have a copy your horn you can post modeled in Horn Response with that driver?
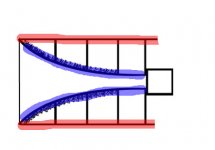
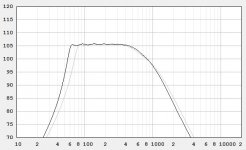
The big picture shows the values for an open-backed build: 9999 litre rear chamber and 200cm throat.
The SPL plot shows how it should compare to the smaller prototype: exactly the same, with but with 20Hz more extension.
Small picture = how I'll actually build it: 50 litre rear chamber and 150cm throat. Again this is compared to the prototype: exactly the same, with but with 20Hz more extension.
Note that it doesn't seem very sensitive to variation. This seems to become true for any horn that's full-sized, e.g. if I make other changes like doubling the front chamber or model a different expansion type, the plot stays about the same.
Attachments
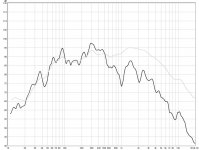
The black line is an in-room measure of the prototype. No eq.
Boundary effects (mostly) make this much rougher than the model, but it is indeed strong 80-500Hz as predicted.
The grey line is with a JBL 2445 (single cap crossover) to show relative levels... the JBL should be 111dB, so the Faital appears to be ~as loud as predicted.
I applied subtractive eq based on this grey line, to get flat output 60Hz - 6kHz. It was good.
In the short term, that's what I want to get outdoors. Once I have the midrange sorted out, I will add more parts to make it a 4-way.
Attachments
Note that it doesn't seem very sensitive to variation. This seems to become true for any horn that's full-sized, e.g. if I make other changes like doubling the front chamber or model a different expansion type, the plot stays about the same.
Oops - I realised I had copied a couple of values from the wrong place / some other driver (e.g. moving mass was too low). But after pasting in the right numbers, I still get the same plot. Not very sensitive to variation
usspeaker.com link for values
A Dayton woofer tester (using 1.25kg added mass and 11" effective diameter to calculate VAS) gives some values as very close to the spec:
VAS (spec) 64.2 litres - measured 62.8 litres
mms (spec) 56g - measured 53g
SPL (spec) 98dB - measured 97.5dB
Other values measure too high, but may drop with use, e.g.
Fs (spec) 50Hz - measured 63Hz
how is the horn placed as far as room boundaries. side wall - floor - where are you measuring it from
For the in-room plot:
Mic was about 200cm from the mouth, and about 80cm from the floor.
Horn was about 150 cm from the nearest wall.
I was limited by cable lengths and the small room.
I modeled it as a half-space 80Hz horn. The measured response to 60Hz shows I was getting lots of boundary loading, despite being as far from boundaries as I could be.
I'll try to get an outdoor measurement next weekend.
The final version will be more solid*, will have a sealed driver chamber and is under construction in a lightly wooded open space ...so it should be more 'ideal' than the prototype**. That was just a loose guide to check that bandwidth and SPL were OK.
*currently ~100kg of plywood & bracing, completed weight will be >150kg. I can load it with literally tons of of ballast (rocks) once I have it finished & positioned.
**but I don't really care if the final build also needs 10dB of subtractive eq. The prototype sounded surprisingly good after rough eq, and I do plan to use a miniDSP in the final build. It's harder to define stuff like 'clarity' that I'm hoping to maximise with the slot vs. phase plug question.
Art mentioned "the better clarity the phase plug provided was obvious to him" but I'm not sure of the context / what 'clarity' means. If the item under comparison was just the midbass horn (not a whole system), then an increase in HF extension from 500 to 850Hz would be percieved as 'clarity', even if the phase plug slightly increased distortion <500Hz.
Another layer of red tape was added - the cost of the permits required blew out to >$1500. Sod that*
However: there's plenty of stuff in my zone does not require a permit. Earthworks and retaining walls up to 1m are OK ...so I think I'll be doing some earthworks in my spare time, that just happen to form the shape of a bass horn. Keeping this bit <1m won't be too bad.
I'm now planning a 'normal' horn system for midbass and above (meaning: fairly big, but not a permanent / fixed structure). The bass can come later... probably much later.
Pictured are my midbass and bass horns, under construction. The bass section obviously has a way to go yet.
The midbass horn is 150cm long. I'm hoping to cover 75Hz-400Hz with this, and >400Hz with compression drivers.
*old Australian joke:
A swagman (roving labourer) is walking down a scorchingly hot road through a vast open plain. The monotony is relieved only by the occasional dead tree and a gate every few kilometres. A grazier pulls up beside him in a large, comfortable car. He offers the swagman a ride.
"You can open your own b|o0dy gates!" says the swaggie, and he keeps on trudging through the dust.
Subscribed!
Regarding approvals, if neighbour's don't complain, council won't care on a property that big. Local councils are pests anyway so screw em
Subscribed!
Regarding approvals, if neighbour's don't complain, council won't care on a property that big. Local councils are pests anyway so screw em
I think I'm highly likely to be checked, since I submitted an application (and then fled from the fees). The container idea is therefore dead for now.
The entire materials cost of a pair of 60Hz horns - ply, glue, paint, screws, drivers, everything - will be less than the cost of the permits for a container.
Regarding neighbours, I should be OK. I did a model (using the Danley software & DBH218) that indicates test noise played at 100dB (measured 8m in front) should measure ~65dB at the nearest house... and that leak is all within 60-80Hz. In practice, I hope for about 5dB better attenuation since I'll have a bigger horn and a screen of trees.
The pix show:
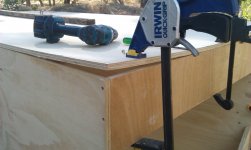
- forcing the ply into shape. It doesn't want to be square, which slowed me down somewhat.
- the outer shell. The V shape is some scrap material I used for bracing. The horn throat will start 10cm in from this.
The sheet on top of the shell is some of the the 7mm ply that I'll be bending and fastening onto supports to form the inner curve.
I'll use the top 1/4 of one of those big food barrels as the rear chamber.
It is nice to be moving forward with this.
Attachments
re: the forcing plywood into correct shape: What I do in these cases is start the screws, or glue and screws, in the middle of the joint and work towards the edge, likely won't have to use as much clamping force to coerce into shape by the time you get to the outer edge.
I'm quite excited to watch this progress, as I've considered some plywood, 'half' horns like the burning man inspiration, for movies out in the back yard.
Keep up the progress!
I'm quite excited to watch this progress, as I've considered some plywood, 'half' horns like the burning man inspiration, for movies out in the back yard.
Keep up the progress!
That's how I did it, but some of the corners were still difficult cos they had no clamp point.re: the forcing plywood into correct shape: What I do in these cases is start the screws, or glue and screws, in the middle of the joint and work towards the edge, likely won't have to use as much clamping force to coerce into shape by the time you get to the outer edge.
My solution was to flip the whole cabinet so I could clamber onto it and stand on the offending corner while I drilled and screwed it into submission.
I'm quite excited to watch this progress, as I've considered some plywood, 'half' horns like the burning man inspiration, for movies out in the back yard.
If I made one exactly like the inspiration, it would be drilled out by termites pretty quickly. When I left a scrap of plain MDF on the ground, termites demolished the underside of it. The glue / resin doesn't deter them, so I imagine they'd have a good appetite for ply. Perhaps you should try this at your place, to see whether it would be a problem for you.
My horns will sit on a couple of plastic pallets to keep them dry & un-munched. I'm also thinking of 'wallpapering' them with this stuff, for weather and termite proofing:
https://www.bunnings.com.au/cyclone-1220mm-x-6m-fibreglass-insect-screen_p4110412
...using a technique similar to this:
Poor Mans Fiberglass, permanent exterior paint, never paint again (almost), waterproofing with out epoxy, fiberglass epoxy allergy relief
basically: glue --> mesh --> paint
Last edited:
Hollowboy,basically: glue --> mesh --> paint
With those three ingredients, the omniverse was borne for the first and last conspiracy:^)
Art (Theosophical Society) Welter
I bet that makes them pretty durable, especially with that bug screen material.
I hope so. Small scale experiments (with fibreglass plastering tape + paint) worked well and seem strong. On a larger scale, I need to see whether the bug screen version is easy to work with and reasonable in terms of material costs - that is: how much filler the mesh needs.
In the absence of any tips regarding throat & phase plug, I think I'll build the throat in a way that keeps my options open.
A 150cm^2 throat simulates well. Therefore, I'll build it with a 10x20cm throat, and reduce the area to 150cm^2 with a very basic phase plug. The RCF H600 will be my inspiration - I can clone a simple phase plug like that for free, using a suitable found object... I could go full bogan by using a beer bottle as the plug, mounted on an "X" made of scrap plywood. Then, if that works badly, I can simply tear out the phase plug, and revert to the narrow throat option (7.5x20cm), similar to the prototype.
Attachments
I hope so. Small scale experiments (with fibreglass plastering tape + paint) worked well and seem strong. On a larger scale, I need to see whether the bug screen version is easy to work with and reasonable in terms of material costs - that is: how much filler the mesh needs.
In the absence of any tips regarding throat & phase plug, I think I'll build the throat in a way that keeps my options open.
I think I would make the throat easily replaceable. So you could pop the driver out, and unscrew the throat plate/baffle/driver mounting 'plate' and pop in a new one. Make it modular and thus, easy to experiment until you find the right design.
- Status
- This old topic is closed. If you want to reopen this topic, contact a moderator using the "Report Post" button.
- Home
- Loudspeakers
- Multi-Way
- Artichoke Horn