thanks a lot, I use a mini dsp but my speaker is a hybrid, passive for the mid/tweet and active for the woofer/mid.
Ill try that asap
so far, ive tried to time align the mid and the woofer by measuring the voice coils of both and measure the difference. The 0.12 milisecond delay to the mid have made a considerable difference. looking forward to try more
thanks
Ill try that asap
so far, ive tried to time align the mid and the woofer by measuring the voice coils of both and measure the difference. The 0.12 milisecond delay to the mid have made a considerable difference. looking forward to try more
thanks
Last edited:
Finally, with all drivers operating in phase, I play pink noise (HFN Test CD, track 74) and adjust levels for a smooth overall response mon The RTA.
Oops, I meant track 64.
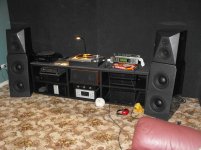
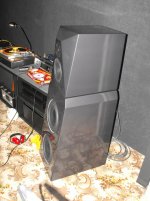
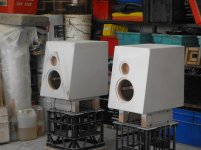
Thanks. They have more than exceeded my expectations. Many positive comments from experienced listeners. The highest compliment was an audio buddy pestering me to build a copy for him to replace his $11k speakers. He couldn't be happier. He went for an auto gunmetal finish. The only real variation is I ditched the cast mid-tweeter baffle and went with 3" mdf and extra bracing ... not that it really needed it.What a build!
Attachments

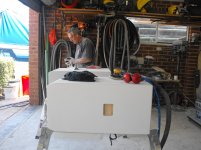
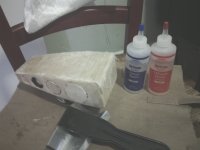
Very good questions. Here is the full story. My original speakers were finished with a stained marine ply veneer layer and many layers of polyurethane clear. My buddy wanted a painted finish and mdf is almost impossible to paint to a high standard. So he applied a thin (2mm) fibre-glass and resin layer, filled and sanded with special autobody filler and pestered another auto-buddy to spray paint the enclosures. It was very time consuming and messy work but he got the finish he was after. The fibre-glass/resin skin is VERY hard and the resin appears to soak into the mdf quite deeply. It's probably not right to call it mdf anymore. It all contributes to a very acoustically inert enclosure. I'm not physically comfortable around resin fumes but if you have experience with the material, fibreglass gives a wonderful base for spray painting and is impervious to accidental knocks which would dent mdf. The first two photos show the fibre-glass layer and you can see through it. The last two photos show sanding the filler. The guy in the photo is the spray painter guru doing his thing.Could resin coating the entire front panel be achieved? A sandwich of MDf to resin to MDf, wouldn't it process superior qualities? What Specific type of resin did you use?
Attachments
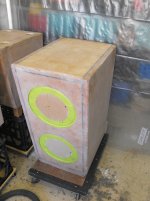
The fibre-glass/resin skin is VERY hard and the resin appears to soak into the mdf quite deeply. It's probably not right to call it mdf anymore.
Might not be quite as rugged, but you could save a whole bunch of work and get the same desired result by just painting the MDF with resin.
As you said, it soaks into the MDF and the result is a surface like Bakelite.
I'm working on some boxes now and I'm going to tint the resin black; my hope is to dispense with paint altogether and just sand and polish to the low luster I want.
I can see that you have used fibreglass cloth. I recommend using chopped strand fibreglass instead. It is easier to evenly bed into the resin. The strands sort of float loose when the resin is applied and it needs less rolling to form an even surface. More importantly, it goes more easily around edges. Even so, I smoothed off the sharp edges to a pencil round prior to fibre-glassing. A tip for around the baffle cut outs. Use masking tape to make a 5 mm dam around all holes. Otherwise the resin will certainly flow in and make a mess. Experience has taught me to mask up any surface that you don't want resin onto. The resin is so much harder than the mdf that you will sand away any adjacent mdf with little impression on the resin. In fact, it is worthwhile making a special effort to get a level surface from the start, then fill with a thin coat of auto body filler and sand. You may need to go around more than once. If you want an excellent finish, get a pro to do it or at least give advice.yes, as you predicted the addition of resin plus fiber transforms the wood into a less resonance unit.
Might not be quite as rugged, but you could save a whole bunch of work and get the same desired result by just painting the MDF with resin.
As you said, it soaks into the MDF and the result is a surface like Bakelite.
I'm working on some boxes now and I'm going to tint the resin black; my hope is to dispense with paint altogether and just sand and polish to the low luster I want.
I would anticipate that resin alone might be difficult to control. The thing about the chopped fibreglass is it moderates the flow of the resin, which is helpful, especially near verticals and holes. Without some matting the resin just drools over the sides and is very difficult to sand off once it sets hard. Another issue is whether the resin alone can hide the glue joins in mdf. Glue joins in mdf are notoriously hard to hide. This is why painting even filled and primed mdf seems to never work well. There needs to be a rigid layer covering any joins.
I would very much like to see how this turns out. Please take some photos and post the results.
Right about joints; my plan is to first treat just the joints and endgrain areas, which really drink up the resin.
I use a heat gun to thin the resin and make it penetrate further and cure quicker.
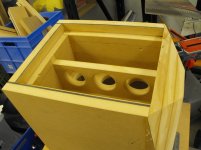
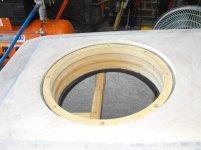
I treat the speaker mounting areas this way too to increase the strength of the driver mounting holes and make a surface which can be sanded flat for the gasket tape; the baffles are rebated for flush-mounting the drivers and the finish is "pebbly".
After it penetrates but before it cures I wipe it with a rag to remove the excess.
As I said, when cured it's like Bakelite.
I do this to the speaker mounting holes and then re-drill them, which solves the thread stripping problem.
Did you use chopped or milled glass fibers?
I've used the former and the 1/4 in. (6 mm) long fibers don't wnat to lie flat and make for a really rough surface.
Other alternatives are shown here
Resin Fillers & Dyes : TAP Plastics
I've used the Cabosil whiich makes it thixotropic; if you use enough it gives a petroleum jelly consistency, but it's double-edged as the silica makes it even harder to sand.
They say the glass microspheres makes it easier to sand but I don't know how it takes a polish.
Maybe a base coat with that, sand smooth, then a thin finish coat and final sand/polish.
At this point it's not sounding like a time-saver; the attraction for me is that it will be more scratch resistant than paint and they could be polished or repaired with resin if necessary.
I use a heat gun to thin the resin and make it penetrate further and cure quicker.
I treat the speaker mounting areas this way too to increase the strength of the driver mounting holes and make a surface which can be sanded flat for the gasket tape; the baffles are rebated for flush-mounting the drivers and the finish is "pebbly".
After it penetrates but before it cures I wipe it with a rag to remove the excess.
As I said, when cured it's like Bakelite.
I do this to the speaker mounting holes and then re-drill them, which solves the thread stripping problem.
Did you use chopped or milled glass fibers?
I've used the former and the 1/4 in. (6 mm) long fibers don't wnat to lie flat and make for a really rough surface.
Other alternatives are shown here
Resin Fillers & Dyes : TAP Plastics
I've used the Cabosil whiich makes it thixotropic; if you use enough it gives a petroleum jelly consistency, but it's double-edged as the silica makes it even harder to sand.
They say the glass microspheres makes it easier to sand but I don't know how it takes a polish.
Maybe a base coat with that, sand smooth, then a thin finish coat and final sand/polish.
At this point it's not sounding like a time-saver; the attraction for me is that it will be more scratch resistant than paint and they could be polished or repaired with resin if necessary.
I don't know about your local climate, but in Sydney summertime temperatures can average mid 30's celsius with a few 40+. That is almost too hot and plenty for a very fast flowing resin. Often we need a fan on the curing resin to remove heat or the resin can crack.and yes soaking the resin\hardener in hot water to increase flow rate does a very good job.
This is an impressive no compromises build. I have a question for Bon, not sure if its already been answered.
So if you want to figure out driver alignment in an active system, you play test tones and find the "hole" in the response when one driver is out of phase. Wouldn't this align them to one particular position? I assume it does.
Also the driver makers sometimes supply a phase chart. Can't you look at the phase at a certain frequency and then do some quick math to adjust the distance. Then in the area of the crossover apply a small delay to one of the drivers so that they are aligned in that frequency range? Basically is this better than doing the test tones method? THanks for posting this build.
To quote the Highlander movie, "there can be only one". You are correct that the phase nulling method for phase/time aligning drivers at crossover is perfect only at the listening position, and so creates a distinct "hot seat". However, I can live with this as 90% of the time it is only me listening. A significant contribution to the performance of the nulling is the choice of Bessel crossover topology in preference to the much more common Linkwitz-Riley or Butterworth. The Bessel filters have the nice property that phase varies linearly and slowly through the crossover region. So the phase mis-alignment just either side of crossover is very much less than other filters. This is important since both drivers are sharing the duty in this region. The initial roll-off of Bessel filters are not as rapid as L-R although the ultimate roll-off is the same for the same order. This makes it essential to use drivers that behave well out-of-band, as resonances are not as well suppressed as with L-R filters. The beauty of the phase nulling is that it takes all of the phase and timing errors into account (at the measurement position). No need to consult the driver manufacturer phase data. Of course this essentially means active crossovers. Once heard, it is hard to go back.This is an impressive no compromises build. I have a question for Bon, not sure if its already been answered.
So if you want to figure out driver alignment in an active system, you play test tones and find the "hole" in the response when one driver is out of phase. Wouldn't this align them to one particular position? I assume it does.
Also the driver makers sometimes supply a phase chart. Can't you look at the phase at a certain frequency and then do some quick math to adjust the distance. Then in the area of the crossover apply a small delay to one of the drivers so that they are aligned in that frequency range? Basically is this better than doing the test tones method? THanks for posting this build.
- Status
- This old topic is closed. If you want to reopen this topic, contact a moderator using the "Report Post" button.
- Home
- Loudspeakers
- Multi-Way
- 3-way active, time aligned, constrained layer construction