This tutorial is designed to get you started and tweaking a decent crossover… whether you're new to crossovers, or have built speakers before and are looking for a design method that relies on listening and doesn't require measurements.
The acoustic concepts apply to an active or passive crossover, since the needs of the speakers are the same in both cases. The simple but effective example crossover included here with formulas is of the passive type. With it you will achieve a much higher quality of crossover than possible using basic online calculators, and there is enough explanation to enable you to take it to the next level. Math has been kept light.
For illustration, I will be assuming a dome tweeter and a mid sized mid/woofer but with a little common sense this tutorial can apply to more than just two-way systems using typical drivers.
INDEX
Preparation
Post 2 - Choosing the crossover frequency - Part 1
Post 3 - Choosing the crossover frequency - Part 2
Post 4 - Directivity
Post 5 - Choosing the level
Post 6 - Baffle step diffraction
Post 7 - The design process
Design
Post 8 - Flattening the woofer's impedance
Post 9 - Flattening the tweeter's impedance
Post 10 - The woofer's crossover
Post 11 - The tweeter's crossover
Tweaking
Post 12 - Phase and diffraction
Post 13 - Tweaking the woofer
Post 14 - Tweaking the tweeter
Post 15 - Tweaking the system
You'll need to achieve these goals…
As this tutorial covers more than you may need, here is a list of the essential steps in case you don't plan on reading all of it.
1. Choose a crossover frequency based on your drivers
2. Choose the tweeter level (how loud it should be)
3. Flatten the impedances
4. Add the crossovers
…then on to tweaking. The rest of this tutorial helps in understanding how it works which will make the tweaking process more successful.
The goal of a crossover
Is to blend the sound from the two drivers (woofer and tweeter) so they work together as one. It may need to make the drivers as loud as each other, to divide the frequencies between them, and to correct or sidestep the limitations each driver will have.
Crossovers will not cut the drivers off suddenly at some frequency. There is a more gradual roll-off, somewhat like rolling a treble or bass control down. This means the drivers will be working together near the crossover frequency.
The acoustic concepts apply to an active or passive crossover, since the needs of the speakers are the same in both cases. The simple but effective example crossover included here with formulas is of the passive type. With it you will achieve a much higher quality of crossover than possible using basic online calculators, and there is enough explanation to enable you to take it to the next level. Math has been kept light.
For illustration, I will be assuming a dome tweeter and a mid sized mid/woofer but with a little common sense this tutorial can apply to more than just two-way systems using typical drivers.
- Adding a sub to existing speakers - https://www.diyaudio.com/community/...overs-without-measurement.189847/post-7378329
- Notes on 3-way speakers - https://www.diyaudio.com/community/...overs-without-measurement.189847/post-3031202
INDEX
Preparation
Post 2 - Choosing the crossover frequency - Part 1
Post 3 - Choosing the crossover frequency - Part 2
Post 4 - Directivity
Post 5 - Choosing the level
Post 6 - Baffle step diffraction
Post 7 - The design process
Design
Post 8 - Flattening the woofer's impedance
Post 9 - Flattening the tweeter's impedance
Post 10 - The woofer's crossover
Post 11 - The tweeter's crossover
Tweaking
Post 12 - Phase and diffraction
Post 13 - Tweaking the woofer
Post 14 - Tweaking the tweeter
Post 15 - Tweaking the system
You'll need to achieve these goals…
As this tutorial covers more than you may need, here is a list of the essential steps in case you don't plan on reading all of it.
1. Choose a crossover frequency based on your drivers
2. Choose the tweeter level (how loud it should be)
3. Flatten the impedances
4. Add the crossovers
…then on to tweaking. The rest of this tutorial helps in understanding how it works which will make the tweaking process more successful.
The goal of a crossover
Is to blend the sound from the two drivers (woofer and tweeter) so they work together as one. It may need to make the drivers as loud as each other, to divide the frequencies between them, and to correct or sidestep the limitations each driver will have.
Crossovers will not cut the drivers off suddenly at some frequency. There is a more gradual roll-off, somewhat like rolling a treble or bass control down. This means the drivers will be working together near the crossover frequency.

CHOOSING THE CROSSOVER FREQUENCY - Part 1
You will firstly need to choose a crossover frequency that gets the best out of the drivers. If we choose too high a frequency, we risk poor sound from the woofer, and poor matching to the tweeter. If we choose too low a frequency we risk distortion and power handling issues with the tweeter.
Get some spec sheets
If you haven't already, collect the specifications for each of the drivers which you'll likely find at the manufacturers website. (if not, read on… but there'll be more on what to do at the end of this section.)
A spec sheet should show a bunch of numbers relating to things such as - how much power it can handle, how big is the cone and how far does it travel, how loud it plays compared to other speakers etc…
The spec sheet should also show a graph with a couple of lines plotted on it. One will show how loud the speaker will play at each frequency. The other will show how the speaker behaves electrically by plotting how it conducts electricity at each frequency.
Woofers - choosing where to cross
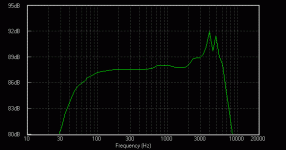
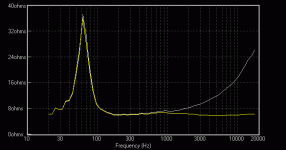
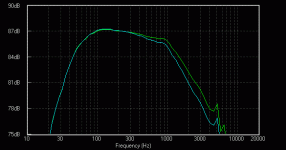
If you look at the woofer's frequency response plot shown below, you will see that the woofer has a peak in its response at 4kHz (4,000 Hertz) just before it rolls off above 7kHz. In other words, it will play too loud at these frequencies. This peak is not uncommon for a woofer but it will not always be obvious when looking at some plots.
It is the region of cone breakup, and it is the result of the cone flexing when working at these frequencies. Woofers don't normally sound good here and it is best to cross them over below this point which prevents them receiving as much energy at these frequencies.
A rule of thumb is to leave at least an octave (or two) between the crossover point and the cone breakup. An 'octave' means a doubling or a halving in frequency, so in the case of the woofer shown below, our crossover should probably be at or below 2kHz.
You will firstly need to choose a crossover frequency that gets the best out of the drivers. If we choose too high a frequency, we risk poor sound from the woofer, and poor matching to the tweeter. If we choose too low a frequency we risk distortion and power handling issues with the tweeter.
Get some spec sheets
If you haven't already, collect the specifications for each of the drivers which you'll likely find at the manufacturers website. (if not, read on… but there'll be more on what to do at the end of this section.)
A spec sheet should show a bunch of numbers relating to things such as - how much power it can handle, how big is the cone and how far does it travel, how loud it plays compared to other speakers etc…
The spec sheet should also show a graph with a couple of lines plotted on it. One will show how loud the speaker will play at each frequency. The other will show how the speaker behaves electrically by plotting how it conducts electricity at each frequency.
Woofers - choosing where to cross
If you look at the woofer's frequency response plot shown below, you will see that the woofer has a peak in its response at 4kHz (4,000 Hertz) just before it rolls off above 7kHz. In other words, it will play too loud at these frequencies. This peak is not uncommon for a woofer but it will not always be obvious when looking at some plots.
It is the region of cone breakup, and it is the result of the cone flexing when working at these frequencies. Woofers don't normally sound good here and it is best to cross them over below this point which prevents them receiving as much energy at these frequencies.
A rule of thumb is to leave at least an octave (or two) between the crossover point and the cone breakup. An 'octave' means a doubling or a halving in frequency, so in the case of the woofer shown below, our crossover should probably be at or below 2kHz.
Attachments
Last edited:
CHOOSING THE CROSSOVER FREQUENCY - Part 2
Tweeters
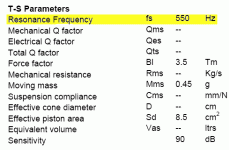
If you look at the spec sheet for the tweeter below, you'll see one spec named "fs". This is the resonance frequency of the tweeter (550Hz in this case) and you shouldn't cross this low. The response plot below (image 2) shows that the tweeter can't produce useful sound this low in frequency although the dome or cone will still move about freely if you ask it to. You can overdrive a tweeter if not careful. This may produce distortion, or cause damage.
The rule of thumb here is to cross the tweeter an octave above, and preferrably two octaves above the resonance frequency. In our case, this means our crossover should be higher than 1,100Hz and if possible 2,200Hz.
The best crossover frequency for this example set of drivers
With the woofer's maximum of 2kHz and the tweeter's minimum of 1100Hz, the crossover should be somewhere in this range. I would tend towards 2kHz as this way, when the volume is turned up the tweeter shouldn't be the first thing to strain (as it probably would if we chose 1100Hz for the crossover frequency). Sometimes a woofer will have particularly bad cone breakup and a tweeter may be known to handle a low crossover frequency so the option may be there to take yours lower as required.
If you can't get specs…
…then your crossover will be based largely on trial and error (unless you can measure the drivers or find out from someone else) First you'll need a starting point. If the rated impedance is not written on the driver, you can estimate this by measuring the resistance with a multimeter (on the speaker terminals) and multiplying this by 1.25 and rounding to the nearest whole number.
When choosing a crossover point, most dome tweeters will happily work down to 5kHz, and some down to 2kHz or less. You should choose a high crossover frequency to start with as this will reduce the risk of damage. Once you learn the capabilities of the drivers through listening, you can lower the crossover frequency as this will stop the woofers working at their upper extremes where they may not sound as good. Generally, smaller woofers can be crossed over at higher frequencies.
Tweeters
If you look at the spec sheet for the tweeter below, you'll see one spec named "fs". This is the resonance frequency of the tweeter (550Hz in this case) and you shouldn't cross this low. The response plot below (image 2) shows that the tweeter can't produce useful sound this low in frequency although the dome or cone will still move about freely if you ask it to. You can overdrive a tweeter if not careful. This may produce distortion, or cause damage.
The rule of thumb here is to cross the tweeter an octave above, and preferrably two octaves above the resonance frequency. In our case, this means our crossover should be higher than 1,100Hz and if possible 2,200Hz.
The best crossover frequency for this example set of drivers
With the woofer's maximum of 2kHz and the tweeter's minimum of 1100Hz, the crossover should be somewhere in this range. I would tend towards 2kHz as this way, when the volume is turned up the tweeter shouldn't be the first thing to strain (as it probably would if we chose 1100Hz for the crossover frequency). Sometimes a woofer will have particularly bad cone breakup and a tweeter may be known to handle a low crossover frequency so the option may be there to take yours lower as required.
If you can't get specs…
…then your crossover will be based largely on trial and error (unless you can measure the drivers or find out from someone else) First you'll need a starting point. If the rated impedance is not written on the driver, you can estimate this by measuring the resistance with a multimeter (on the speaker terminals) and multiplying this by 1.25 and rounding to the nearest whole number.
When choosing a crossover point, most dome tweeters will happily work down to 5kHz, and some down to 2kHz or less. You should choose a high crossover frequency to start with as this will reduce the risk of damage. Once you learn the capabilities of the drivers through listening, you can lower the crossover frequency as this will stop the woofers working at their upper extremes where they may not sound as good. Generally, smaller woofers can be crossed over at higher frequencies.
Attachments
DIRECTIVITY
Note -- The first time crossover builder may want to skip to the next section…this is here only to make a point about driver selection, and is slightly technical.
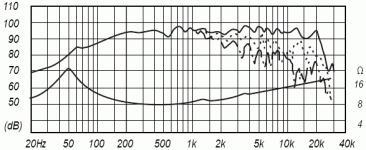
At higher frequencies, a woofer will be producing less sound off to the sides (off-axis). Its forward (on-axis) sound may measure good and flat across the frequencies we want it to produce, and this may seem to be all that matters.
The attached image shows a plot for a 6" full range driver showing the on-axis response (top line), 30 degrees off-axis (dotted) and 60 degrees off-axis showing the driver is becoming directional at around 2kHz. The total sound (from all angles) reverberates around the room and comes back to the listening position. The on-axis sound is most important but the total sound is also an issue.
A dome tweeter radiates over a wider angle near the crossover as the dome is smaller. If a crossover was set above a few kHz in this case, and we based it solely on the on-axis frequency response, there would be less total sound from the woofer just below the crossover. This could contribute to tonal problems and may cause the tweeter to stand out rather than blending in.
It would be OK to use a woofer into this upper region where a tweeter with a waveguide is used, since they would both have narrow radiation in that range.
Note -- The first time crossover builder may want to skip to the next section…this is here only to make a point about driver selection, and is slightly technical.
At higher frequencies, a woofer will be producing less sound off to the sides (off-axis). Its forward (on-axis) sound may measure good and flat across the frequencies we want it to produce, and this may seem to be all that matters.
The attached image shows a plot for a 6" full range driver showing the on-axis response (top line), 30 degrees off-axis (dotted) and 60 degrees off-axis showing the driver is becoming directional at around 2kHz. The total sound (from all angles) reverberates around the room and comes back to the listening position. The on-axis sound is most important but the total sound is also an issue.
A dome tweeter radiates over a wider angle near the crossover as the dome is smaller. If a crossover was set above a few kHz in this case, and we based it solely on the on-axis frequency response, there would be less total sound from the woofer just below the crossover. This could contribute to tonal problems and may cause the tweeter to stand out rather than blending in.
It would be OK to use a woofer into this upper region where a tweeter with a waveguide is used, since they would both have narrow radiation in that range.
Attachments
CHOOSING THE LEVEL
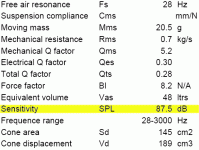
This is how loud the speaker will play compared to how much power you give it, and is called it's sensitivity. This is normally how loud the driver will be if we feed it with one Watt, after screwing it to a large flat baffle and setting the microphone back one metre from it.
As we need to set the tweeter to be around as loud as the woofer, we first need to discover how loud the woofer will be. Our tweeter needs to already be at least as loud as the woofer because we will be reducing the tweeter's level, not the woofer's.
Discovering the woofer's level
Looking at the woofer specs (image 1), we see that the sensitivity is listed as 87.5 dB/W/m. Looking at the woofer graph you'll see that much of the plotted response is at that level except for the cone breakup region (image 2).
This will be the level of our example system. If you choose to do some baffle step compensation (next post), this will come down further.
Setting the tweeter level
Later, we will use resistors to make the tweeter more quiet until it matches the woofer level. You should write down the published tweeter sensitivity specification as well as the chosen system level (in dB).
Attachments

BAFFLE STEP DIFFRACTION
TL;DR -- If the treble is too loud, come back to this.
What is the problem?
The bass will not be as loud as expected because the baffle/box is too small to prevent the bass from spreading out and wrapping around the cabinet.. whereas the higher frequencies will stay in front. This is a matter of wavelengths being larger at lower frequencies. When looking at the response on-axis it may seem as though the lower frequencies have gone quiet by up to 6dB. (This can vary because the room complicates what happens to the rearward energy, so you may want to experiment with where you put the speaker, and how much you compensate the level.)

What to do
Make the tweeter about 6dB more quiet than the woofer sensitivity, and trim down the woofer's high frequencies as well. (This assumes that the width of your baffle causes your baffle step to be a little below the crossover frequency, which it typically will be with a 2 way, for example.)
For the woofer, sometimes this is as easy as increasing the inductor value. Sometimes you can change from the regular first to a second order filter..
..or you can use a 2.5 way (easy, and described in the next post), or a BSC circuit.. for example here it is with the 6.2ohm resistor across the 2mH inductor, which have been added to an existing crossover. The inductor trims more of the high frequencies and the resistor limits how much extra they will be reduced. This creates a shape the opposite of the baffle step shown above.

[Optional] This link goes a little further to describe baffle step circuits and their variations - https://www.diyaudio.com/community/...overs-without-measurement.189847/post-6910468
TL;DR -- If the treble is too loud, come back to this.
What is the problem?
The bass will not be as loud as expected because the baffle/box is too small to prevent the bass from spreading out and wrapping around the cabinet.. whereas the higher frequencies will stay in front. This is a matter of wavelengths being larger at lower frequencies. When looking at the response on-axis it may seem as though the lower frequencies have gone quiet by up to 6dB. (This can vary because the room complicates what happens to the rearward energy, so you may want to experiment with where you put the speaker, and how much you compensate the level.)
What to do
Make the tweeter about 6dB more quiet than the woofer sensitivity, and trim down the woofer's high frequencies as well. (This assumes that the width of your baffle causes your baffle step to be a little below the crossover frequency, which it typically will be with a 2 way, for example.)
For the woofer, sometimes this is as easy as increasing the inductor value. Sometimes you can change from the regular first to a second order filter..
..or you can use a 2.5 way (easy, and described in the next post), or a BSC circuit.. for example here it is with the 6.2ohm resistor across the 2mH inductor, which have been added to an existing crossover. The inductor trims more of the high frequencies and the resistor limits how much extra they will be reduced. This creates a shape the opposite of the baffle step shown above.
[Optional] This link goes a little further to describe baffle step circuits and their variations - https://www.diyaudio.com/community/...overs-without-measurement.189847/post-6910468
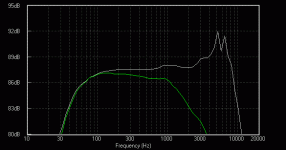
THE DESIGN PROCESS - Why the following stages are necessary
Note -- If you are looking for a 'cookbook' approach, feel free to skip this section. It is a discussion post, and is slightly technical but recommended. It covers the interactions between the crossover and the speaker, and how to approach the design process. (I will be ignoring baffle step compensation here as it can be dealt with separately, isn't always necessary, and would needlessly complicate the following sections).
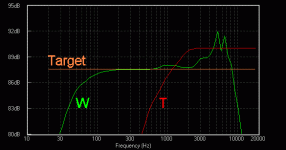
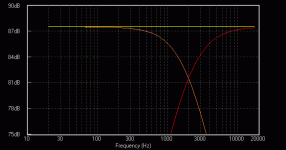
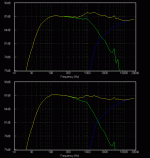
The first image below shows the example published woofer and tweeter response, with the desired final response. Now, it should be clear that the woofer and tweeter need to be treated differently… something you wont get following standard formulas.
In order to achieve this target response you'll want to make the individual responses look like the second graph shown below (around the crossover region). For this no-measurement crossover, I am going to use a first order electrical filter on the woofer and a second order electrical filter on the tweeter. Although these are not equal, it is more important that the drivers cross well acoustically and this combination typically works well.
This has the advantage of being a fairly straightforward crossover, whilst offering a fair range of control over the responses, and enough protection for the tweeter. Even for a 'measured' style crossover, this format is a common final result. I encourage you to think 'outside the box' once you get the feel for it… for the time being without measurement it may be prudent to start with something like this.
Impedance
This is the final hurdle to cross before we can get down to designing the crossover itself. First though a short explanation of the word impedance. For our purposes, impedance is the same as resistance except that it applies to alternating current like music signals. Impedance can be a combination of plain resistance, inductance, and capacitance. The difference being that resistors behave the same at all frequencies but inductors and capacitors have a varying effect that shows greater influence at higher or lower frequencies.
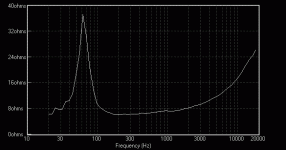
A crossover is electrical, and when you put one on to a speaker, the impedance plot shows how the speaker will be 'seen' by the crossover. An example impedance plot is shown as the third image below, and it is fairly typical.
The problem here is that the crossover will have a varying effect as the impedance of the driver varies (i.e: the impedance will present a lighter or heavier load to the crossover depending on the frequency, which may upset the balance).
How to deal with the impedance issue
Measurements would help us design a crossover that works directly around the issue, but this won't be a problem as we can approach it another way. We will first correct the impedances which then frees us to apply more standard crossovers successfully. This means flattening the impedance plots near the crossover region, which makes the speakers 'look' more like resistors, which are predictable and consistent.
Notes for using two woofers (Parallel or 2.5 way)
You can use the woofers together in parallel as either TMM, or in the D'Appolito configuration as MTM.
Another way you can use them is as a 2.5 way, where one covers the baffle step region and the other crosses to the tweeter as normal. This is one of the easiest ways to set and forget the baffle step and continue designing the rest of the speaker as normal.
Two woofer calculation differences and how to do the impedance (non-2.5 way)
When you put the woofers in parallel, the impedance halves. Work out the values for a single woofer and halve the resistor and inductor, but double the capacitor. The sensitivity goes up by 6dB.
When you put them in series, the impedance doubles. Work out the values for a single woofer and double the resistor and inductor, but halve the capacitor. The sensitivity is the same as for a single woofer.
Two woofer calculation differences and how to do the impedance (2.5 way)
With the 2.5 way option, you can't connect the woofers directly in parallel since they need different circuits. The upper woofer is easy, do that the same as for a single woofer, using the single woofer impedance.
The lower woofer should also be seen as having the single woofer impedance for calculation of any of the components you choose to use. The series inductor is larger since it will be tuned to the baffle frequency, and the RC impedance compensation is the same as before. You could leave the RC out if looking to use fewer components. Since this cross starts lower it is somewhat less critical.
Note -- If you are looking for a 'cookbook' approach, feel free to skip this section. It is a discussion post, and is slightly technical but recommended. It covers the interactions between the crossover and the speaker, and how to approach the design process. (I will be ignoring baffle step compensation here as it can be dealt with separately, isn't always necessary, and would needlessly complicate the following sections).
The first image below shows the example published woofer and tweeter response, with the desired final response. Now, it should be clear that the woofer and tweeter need to be treated differently… something you wont get following standard formulas.
In order to achieve this target response you'll want to make the individual responses look like the second graph shown below (around the crossover region). For this no-measurement crossover, I am going to use a first order electrical filter on the woofer and a second order electrical filter on the tweeter. Although these are not equal, it is more important that the drivers cross well acoustically and this combination typically works well.
This has the advantage of being a fairly straightforward crossover, whilst offering a fair range of control over the responses, and enough protection for the tweeter. Even for a 'measured' style crossover, this format is a common final result. I encourage you to think 'outside the box' once you get the feel for it… for the time being without measurement it may be prudent to start with something like this.
Impedance
This is the final hurdle to cross before we can get down to designing the crossover itself. First though a short explanation of the word impedance. For our purposes, impedance is the same as resistance except that it applies to alternating current like music signals. Impedance can be a combination of plain resistance, inductance, and capacitance. The difference being that resistors behave the same at all frequencies but inductors and capacitors have a varying effect that shows greater influence at higher or lower frequencies.
A crossover is electrical, and when you put one on to a speaker, the impedance plot shows how the speaker will be 'seen' by the crossover. An example impedance plot is shown as the third image below, and it is fairly typical.
The problem here is that the crossover will have a varying effect as the impedance of the driver varies (i.e: the impedance will present a lighter or heavier load to the crossover depending on the frequency, which may upset the balance).
How to deal with the impedance issue
Measurements would help us design a crossover that works directly around the issue, but this won't be a problem as we can approach it another way. We will first correct the impedances which then frees us to apply more standard crossovers successfully. This means flattening the impedance plots near the crossover region, which makes the speakers 'look' more like resistors, which are predictable and consistent.
Notes for using two woofers (Parallel or 2.5 way)
You can use the woofers together in parallel as either TMM, or in the D'Appolito configuration as MTM.
Another way you can use them is as a 2.5 way, where one covers the baffle step region and the other crosses to the tweeter as normal. This is one of the easiest ways to set and forget the baffle step and continue designing the rest of the speaker as normal.
Two woofer calculation differences and how to do the impedance (non-2.5 way)
When you put the woofers in parallel, the impedance halves. Work out the values for a single woofer and halve the resistor and inductor, but double the capacitor. The sensitivity goes up by 6dB.
When you put them in series, the impedance doubles. Work out the values for a single woofer and double the resistor and inductor, but halve the capacitor. The sensitivity is the same as for a single woofer.
Two woofer calculation differences and how to do the impedance (2.5 way)
With the 2.5 way option, you can't connect the woofers directly in parallel since they need different circuits. The upper woofer is easy, do that the same as for a single woofer, using the single woofer impedance.
The lower woofer should also be seen as having the single woofer impedance for calculation of any of the components you choose to use. The series inductor is larger since it will be tuned to the baffle frequency, and the RC impedance compensation is the same as before. You could leave the RC out if looking to use fewer components. Since this cross starts lower it is somewhat less critical.
Attachments
Last edited:
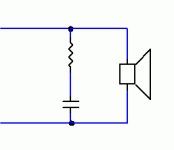
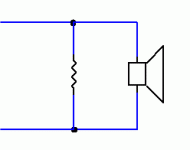
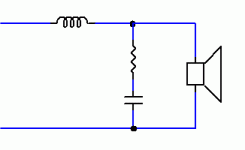
FLATTENING THE WOOFER'S IMPEDANCE
We'll need to use one resistor and one capacitor (per woofer). The first image below shows the before and after impedance plot (grey/yellow). The impedance is now the same at all frequencies around the proposed crossover. The second image shows the schematic (electrical) diagram so far.
Working out the values
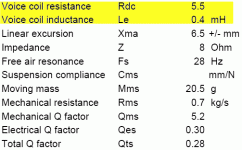
Looking at the specs (image 3) you'll see one called either 're' or 'Rdc'. When working out the value for the resistor in this circuit you should multiply this value by 1.25. For our example this is 5.5 x 1.25 Although this equals 6.875, there is no easy to find resistor of this value, but 6.8 ohms will do nicely.
For the capacitor, look for a spec called "Le" which for our example is 0.4mH (that is 0.4 milli, also known as 0.0004). Take your value of Le and divide it by R squared. For example, our resistor was 6.8 ohms, and 6.8 squared is 46, so 0.0004 divided by 46 gives us a value for our capacitor of 8.7uF, which is close enough to the easy to find value of 8.2uF.
We'll need to use one resistor and one capacitor (per woofer). The first image below shows the before and after impedance plot (grey/yellow). The impedance is now the same at all frequencies around the proposed crossover. The second image shows the schematic (electrical) diagram so far.
Working out the values
Looking at the specs (image 3) you'll see one called either 're' or 'Rdc'. When working out the value for the resistor in this circuit you should multiply this value by 1.25. For our example this is 5.5 x 1.25 Although this equals 6.875, there is no easy to find resistor of this value, but 6.8 ohms will do nicely.
For the capacitor, look for a spec called "Le" which for our example is 0.4mH (that is 0.4 milli, also known as 0.0004). Take your value of Le and divide it by R squared. For example, our resistor was 6.8 ohms, and 6.8 squared is 46, so 0.0004 divided by 46 gives us a value for our capacitor of 8.7uF, which is close enough to the easy to find value of 8.2uF.
Attachments
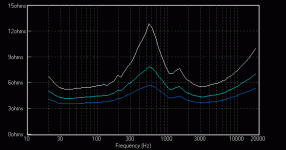
FLATTENING THE TWEETERS IMPEDANCE
In this section, you need to choose a value to use as the tweeter's impedance in an upcoming section, as well as choosing a resistor to add to the tweeter circuit.
-- (Optional further reading.. An impedance peak circuit is a more efficient way to manage this, and is usually used instead of the resistor used in this post when measurements are available. An example of this circuit can be found at the bottom of this post - https://www.diyaudio.com/community/...overs-without-measurement.189847/post-7378329 )
Adding the resistor
The tweeter has an impedance peak at its resonance like the white curve shown in the first image below, at 550Hz. If we don't take care of this it may cause the tweeter to play loud around the resonance as our crossover will be less predictable. It may also reduce power handling.
The simple way to deal with this is to put a resistor in parallel with the tweeter. The entire impedance will be reduced, but the peaks will be reduced by the greatest amount. The smaller the value of resistor the more effective it will be but don't go too low… you may lower the total impedance too much which some amps won't like. (It isn't so bad if you plan to add some series resistance later, as will be shown in the crossover section.)
The first image below shows the effect (from top to bottom) of no resistor, a 20 ohm resistor, and a 10 ohm resistor. This will be a matter of trial and error for your tweeter. The circuit so far is shown in the second image.
If you are interested in taking this further or have a difficult tweeter, you can look at resonance peak filters. One of these could remove the peak altogether.
The new impedance
We'll need to know what the impedance is now, in order to work out the values to use later in the crossover. Estimating the 'typical' impedance value near the crossover frequency will be good enough for our purposes, and is not too difficult.
This example tweeter is a 6 ohm tweeter. Looking at the white curve on the plot below (which is the published curve from the spec sheet), the impedance goes to around 6 ohms at 2kHz, where our crossover will be. This impedance 'dip' region is not uncommon for the chosen crossover point because it happens above the resonance where we often choose to cross. For an 8 ohm tweeter we might assume it will be 8 ohms at this point (it isn't really that critical as long as we don't do anything unusual or assume too much).
Because the two blue plots in the image below will not be given on the spec sheets, we need to figure in the effect of the resistance we put in parallel with the tweeter, and this is how to do it. Start with the rated impedance of the tweeter (such as 8 ohms but in this example it is 6 ohms). Multiply this by the resistor you put in parallel, then divide this by the amount you get when you add the two. For example, a 6 ohm tweeter and a 10 ohm parallel resistor…. (6 x 10)/(6 + 10). This equals 3.75 ohms. Write your value down.
Attachments
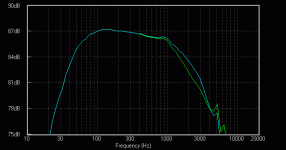
THE WOOFER'S CROSSOVER
What we will need here is an inductor. This is a coil of wire that has the property of impeding the flow of high frequency energy whilst letting the low frequencies pass. The final basic woofer crossover is shown in the image below (…more in the tweaking section).
Choosing the inductor value
Since we have flattened the impedance, we can use the standard formula to find the starting value of inductance. First take the driver's rated (nominal) impedance and divide this by 6.3 times the crossover frequency. For example, 8 ohms divided by (6.3 x 2000Hz). In other words, 8/12600 which equals 0.000635 This is also written as 0.635m and the nearest easily available value of inductor should be 0.68mH, which will make a good starting value.
The second image below shows the frequency response of the woofer with and without the crossover. It isn't quite there yet, but in a later post on tweaking I will discuss how changing the values of each of the three woofer crossover components gives us a finer control over the woofers response.
Attachments
THE TWEETER'S CROSSOVER
There are three components we need to add to the tweeter. A capacitor and an inductor will prevent the low frequency energy below the crossover from overwhelming the tweeter, and will shape the response near the crossover. A resistor will be used to set the overall level of the treble. The complete tweeter schematic is shown below.

The capacitor
Take the value of impedance you wrote down two posts ago (for our example it was 3.75). Multiply it by 12.6 and then multiply it by the crossover frequency. For example, 3.75 x 12.6 x 2000 equals 94500.
Now, if your calculator has an invert function, use it on this number, or simply do 1 divided by your answer. ie: 1/94500 is 10.6uF which is close enough to 10uF.
The inductor
Take the value of impedance and divide this by the result you get when you multiply the crossover frequency by 3.15
For example, 3.75/(2000 x 3.15) which equals 0.000595, or 0.595m. The closest value of inductor is 0.56mH.
The resistor
If you subtract the woofer sensitivity figure from the tweeter sensitivity figure, you'll have a starting point for how much to lower the tweeter's level. Lower it a couple of dB more for good measure, if desired (there are several reasons for wanting to try this).
To choose the value of resistor to use, look at the following. To attenuate the tweeter by 1dB, take the tweeter impedance value we've been using here and multiply it by 0.12 to get the resistor value. For 2dB multiply instead by 0.25, 3dB by 0.4, 4dB by 0.6, 5dB by 0.8, and finally for 6dB of attenuation use a resistor which is equal to the impedance value.
You'll likely tweak this later, it is a very commonly adjusted component.
Polarity
One final point is the polarity of the tweeter. Try reversing the connections and listen each way. There will be more on why in the next post.
Finally
The entire response is shown below (image 2). It is a good starting point and will be tweaked later.

There are three components we need to add to the tweeter. A capacitor and an inductor will prevent the low frequency energy below the crossover from overwhelming the tweeter, and will shape the response near the crossover. A resistor will be used to set the overall level of the treble. The complete tweeter schematic is shown below.
The capacitor
Take the value of impedance you wrote down two posts ago (for our example it was 3.75). Multiply it by 12.6 and then multiply it by the crossover frequency. For example, 3.75 x 12.6 x 2000 equals 94500.
Now, if your calculator has an invert function, use it on this number, or simply do 1 divided by your answer. ie: 1/94500 is 10.6uF which is close enough to 10uF.
The inductor
Take the value of impedance and divide this by the result you get when you multiply the crossover frequency by 3.15
For example, 3.75/(2000 x 3.15) which equals 0.000595, or 0.595m. The closest value of inductor is 0.56mH.
The resistor
If you subtract the woofer sensitivity figure from the tweeter sensitivity figure, you'll have a starting point for how much to lower the tweeter's level. Lower it a couple of dB more for good measure, if desired (there are several reasons for wanting to try this).
To choose the value of resistor to use, look at the following. To attenuate the tweeter by 1dB, take the tweeter impedance value we've been using here and multiply it by 0.12 to get the resistor value. For 2dB multiply instead by 0.25, 3dB by 0.4, 4dB by 0.6, 5dB by 0.8, and finally for 6dB of attenuation use a resistor which is equal to the impedance value.
You'll likely tweak this later, it is a very commonly adjusted component.
Polarity
One final point is the polarity of the tweeter. Try reversing the connections and listen each way. There will be more on why in the next post.
Finally
The entire response is shown below (image 2). It is a good starting point and will be tweaked later.
PHASE and DIFFRACTION
Note -- This section is slightly technical and may be skipped over if desired.
Phase
A speaker cone moves back and forth in cycles. Each cycle is analysed as a rotation. Phase is an indicator of a point in that rotation, and is measured in degrees. It is important to consider phase because where you have two drivers sharing the crossover region, they need to work together. If one is moving out when the other is moving in they will cancel each other to some degree and the direct sound will not be balanced around the crossover region.
I put this section before the tweaking sections to create awareness as every crossover change you make is going to affect phase to some extent and to put it simply, this may cause unexpected results in the frequency response. For now, it is enough to just be aware of this fact.
With regards to the polarity of the tweeter, which is simply the order that the positive and negative wires are connected, both ways should be tried on each speaker designed this way. As there are only two ways it can be, it is a broad kind of tweak but we need to find which is best.
As an experimental tweak you can do if there seems to be a problem in blending the tweeter to the woofer, and in keeping with our trial and error approach… it may be worth changing one of the major components, either the woofer inductor or the tweeter capacitor, then alter the other driver's crossover to match up. For example, increasing the tweeter's capacitor a little and then increasing the woofer's inductor by a similar amount will push the crossover lower but shouldn't necessarily change the balance. The point is that the difference in phase between the drivers may have changed which may have altered how well they blend.
Diffraction
For our purposes, diffraction is when sound encounters a change in direction. For example, if sound is travelling sideways across the baffle and it reaches the edge, it will expand to reach around the sides. This produces a new (and normally unwanted) wave in return, which is out of phase and out of time with the original sound.
There is sometimes confusion between this and baffle step diffraction although they are about the same phenomenon. The baffle step shows a specific and easily measureable effect that gets its share of attention. Diffraction in general tends to be a less easily identifiable source of problems that should be dealt with by reducing or treating sharp edges where possible.
Diffraction is the reason that drivers are sometimes flush mounted (sunk into the baffle), and why the ratio of baffle height to width and driver placement on it, is considered. Cabinet edges ought to be rounded as well.
TWEAKING THE WOOFER
There are three components in the woofer crossover. Between them, there is plenty of room for adjustment. Since the resistor and capacitor are doing a specific job of fixing the impedance, the inductor may seem to be the component that ought be adjusted first, but as we will see there are no hard and fast rules here.
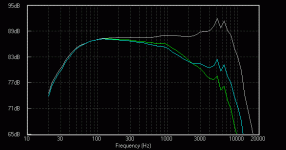
Fixing our example system
Although we won't see what's going on if we don't measure it, we can still hear it. The top half of image 1 shows the starting crossover, and it has a small peak at around 1kHz which I will use to illustrate the point. I decided to increase the value of the inductor (to 1mH) to bring down the woofers response near the crossover.
Adjusting the inductor
Making the inductor larger will reduce the upper midrange by cutting off the woofer at a lower frequency (image 2). This can help to tame some kinds of harshness, or to give the impression of more bass. It is useful for when the woofer is too loud at its top end to begin with so if it sounds better, do it. Be aware however that the desire to turn up the bass is sometimes the result of room based cancellations which have little to do with the crossover.
Going the other way with the inductor can give the bass more punch by increasing the level of bass harmonics. On the other hand if your tweeter isn't blending, it may be because the woofer is not meeting it at the crossover (not producing enough upper midrange, for example), so reducing the inductor value might help.
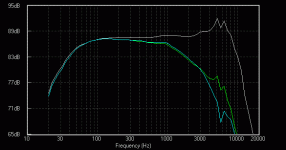
Adjusting the resistor
Reducing this resistance should increase the woofer's output near the crossover without changing the crossover frequency (image 3). This causes the woofer crossover to more closely resemble a second order filter. In practice, adjusting the resistor gives somewhat similar effects to the control you get with small changes in the size of the inductor, but there will be differences between the two in response and phase. With a no-measure type of crossover you should try both if necessary, as one may work better than the other.
Adjusting the capacitor
Also affects the region just below the crossover, and changes the frequency of the crossover. If you found that you had too much upper midrange but increasing the inductance made the sound too dull, increasing the capacitance value is worth a try instead.
With and without having flattened the impedance
The fourth image below shows the woofer response when using the inductor before fixing the impedance (light blue). Green shows the proper crossed over response and grey is the raw woofer response for reference. It is obvious that without the resistor and capacitor, the response is not following the same downward trend. It fails to reduce the cone breakup region sufficiently (above 3kHz).
Notch filters
The fifth image shows the effect of using a notch filter to reduce the breakup region even further. Although I'll leave the design of notch filters for another time, it can be seen that one is useful in reducing the breakup region by a significant amount. It is usually good to try to have this region playing 20dB less than the rest of the spectrum. The green trace is the normal crossover and the light blue trace shows the notch filter in place. It was made using a 0.4mH inductor, a 2uF capacitor and a 3.3 ohm resistor.
Going second order
This will reduce the woofer's output above the crossover where only the tweeter should be heard. If you feel this is necessary, start reducing the value of resistance in the woofer crossover. This is likely to produce a peak in the response as discussed above and this can be offset by increasing the inductance. You will have moved closer to a second order electrical crossover.
There are three components in the woofer crossover. Between them, there is plenty of room for adjustment. Since the resistor and capacitor are doing a specific job of fixing the impedance, the inductor may seem to be the component that ought be adjusted first, but as we will see there are no hard and fast rules here.
Fixing our example system
Although we won't see what's going on if we don't measure it, we can still hear it. The top half of image 1 shows the starting crossover, and it has a small peak at around 1kHz which I will use to illustrate the point. I decided to increase the value of the inductor (to 1mH) to bring down the woofers response near the crossover.
Adjusting the inductor
Making the inductor larger will reduce the upper midrange by cutting off the woofer at a lower frequency (image 2). This can help to tame some kinds of harshness, or to give the impression of more bass. It is useful for when the woofer is too loud at its top end to begin with so if it sounds better, do it. Be aware however that the desire to turn up the bass is sometimes the result of room based cancellations which have little to do with the crossover.
Going the other way with the inductor can give the bass more punch by increasing the level of bass harmonics. On the other hand if your tweeter isn't blending, it may be because the woofer is not meeting it at the crossover (not producing enough upper midrange, for example), so reducing the inductor value might help.
Adjusting the resistor
Reducing this resistance should increase the woofer's output near the crossover without changing the crossover frequency (image 3). This causes the woofer crossover to more closely resemble a second order filter. In practice, adjusting the resistor gives somewhat similar effects to the control you get with small changes in the size of the inductor, but there will be differences between the two in response and phase. With a no-measure type of crossover you should try both if necessary, as one may work better than the other.
Adjusting the capacitor
Also affects the region just below the crossover, and changes the frequency of the crossover. If you found that you had too much upper midrange but increasing the inductance made the sound too dull, increasing the capacitance value is worth a try instead.
With and without having flattened the impedance
The fourth image below shows the woofer response when using the inductor before fixing the impedance (light blue). Green shows the proper crossed over response and grey is the raw woofer response for reference. It is obvious that without the resistor and capacitor, the response is not following the same downward trend. It fails to reduce the cone breakup region sufficiently (above 3kHz).
Notch filters
The fifth image shows the effect of using a notch filter to reduce the breakup region even further. Although I'll leave the design of notch filters for another time, it can be seen that one is useful in reducing the breakup region by a significant amount. It is usually good to try to have this region playing 20dB less than the rest of the spectrum. The green trace is the normal crossover and the light blue trace shows the notch filter in place. It was made using a 0.4mH inductor, a 2uF capacitor and a 3.3 ohm resistor.
Going second order
This will reduce the woofer's output above the crossover where only the tweeter should be heard. If you feel this is necessary, start reducing the value of resistance in the woofer crossover. This is likely to produce a peak in the response as discussed above and this can be offset by increasing the inductance. You will have moved closer to a second order electrical crossover.
Attachments
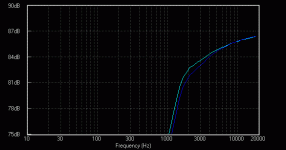
TWEAKING THE TWEETER
The series resistor
This is the normal method of setting the level and is probably the first thing you'll try when sorting out treble issues. Changes to the woofer crossover may need an adjustment here as well. Changing this resistor will have the side-effect of bringing about some minor changes in the tweeter's tonal balance (image 1).
The capacitor
This will change the crossover point for the tweeter. This is a fair tweak if it gives you what you need, even if you don't do anything to the woofer. Larger capacitors will give you an increase in the response at the tweeter's lower end, and will also increase the level of the tweeter just above the crossover point (image 2).
The inductor
A larger inductor will also lower the crossover point, but it will reduce the level just above the crossover (image 3).
It may not always be clear whether to adjust the capacitor or the inductor until you try it.
The parallel resistor
Reducing this value will typically reduce the level of the tweeter (image 4). In some cases there will be an emphasis around the resonance, and top end. In some cases it will produce a better result than adjusting the other resistor, just don't use extremely small values for this one.
Attachments


TWEAKING THE SYSTEM
Don't forget to try reversing the tweeter polarity to see which way works best. This should be repeated after significant crossover adjustments.
Tweeter level
Playing a tweeter louder than it is meant to be played may sound good for a while, but can become tiring. If you find that some recordings sound a little harsh or bright, and annoying, start by reducing the level of the tweeter. When a tweeter blends, you should only just hear it, and not specifically…it shouldn't stand out.
(For more on the reasoning behind the position of the resistor in the circuit - https://www.diyaudio.com/community/...overs-without-measurement.189847/post-7938256 )
General issues
When listening for problems, try to identify which driver is involved (if only one), and which frequency range is involved. Try to repeat the problem using different types of music. Is it due to some range being too loud or is it some other kind of distortion. Problems due to some frequency range being too quiet tend to be more difficult to identify. Be persistent, it sometimes takes time to sort out issues like this.
For more on whether to change the inductance or capacitance in a second order filter - https://www.diyaudio.com/community/...overs-without-measurement.189847/post-7938257
Not enough bass
Problems around a lack of bass are often due to the room, not the speaker. If you have lowered the midrange and treble with the crossover, but your bass is still not satisfactory, you might try moving your speakers around and using subwoofers in an attempt to augment the room affected bass response. It is a commonly held belief that subwoofers are a poor fix for small speakers but subwoofers tend to have a special case relationship with domestic listening rooms, and are not a bad idea, even overlapping with large speakers.
If you seek more pluck, or punch to the bass lines you'll find this in the midrange, even the upper midrange which is often a matter of adjusting the woofer inductor or resistor. You might need to correct the tweeter to match.
A woofer that has been crossed over too high
Two issues here. Apart from cone breakup which has been covered, a woofer that is becoming directional might sound thin in the upper midrange, which can be worked around by reducing the resistor value in the woofer crossover and/or reducing the tweeter's capacitance and/or trying different values for the tweeter resistors.
A word on component quality
You may have heard that quality components can make a difference, and this is true to a point. A properly designed crossover using appropriate off the shelf parts will sound better than a generic crossover using the most expensive parts. You can achieve very good results using moderately priced components.
What a champion you are !
This is fantastic info for the newcomers like myself.
Very easy to understand and very inspirational.
Thanks a lot. 😉
This is fantastic info for the newcomers like myself.
Very easy to understand and very inspirational.
Thanks a lot. 😉
Very good information!
One comment on tweeter polarity. i.e. choosing the right polarity. Try pink noise and sit fairly close (and on the intended listening axis). Reverse the polarity reapeatedly. The better position will make the sound more integrated and will make the units sound like they merge. With the wrong choice the woofer and tweeter are perceived as separate and distinct units.
David S.
Excellent work AllenB! 🙂 A lot of thought, time and effort has gone into producing this tutorial! Wish I had something like this 26 years ago when I first started randomly putting drivers together with pre-built crossovers!
Tony.
Tony.

Nice writeup! This captures many of the steps and explains things in a very basic way so that a beginner can understand it.
I wanted to let beginners know that there is a similar guide to designing speakers without measurements by Dave Dal Farra that is posted here (at the bottom of the page):
Loudspeaker Design Software
It goes in to more detail about how to use various free software programs and spreadsheets as part of the design, and gives a worked example design. It might be a good next step for people who have completed a a "first" speaker design using your tutorial.
-Charlie
- Home
- Loudspeakers
- Multi-Way
- Introduction to designing crossovers without measurement