Ryan,
Nothing looks dry. Just went over everything with a high power magnified loop. Also, re-cleaned the board.
When the board is cold, voltages are correct for -15 and +5. Then voltages drift very quickly (low for the +5, high for the -15 and good on the -5). So, maybe I over heated x-1, 2, 3?
I've never had an issue like that. Ill have a think about it.
I was at BAF2019 all day today and I just read the voltage readings. I am sorry to hear that the voltages are not correct. Are these with the TDA or dummy loads in place? Definitely try it with dummy loads to take the TDA out of the equation.
If you are getting the same voltage variations with the dummy loads, then you know that the D3 has issues. Also if the regulated supplies are working properly, the -15V should not be able to rise to -20V.
My thoughts are if -5V is good cold and hot, then the -5V portion of the circuit is good. If +5v is low there is a good chance that the TL431 is faulty. When I built mine, I messed up a couple of them and that resulted in low voltages. When I replaced them the voltage came up to normal. However, in my case the voltage was low to start and stayed low.
The -15V is the sum of the -5V and the -10V supplies. So if the -5V works properly, then that points to a problem with the -10V portion of the supply. And if all the solder joints and components are properly located, then I would think that either the TL431 and/or Q3 PNP transistor are defective.
Ryan, perhaps you can critique my logic and give some insight into my assessment. I am not an electrical designer, so I do not have a good understanding of the function of the transistor in the regulation stage. I am just applying logic and my very basic electrical design knowledge to try to help Greg as best that I can. So perhaps you can determine whether a faulty TL431 and/or Q3 is likely to be causing the voltage to rise.
Unfortunately, I found out the hard way that replacing the TL431 and Q3 was not an easy task. In my trouble-shooting and repair of my own board, I ended up having to replace a couple of TL431 and a Q3. It was all precipitated by bad soldering to start out with, and then made worse by probably overheating them when I tried to reflow the solder with hot air. Then I made things worse again by trying to remove them with hot air after the reflow did not solve my problem - I ended up losing some solder pads for the TL431. It also took a lot of heat to remove the Q3. But the good thing was that I was able to solder some through-hole TL431 directly to the appropriate components and complete the circuit.
So Greg, I am not telling you this to scare you, but to assure you that if you have to desolder some smd components and if you lose some teeny solder pads in the process, all is not lost, and it can be fixed.
I'm sure Ryan will be giving you further instruction on how to proceed with your issue.
Ben I think you are right, there is most likely something wrong with x3 and x1 on Greg's board. I've fried a few of these in the past and also ripped the pads off the PCB replacing them. When re-working these parts there is no need to go hotter than 270c with the iron and the hot air gun. Also, be very careful not to heat up the 22uF film caps with hot air as they have a tendency to blister and the layers end up delaminating...
Ben / Ryan,
I'm going to replace x1, x3, and Q1. I've done plenty of SMD soldering with perfect results, but never this many components in one build.
What's fascinating is that both +5 and -15 Delta at the same rate.
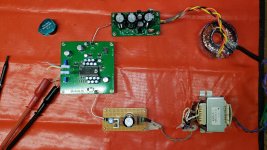
What also concerns me is that what else is potentially wrong that cannot be measured: this board really needs to be wave soldered.
I will order multiple replacements and report back.
Cheers,
Greg
I'm going to replace x1, x3, and Q1. I've done plenty of SMD soldering with perfect results, but never this many components in one build.
What's fascinating is that both +5 and -15 Delta at the same rate.
What also concerns me is that what else is potentially wrong that cannot be measured: this board really needs to be wave soldered.
I will order multiple replacements and report back.
Cheers,
Greg
Last edited:
Greg,
Hopefully you will get it running soon. It's a great dac.
Ben
Ben,
Thanks for all the guidance. I've got everything ordered and will be delivered in a few days. I'm going to start with X1, X3, and Q1. Then, V1 and CC1.
I will be very careful with the TL431s.
Cheers,
Greg
Ben / Ryan,
I'm going to replace x1, x3, and Q1. I've done plenty of SMD soldering with perfect results, but never this many components in one build.
What's fascinating is that both +5 and -15 Delta at the same rate.
What also concerns me is that what else is potentially wrong that cannot be measured: this board really needs to be wave soldered.
I will order multiple replacements and report back.
Cheers,
Greg
I think that's a good place to start, good luck.
Hi Greg,
How did you get such high voltages? Hopefully your chip is ok.
Normally when im testing the board I use dummy loads.
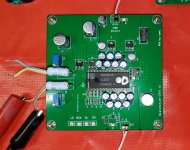
Lately the first thing I solder on the D3 board is the minimum amount of parts to get the 3 supplies working, so if there is something wrong there aren't many parts the check/replace/reflow.
Solder these first, then test -
X1, X2, X3, C5, C13, C21,
R19, R20, R18, R24, R23, R25, R28, R30, R27, R29, R21, R17, R16
Q3, Q2, Q1, CC1, V1, R22.
Once these parts are in place I place the dummy load into the dip-28 socket holes and then power it up. If all is well your current should be around 135mA. If I have an issue I usually inspect all the solder joints. Then I re-flow the suspect joints using a little bit of flux.
Without the caps in place the supply voltages wont be accurate or stable but they should be close enough to verify operation.
Since I've started using this method my success rate of the circuit working first go is much better.
One other issue I've noticed that comes up sometimes is some fluxes need to be thoroughly cleaned off before testing or they affect the operation of the circuit.
Mark,
Follow Ryan's guidance. The simple test are to check the -15, +5, and -5 at the socket.
If you get those right then you are doing very well.
Cheers,
Greg
Hi Greg,
I built it some time ago and getting ready to test things. I have spot on supply voltages at the TDA -15, 5, -5V at the appropriate pins. No inputs or ouputs yet. Have J1 jumpered and with TDA inplace getting approx -400mV at AOL and AOR with approx 40mV of attenuation and unable to zero. Not sure if this is normal with no connections or not. R35&36 are not in place.
Thanks,
Mark K.
Last edited:
Hi Greg,
I built it some time ago and getting ready to test things. I have spot on supply voltages at the TDA -15, 5, -5V at the appropriate pins. No inputs or ouputs yet. Have J1 jumpered and with TDA inplace getting approx -400mV at AOL and AOR with approx 40mV of attenuation and unable to zero. Not sure if this is normal with no connections or not.
Thanks,
Mark K.
I was able to adjust all the offset out of my build, BUT, my voltages are off. 40mV is a bit high, what is your output stage?
Cheers,
Greg
I am attempting as simple a setup as possible to test functionality. I have no input yet and no output and leaning towards Resistor IV for simplicity.
No connections yet. Just testing.
Mark K.
Mark,
I'm not sure what other builds are achieving as far as offset goes, you should be able to zero it out. So, if you've you've had only -40mv of attenuation, then 360, is high.
I'll let Ryan chime in on this one.
This is a tough build, just because thermal damage to SMDs is very, very easy with this project. All the SMD projects I've had in the past have been easier.
Cheers,
Greg
The TDA1541A has an output current offset of 2mA. The output circuit with the trimmer and resistor connected to the +5V supply is to null this offset. 5V/2500 ohm = .002A. So the trimmer would be set at around 500 ohms in series with the 2000 ohm resistor.
Mark,
Did you try adjusting the trimmer?
Try measuring the offset with an IV resistor in place. The IV resistor value for testing isn't critical. Anything from 25 ohm to 150 ohm will easily work. You can even use that to play music. The higher the value, the louder it will play. I use an IV value of approximately 75 ohm in my dac.
Ben
Hi Ben,
With a 150ohm resistor in place for R35&36:
AOR1= TR1 full CW 202.7mV
AOR1= TR1 full CCW 93.1mV
AOL1= TR2 full CW -85.3mV
AOL1= TR2 full CCW -200.2mV
I didn't write down the voltages earlier with the IV resistors out and the values were nearer to 500 ohm on the high end and 400 on the low end.
Thanks,
Mark K.
- Home
- Group Buys
- DIY TDA1541A PCB "D3"