Micro Towers - I can't exactly remember which one I came across first - the plans on Planet 10 website http://homepage.mac.com/tlinespeakers/FAL/downloads/microTower-maps-150909.pdf, or this thread by Dave: http://www.diyaudio.com/forums/full-range/148901-microtower-bipolar-ml-tl-chr-70-el70-2.html. Either way, I loved the intro... a bit of nostalgia, a bit of reviving a joy of the past... and the build looked simple, the finished speakers cute. Compact dimesions = (usually) Higher WAF 🙂, especially given that my first FR build was the BIB (pretty massive); then the plan was to build a Pensil 12 which became a Super Pensil 12 (pretty massive too).
I was also looking for speakers which could produce good bass and became very excited about FAST. After discussing FAST with Dave I had initially planned to order a pair of Alp 7 or CHR70.2En from Dave as FAST FR units. Dave's CHR70.2Ens were on sale at that time, so just decided to pick up 2 pairs... a pair for FAST and a pair for other experiments.
And then it hit me - why don't I do a Micro Tower build? According to Dave and ChrisB the MTs give plenty of bass... also the MT dimensions looked a perfect fit to me for using my left over pieces of ply board.
And so it was decided - let's go and build this! The picture below is not my buidl, but a concept build by Dave and Chrisb taken from the plans. If you take look at the illustration (taken from P10 plans), you will see how compact the speakers are (and the variations that can be made).
-Zia
Attachments


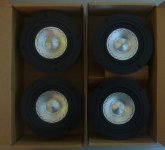
Drivers
The drivers for this project are Planet 10 modified CHR70 MK2.
Very happy with shipping and service from Planet 10, thanks Dave.
I have 40 hours of break in done for all the drivers. Will get some more before sounding off big time with the Micro Towers...
The drivers for this project are Planet 10 modified CHR70 MK2.
Very happy with shipping and service from Planet 10, thanks Dave.
I have 40 hours of break in done for all the drivers. Will get some more before sounding off big time with the Micro Towers...
Attachments
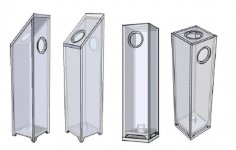
Many flavors, which one to choose?
If you go through the MT plans, you'll see that there are a good number of variants.
For me the "castle" or sloped design caught my eye... I liked the aesthetic. Initially I was thinking of doing the 45 degree incline build, finally went for the 15 degrees. The attached image is an illustration from the Planet 10 MT plans file showing the standard MT and the 45 degree inclined top model.
Regarding WAF, my wife liked the design the first time I showed it to her and voted for the "castle" look. Good, more power to the towers!
Attachments
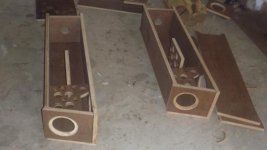
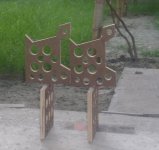
Cutting the pieces for teh build
I used 18mm ply, the plans on the site are for 15 mm ply board.
I kept the internal dimensions same as the original and cut the pieces accordingly.
Again there are some holey braces and more to that on the next post.
I used 18mm ply, the plans on the site are for 15 mm ply board.
I kept the internal dimensions same as the original and cut the pieces accordingly.
Again there are some holey braces and more to that on the next post.
Attachments
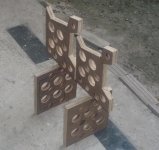
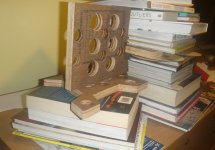
Braces for the Castel Microtower
Adapted Dave's holey brace design for this build.
Since I do not have clamps, the books came in handy while gueing the two pieces together. 🙂
Adapted Dave's holey brace design for this build.
Since I do not have clamps, the books came in handy while gueing the two pieces together. 🙂
Attachments

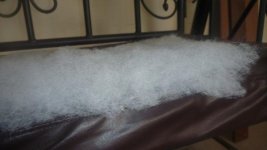
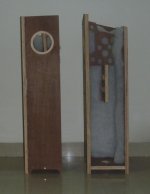
Damping
At first I had assumed that damping would be like BIB or Pensil 12, where there removable panels at the front or back to adust damping level to room need and personal preference. Then I realized that the MTs do not have a removable panel option in the original design.
Going through the plans again, I discovered that acosutic fibre glass wool is recommended. After asking at the forum I learnt that poly batting will also work.
It took me aday to track down some 1" thick poly batting. Fixed this with glue to the insides of the back and both sides.
Attachments

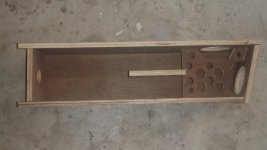
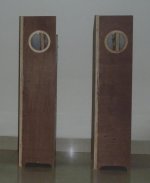
Putting the parts together
Finished cutting the pieces, making the braces, cutting the driver holes, and finaly fixing the damping material - so time to put the cabs together.
Have one side and the top open as of now.
Finished cutting the pieces, making the braces, cutting the driver holes, and finaly fixing the damping material - so time to put the cabs together.
Have one side and the top open as of now.
Attachments
Wow you built these up quick! This'll be cool to hear how you feel about these vs. the SuperPensil's you're building.
Scott
Scott
You'll need more damping than that, it will be similar to the pensils
dave
Dave, thanks for pointing this out.
This is the 1" thick poly batting lining. I have more with me. So basically I should have the fuff placed from under the drivers all the way to the base?
-Zia
Wow you built these up quick! This'll be cool to hear how you feel about these vs. the SuperPensil's you're building.
Scott
Scott,
This is a simple and fun build. The cutting was done real quick and we took a lot of learning experiences from the Pensil build into this. Worked out ways to overcome the lack of router for the driver holes (I used my hole saw since these are much smaller drivers) and the workmen were up to it. They worked with me on the previous 2 builds and by now have a hang of things (so mistakes are fewer and measurements more accurate🙂).
If you have space I would dare you to do one and try them out EL70s!
-Zia
Zia,
Yeah you rocked this build super quick! They look very clean with nice joints.
Depending on how I like the Super's I might build a center and matching surrounds with a set of 7's or 70's, we'll see.
I'm subscribed to this thread so I can follow your progress 🙂 What are you doing to finish these?
Scott
Scott,
Thanks 🙂, probably the finish will be in teak veneer. I also have your suggestion for Pensils in mind - a nice reddish brown stain on the panels and a clear gloss finish of the edges of the ply boards.
-Zia
Thanks 🙂, probably the finish will be in teak veneer. I also have your suggestion for Pensils in mind - a nice reddish brown stain on the panels and a clear gloss finish of the edges of the ply boards.
-Zia
Scott,
Thanks 🙂, probably the finish will be in teak veneer. I also have your suggestion for Pensils in mind - a nice reddish brown stain on the panels and a clear gloss finish of the edges of the ply boards.
-Zia
Ooh! I like your last idea! A dark stain on that already pretty plywood then making then end grains pop with clear gloss ... That's the ticket right there

Scott
Ooh! I like your last idea! A dark stain on that already pretty plywood then making then end grains pop with clear gloss ... That's the ticket right there
Scott
Experiment with filling / sealing exposed edge grain on plywood scraps before finishing the boxes - it's notorious for sucking a lot of material, and finishing up with uneven colors / sheen if not at least pre-sealed with shellac, etc.
Before you apply any product, give all surfaces and particularly edges a thorough sanding down to at least 220G (random orbit, followed by careful straight stroke hand sanding), and pretest for sanding swirls, saw marks, scratches or other imperfections with paint or lacquer thinners and side-lighting. Once stain and first coat of finish product are down, it's a lot harder and very time consuming to fix the flaws that will jump out at you.
The enclosure's finish is the only thing that most folks will ever see, and lasts a lot longer than your own memory of imperfections or remediation required to the inside of the the box.
Last edited:
Thanks for logging your build. I look forward to hearing your impressions. Will you measure these? I haven't found many measurements on some of these full range builds.
Thanks again.
Thanks again.
Thanks for logging your build. I look forward to hearing your impressions. Will you measure these? I haven't found many measurements on some of these full range builds.
Thanks again.
Tuxedocivic,
Glad you liked the log 🙂.
I've never measured speakers, and I doubt if I have the right equipment - plus I think the room will be a big obstacle here... sound will be colored by room characteristics and speaker placement. But if it is a worthwhile exercise I can give it a try.
Listening impressions definitely I will post.
-Zia
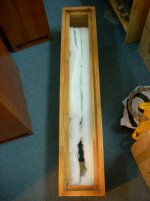
More damping
Dave,
I got this pic on damping from a Pensil thread - this looks right to you?
-Zia
You'll need more damping than that, it will be similar to the pensils
dave
Dave,
I got this pic on damping from a Pensil thread - this looks right to you?
-Zia
Attachments
Removable side panel?
Dave, Chrisb,
Since one side of the cab is still not glued up, I can consider making the side panel removable... the main reason for this would be to have the flexibility of adjusting the stuffing. A thin rubber foam gasket can be used to keep the edge more or less sealed.
For removable panel I have the option of directly making screw holes into the sides, or use cleats (illustration attached).
-Zia
Attachments

- Home
- Loudspeakers
- Full Range
- Castle Microtower build