OK, I guess it’s time for me to start reporting on my Fonken build. I work so slowly that I hesitate to say anything until I’ve made significant progress.
For the benefit of newbies or those who need a little encouragement to get started, I will pontificate at length on some details. If the experienced builders have suggestions for improvements, by all means, chime in. Just remember that this is an approach for one who doesn’t have a wood working shop & can’t afford one.
The Fonken is my fourth build. I had originally planned to get at least one more under my belt before starting in on the small (but somewhat fussy) project. Build number 3, a Triska sub, didn’t fill the slot I intended: the XO in the plate amp doesn’t cross as low as it says; as a result, it doesn’t blend well w/ my FE108eSigma Metronomes. Hopefully, it will match the more bass challenged Fonkens. (If not, then I’ll need a better plate amp.)
For those who haven’t tried building yet, let me set the stage w/ a few bits of wisdom that the old timers may forget to say (‘cause it’s second nature to them so they don’t think about it anymore.)
1) Trust NO ONE, not even yourself! Maybe the old timers don’t need this, but making full size drawings and triple checking every measurement reduces my error rate.")
2) That sheet of plywood may be premium quality, but it isn’t square.
3) Plan the work, then work the plan. Once you start pouring glue, it’s too late to rethink what you’re doing.
4) In the end, the only way to be sure you never make a mistake is to do nothing! When you do mess up, chalk it up as a learning experience--however painful that may be.
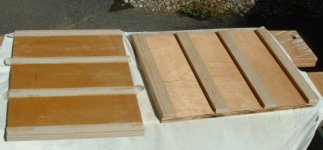
I found that I can buy Baltic Birch ply at the Curtis Lumber. At Home Depot and Lowes they had no clue what I was talking about. At the time I was looking to buy materials for the Fonkens, I couldn’t find any good ply at either HD or L. What they did have was either too warped or too beaten up. So I went to Curtis. They don’t have BB in the store, but can get it from their warehouse.
The BB I got is flat & in good condition, but the edges tend to chip out or fray, no matter what I use to cut it. So after I get the Fonkens tuned to my satisfaction, I plan to take them apart again and veneer them in red oak--which will match the stands I built for them.
End Part 1.
For the benefit of newbies or those who need a little encouragement to get started, I will pontificate at length on some details. If the experienced builders have suggestions for improvements, by all means, chime in. Just remember that this is an approach for one who doesn’t have a wood working shop & can’t afford one.
The Fonken is my fourth build. I had originally planned to get at least one more under my belt before starting in on the small (but somewhat fussy) project. Build number 3, a Triska sub, didn’t fill the slot I intended: the XO in the plate amp doesn’t cross as low as it says; as a result, it doesn’t blend well w/ my FE108eSigma Metronomes. Hopefully, it will match the more bass challenged Fonkens. (If not, then I’ll need a better plate amp.)
For those who haven’t tried building yet, let me set the stage w/ a few bits of wisdom that the old timers may forget to say (‘cause it’s second nature to them so they don’t think about it anymore.)
1) Trust NO ONE, not even yourself! Maybe the old timers don’t need this, but making full size drawings and triple checking every measurement reduces my error rate.
2) That sheet of plywood may be premium quality, but it isn’t square.
3) Plan the work, then work the plan. Once you start pouring glue, it’s too late to rethink what you’re doing.
4) In the end, the only way to be sure you never make a mistake is to do nothing! When you do mess up, chalk it up as a learning experience--however painful that may be.
I found that I can buy Baltic Birch ply at the Curtis Lumber. At Home Depot and Lowes they had no clue what I was talking about. At the time I was looking to buy materials for the Fonkens, I couldn’t find any good ply at either HD or L. What they did have was either too warped or too beaten up. So I went to Curtis. They don’t have BB in the store, but can get it from their warehouse.
The BB I got is flat & in good condition, but the edges tend to chip out or fray, no matter what I use to cut it. So after I get the Fonkens tuned to my satisfaction, I plan to take them apart again and veneer them in red oak--which will match the stands I built for them.
End Part 1.
Part 2:
Having planned the work, including full size drawings, it’s time to make saw dust!
My table saw is too small for me to cut a full sheet of ply, so I use a guide and circular saw to cut the 5x5 sheet into slightly over-width strips. Then get the fence set on the table saw and cut those strips to precise width. Don’t change the fence until all pieces of a given width are cut!
Now cut the strips into appropriate size making sure that you get them square. If you don’t have the benefit of a table saw or need to make odd shaped pieces (like for a Metronome) you can make one piece as close to perfect as you can, then use a router with pattern follower or flush trim bit to replicate it. And keep the flush trim bit handy for later! A router is great for cutting holes, but it’s the flush trim bit that makes it indispensable to me.
I apply finish to all surfaces, inside and out, with the exception of areas which will be glued. I was quite sure that wood glue doesn’t hold on finished surfaces, but I did try it just to be certain I wasn’t ‘missing out’ on sealing glued areas. Yes, I was able to break apart pieces finished with polyurethane and then glued with wood glue.
One reason I am so slow in assembling is that I am applying stain/finish to surfaces before gluing, so that excess glue will wipe off easily. Prior experience tells me that no matter how hard I try, if glue gets on a fresh wood surface, I can’t clean it off well enough to get it to stain properly.
End Part 2
lineup,
No problem! Should have thought of that!
Fonken is a Planet10-HiFi (Dave Dlugos) design using a Fostex FE127 driver. Check out at:
http://www.planet10-hifi.com/fonken.html
No problem! Should have thought of that!
Fonken is a Planet10-HiFi (Dave Dlugos) design using a Fostex FE127 driver. Check out at:
http://www.planet10-hifi.com/fonken.html
Re: What is fonken
Wow - and I thought everyone on this forum knew the Fonken......
Was just listening to a pair 15 minute ago.
lineup said:lineup - has not the faintest idea what is a fonken
Wow - and I thought everyone on this forum knew the Fonken......
Was just listening to a pair 15 minute ago.
Re: Re: What is fonken
just proves me is spending still too much time in Solid State
and far from enough at Full Range & Loudspeakers
But thanks, now I know one thing more:
Fonken is a Planet10-HiFi (Dave Dlugos) design using a Fostex FE127 driver. Check out at:
http://www.planet10-hifi.com/fonken.html
Looks like a nice speaker!
fonken, frugal-phile ... there is no end to Dave's
planet10 [trademarks(diy)]
panomaniac said:Wow - and I thought everyone on this forum knew the Fonken......
Was just listening to a pair 15 minute ago.
just proves me is spending still too much time in Solid State
and far from enough at Full Range & Loudspeakers
But thanks, now I know one thing more:
Fonken is a Planet10-HiFi (Dave Dlugos) design using a Fostex FE127 driver. Check out at:
http://www.planet10-hifi.com/fonken.html
Looks like a nice speaker!
fonken, frugal-phile ... there is no end to Dave's
planet10 [trademarks(diy)]
Jim Shearer said:2) That sheet of plywood may be premium quality, but it isn’t square.
And sometimes the sheet may not be the same thickness on one side as the other.
dave
Re: Re: Fonken-- my 4th build
I check the thickness of the ply, but it didn't occur to me that there might be significant variation within the sheet. One more thing to worry about!
planet10 said:
And sometimes the sheet may not be the same thickness on one side as the other.
dave
I check the thickness of the ply, but it didn't occur to me that there might be significant variation within the sheet. One more thing to worry about!
Having gotten the cabinets glued up (but not finished) recently, it makes me feel better that someone with more experience called them fussy to build. Good tips, Jim. The only thing that I could add to these, if I may:
If you plan on finishing them after listening to them, make sure to give yourself a finite time frame. Mine have been done for about 2 weeks now, I keep finding reasons why I shouldn't take the drivers out and start sanding. These things sound damn good, they're getting addictive!
If you plan on finishing them after listening to them, make sure to give yourself a finite time frame. Mine have been done for about 2 weeks now, I keep finding reasons why I shouldn't take the drivers out and start sanding. These things sound damn good, they're getting addictive!
Strider,
I'm hoping I will find my Fonkens addictive too! Note that I apply finish as I go along, so they won't look too bad; however, I don't think I can stand looking at the chipped out edges of the BB ply in the long run--so trust me, I will be taking them apart for veneering! Just remember that I'm on the slow side.
I'm hoping I will find my Fonkens addictive too! Note that I apply finish as I go along, so they won't look too bad; however, I don't think I can stand looking at the chipped out edges of the BB ply in the long run--so trust me, I will be taking them apart for veneering! Just remember that I'm on the slow side.
Part 3:
The difficult part of the Fonken is building the ports in the side panels. After cutting the exterior and interior pieces of plywood, I applied finish to one side of each piece.
Then I found some 3/8” birch for the port spacers. I cut the 3/8” birch into strips 0.996” wide (as close to 1” as I could get, as measured with a vernier caliper.) Next cut the strips to length, adding an extra 1/32” so they are just slightly long.
Find a scrap piece of the BB ply and clamp it onto the rear of the outer side piece where the back panel will be when you finish. Take a couple other small scrap pieces and cut them to 3” wide (port width,) mine ended up 3.020”.
Lay the outer side piece against a flat, vertical surface (like the fence on a table saw.) Now apply glue to the first of the 3/8” strips and place it onto the side piece using the BB ply piece and the fence (or whatever) to insure correct positioning. I used 1/2” wire nails (brads) to hold the strip in place, making sure that the brads are not within the area to be cut by the corner bevel (critically important!)
Using the 3” spacers, glue the next strip in place and nail it. repeat twice more. Now wipe off excess glue and ‘clamp’ with a flat board and weights. The bottom strip was about 0.06” beyond the edge of the ply, so I trimmed it off with the router and flush trim bit.
Apply finish to the interior surfaces of the ports--both sides. Use masking tape to protect the surfaces which will be glued. Photo below shows the two pieces which will make-up the port assembly.
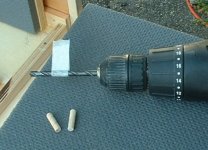
To make sure the interior side piece attaches to the exterior side (with port spacers) correctly, I used dowel pegs. Lay the top of the exterior piece against the table saw fence. Place the interior side piece onto the port spacers in proper registration. Use masking tape to mark the 1/4” drill bit so you can go in slightly more than 1”, but know when to stop! (See photo in next post.) Drill two holes (one top, one bottom) for the dowel pegs in the side pieces (making sure you avoid hitting the wire nails in the port spacers.) Clean wood chips from the holes.
Apply glue to the port spacers. I used a small paint brush to spread a thin layer of glue over their entire surface--insuring full coverage with minimal excess. Place the interior part onto the assembly, apply glue to dowel pegs, and pound in dowel pegs. Wipe off excess glue. I used a stiff bristled artist’s brush with a long handle to remove/smooth the excess glue inside the ports. Clamp with flat board and weights.
Apply finish to the bits of port spacer extending to the back panel and to the interior edge of the plywood.
Use the flush trim bit on the router to insure that the front edges of the assembly are flat/square and the excess length of port spacers is removed on the front.
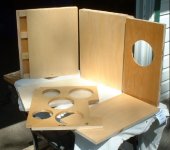
Post below shows photo of the finished side/port assembly.
The difficult part of the Fonken is building the ports in the side panels. After cutting the exterior and interior pieces of plywood, I applied finish to one side of each piece.
Then I found some 3/8” birch for the port spacers. I cut the 3/8” birch into strips 0.996” wide (as close to 1” as I could get, as measured with a vernier caliper.) Next cut the strips to length, adding an extra 1/32” so they are just slightly long.
Find a scrap piece of the BB ply and clamp it onto the rear of the outer side piece where the back panel will be when you finish. Take a couple other small scrap pieces and cut them to 3” wide (port width,) mine ended up 3.020”.
Lay the outer side piece against a flat, vertical surface (like the fence on a table saw.) Now apply glue to the first of the 3/8” strips and place it onto the side piece using the BB ply piece and the fence (or whatever) to insure correct positioning. I used 1/2” wire nails (brads) to hold the strip in place, making sure that the brads are not within the area to be cut by the corner bevel (critically important!)
Using the 3” spacers, glue the next strip in place and nail it. repeat twice more. Now wipe off excess glue and ‘clamp’ with a flat board and weights. The bottom strip was about 0.06” beyond the edge of the ply, so I trimmed it off with the router and flush trim bit.
Apply finish to the interior surfaces of the ports--both sides. Use masking tape to protect the surfaces which will be glued. Photo below shows the two pieces which will make-up the port assembly.
To make sure the interior side piece attaches to the exterior side (with port spacers) correctly, I used dowel pegs. Lay the top of the exterior piece against the table saw fence. Place the interior side piece onto the port spacers in proper registration. Use masking tape to mark the 1/4” drill bit so you can go in slightly more than 1”, but know when to stop! (See photo in next post.) Drill two holes (one top, one bottom) for the dowel pegs in the side pieces (making sure you avoid hitting the wire nails in the port spacers.) Clean wood chips from the holes.
Apply glue to the port spacers. I used a small paint brush to spread a thin layer of glue over their entire surface--insuring full coverage with minimal excess. Place the interior part onto the assembly, apply glue to dowel pegs, and pound in dowel pegs. Wipe off excess glue. I used a stiff bristled artist’s brush with a long handle to remove/smooth the excess glue inside the ports. Clamp with flat board and weights.
Apply finish to the bits of port spacer extending to the back panel and to the interior edge of the plywood.
Use the flush trim bit on the router to insure that the front edges of the assembly are flat/square and the excess length of port spacers is removed on the front.
Post below shows photo of the finished side/port assembly.
Attachments
And here are the side assemblies and other parts ready for glue up. You can just about see the dowel pegs in the interior view of the assembly on the left. Note that I applied finish over the pegs in keeping with the philosophy that ALL surfaces be finished to assure stability and good sound. 
Attachments
nice work Jim
if not already clear, the name "Fonken" came about as a contraction of F ostex and onken (inspired) driver loading and enclosure topology.
BTW, for those not sure that a teensy driver like the FE127 will be satisfying, a larger floorstanding version for the FE167 is quite nice too.
if not already clear, the name "Fonken" came about as a contraction of F ostex and onken (inspired) driver loading and enclosure topology.
BTW, for those not sure that a teensy driver like the FE127 will be satisfying, a larger floorstanding version for the FE167 is quite nice too.
Thanks Chris.
I'm working very hard to get this one so it not only sounds good, but looks decent too. I have been extremely satisfied with the sound of the Metronomes and Half Changs I built, but neither comes close to looking like furniture. OK from a couple feet away, but any closer & you start to see the warts.
With any luck, veneer will cover not only the chipped out edges, but other deficiencies as well.
Veneering
Cutting out the veneer around the port slots is the most tedious part - take your time and as many breaks as you need
Jim Shearer said:Thanks Chris.
I'm working very hard to get this one so it not only sounds good, but looks decent too. I have been extremely satisfied with the sound of the Metronomes and Half Changs I built, but neither comes close to looking like furniture. OK from a couple feet away, but any closer & you start to see the warts.
With any luck, veneer will cover not only the chipped out edges, but other deficiencies as well.
Cutting out the veneer around the port slots is the most tedious part - take your time and as many breaks as you need
Re: Re: Re: Fonken-- my 4th build
In our production shop, we've seen variations in thickness well over 1mm difference within a single 4x8 sheet of commercial grade 1/2" prefinished plywood, regardless of core composition.
This can certainly make for a lot of fun when you have parts cut for several hundred drawer boxes and cabinet cases - the drawer parts might still fit together, but the assembled box will be too wide to fit the cabinet case.
Jim Shearer said:
I check the thickness of the ply, but it didn't occur to me that there might be significant variation within the sheet. One more thing to worry about!
In our production shop, we've seen variations in thickness well over 1mm difference within a single 4x8 sheet of commercial grade 1/2" prefinished plywood, regardless of core composition.
This can certainly make for a lot of fun when you have parts cut for several hundred drawer boxes and cabinet cases - the drawer parts might still fit together, but the assembled box will be too wide to fit the cabinet case.
Chris,
Cutting the port slots in the veneer is the least of my worries. That's the sort of detail I can handle. I'm a mostly retired analytical chemist whose specialty is micro-FTIR. I'm used to working with microscopic particles; handy with a scalpel and probe. So I have the patience (and plenty of No. 11 scalpel blades) to deal with the veneer. It's the big pieces of wood that cause me problems!
Cutting the port slots in the veneer is the least of my worries. That's the sort of detail I can handle. I'm a mostly retired analytical chemist whose specialty is micro-FTIR. I'm used to working with microscopic particles; handy with a scalpel and probe. So I have the patience (and plenty of No. 11 scalpel blades) to deal with the veneer. It's the big pieces of wood that cause me problems!
Part 4: How to assemble W/O clamps
I don’t own furniture clamps--can’t justify the cost for the little I would use them. (If I bought the clamps, then I wouldn’t have the money to build anything with them!)
Most of the time I use screws. Sometimes I use dowel pegs. But the Fonken is made w/ 1/2” ply, which seems to me too thin for screws or pegs to go in edge-wise.
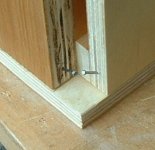
I finally settled on nails in a temporary mode. First I drilled 1/16” holes diagonally through the corners of the front baffle and one side assembly. Set these onto the bottom piece and extend the holes from the front & side into the bottom. Add another hole from the top of the front into the side. Note that a sharp, new drill bit is essential here. Insert 1.5” long 17 gauge wire brads to insure proper fit-up. Don’t pound them in! Just slip them in w/ fingers, leaving a generous amount for pliers to grip when you remove them. See photo below.
Now glue the front baffle onto the bottom, locking it in place w/ the wire brads. Glue up the side and fasten w/ brads. When the glue is dry, pull out the wire brads with pliers.
My next step was to glue in the 1/2” x 1/2” strips for extra hold along the bottom of the back. Then add the driver brace. Next come the other side assembly and the back. And finally, the top.
You may find it easier/better to assemble in another order (or a whole other way,) but this is how I plan to do it.
I don’t own furniture clamps--can’t justify the cost for the little I would use them. (If I bought the clamps, then I wouldn’t have the money to build anything with them!)
Most of the time I use screws. Sometimes I use dowel pegs. But the Fonken is made w/ 1/2” ply, which seems to me too thin for screws or pegs to go in edge-wise.
I finally settled on nails in a temporary mode. First I drilled 1/16” holes diagonally through the corners of the front baffle and one side assembly. Set these onto the bottom piece and extend the holes from the front & side into the bottom. Add another hole from the top of the front into the side. Note that a sharp, new drill bit is essential here. Insert 1.5” long 17 gauge wire brads to insure proper fit-up. Don’t pound them in! Just slip them in w/ fingers, leaving a generous amount for pliers to grip when you remove them. See photo below.
Now glue the front baffle onto the bottom, locking it in place w/ the wire brads. Glue up the side and fasten w/ brads. When the glue is dry, pull out the wire brads with pliers.
My next step was to glue in the 1/2” x 1/2” strips for extra hold along the bottom of the back. Then add the driver brace. Next come the other side assembly and the back. And finally, the top.
You may find it easier/better to assemble in another order (or a whole other way,) but this is how I plan to do it.
Attachments
- Status
- This old topic is closed. If you want to reopen this topic, contact a moderator using the "Report Post" button.
- Home
- Loudspeakers
- Full Range
- Fonken-- my 4th build