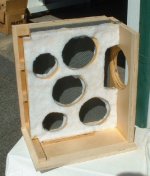
I should have mentioned that the lining needs to go on the parts prior to assembly. I decided to use 1/2" acoustic foam from Parts Express (p/n 260-520.) I have used this foam previously with good results; and haven't found any wool felt locally.
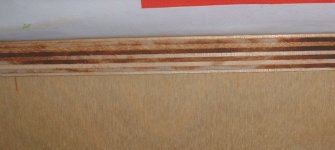
Photo below shows the driver brace installed with its fuzzy coating: 1/4" poly batting on each side. We'll see if this works as well as the recommended 1/2" of felt on one side. You can also see that this time I used a wood joiner to hold the brace for glue up rather than a wire brad.
Photo below shows the driver brace installed with its fuzzy coating: 1/4" poly batting on each side. We'll see if this works as well as the recommended 1/2" of felt on one side. You can also see that this time I used a wood joiner to hold the brace for glue up rather than a wire brad.
Attachments
Great looking work, Jim. You really are taking your time and doing it right. One thing about the dampening on the brace, if I may. In Dave the Bass' Fonken build thread, it was recommended to cover the holes in the brace with the dampening material. Also, they said to add it to one side only. Hope this helps.
Ben
Ben
Part 5:
Don’t forget to check the fit of the driver to the brace before installing the second side!
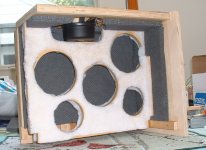
I found that the separation between the back of the driver and the brace increased slightly with the glue added. When doing the dry fit up, I found that a thin piece of cotton fabric was the right thickness for correct contact--firm contact, but no great stress. After glue up, I’m using a piece of slightly thinned poly batting.
Don’t forget to check the fit of the driver to the brace before installing the second side!
I found that the separation between the back of the driver and the brace increased slightly with the glue added. When doing the dry fit up, I found that a thin piece of cotton fabric was the right thickness for correct contact--firm contact, but no great stress. After glue up, I’m using a piece of slightly thinned poly batting.
Attachments
strider75 said:In Dave the Bass' Fonken build thread,
Indeed covering the holes is the most important part to cover. This is where the big side-to-side pressure node sits and where the damping is most effective. Since it is deas on the middle of the box, situating the damping on the side that puts it closest to the middle is best in theory. some on both sides is worth a try.
(note that in early builds we didn't have any on the side of the holey brace and things were still fine)
dave
Ahhh, I had no idea that the felt was supposed to go over the holes in the brace!
I haven't glued the tops on yet, so it's easy enough to put some batting in the center. And if it sounds over-damped, well, it's easy enough to get it out; even w/ the slightly obstructed 4" 'entrance.' Getting the excess lining out of the Metronome via the 4" drive hole was...well, impossible (and resulted in major surgery on the port baffle.)
Thanks, Jim
Part 6:
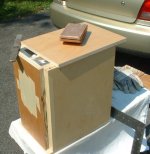
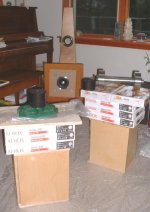
With all the sides on, it’s time to make final adjustments before gluing on the tops. Photo below shows the labor intensive process of tiny adjustments with wood file and sand paper, trying to get the fit as good as I possibly can. Good joints are essential if the cabinet is to reach its full potential!
With all the sides on, it’s time to make final adjustments before gluing on the tops. Photo below shows the labor intensive process of tiny adjustments with wood file and sand paper, trying to get the fit as good as I possibly can. Good joints are essential if the cabinet is to reach its full potential!
Attachments


Jim,
Thanks so much for your updates. The MiniOnken will be my first attempt at speaker building.
While I'm a virgin as far as speakers are concerned, I have a fair amount of experience building cabinets and furniture. Chipout can be avoided by using a sharp, goodquality, high tooth count blade (60-80 tooth) combined with a zero-clearance insert in your tablesaw. If you just have a circular saw you can add on a plywood base to your circular saw plate after plunging through it with the blade...use double stick tape to attach it. Keep the show face of the workpiece down on the tablesaw and up if using a circular saw.
Mark in NC
Mark,
There is NO way to avoid chip out on this batch of BB. Areas where I taped off to keep them clear of finish (so they will accept glue properly) suffered chip out! If masking tape rips up the surface, then the only way I can think to cut it that won't chip out is with a laser.
There is NO way to avoid chip out on this batch of BB. Areas where I taped off to keep them clear of finish (so they will accept glue properly) suffered chip out! If masking tape rips up the surface, then the only way I can think to cut it that won't chip out is with a laser.
Jim Shearer said:Mark,
There is NO way to avoid chip out on this batch of BB. Areas where I taped off to keep them clear of finish (so they will accept glue properly) suffered chip out! If masking tape rips up the surface, then the only way I can think to cut it that won't chip out is with a laser.
as Terry Olson would say "Bondo is the DIYers' best friend"
Jim - I've run into the same issue myself on several batches of BB ply. Even brand new carbide router bits or freshly sharpened saw blades can still chip out on the cross-cuts.
While it sounds like it's too late for this project, what I've has some success with is clamping a sacrificial block of wood to the bottom of the enclosure while cutting the side chamfers. Having access to a production sliding table saw with a 5ft stroke and 15HP main motor also helps make this part relatively easy.
I always veneer my finished cabinets, so minor chip-outs on the bevel cuts are simply filled with Bondo or yellow glue/sawdust mixture, and sanded out before applying veneer.
Chris,
I did hold a scrap piece up to the end of the chamfer cut, but I didn't dare add a piece under the cabinet. My poor little 3 HP table saw had enough trouble making that cut as is.
I note that the urethane finish was some help in reducing chip out on this cut. And of course, the scrap piece at the end of the cut was a major help.
Report and photos will follow tomorrow.
Part 7:
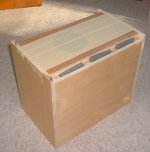
With the tops glued on, I used the router with flush trim bit to clean off the edges.
Time to cut the 45 degree chamfer on the ports!
To keep the sawdust out of the cabinet, I covered the driver & binding post holes and stuffed pieces of foam into the ports (being sure to get them in far enough that they won’t get caught by the saw blade.) The foam will be removed later with fine pointed forceps (tweezers.)
Note: for improved WAF, I want to mount the drivers diagonally, i.e. so that they look like a diamond shape, rather than a square. If I make a 45 degree cut, the front baffle will be just a little too narrow to accommodate this arrangement. So, I changed the angle by 5 degrees. This is the sort of detail which is easily worked out with the full sized drawings I spoke of earlier.
Attachments
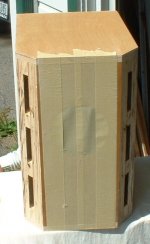
I was worried that my little 3 HP Sears table saw might not be up to the task of cutting the chamfer, but by going slowly, it made it--although there was a distinct aroma of burned wood. I did hold a piece of scrape wood on the end so that when the saw blade emerged it wouldn’t shred the top or bottom surface of the cabinet (too badly.) The ports did suffer some chip out, but what can you do?
Next up will be patching the chipped out areas, sanding, and another coat of finish. (The exposed ply edges are still bare.)
Then I can install drivers and proceed to sound tests.
And when all is good sonically, then I will take them apart again and veneer the cabinets.
Next up will be patching the chipped out areas, sanding, and another coat of finish. (The exposed ply edges are still bare.)
Then I can install drivers and proceed to sound tests.
And when all is good sonically, then I will take them apart again and veneer the cabinets.
Attachments
Jim Shearer said:I was worried that my little 3 HP Sears table saw might not be up to the task of cutting the chamfer, but by going slowly, it made it--although there was a distinct aroma of burned wood.
Nice job Jim!
IIRC I cut my chamfers using four or five smaller passes, less load on the saw
")
Thanks! I'm taking my time & trying to make them as good as I know how.
Actually, I did cut the chamfers in two passes, but not in a way that took any load off the saw. The first cut was intentionally short of where it needed to be. Then I measured the depth from the outer side of the cut to the interior side of the port; re-set the fence by that amount by using a square on the table saw to mark the displacement from the fence, then moving the fence. Seemed like the best way to get it 'just right'.
Actually, I did cut the chamfers in two passes, but not in a way that took any load off the saw. The first cut was intentionally short of where it needed to be. Then I measured the depth from the outer side of the cut to the interior side of the port; re-set the fence by that amount by using a square on the table saw to mark the displacement from the fence, then moving the fence. Seemed like the best way to get it 'just right'.
Part 8:
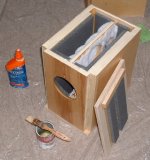
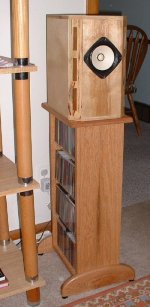
The finish is now ready for veneering. I filled & sanded to cover the chip out, then gave the cabinets another complete coating of polyurethane, so all edges are sealed. This is important not only for cabinet stability and sound, but also because I use peel & stick veneer, which won’t bond properly with bare wood.
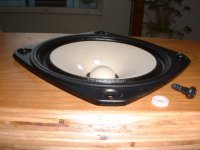
But before veneering, it’s time for ‘first sound’ to check the cabinets, and decide on BSC (baffle step correction.) So I installed the drivers, binding posts, and wiring. Photo below shows the drivers going in. I used washers (Nylon in this case) between the driver and the cabinet to prevent stressing (bending) the driver basket. I think this idea came from Bob Brines; (correct me if I’m wrong guys.)
The finish is now ready for veneering. I filled & sanded to cover the chip out, then gave the cabinets another complete coating of polyurethane, so all edges are sealed. This is important not only for cabinet stability and sound, but also because I use peel & stick veneer, which won’t bond properly with bare wood.
But before veneering, it’s time for ‘first sound’ to check the cabinets, and decide on BSC (baffle step correction.) So I installed the drivers, binding posts, and wiring. Photo below shows the drivers going in. I used washers (Nylon in this case) between the driver and the cabinet to prevent stressing (bending) the driver basket. I think this idea came from Bob Brines; (correct me if I’m wrong guys.)
Attachments
- Status
- This old topic is closed. If you want to reopen this topic, contact a moderator using the "Report Post" button.
- Home
- Loudspeakers
- Full Range
- Fonken-- my 4th build