Wheres dah boom box?
The bass horn comes next. The recent cold snap (-37F windchill) has made my unheated garage less appealing, but I'll grow some balls and get it done sometime this winter.
Another thought about compression drivers and the throat. You want to make sure that you make the transition from the CD exit into the horn is as smooth as possible. With my S2 I actually got the calipers on my compression drivers and made a fairly accurate 3D model which helped me then work out what must happen at the throat. So in effect I aimed for a throat that was like an oblate spheroidal waveguide but applied to a different horn. If you change CD you might find it wants a different throat.
I was involved in some comparisons between waveguides and drivers last year. We played torture tracks that really showed up the ability of the system to handle music that can get harsh. First up I remember hearing the Selenium driver in a Pyle waveguide, which is basically a copy of a JBL progressive transition, Dayton also has a copy. Outch. It made our ears bleed and we winced. I believe the CD was mostly at fault because the same waveguide even with a crappy adaptor did not have the same problem with DE250. Next up we heard a Faital CD in an 18sound waveguide, the driver had a softer diaphragm. Much smoother and gentler on the ears, but still there was some harshness. Next up we heard my Miniwaves which basically has a DE250 on a custom made 6" OS waveguide and a 6" mid. It was a step up again in terms of smoothness and listenability. I later added reticulated foam and at that point it was very close to a soft dome tweeter in terms of listenability, it was another step again.
More:
Red Spade Audio: Waveguide shootout
I believe the Yorkville uses a BMS compression driver, I've heard it and liked the sound very much. I've also used 4550 and I think it's in similar territory to the B&C in terms of listenability.
I've also got a couple of pages about these compression drivers, where I took them apart and took some pics. The BMS has a very different design.
I've also got a couple of pages about these compression drivers, where I took them apart and took some pics. The BMS has a very different design.
I've read your entire blog 😛
Your waveguide and driver tests are great! The BMS drivers seem to be in a league of their own and are priced really fairly. I initially chose to use the d220ti because it has a reputation for a good cost/performance ratio and, if I failed, I could use it in an econowave box (which is what I'll do with it once I get the BMS).
For the horn throat, I used modeling clay and did trial and error until I felt I had a good result. We'll see how much a different driver changes things, but I feel it can only get better.
If I were more ambitious I would try something entirely different with the throat. The original unity horns and many clones seem to mate a 1" diameter CD to a 1" square horn entry then fill the four corners. I would like to see how the same 1" diameter exit would work going into, say, a 0.875" square and then using a combination of material removal and filling. This could make for a smoother transition and a more constant flare rate.
Attachments

What I've done is a bit more like your illustration on the right. However, I also took the mounting plate for the CD and started to flare it out by turning it up in the lathe. I then overlap the square throat like your right illustration, perhaps overlapping even slightly more. Then I have more removal than filling and I find that it is easier to remove. Filling with bog isn't my favourite thing. The result is a smoother transition.

That shows the flare on the mounting plate, but it doesn't show the square overlapping as I actually did it.
Looking again at my 3D render, you can see that if you are willing to do enough filling, you could actually get it perfectly smooth without making the square smaller. You just have to fill enough so that there isn't a sudden transition at the throat, but instead very gradual.
What I've had success with is building my horn with a 0.7" X 0.7" throat. I then run a 15/16" drill bit through it. I do some final sanding to enlarge the opening to 1". As the corners fall away from the circular throat, this starts the expansion of the horn in a smooth way that does not require any filling.
This technique sounds like a winner. Hmmm.... no filler means I could build it from hardwood. If I'm feeling up to a woodworking challenge I might try making a second set this summer. Can you imagine the unity horn in a beautifully figured hardwood 
I used a similar approach with some conical horns recently built, similar to the Hughes Quadratic Throat or Geddes OS entrance. Required various shaped files and some filling and more filing where I got too aggressive/impatient with the work.What I've had success with is building my horn with a 0.7" X 0.7" throat. I then run a 15/16" drill bit through it. I do some final sanding to enlarge the opening to 1". As the corners fall away from the circular throat, this starts the expansion of the horn in a smooth way that does not require any filling.
The difference in sound between the previous horns I had made using a diffraction (pinched) throat was apparent (especially at loud levels), even though the measured response difference was not great.
I'm back! ......
I'll post results as I get the ball rolling again.
Oh, and I ordered the kit for this beast. 😀
I really enjoyed reading about the horn you made. Wow, looks very complex with getting the througjt right, and everything smooth.
I hope that you'll also document the building of this folded horn beast of a subwoofer. I am one crazy enough to try something like this. Though I've never built a speaker, I am right at home in the shop, have tools, added a room onto my house, etc. Is this too much for a first build? I think I could do it.
"Whether you think you can, or you think you can't...
Either way, you're probably right!"
Henry Ford
Either way, you're probably right!"
Henry Ford
The documentation that CSS sends along are very exhaustive, and without them this project would be out of reach of most amateurs. They are detailed enough that I think anyone with a table saw and (most importantly) lots of patience could take it on.
Skill saw will work in a pinch. Heck even a jig saw if you are patient enough. It is a fairly simple box when you look at it correctly. No extreme angles or anything hard like that. I tried to make it as simple as possible with the best performance possible.
That was my thought,.. that all the lines looked pretty straight. I have a table saw, and a router.
The way I envision myself taking on a project like this, mostly what I need is tape measure, pencil, good instructions, and lots of patience.
To me the difficult part about speaker building (or shall I say the part I need to learn the most), is what kind of equipment to get to measure the sonic responces, and then how to interpret the data, use the data to make appropriate adjustments using crossovers and whatnot. I think I have much to learn -With this kit, the design part is done, just follow the directions to the proven design. The woodworking is a much lesser challenge to me.
Last edited:
Go for it buddy. You have never heard the likes of what this box will produce. Few people have. It is a real eye opener. And most importantly ear opener.
Jmorken, your unity looks fantastic! First rate work. I would like to build a horn that's basically a slightly longer version of your design that uses two Eminence alpha 6 mids.
Can anyone draw up what I have attached in google sketchup, so that I can know the dimensions and miter angles? I have a shop full of tools and lots of woodworking experience, but I haven't yet figured out sketchup. Maybe there's a simple way to modify jmorken's design that he posted here? I have attached it here as well.
http://www.diyaudio.com/forums/mult...midrange-cone-bandpass-mid-unity-horn-46.html
Thanks very much,
John
Attachments
I don't use Sketchup - i do my stuff in 2D because it's faster, and then I draw the 3D model by hand. (Having made a bunch of these, I can draw it out in less than an hour now 🙂 )
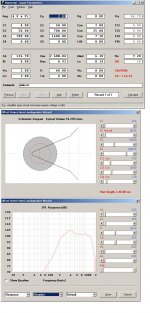
But these parameters are unfortunately impossible to build. For instance, the throat chamber volume and area is set to zero. Which means there is no throat chamber. And that's perfectly valid, as long as the area where the woofers enter the horn is large enough. But it's not - it's set to fifty square centimeters, which is a small fraction of the woofer's size.
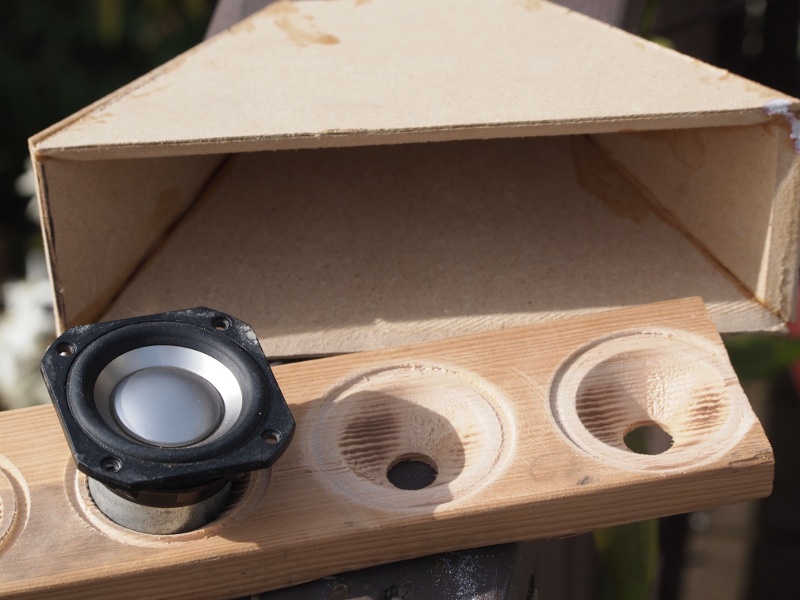
That's the reason that the very very small woofers start to look attractive for a unity horn. You can squeeze a pile of them very close to the throat, and get the surface area of a much larger woofer, basically subdivided over an array of small drivers.
Taken to the extreme, you see the layered combiner that Danley has been talking about lately, with sixty four drivers at the apex of a horn(!)
But these parameters are unfortunately impossible to build. For instance, the throat chamber volume and area is set to zero. Which means there is no throat chamber. And that's perfectly valid, as long as the area where the woofers enter the horn is large enough. But it's not - it's set to fifty square centimeters, which is a small fraction of the woofer's size.
You're right about the parameters. However, this model doesn't accurately depict what we do w/ these unities. I've simulated the alpha 6 mid in winisd as a 4th order bandpass box, and I want to see what happens when I build that box and mate it to the horn. I'll also have to seal the back of the alpha 6.
As far as the woofer offset, you're also right about the model. However, as I'm only using two drivers, I can extend a shelf off the sides of the horn to allow for overhang, much as Paul Spencer has drawn out on his blog, as well as offset the entry tap (great idea, Paul!).
Finally, I don't necessarily plan to have the entry tap at 7 cm from the apex- I'll likely move it closer but will experiment w/ placement via removable wooden plates, onto which the woofers are mounted. As long as the woofer is close enough, the high end roll off won't happen too soon (I've played around w/ hornresp a lot, changing up the L1L2 and S2 to see what happens). I'll likely use a BMW 4550 and a miniDSP for this project. I'm shooting for a fair amount of flat FR overlap between the mids and the CD. If I get it, I'll bisect the overlap for my XO frequency, and use the minidsp to adjust delay and individual driver EQ.... an analog purist I'm most certainly not!
Yeah, this may make an unnecessary pile of sawdust, but I've always been more of a trial and error guy than a modeler. Anyway, I'm starting to learn sketchup on my own, and I'll start a thread when (if!) I get everything together.
John
You're right about the parameters. However, this model doesn't accurately depict what we do w/ these unities. I've simulated the alpha 6 mid in winisd as a 4th order bandpass box, and I want to see what happens when I build that box and mate it to the horn. I'll also have to seal the back of the alpha 6.
Unity horns are hideously complex; I've been studying them for close to a decade and I don't think I understand even half of what's going on.
WinISD is completely unsuitable for simulating them. Hornresp and Akabak are pretty darn good, but they still miss a few variables because they don't simulate the device in three dimensions.
I really don't mean to sound like a wet blanket, but I've built a dozen of these, and I had to waste a lot of time before I got results that were even halfway acceptable.
If anyone's curious to follow my latest one, I am documenting it here:
DIYMA Car Audio Forum - View Single Post - Anyone Want Some HLCDs?

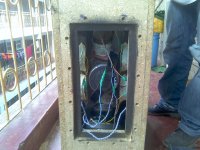
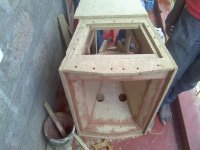
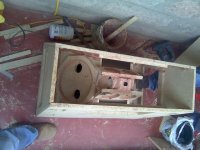
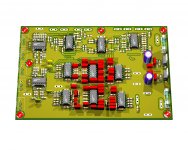
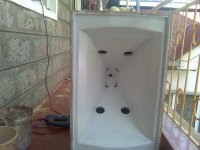
hi all i have been looking for a 24db active crossover to go with the unity horn / synergy horn i made but i have found none. i made a 24db cross over but it did not work well with the horn as i expected could someone please help.
my photos
my photos
Attachments
-
 Pic_1116_001.jpg138.9 KB · Views: 334
 -
 Pic_1115_004.jpg124 KB · Views: 309
 -
 Pic_1115_008.jpg119.7 KB · Views: 613
 -
 gtG 4way with preamp 35h to 22k.jpg376.3 KB · Views: 622
 -
gtG 4way with preamp.zip939.1 KB · Views: 137
-
gtG 4way with preamp 35h to 22k schematic.pdf61.5 KB · Views: 164
-
block diag.pdf10.1 KB · Views: 160
-
synergy unity with 12 sketchup .zip910.6 KB · Views: 184
-
guideline cutting unity with 12 .zip715.1 KB · Views: 198
-
 Pic_1116_004.jpg105.2 KB · Views: 349
- Status
- Not open for further replies.
- Home
- Loudspeakers
- Multi-Way
- Unity Horn - budget drivers, active x-over