Pass DIY Addict
Joined 2000
Paid Member
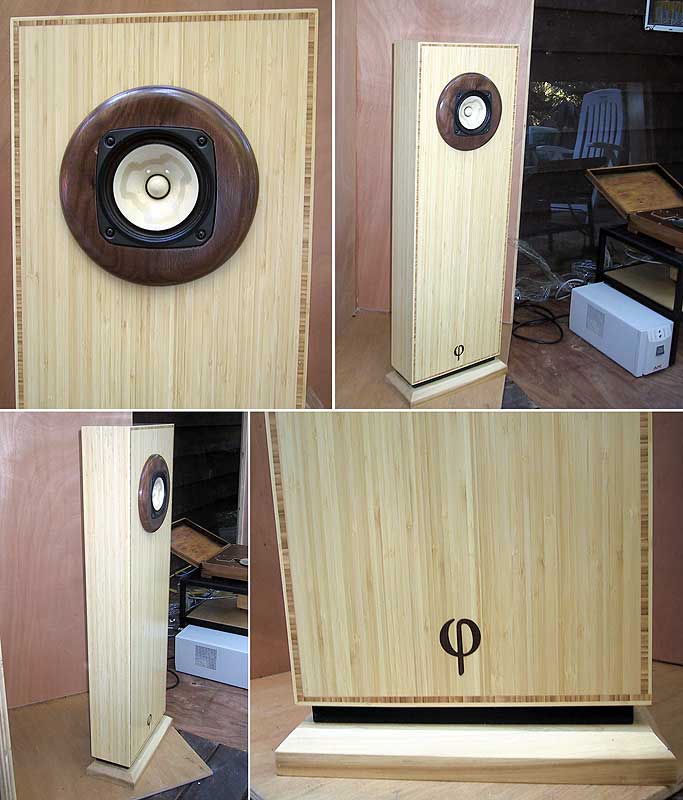
Thanks, it was a bit of work to get it all smoothed out. I used to use Formby's Tung Oil Finish that was available in both high and low gloss. Forby's seems to have been sold to MinWax and there is no longer a choice in finish, so this was a little bit of an experiment. The first coat got absorbed in within 5 mins. The next coat really looked like a mess, some of it stayed on top and still looked shiny, some of it was compleely soaking in and looked all dull. It really takes about 3 coats to seal off the grain and smooth things out. By the 4th coat, it was starting to look pretty even, so it got one more scrub down with a grey pad and then I applied one final coat of oil. I waited about 5 mins after the final coat and then wiped it down gently with a clean cloth. I'll install the drivers in another day or two and post a final glamour shot.
Pass DIY Addict
Joined 2000
Paid Member
And here is the final glamour shot with the driver installed. I was aiming for a bit more of a matte/satin finish, which is why I wiped the speaker down a few minutes after applying the final coat of oil, but it didn't seem to do much to cut the shine... Oh well, they still look nice. The oil is sill out gassing too much, so they need to live in the garage for another few days...


Gorgeous.
Posted the picture here: https://www.diyaudio.com/community/...ken-gallery-pictures-only.214897/post-7621220
dave
Posted the picture here: https://www.diyaudio.com/community/...ken-gallery-pictures-only.214897/post-7621220
dave
Pass DIY Addict
Joined 2000
Paid Member
Thanks for the compliments! And thanks to Dave for adding them to the gallery! The veneer was leftovers from my FHXL and Calpamos builds - I was happy to put it to good use 🙂.
Where can I get a set of those cool badges shown in post #63?
Where can I get a set of those cool badges shown in post #63?
They no longer exist.
It would take a minimum orde rof 50 pieces, and the hope the business that did them survived the plague.
I have artwork.
The original concept was a wooden CNCed bit inserted into an sppropriately CNCed baffle.
dave
It would take a minimum orde rof 50 pieces, and the hope the business that did them survived the plague.
I have artwork.
The original concept was a wooden CNCed bit inserted into an sppropriately CNCed baffle.
dave
Pass DIY Addict
Joined 2000
Paid Member
Bummer about the badges...
I didn't put much effort into thinking about how to cut the brace, mostly because I used 18mm baltic birch for my construction so I figured a cabinet this small didn't really need bracing. How in the world do you cut the brace for these speakers?
I can make the two angle cuts without any trouble, but I'm at a complete loss to understand how to make the inner cut that actually braces the back of the speaker magnet. Any insights here?
Take a bandsaw when you have. Or just cut the brace with the tablesaw and glue it back together afterwards.Bummer about the badges...
I didn't put much effort into thinking about how to cut the brace, mostly because I used 18mm baltic birch for my construction so I figured a cabinet this small didn't really need bracing. How in the world do you cut the brace for these speakers?
I can make the two angle cuts without any trouble, but I'm at a complete loss to understand how to make the inner cut that actually braces the back of the speaker magnet. Any insights here?
View attachment 1282732
Pass DIY Addict
Joined 2000
Paid Member
Carefully, indeed. 😉 The only thing I could come up with was to cut and reassemble, but I thought that would be considered cheating…. I have a scroll saw, but I figured there was no way that I’d cut a straight line through 18mm dense wood with it. Thus, I opted for a smaller rectangular brace between the driver and the rear panel. This made life more simple for me.
Pretty much.
Probably several ways to approach it, but for me it was a case of installing a spare driver frame in the recessed mounting hole, and setting a sliding bevel square on the back of the magnet to measure the required set back, then transfer that measurement to the corresponding edge of the driver brace.
Cutting was generally by band saw, leaving the layout lines visible, then fine tuned with hard backed sanding block. When haps showed up on dry fitment testing, I’d shim with strips of veneer edge tape or thin PSA glazing tape, etc.
After a few dozen, it becomes almost muscle memory. In the cases of larger or multi-driver designs, fitting and cutting all the holes in the driver braces could take almost as long as the rough glue up of the enclosure carcass.
Dave; check your e-mail
Last edited:
Pass DIY Addict
Joined 2000
Paid Member
Thanks to Dave, ChrisB, and the rest of the design/testing team for another excellent speaker project! I've been enjoying my new uMarKen-SET speakers for a while now.
I meant to post a family portrait a while ago, so here are some images...

And a closer view of the cabinets and drivers:

And finally an interesting contrast between by smallest speaker and my heaviest speaker set (about 165 lbs each). This is the uMarKen-SET sitting atop my Calpamos build (Tony Gee design). I'm really liking these little guys, though the larger ones produce a bit more bass...

I meant to post a family portrait a while ago, so here are some images...
And a closer view of the cabinets and drivers:
And finally an interesting contrast between by smallest speaker and my heaviest speaker set (about 165 lbs each). This is the uMarKen-SET sitting atop my Calpamos build (Tony Gee design). I'm really liking these little guys, though the larger ones produce a bit more bass...
Last edited:
Pass DIY Addict
Joined 2000
Paid Member
- Home
- Loudspeakers
- Full Range
- uMar-KenSET for Computer Desktop Speaker?