Thanks again for the input!
My original idea was to have an encoder on the drive motor to feedback to the controller and keep RPM steady. That is still a possibility (on version II) as the motor I have speced has that ability as an option. the price of the motor rises (another $48.00) to add the tach generator. Plus I thought it might be cool to have an actual RPM readout on the Plinth...😛
But, yes, I wanted it to be simple. Generally, simpler is better, but of course not always! The platen will be reasonably massive, so it should spin consistently. I believe (based on my research) that my selected motor will have enough torque at reduced voltage to not need a 'push start' of the platen. Time will tell.
I am running a 50:1 drive ratio, so the torque of the motor is multiplied by 50.
At full RPM (2850) I will have 57 RPM of the platen. Starting torque at full voltage is 65mNm, or 3250mNm at 57 RPM with the reduction. Reducing the voltage will reduce the torque in a more-or-less linear fashion, so we will have 1898.7mNm at 33.3 RPM (almost 1/2 pound of force). That SHOULD be enough to do it, as long as my platen is not excessively heavy. I selecxted a 24V (Nominal) motor to give me a wider range of adjustment window.
Once spinning, with the stylus in place (under load) I think it will be reasonably stable. I just learned my neighbor has several thousand LP's, including an arsenal of test records, so I will test this thing as far as I can with our (his and mine) combination of gear. I figure a test tone LP and my Conn strobe tuner should be a good way to 'tune' the RPM of the table, and see just how much harmonic distortion I have from edge to edge (note I will not be able to quantify it; however I will be able to see the 'drift' across the surface of the LP). Maybe I will integrate a (mutable) tuner output and check the RPM periodically as the electronic components 'burn-in'. That would be easy to do.
 <= just put that there because I thought it was cool...
My original idea was to have an encoder on the drive motor to feedback to the controller and keep RPM steady. That is still a possibility (on version II) as the motor I have speced has that ability as an option. the price of the motor rises (another $48.00) to add the tach generator. Plus I thought it might be cool to have an actual RPM readout on the Plinth...😛
But, yes, I wanted it to be simple. Generally, simpler is better, but of course not always! The platen will be reasonably massive, so it should spin consistently. I believe (based on my research) that my selected motor will have enough torque at reduced voltage to not need a 'push start' of the platen. Time will tell.
I am running a 50:1 drive ratio, so the torque of the motor is multiplied by 50.
At full RPM (2850) I will have 57 RPM of the platen. Starting torque at full voltage is 65mNm, or 3250mNm at 57 RPM with the reduction. Reducing the voltage will reduce the torque in a more-or-less linear fashion, so we will have 1898.7mNm at 33.3 RPM (almost 1/2 pound of force). That SHOULD be enough to do it, as long as my platen is not excessively heavy. I selecxted a 24V (Nominal) motor to give me a wider range of adjustment window.
Once spinning, with the stylus in place (under load) I think it will be reasonably stable. I just learned my neighbor has several thousand LP's, including an arsenal of test records, so I will test this thing as far as I can with our (his and mine) combination of gear. I figure a test tone LP and my Conn strobe tuner should be a good way to 'tune' the RPM of the table, and see just how much harmonic distortion I have from edge to edge (note I will not be able to quantify it; however I will be able to see the 'drift' across the surface of the LP). Maybe I will integrate a (mutable) tuner output and check the RPM periodically as the electronic components 'burn-in'. That would be easy to do.
<= just put that there because I thought it was cool...
Last edited:
*IF* you put in a closed loop servo, then any added complexity in the motor drive circuit is rather wasted, since the feedback loop substantially linearises the forward transfer function.
My original thought was a well regulated power supply into the "control circuit" (whatever that might have been) and that output to the motor. The feedback from the motor would control the "control circuit" to keep RPM constant.
I had no idea how simple or complex this would be; however if the $28.00 tacho output would simplify the "control circuit" of the design, it may be worth re-thinking this option for Version I...😕
I have some technical data on the motor and tacho, but don't understand it all...
I had no idea how simple or complex this would be; however if the $28.00 tacho output would simplify the "control circuit" of the design, it may be worth re-thinking this option for Version I...😕
I have some technical data on the motor and tacho, but don't understand it all...
This is the basic block diagram arrangement of a 'DC Servo' motor control system. The black block is the motor itself. (This is NOT a quartz PLL type)
To clarify my earlier post, if you considered ONLY the motor, the speed would be very largely determined by the voltage applied to the motor - my suggestion to use an LM317 regulator to generate this voltage. Others then suggested shunt regulators, PWM control, etc. which are improvements, but with the cost of added complexity and design work.
Then the topic of servo/tacho control came up: *IF* you go for a closed loop servo control, the 'quality' of the circuit driving the motor (the controllable voltage source, Ao) becomes way less important, because the feedback loop linearises the entire subsystem comprising the voltage source Ao, and the motor itself. Also, the closed-loop control system is much less sensitive to noise & disturbances in the power supply voltage. The setpoint voltage however, must be extremely accurate and stable.
In practice, a simple proportional controller as shown doesnt give the best results: proportional control alone can never drive the steady-state speed error to zero. So the 'gain' block is enhanced by additional components, in the guise of a lag compensator, or integral controller. Scary as their names make them sound, they are in reality just specially designed filters, consisting of resistors, capacitors and maybe an op-amp.
Attachments

Last edited:
Thank you again for the information!
I don't fully understand it; however it is clear we are on the same page here.
The $10.00 question is: which way do I go? Is there less expense, chance for grave error and a better chance of success with a very stable voltage control, or a closed-loop feedback loop from the motor tach?
I don't really know. The earlier circuit seemed doable for a guy like me, and I assume all the parts can come from Digikey. This last idea/concept/diagram is what I had originally envisioned (more or less) but sounds like it will require the very well regulated power supply anyway, which sounds to me like additional complexity. Which I am fine with, as long as the job it self is not overwhelming (I can build the regulator and then the control circuit), I mean a reasonable amount of assembly and solder work I can handle. If I will be at the iron for 8+ hours, that is probably beyond my comfort level. But, maybe not! Hard to say really.
As an experienced builder, wit the goals of the project in mind, what would you do?
The $10.00 question is: which way do I go? Is there less expense, chance for grave error and a better chance of success with a very stable voltage control, or a closed-loop feedback loop from the motor tach?
The LM317 is cheap (50c) and easy to do, requiring little design, and should work well, although not spectacularly. Exactly that setup has been used in many, many belt drive TTs.
I suggest trying it. If it doesn't give you good results, you've wasted only a little time & money, and lost nothing.
The closed loop requires getting into some quite tricky mathematics - IF you plan on designing it fully from the ground up. There is the chance of doing a bit of trial and error 'design' and getting working results.
This last idea/concept/diagram is what I had originally envisioned (more or less) but sounds like it will require the very well regulated power supply anyway, which sounds to me like additional complexity.
Exactly the opposite. The closed loop feedback regulates the motor despite noise & fluctuations in the power supply. So you can get away with a very mediocre power supply.
All you need is a stable voltage reference - and that can be had from a Zener diode + an ordinary diode.
Last edited:
OK. I think I will stick with 'plan A' and use the regulated DC power supply.
Then, if needed, I can ditch the current motor, and order the one with the tacho output and go from there with the closed loop, supplied from the regulated power supply I am making for plan A. since I am planning a rather elaborate AC scheme from my (completely new) service panel to the power conditioning transformer and then to the dedicated 20A hospital outlet, I HOPE this will be a good solution. I want no AC noise on my line! check this post #39 http://listeningroom.audioadvisor.c...-upgraded-Power-Cables-really-necessary/page4
I also have (somewhere) some very LARGE capacitors that I thought might be useful after the bridge rectifier to 'smooth' the DC power a bit. Then it can be regulated down to 'working' voltage from there.
Does that sound like a good idea, or is there a down side to high capacitance on the ~110 DC voltage? (These caps are the size of beer cans- not sure of value) Would it make more sense to put these caps after the transformer and rectifier? Would there be any benefit at all to a tube rectifier, or is that just adding unneeded complication?
Capacitors on 110V Ac need to be carefully implemented! Generally you wouldn't put much more than 0.1uF across the mains, just to reduce high frequency spikes and noise. These capacitors have to be rated specifically for safety across the mains (Class X for European standards, U.S.A, I don't know about). 110VAC means 110V RMS, the peak voltage is 155V. The cap shouldn't be rated for anything less than 200V.
I never bother with mains filtering- other than a surge arrestor to protect against lightning damage. On the low voltage DC side (30V to 40V if you plan on regulating to 24V) 4700uF is about as high as you'd ever need to go, and even that might be going overboard. Under normal runnig, the motor current will be low, and 1000uF to 2000uF ought to be as big as you need.
A tube rectifier - I believe - would be a spectacularly bad idea for a motor power supply. They are very lossy, contribute to poor load regulation, and don't give high current delivery. Gas rectifiers are better, but then there's the issue of delayed turn-on, and still they aren't suited to low voltages. Save the tubes for amplifier PSUs.
An ordinary silicon bridge rated at 1A or 2A is all you'd need.
OK. Sounds good.
I think I have a plan now!
I can (try) to draw up the schematic for my implementation and have it reviewed here. At that point, we should think about specific brands of components and quality (+/- x%) of them as well.
Once it 'passes' I can then order my parts.😀
I think I have a plan now!
I can (try) to draw up the schematic for my implementation and have it reviewed here. At that point, we should think about specific brands of components and quality (+/- x%) of them as well.
Once it 'passes' I can then order my parts.😀
OK. Bear with me and my ignorance here... I have speced a 24V motor. I can change it to 12V if it makes life easier, but thought having the 'headroom' of the 24V motor was wise. RPM of the motor is the same at full voltage, so calculations of voltage needed will be the same.
So, looking at the two earlier schematics, I have determined what I (think) I need for output voltage, and have some concerns, because the input of the LM117 is ~28V and the input to the second circuit is listed as 12V, and therefore I have to assume the output of this second circuit will be lower than 12V (or, at most, equal to 12).
Here's the rub:
To get my platen to spin at 45 RPM I need 18.947 volts (in theory- probably a touch more to overcome frictional losses)
And, for 33.333 RPM I need 14.035 volts (again in theory- probably a touch more to overcome frictional losses)
So, the question is, can I up the input voltage (and output voltage) of the LM117 to get a higher output voltage? (I assume I can increase to get 20V output but wanted to verify).
And the second question: Can I replace the 12V input of the second circuit with the 20V output (or more) of the LM117 circuit to have ~19V available at the output of the second circuit? should I have a bit more headroom on the input voltage? (more of a difference between input and output voltage)
I will draw this up in CAD; however before I get too deep into the design, I want to make sure it will operate reliably without releasing the factory installed smoke...😱
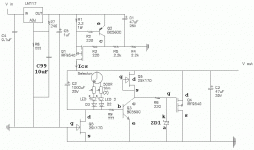
The basicc layout looks OK. Have you done any calculations for those component values? Or were they just lifted off other examples?
Lifted directly from the earlier suggestions in this post (I stuck two ideas together to get this abomination).
So to answer the question directly: I have no idea if any of those components are correct. For sure the value with the ?? is needed; however the others could be way out too, as the voltage needed is higher for my 24V motor (estimated voltages are listed in an earlier post by me).
From the earlier post:
"To get my platen to spin at 45 RPM I need 18.947 volts (in theory- probably a touch more to overcome frictional losses)
And, for 33.333 RPM I need 14.035 volts (again in theory- probably a touch more to overcome frictional losses)"
And that brings me to here!
I'll have to scrutinise the circuit with my calculator and try figure out some equations. Might take a couple of days.
Thank you very much for your time and effort!
I realize it is low on your priority list, and do appreciate your time!
If there is anything I can do in return, just let me know!😉
I realize it is low on your priority list, and do appreciate your time!
If there is anything I can do in return, just let me know!😉
There is a resistor missing from the base pin of Q3, to the cathodes of the LEDs. Without it, Q5 can never recive enough voltage to go into its pinch-off region, and hence just acts like an ordinary resistor, not a current limiter.
And you should probably add a Zener diode from the source to the gate of Q4 (cathode end to the gate), if the supply voltage is anything over 20V to protect the mosfet from destruction if there is a fault condition.
You could probably get better regulation (if running at 24V) by adding extra diodes in series with the "selector" switch - to increase the voltage drop at that point.
Sorry, but I have no idea what is missing or what a good portion of what you said means...
And you can't edit my drawing unless you have AutoCAD..
So, maybe I will try to do what you said, and then we can see if I did it right? I honestly don't understand a lot of what is being depicted on the schematic- I am more mechanical, and visualize better when I have a component in my hand and can say "this pin is the input power, this one the regulation pin, this one the output" etc. Otherwise, I'm a bit lost.
I will try to modify my drawing and re-post it here...
Resistor R9 and extra voltage drop diodes D2 and D3 correct!
Not that it matters with the cost of diodes, but you could use a single diode in place of D2 & D3 by putting it on the other side of the selector. Depending on the voltage drop required, D2/D3 may turn out to be several diodes in series, or even an additional LED (which isn't for its light, but rather for its typically large voltage drop characteristic)
Zener diode ZD1 as shown on my ammendment, this should be about a 12V to 15V, half-Watt zener. It there to save the Mosfet, which can't tolerate more than about 18V between its gate and source pins - if a fault condition develops elsewhere.
R9 value - I'll have to look at the JFET data sheet again to figure that out. I'll dig it out tomorrow.
Have you decided on the 24V motor or the 12V ?
Ics (current source) is set at 300mA, by the value of R1. This is the maximum current this power supply can ever deliver, so that value you may want to adjust according to the motor data or your own motor measurements. Limiting this value will make the motor have a longer run-up time from standstill. Increasing the value of Ics will generate more heat in Q4, which will have to be fitted with a heatsink anyway.
Q1 and the LM117 will also need heatsinks.
Attachments
Last edited:
Thanks for those corrections! Good that you can get into the drawing, rather than re-drawing the whole thing...
I ordered the 24V motor yesterday; should have it today.
Motor current is 150 ma at nominal torque. Any other relevant specs on the motor needed? I have the spec sheet...
I ordered the 24V motor yesterday; should have it today.
Motor current is 150 ma at nominal torque. Any other relevant specs on the motor needed? I have the spec sheet...
- Status
- Not open for further replies.
- Home
- Amplifiers
- Power Supplies
- Turntable Motor Power supply