
Thanks and i agree, I do have measurement gear, but not yet completely calibrated so i have to finish setting it up next week..
I will get some measurements with next tests to see they are more or less "equal" in FR when testing.
(so i will know i will comparing "apples to apples")
I will get some measurements with next tests to see they are more or less "equal" in FR when testing.
(so i will know i will comparing "apples to apples")
Thanks, my weird approach has actually produced some results, so ill start building next.You have some quite interesting ways of testing things. I'm sure you find your way. Good luck!
So lot of new testing, measurements and finally a cabinet plan that i will start building..
So in timeline:
I tested box with rounded edges, surprisingly not that much improvement, actually prefer it with minimal edges.
Maybe my roundovers were too big and too far away, smaller and starting 1cm away from woofer probably would have been better to keep baffle small..
Decided to rip those sides away if further testing needed.

I decided to try larger bevels, same style as Troels Mun17 (or avalon originally..)
This one was more seamless with bass, felt like one big element, but details/air/focus was a bit missing compared to small box baffle.
I slept over it and in the morning asked my brother to listen it without giving any hints which i prefer, basically "blind".
It was the same for him as well, he prefered larger beveled one as more "together", but remarked that small square box were more detailed " i can hear the snare and space in record more clearly"...

So one more prototype was to be made:
This is with more deeper bevels. I felt this was best of them all, being as seamless with bass as prior prototype, but now it had 90-95% air/details of the small box baffle, so we have a winner here, this is shape i will use:


So in timeline:
I tested box with rounded edges, surprisingly not that much improvement, actually prefer it with minimal edges.
Maybe my roundovers were too big and too far away, smaller and starting 1cm away from woofer probably would have been better to keep baffle small..
Decided to rip those sides away if further testing needed.
I decided to try larger bevels, same style as Troels Mun17 (or avalon originally..)
This one was more seamless with bass, felt like one big element, but details/air/focus was a bit missing compared to small box baffle.
I slept over it and in the morning asked my brother to listen it without giving any hints which i prefer, basically "blind".
It was the same for him as well, he prefered larger beveled one as more "together", but remarked that small square box were more detailed " i can hear the snare and space in record more clearly"...
So one more prototype was to be made:
This is with more deeper bevels. I felt this was best of them all, being as seamless with bass as prior prototype, but now it had 90-95% air/details of the small box baffle, so we have a winner here, this is shape i will use:
Measurements:
Midwoofer W130 AL 485
-Completely unsmoothed. Those secondary ridges are my room, these are inroom measurements from 10cm away
Mostly third harmonics +50db down, and rest under that.

Midwoofer W130 AL 485
-Completely unsmoothed. Those secondary ridges are my room, these are inroom measurements from 10cm away
Mostly third harmonics +50db down, and rest under that.
This is the difference between old beveled and new beveled version, blue was measured few db louder so discount that difference.
Othervice, there is not that big measured difference, but deeper bevels were much better and detailed.
Where does the difference come from?
Maybe ill measure these again when i will make measurements outside (for final cabinet) for vituixcad..

Othervice, there is not that big measured difference, but deeper bevels were much better and detailed.
Where does the difference come from?
Maybe ill measure these again when i will make measurements outside (for final cabinet) for vituixcad..
Get your gating window right. Or post the REW-file here, so we can 😉 . Otherwise, that mid is one of the few 5" metal cones that actually succeed in breaking up above 10kHz, if not the only one. Distortion seems also quite classy to me. Anyone claiming Magnat is on a cheap skate should think again.
Here is the small square box:

And here is the first beveled prototype with smaller bevels, also not that much difference in FR but i guess small differences matter?
Troels did write something about this one:
http://www.troelsgravesen.dk/W12CY003.htm

And here is the first beveled prototype with smaller bevels, also not that much difference in FR but i guess small differences matter?
Troels did write something about this one:
http://www.troelsgravesen.dk/W12CY003.htm
Attachments

Thanks, ill try slowly to get better measurements as i learn on the go..Get your gating window right. Or post the REW-file here, so we can 😉 . Otherwise, that mid is one of the few 5" metal cones that actually succeed in breaking up above 10kHz, if not the only one. Distortion seems also quite classy to me. Anyone claiming Magnat is on a cheap skate should think again.
I also compared few songs for fun with Audio technology 18h52 in same fr range.. Not really scientific, but i actually prefer magnat midrange to expensive AT, magnat has better tone and comparable details/air..
I'm afraid measuring (really) right comes after a long learning process. But for starters get your speaker free standing, away at least 3-4 feet from any boundary (the floor included). Likewise the mike should be positioned free from any boundary within 3-4 feet and at approx 4-5 times the baffle width from the speaker for any reference to far field results (the conditions we try to optimize for). Note: this is for level measurements from about 300Hz and up. Low frequency measurements are performed close range and distortion measurements typically at 315mm.
And when I say 'boundary' I mean literally any obstacle close to speaker and microphone. I could show you the sound reflections from my microphone stand 😳 from the days I started doing measurements.
Next, prepare to make off-axis measurements too. We nerds use turntables and put our speakers on them to measure in 5 or 10 degrees increments, but again, for starters simple measurements on 0, 30, 60 and 90 degrees suffice. This way you determine the radiation pattern of your loudspeaker, which is quite important, as research has shown.
Guard your sound level against background noise too. If your environment is noisy, use averaging of multiple measurements. Save measurements in the original format, so you can apply post processing (gating and distortion analysis). There is a lot more to say but for now I let that be.
Thank you Markbakk for the advice, i will read and try to do measuring as best as i can.

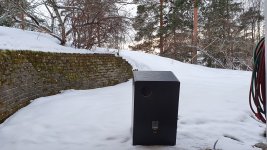
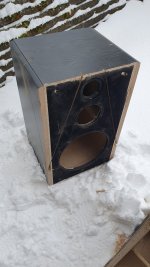
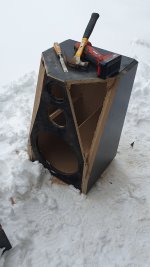
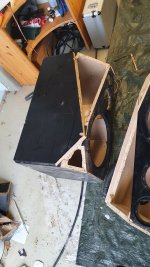
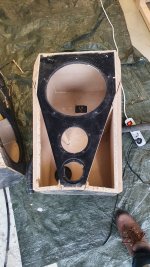
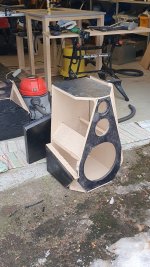
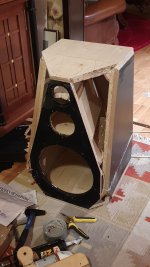
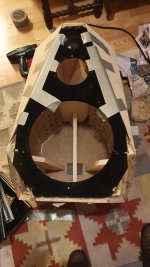
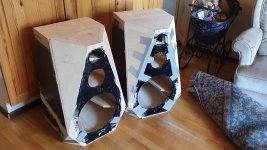
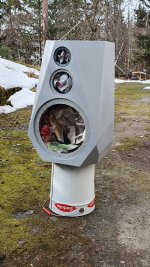
Well, it is finally ready painting.
Lots of work, modifying box for new shape. The finishing touches for painting were the part that took longest, but im happy to say its done.
Next painting, measuring and making new crossover in vituixcad. I will use different tweeter from the original, i don't think it is up to par for today so new one will be tw29rn-b-8. I will ask if i can get it professionally painted in carshop. If no, time to buy airbrush..
Progress images under:
Attachments
-
 20240210_161651.jpg527.6 KB · Views: 44
 -
 20240214_153717.jpg299.9 KB · Views: 44
 -
 20240214_153709.jpg255.8 KB · Views: 43
 -
 20240216_143314.jpg455.8 KB · Views: 45
 -
 20240216_143317.jpg579.7 KB · Views: 46
 -
 20240217_140515.jpg532.9 KB · Views: 46
 -
 20240219_180627.jpg369.7 KB · Views: 51
 -
 20240301_204005.jpg361.1 KB · Views: 47
 -
 20240304_183407.jpg328.9 KB · Views: 41
 -
 20240306_162308.jpg392.5 KB · Views: 52
 -
 20240307_170218.jpg363.9 KB · Views: 49
 -
 20240327_143032.jpg706 KB · Views: 45
- Home
- Loudspeakers
- Multi-Way
- This project just dropped on my lap... Rebuilding Magnat all ribbon 12