the 12.1" is laptop so it needs a controller ... i getting it from ebay... from a dell 700m ... i found the company that makes them but dont have it here....
as for the 15.4 yes its the synaps from walmart 🙂 im praying it can strip properly
as for the 15.4 yes its the synaps from walmart 🙂 im praying it can strip properly
Good luck with the synaps monitor. Ive been looking at that monitor for a few weeks now but my current projector REALLY doesnt need to be replaced (it works really well). One of the main reasons i wanted to convert to that monitor is not only the 720p but the fact that you could replace it with a 15.4" 1920 1200 laptop monitor + controller later. Even though xga projectors are going down in price 720p and 1080p projectors are still very pricy. Keep me updated on the stripability of the synaps monitor.
exactly the reason im doing it as well... i want a 1080p but dont have the 250$ for the lcd and the 400-450$ for the good controller... this way for 150 i get a lcd that doesnt need a controller and has an easy path to the 1080p later when i get cash 🙂 PM me your MSN or Y! and we can chat some time... that we stop hijacking gnu's thread hehe
Thank you all for your nice and encouraging comments
...I have been a little bit lazy with the updates here at diyaudio. Anyway here is the next one.
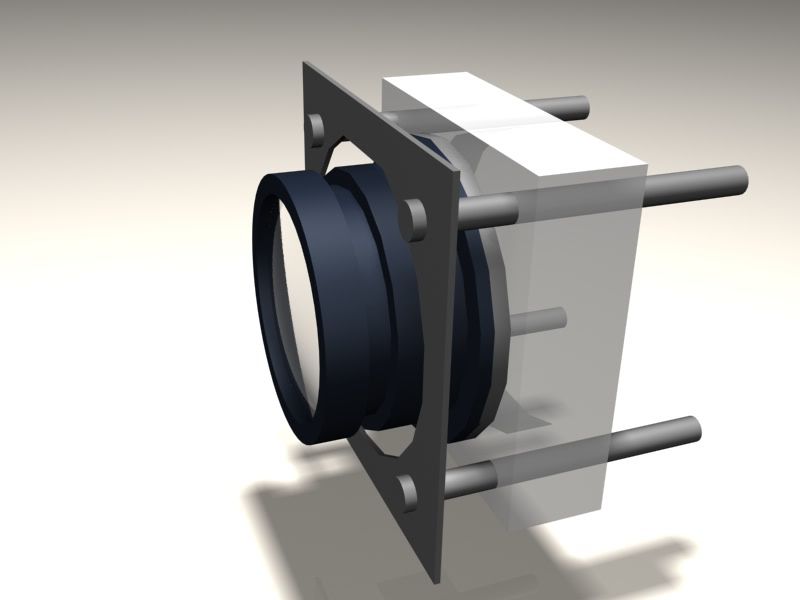
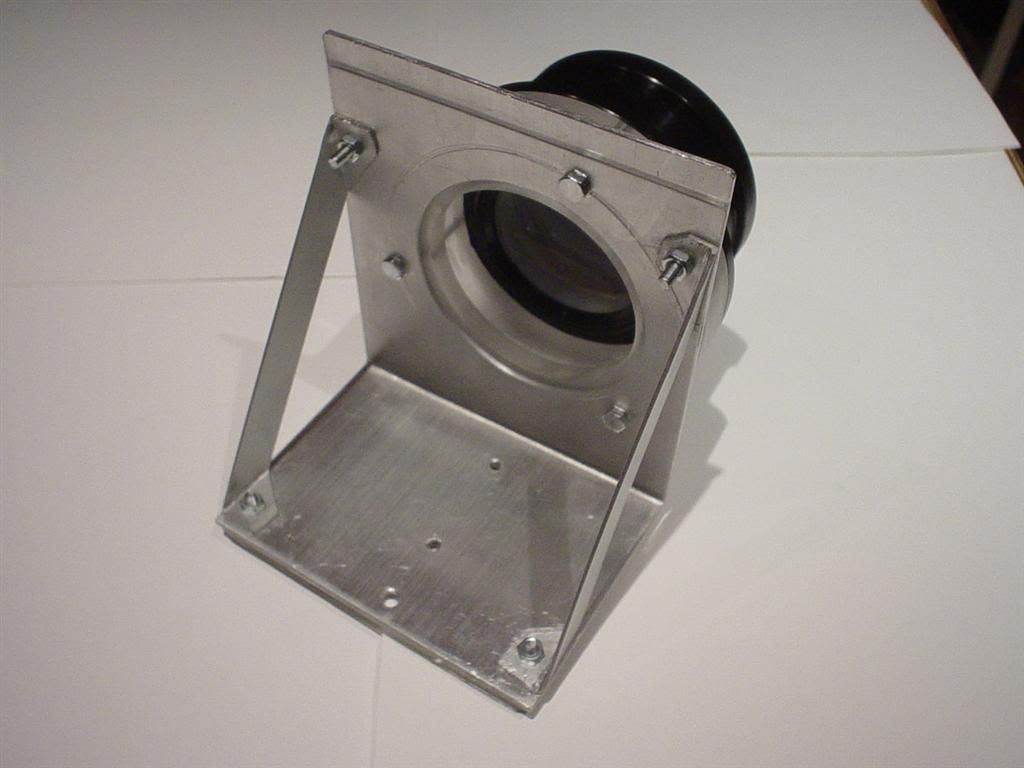
This is currently the zoom mechanism I'm working on.
The triplet lense is attached to the see through white parts that will be fabricated out of 2x13=26 mm plexi.There is 4 7mm holes in the plexi that will allow it to slide back and forth on the four 7mm steel rods. In the pics you can only see 1 thin spacer for the triplet, but I will also ad a larger one to increase the space .
I thought this zoom mechanism would be an easy task but it was really hard. The holes can't be of the exakt same dimension as the rods because then it will be a verry tight fit. And the holes can't be to large either because then the whole plexi part can twist a little bit and jam because of that. And the four steel rods need to be in a perfect vertical angle or the whole thing will jam.. ..
Any sugestions on any easy zoom mechanisms would really be helpfull.
(it needs to be able to slide ~5 cm)

(CLICK TO ZOOM)

(CLICK TO ZOOM)
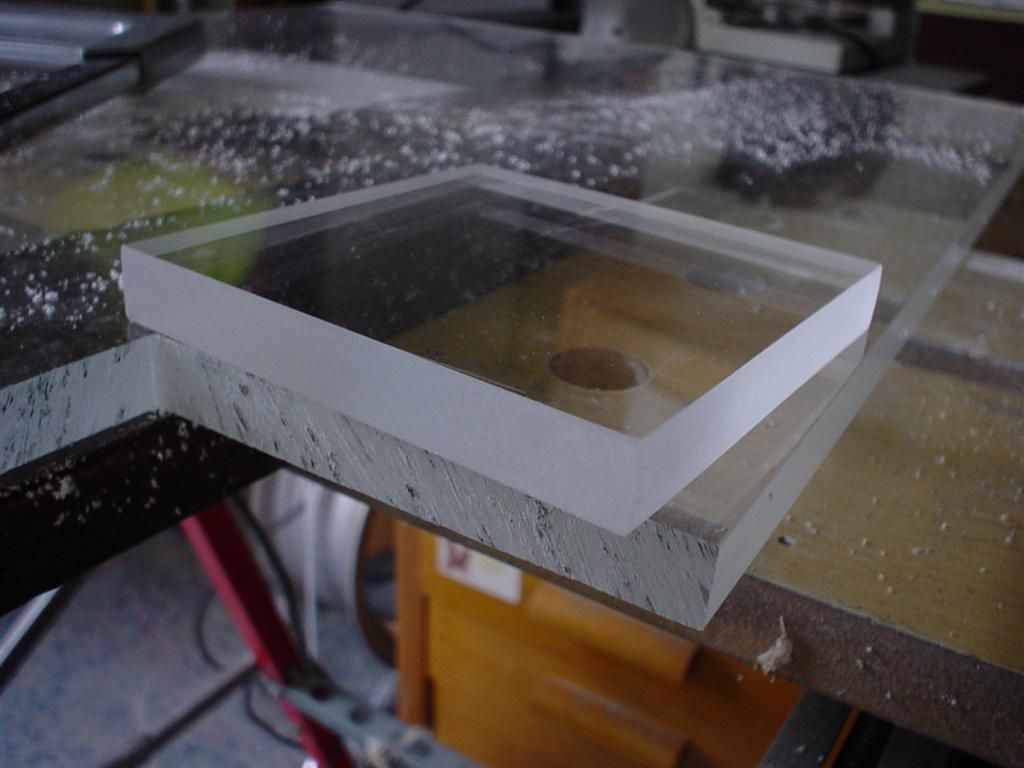
Here is the 13mm plexi I got for free. It's from when we rebuilt at the supermarket I was working in. Its a cashregister "booth".

(CLICK TO ZOOM)

(CLICK TO ZOOM)
cut a piece and drilled a hole in the middle that is threaded and inserted a cut of bolt.

(CLICK TO ZOOM)
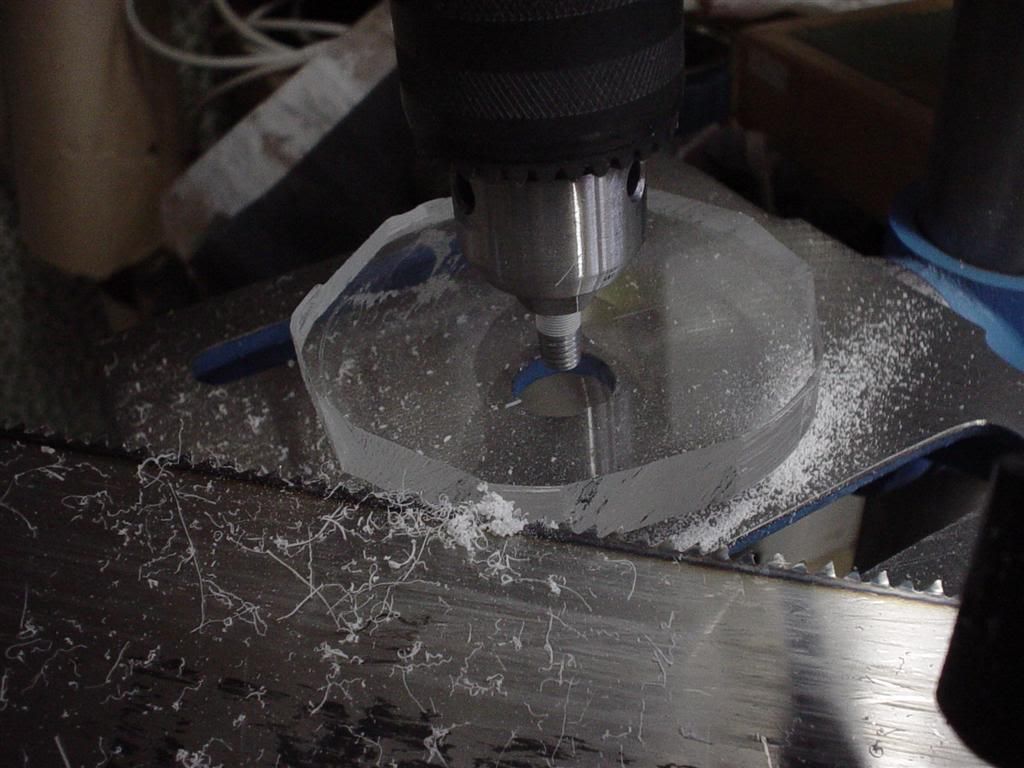
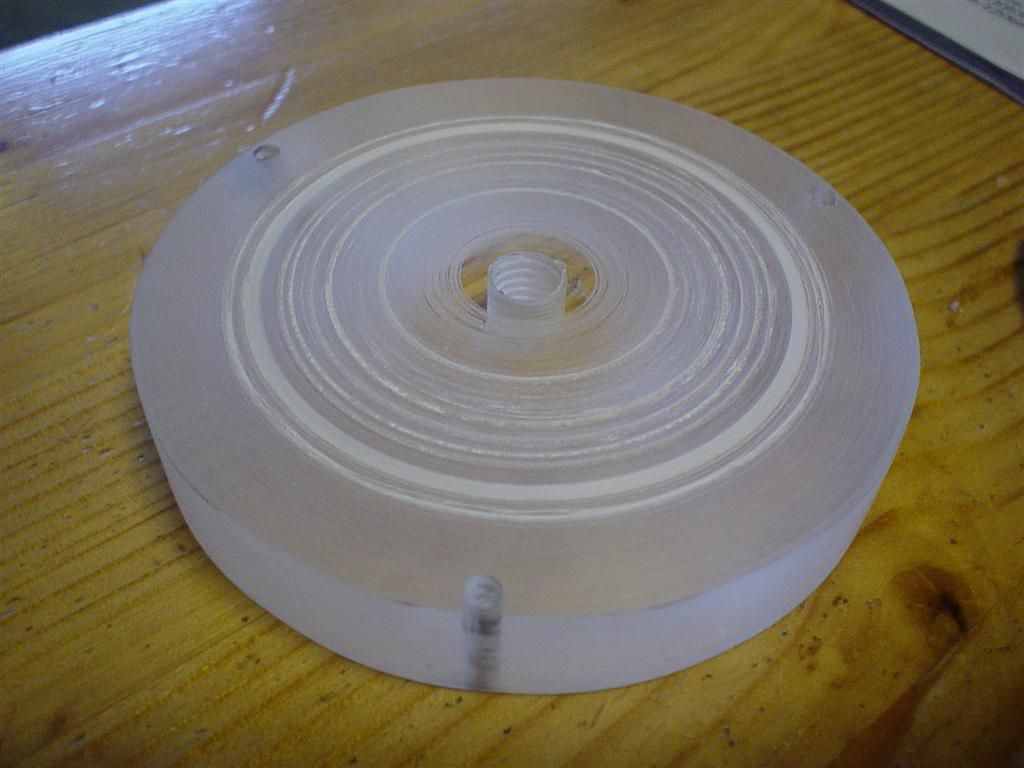
This is How I started to create the round shape for the triplet lense spacer.I attached the plexi to my drillpress and used a normal saw. The larger ones that you normaly cut wood with. Make shure not to press the sawblade to hard against the spinning plexi, as it will "cut" and you can hurt yourself or damage the plexi.

(CLICK TO ZOOM)
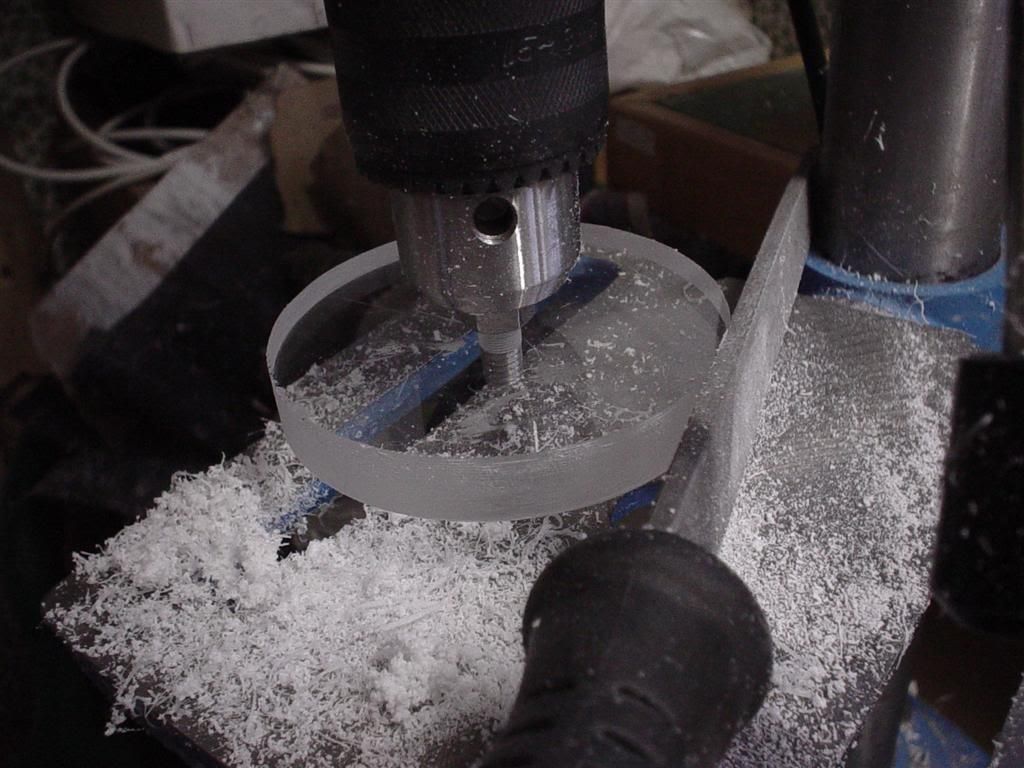
after a while i could move down to the file and at last the sandpaper.

(CLICK TO ZOOM)
I used a razorblade to pres against the top while spinning to mark where i was going to create a hole. The 3 smaller holes are for the triplet to attach to.

(CLICK TO ZOOM)
I drilled holes in a cirkle and removed the middle section. Trimed down the edges with this dremel ad on. Its a sandpaper brushing weel.

(CLICK TO ZOOM)

(CLICK TO ZOOM)
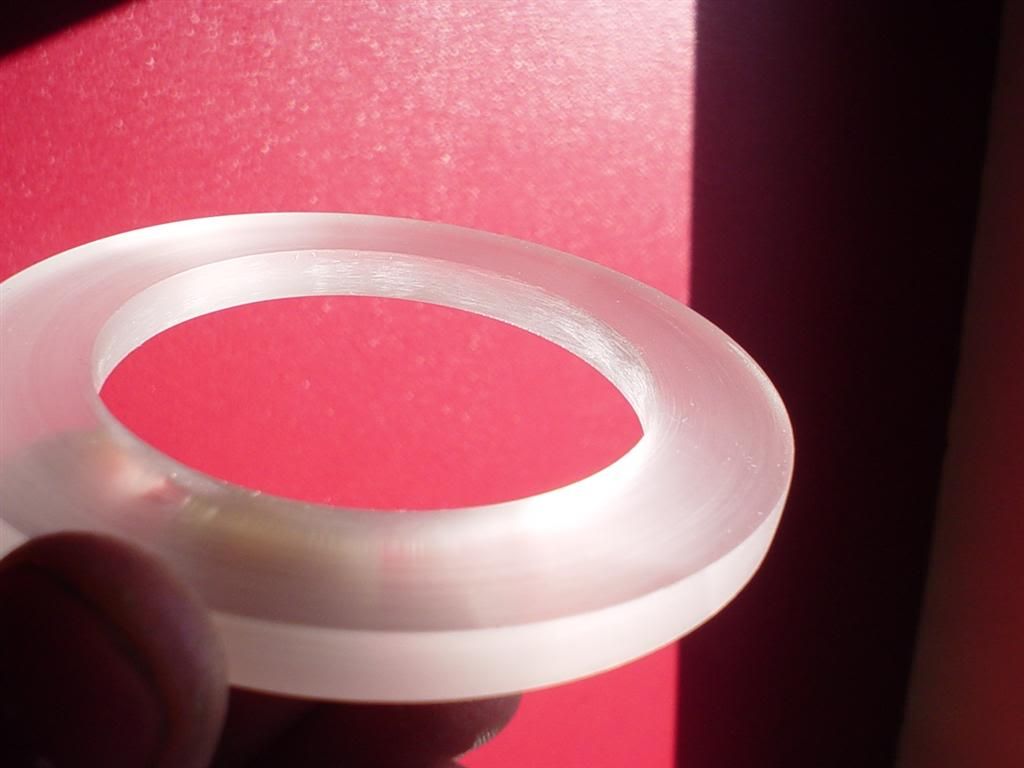
I have also made a second smaller spacer for the triplet lense in the same way.

(CLICK TO ZOOM)
triplet lense with small spacer.

(CLICK TO ZOOM)

(CLICK TO ZOOM)
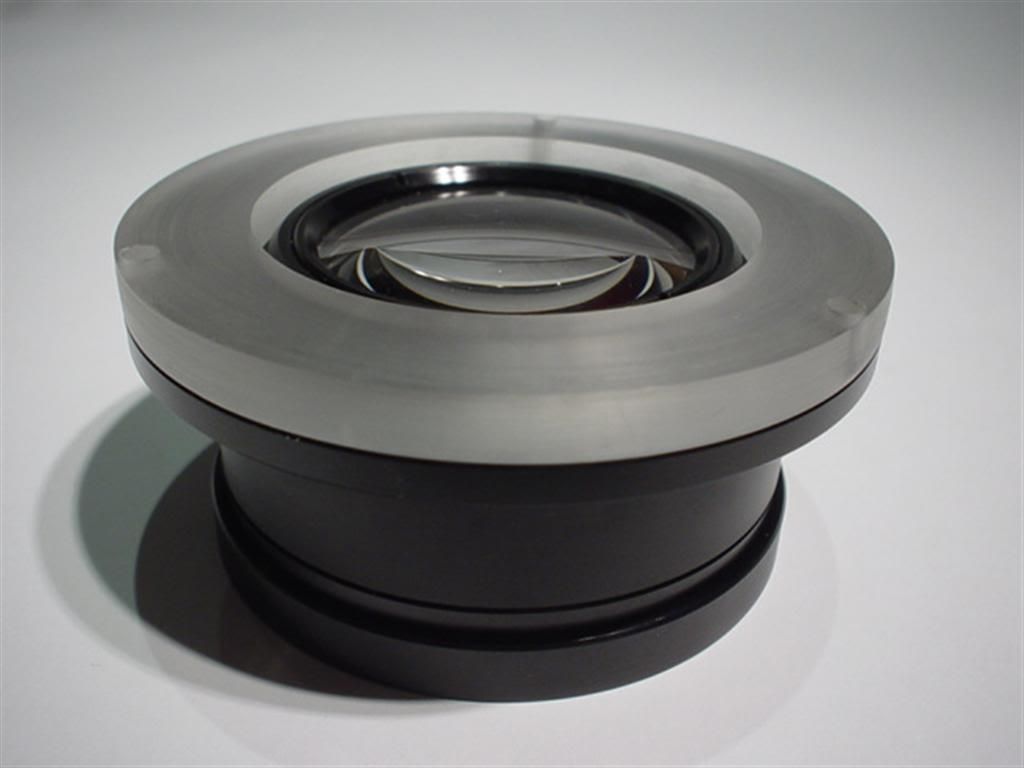
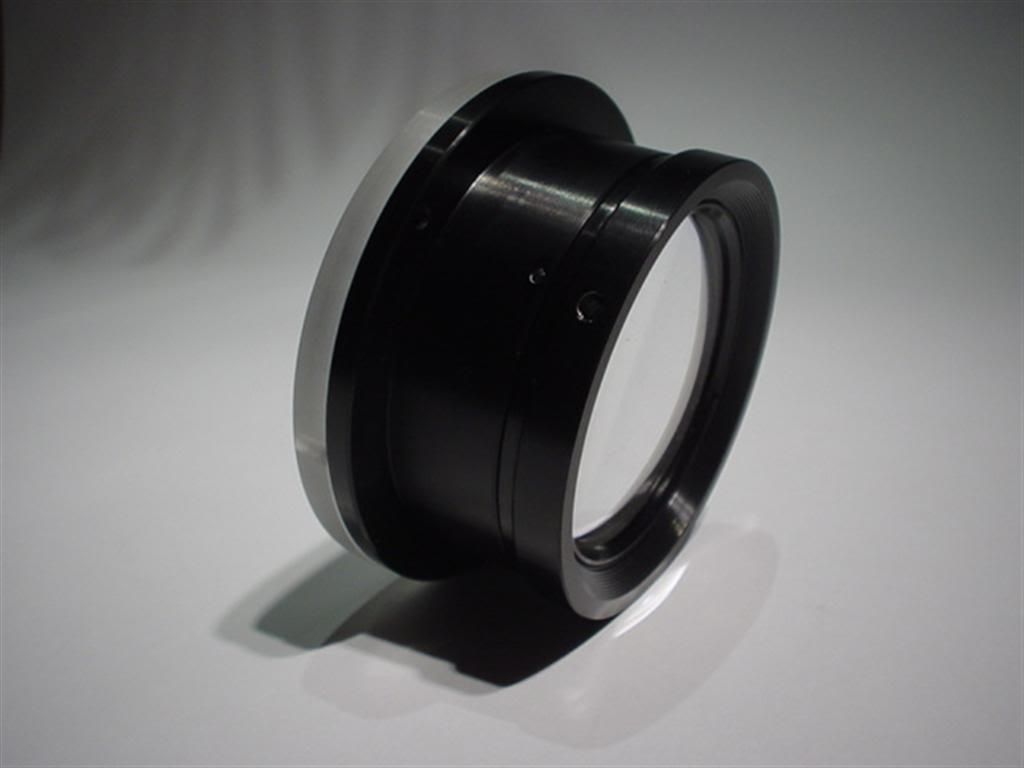
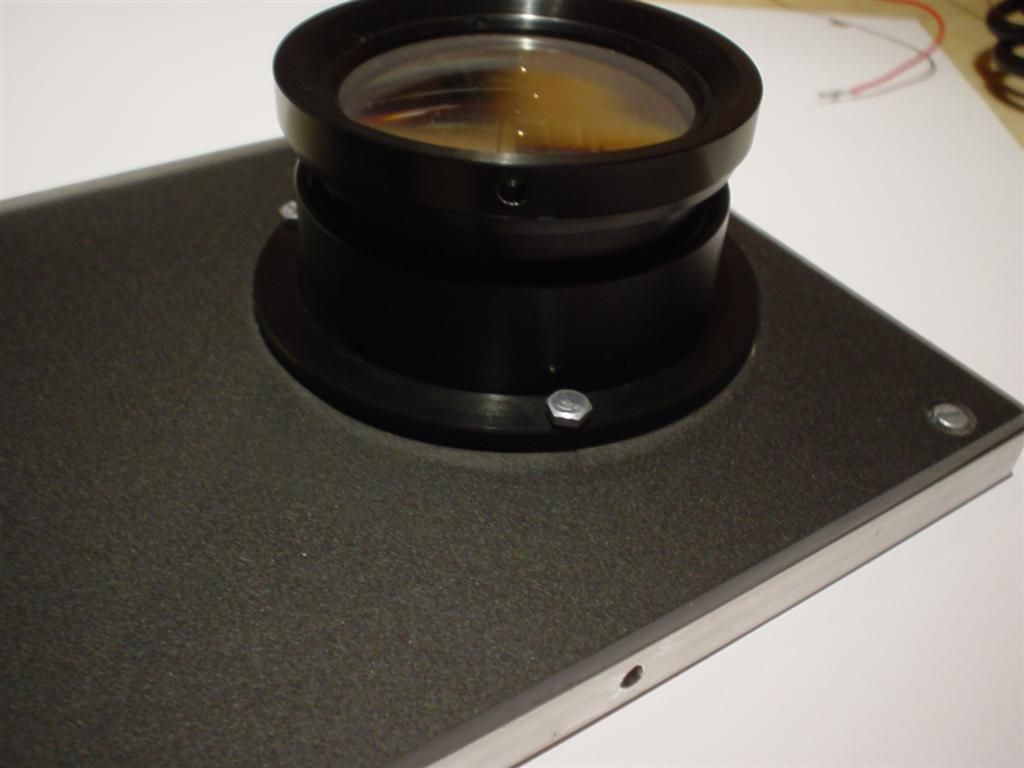
Cut a hole in the front plexi plate for the triplet.

(CLICK TO ZOOM)
The fit was perfect... those ugly bolts will not be visible in the end.

(CLICK TO ZOOM)
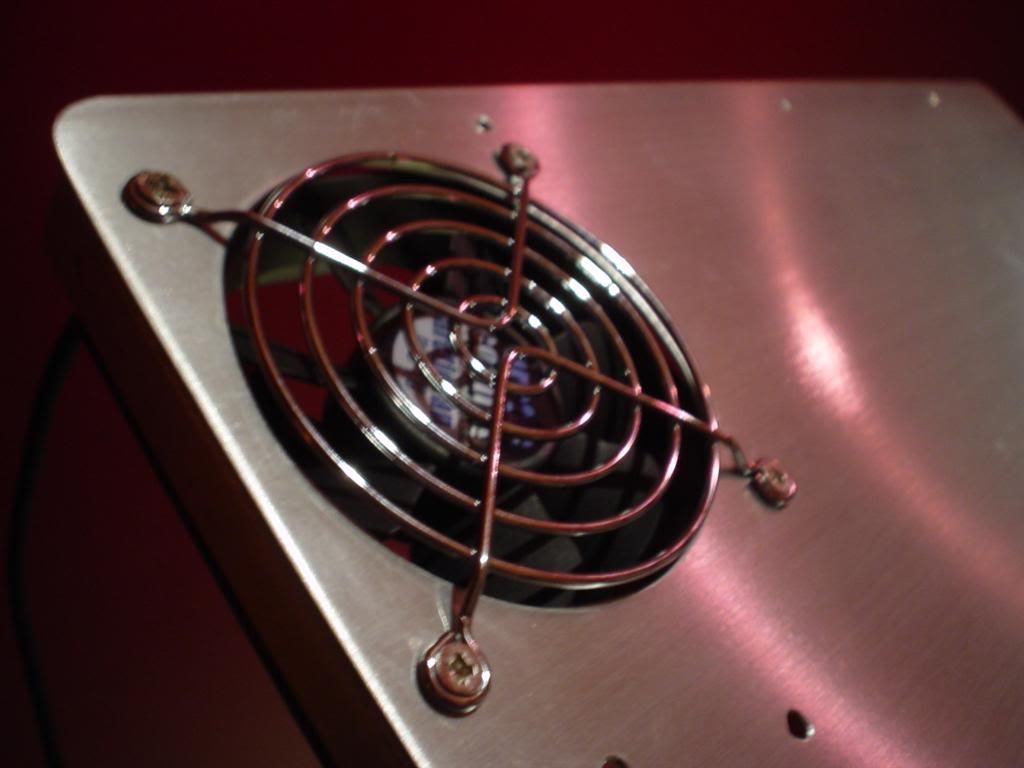
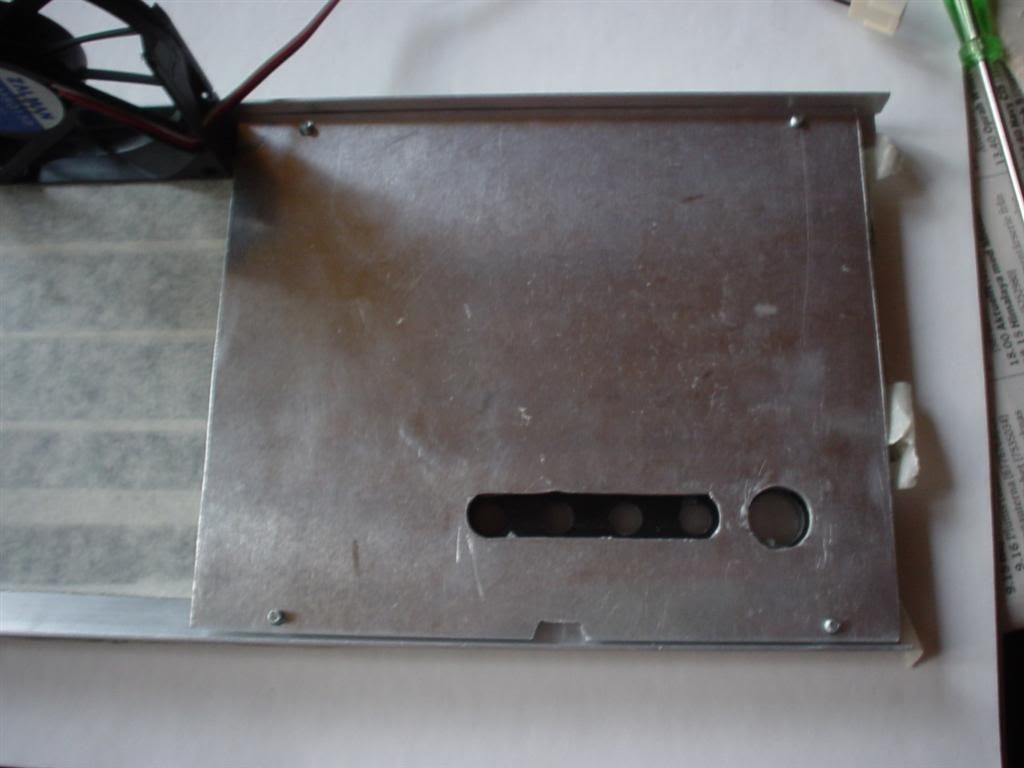
Here I cut a fan hole in the bottom plate to blow air in to the lamp from below.

(CLICK TO ZOOM)

(CLICK TO ZOOM)
/GNU
...I have been a little bit lazy with the updates here at diyaudio. Anyway here is the next one.
This is currently the zoom mechanism I'm working on.
The triplet lense is attached to the see through white parts that will be fabricated out of 2x13=26 mm plexi.There is 4 7mm holes in the plexi that will allow it to slide back and forth on the four 7mm steel rods. In the pics you can only see 1 thin spacer for the triplet, but I will also ad a larger one to increase the space .
I thought this zoom mechanism would be an easy task but it was really hard. The holes can't be of the exakt same dimension as the rods because then it will be a verry tight fit. And the holes can't be to large either because then the whole plexi part can twist a little bit and jam because of that. And the four steel rods need to be in a perfect vertical angle or the whole thing will jam.. ..
Any sugestions on any easy zoom mechanisms would really be helpfull.
(it needs to be able to slide ~5 cm)
(CLICK TO ZOOM)

(CLICK TO ZOOM)
Here is the 13mm plexi I got for free. It's from when we rebuilt at the supermarket I was working in. Its a cashregister "booth".

(CLICK TO ZOOM)
(CLICK TO ZOOM)
cut a piece and drilled a hole in the middle that is threaded and inserted a cut of bolt.

(CLICK TO ZOOM)
This is How I started to create the round shape for the triplet lense spacer.I attached the plexi to my drillpress and used a normal saw. The larger ones that you normaly cut wood with. Make shure not to press the sawblade to hard against the spinning plexi, as it will "cut" and you can hurt yourself or damage the plexi.
(CLICK TO ZOOM)
after a while i could move down to the file and at last the sandpaper.
(CLICK TO ZOOM)
I used a razorblade to pres against the top while spinning to mark where i was going to create a hole. The 3 smaller holes are for the triplet to attach to.
(CLICK TO ZOOM)
I drilled holes in a cirkle and removed the middle section. Trimed down the edges with this dremel ad on. Its a sandpaper brushing weel.

(CLICK TO ZOOM)

(CLICK TO ZOOM)
I have also made a second smaller spacer for the triplet lense in the same way.
(CLICK TO ZOOM)
triplet lense with small spacer.
(CLICK TO ZOOM)
(CLICK TO ZOOM)
Cut a hole in the front plexi plate for the triplet.

(CLICK TO ZOOM)
The fit was perfect... those ugly bolts will not be visible in the end.
(CLICK TO ZOOM)
Here I cut a fan hole in the bottom plate to blow air in to the lamp from below.

(CLICK TO ZOOM)
(CLICK TO ZOOM)
/GNU

Im glad to hear you like it. Been working on this creature for a long time now. Started searching for parts and planing about 2 years ago and It's only the finnishing details and electronics left to fabricate..
Here is some more pictures.
Marking out where im going to mount all the connectors and the power switch.
 (CLICK TO ZOOM)
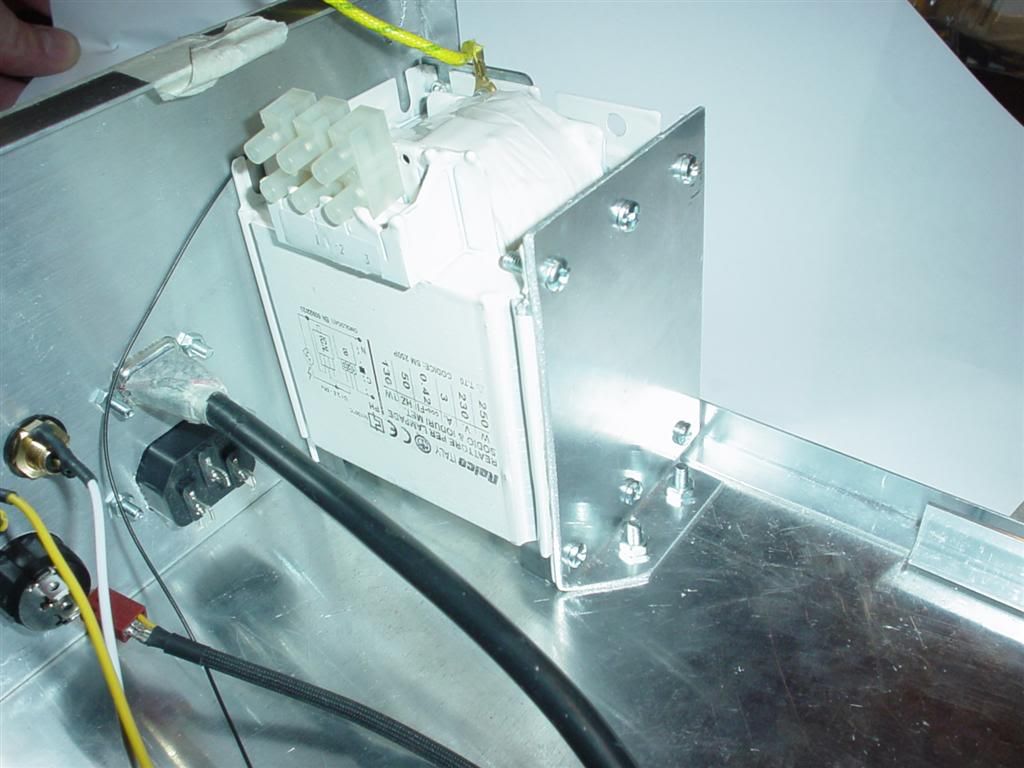
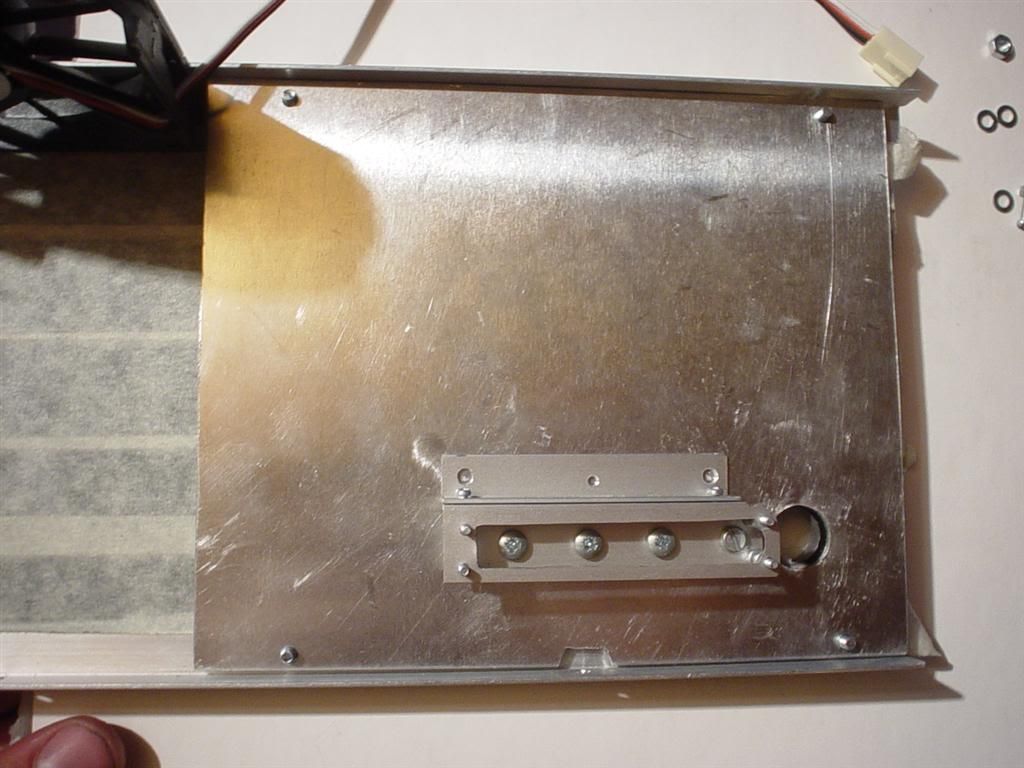
Here it is all mounted. You can see the VGA connector is attached with regular screws. These will be changed for normal connector screws so that you can secure the connector. The reead and black connectors are NOT for sound, they are for AV1 and AV2 video IN. There will be no speakers in it at all. Don't think that will be needed because all audio will bee connected to the sorround system.

(CLICK TO ZOOM)

(CLICK TO ZOOM)
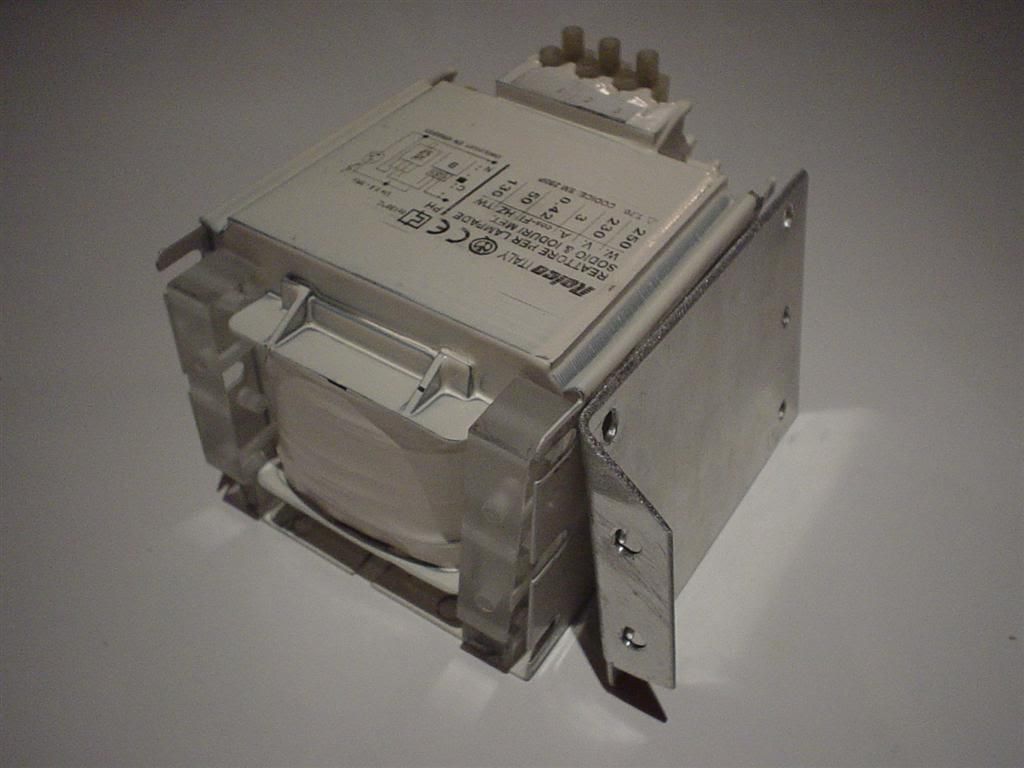
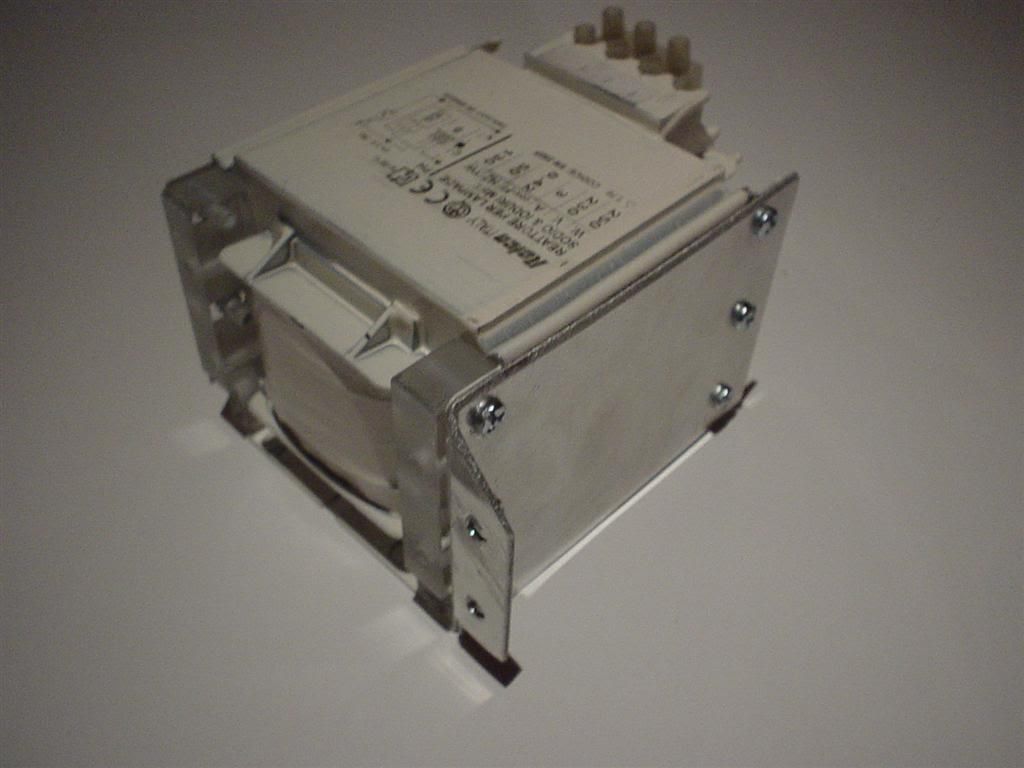
Time to mount the ballast for the 250w lamp. It is very very heavy. Around 3-5 kilo I would guess. So I relly want it to stay in place and this is how I mounted it.

(CLICK TO ZOOM)
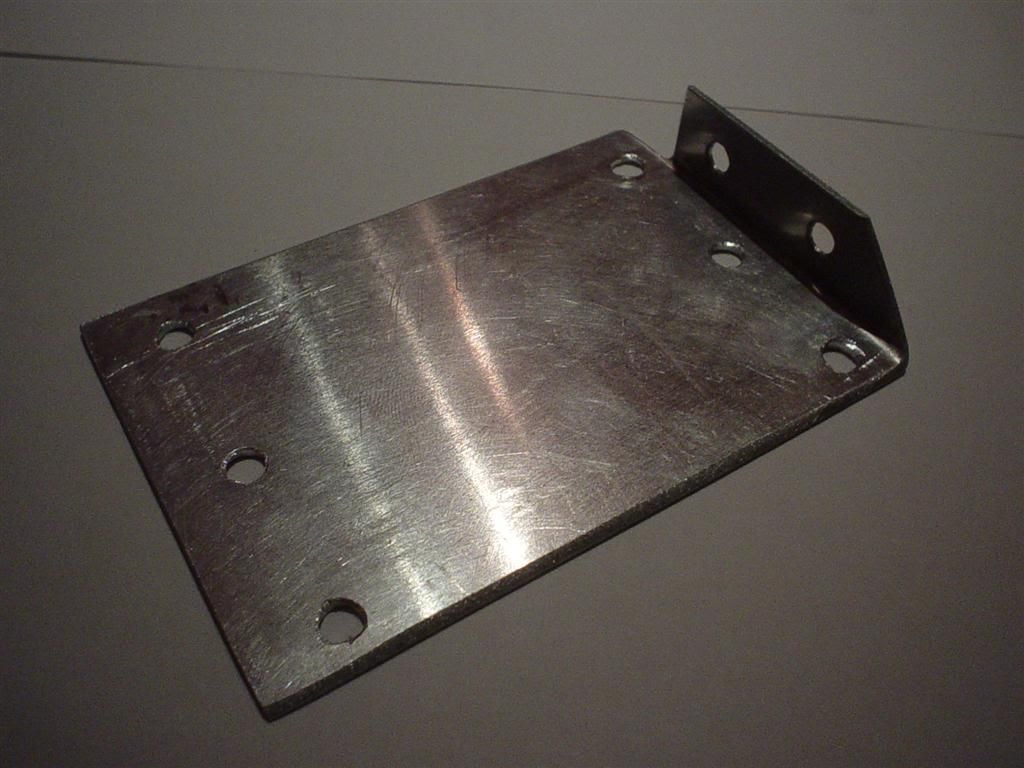
Fabricated 2 pieces of plexi that will act as a stand for the ballast. They will be secured to the ballast and then too the bottom plate from underneath.

(CLICK TO ZOOM)
This white thing is the ballast.

(CLICK TO ZOOM)

(CLICK TO ZOOM)
The ballast is mounted to the bottomplate with 6 screws. 2 vissible on that aluplate on the side of the ballast and 4 non vissible underneath that is secured into the 2 pieces of plexi. Now that big heavy thing won't move at all.

(CLICK TO ZOOM)
That's it for today. Will be back soon with more.
/GNU
Here is some more pictures.
Marking out where im going to mount all the connectors and the power switch.
 (CLICK TO ZOOM)
Here it is all mounted. You can see the VGA connector is attached with regular screws. These will be changed for normal connector screws so that you can secure the connector. The reead and black connectors are NOT for sound, they are for AV1 and AV2 video IN. There will be no speakers in it at all. Don't think that will be needed because all audio will bee connected to the sorround system.

(CLICK TO ZOOM)

(CLICK TO ZOOM)
Time to mount the ballast for the 250w lamp. It is very very heavy. Around 3-5 kilo I would guess. So I relly want it to stay in place and this is how I mounted it.
(CLICK TO ZOOM)
Fabricated 2 pieces of plexi that will act as a stand for the ballast. They will be secured to the ballast and then too the bottom plate from underneath.
(CLICK TO ZOOM)
This white thing is the ballast.
(CLICK TO ZOOM)
(CLICK TO ZOOM)
The ballast is mounted to the bottomplate with 6 screws. 2 vissible on that aluplate on the side of the ballast and 4 non vissible underneath that is secured into the 2 pieces of plexi. Now that big heavy thing won't move at all.
(CLICK TO ZOOM)
That's it for today. Will be back soon with more.
/GNU
sweet, this really makes me want to start again. Just dont know where to get all the parts and stuff. Can you please post some sites where you got lenses and stuff. Many thanks, Rob
fresnels you can get from 3dlens.com or lumenlabs depending on the focal length you want.... i'd say to go with http://www.diyprojectorcompany.com/ has a cheap triplet that many have compaired to the pro lens from lumenlabs... just at about 1/5th the price 🙂 for a ballast light if your going big i'd suggest the t15 from lumenlab with a magnetic ballast m59 (ebay) or an eballast if u have the cash
rob1231 said:sweet, this really makes me want to start again. Just dont know where to get all the parts and stuff. Can you please post some sites where you got lenses and stuff. Many thanks, Rob
"want to start again...." have you got some unfinished project laying around.. what made you stop? I don't know to much about all the parts i have to admit. I'n the beginning I was searching for parts in different places but then I realised that ,since I wasn't shure if the parts would fit together, it would probably be best to buy all the parts together. All of my parts are bought from www.exclusiv-online.com. That way, I was shure that all the parts would fit together. But if your planing on buying separate parts. I recomend you talk to cchance, as I bet he knows more about that than me 😛
Good luck with you project if you choose to start again..
/GNU
What made me stop was using a cheap lcd, thats what. I bought a PS1 lcd off ebay hoping it would be a neat beginners project, turns out it was a big waste. I had problems with the lcd 15 minutes out of the box. Started to act up, so instead of returning it I opened it up hoping to find out what was wrong and fix it. Didn't happen. Spent money on parts from local stores and shops that overpriced, making the project harder to make on a smal budget. Me being 15 and not having a job trying to make a prjector was making a big dent in my wallet, so I thought I had enough for a while, and to try again when I had some more money. havent touched it in ofer 3 months.
This is what I have been doing lately..
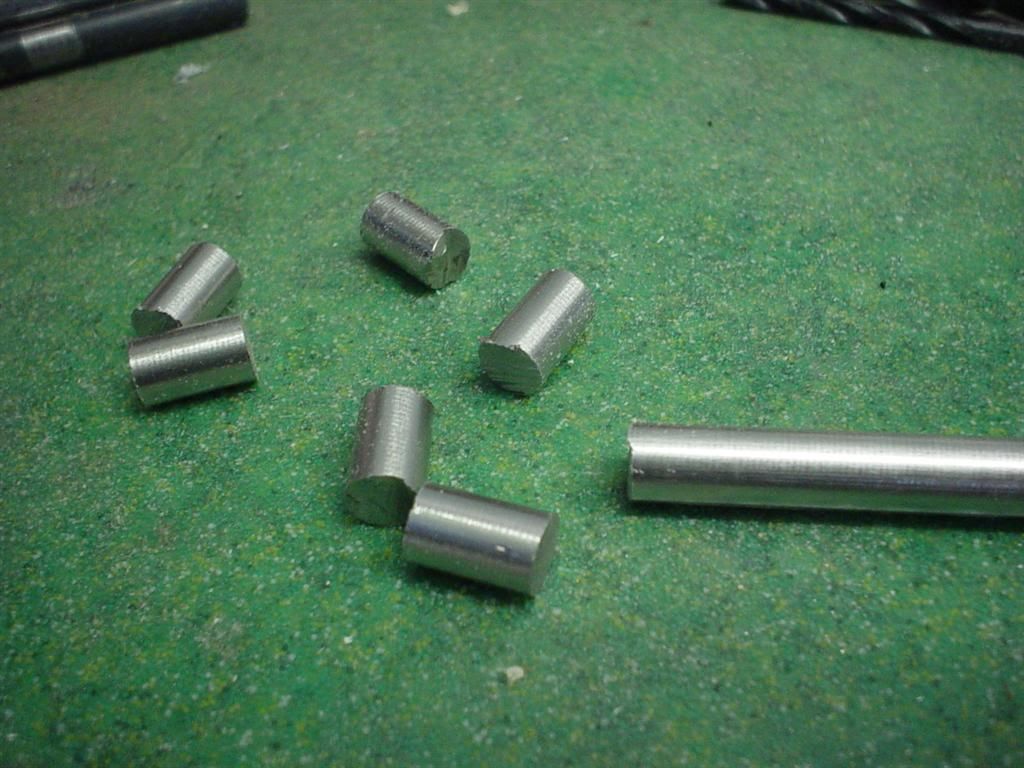
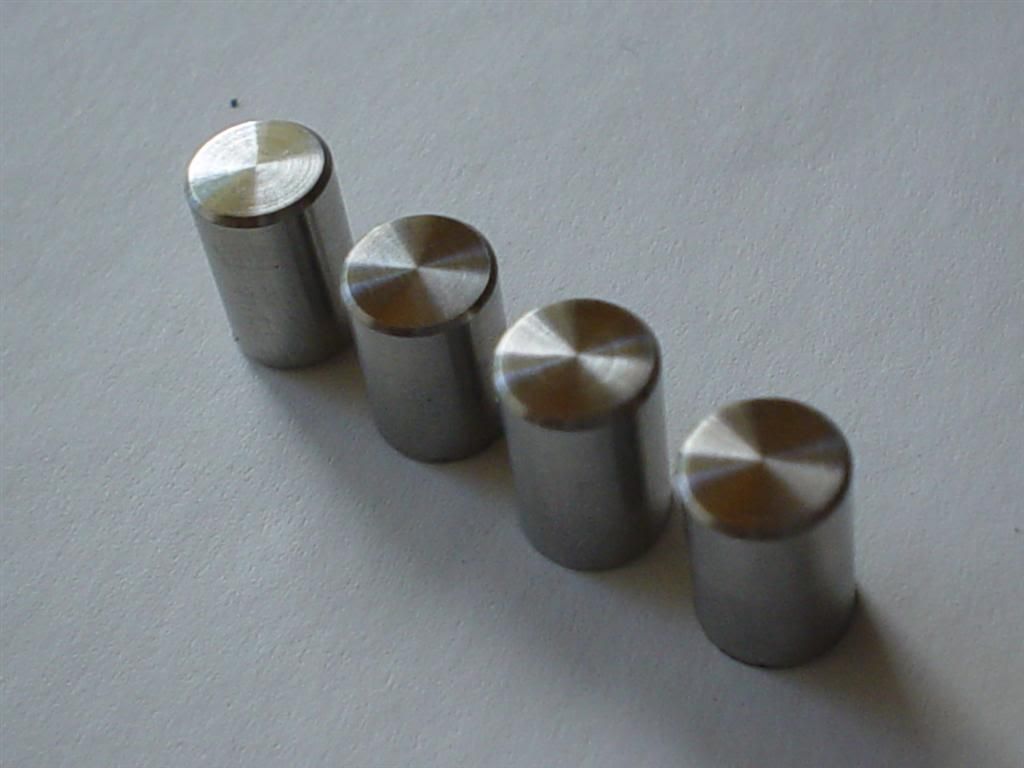
This is the buttons for the tft controlls. Its a 7mm steel rod from an old printer.

(CLICK TO ZOOM)
After putting them in the drillpress and smothing them with a file and 80-120-240-800grit sandpaper. They look like this. The surface is so reflective it was hard to get a good capture of the true look. They look dirty but they are not.

(CLICK TO ZOOM)
Backside

(CLICK TO ZOOM)
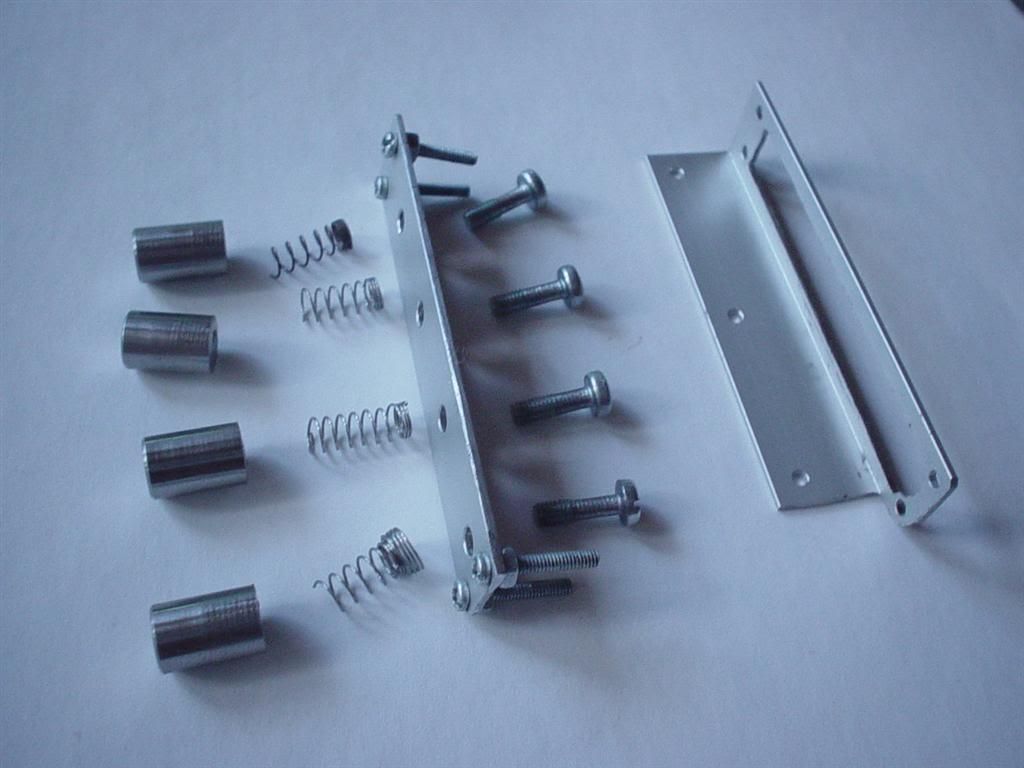
Stole some pens from my mum and took the springs out

(CLICK TO ZOOM)

(CLICK TO ZOOM)
When pushing the buttons, the springs will push the buttons back. I can adjust the buttons to be even with the front surface later, by screwing the M3 screws in or out. The electronical parts of the buttons will be added in the end.

(CLICK TO ZOOM)
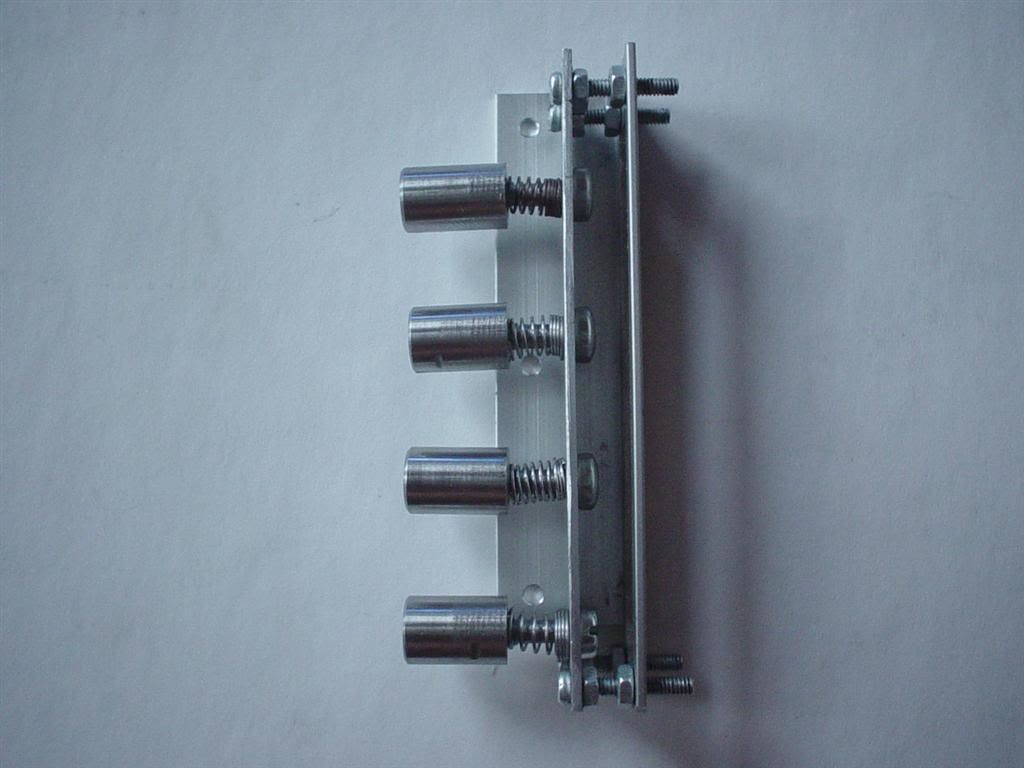
Mounting plate on the backside of the front panel.

(CLICK TO ZOOM)
Buttons mounted.

(CLICK TO ZOOM)
To get the holes for the buttons lined up correctly I taped this PCB card to the plastic front and drilled every 7th hole using a 1mm drill.

(CLICK TO ZOOM)
The holes where perfectly aligned. Here I have used a 3 mm drill to enlarge the holes a little bit to get a better aim with the drillpress when heading on to the big 12mm and the 7 mm drills.

(CLICK TO ZOOM)
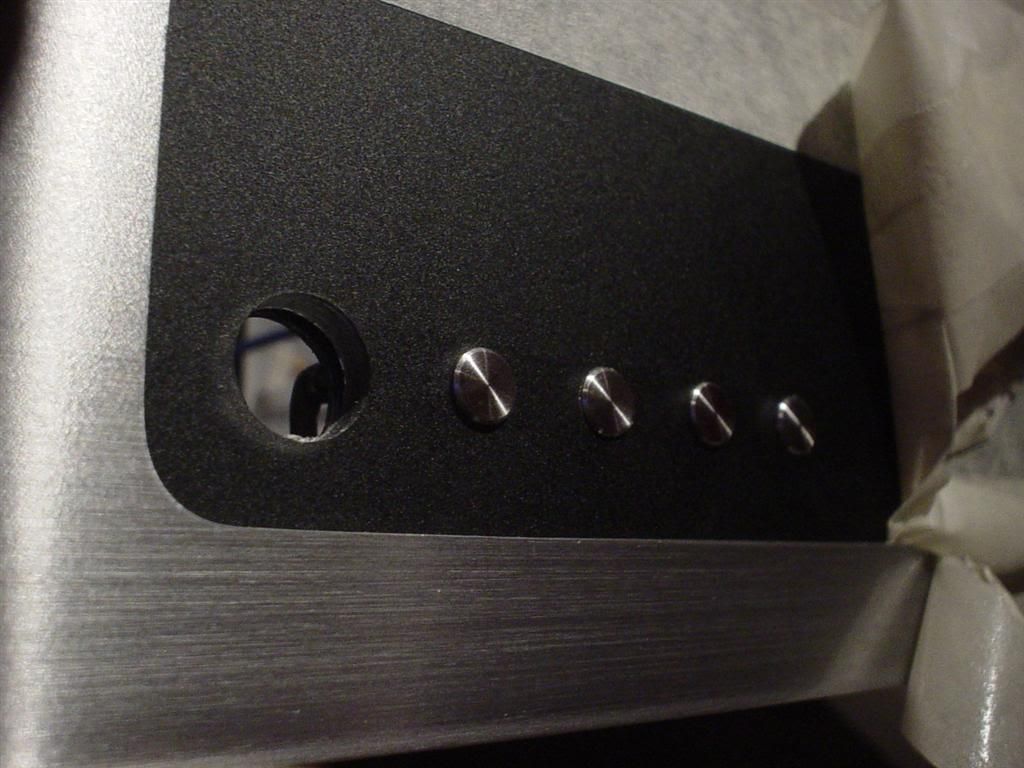
Here is a sneek peak of the front. Still need to fabricate the 12mm main power button. But so far, I am more than satisfied.

(CLICK TO ZOOM)
On with the zoom mechanism.
This was the first method i was working on.. I spent alot of hard work trying to get the design to work, but it was to hard. Hardest part was to get the holes in the plastic to align perfect with the metal rods. IN the end..it turned out very wiggly or it was totaly jamed. I don't want to think about how many hours I have wasted on the zoom mechanism design, but I'm shure its more than 25hours of head scratching.
(CLICK TO ZOOM)
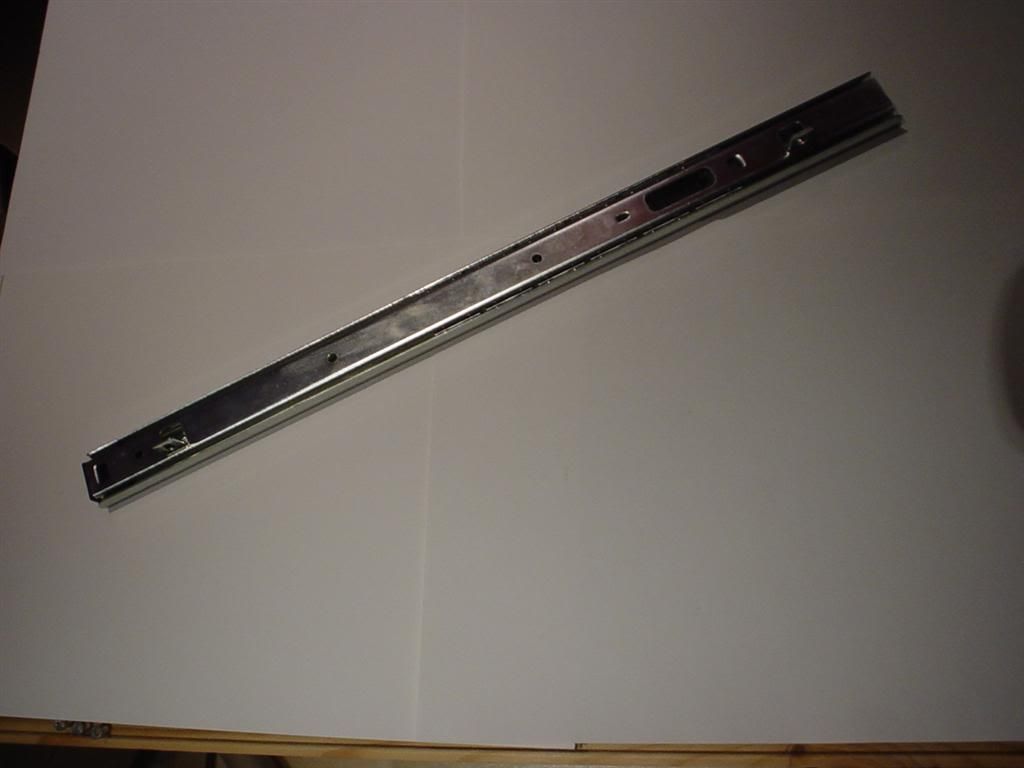
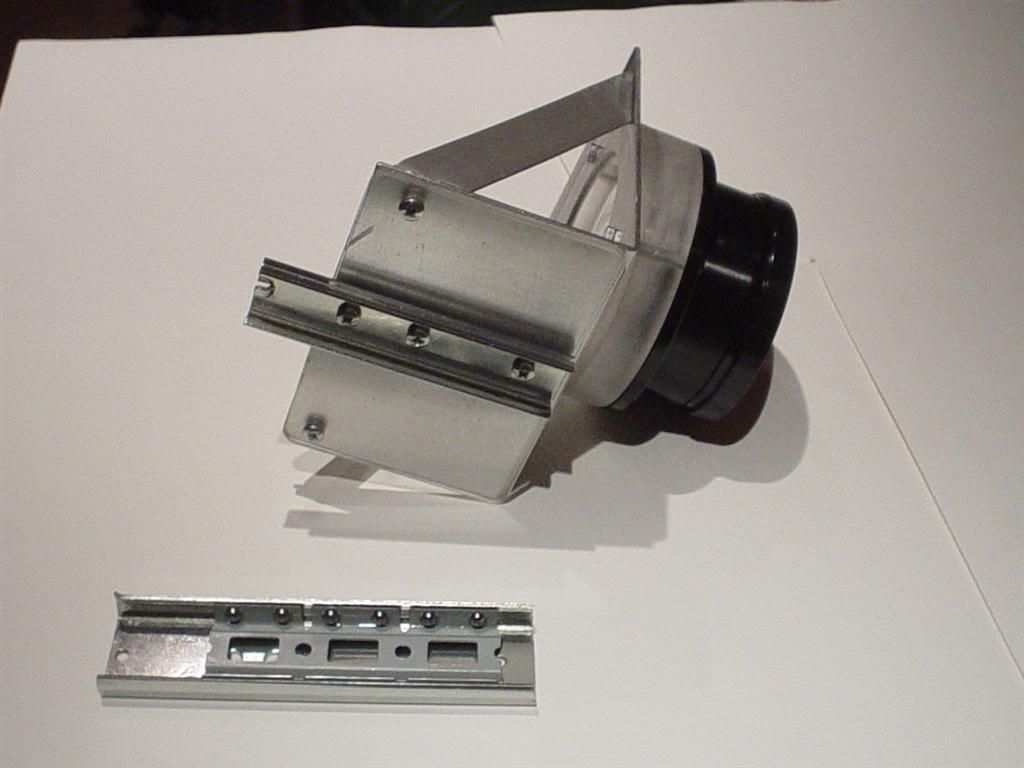
I have seen people use these type of sliding rails in other projectors but I didn't think they would work any good. They look so wiggly and unstable. But when I found one of these laying around in a shop nearby it blew my mind. It was just the perfect thing, very firm and stable in the sliding. How could I bee so stupid to doubt on these things.

(CLICK TO ZOOM)
... the lengt I need

(CLICK TO ZOOM)
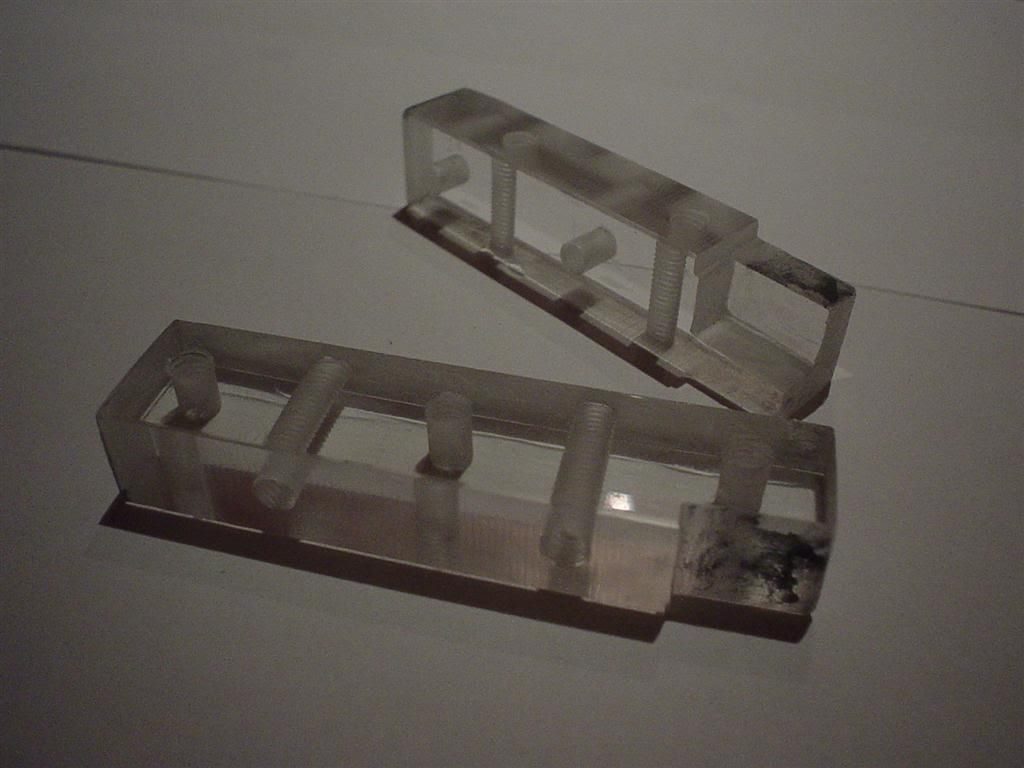
The new triplet lens holder...

(CLICK TO ZOOM)
..with both of the triplet spacers I fabricated earlier

(CLICK TO ZOOM)
Attaching the sliding part to the bottom of the lens holder..

(CLICK TO ZOOM)
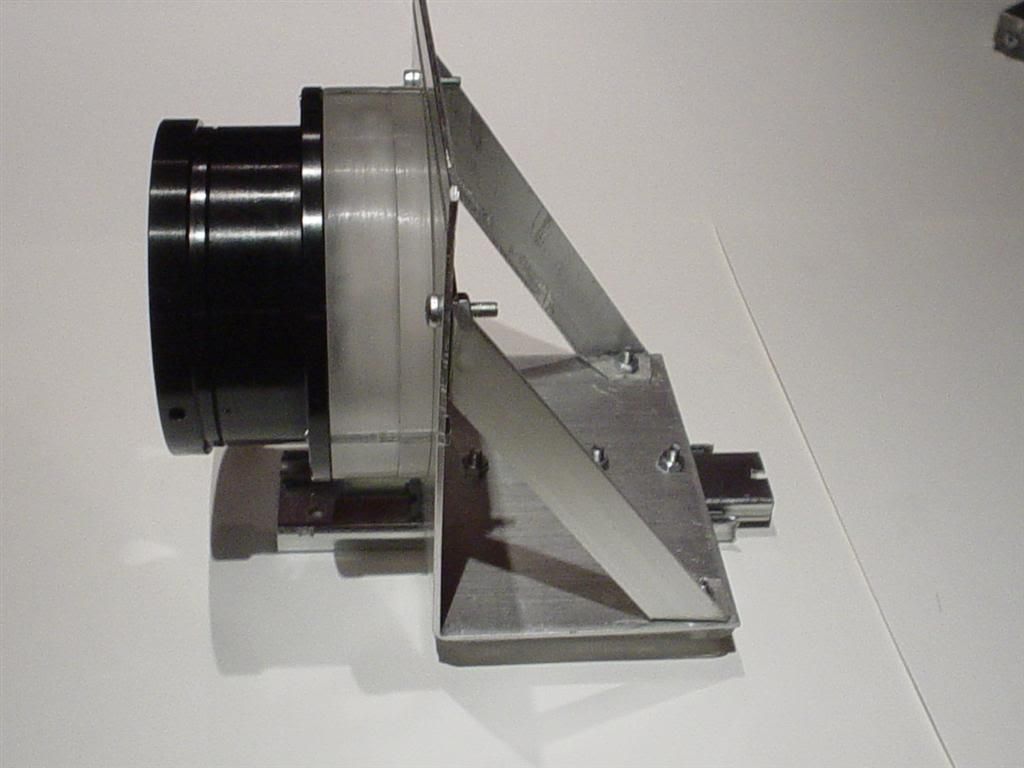
...and the sliding part and the rail together. The zoom mechanism is done and it slides great and is very stable..

(CLICK TO ZOOM)
Now I need to attach it to the case bottom...but that's another story 😉
/GNU
This is the buttons for the tft controlls. Its a 7mm steel rod from an old printer.
(CLICK TO ZOOM)
After putting them in the drillpress and smothing them with a file and 80-120-240-800grit sandpaper. They look like this. The surface is so reflective it was hard to get a good capture of the true look. They look dirty but they are not.
(CLICK TO ZOOM)
Backside

(CLICK TO ZOOM)
Stole some pens from my mum and took the springs out

(CLICK TO ZOOM)
(CLICK TO ZOOM)
When pushing the buttons, the springs will push the buttons back. I can adjust the buttons to be even with the front surface later, by screwing the M3 screws in or out. The electronical parts of the buttons will be added in the end.
(CLICK TO ZOOM)
Mounting plate on the backside of the front panel.
(CLICK TO ZOOM)
Buttons mounted.
(CLICK TO ZOOM)
To get the holes for the buttons lined up correctly I taped this PCB card to the plastic front and drilled every 7th hole using a 1mm drill.
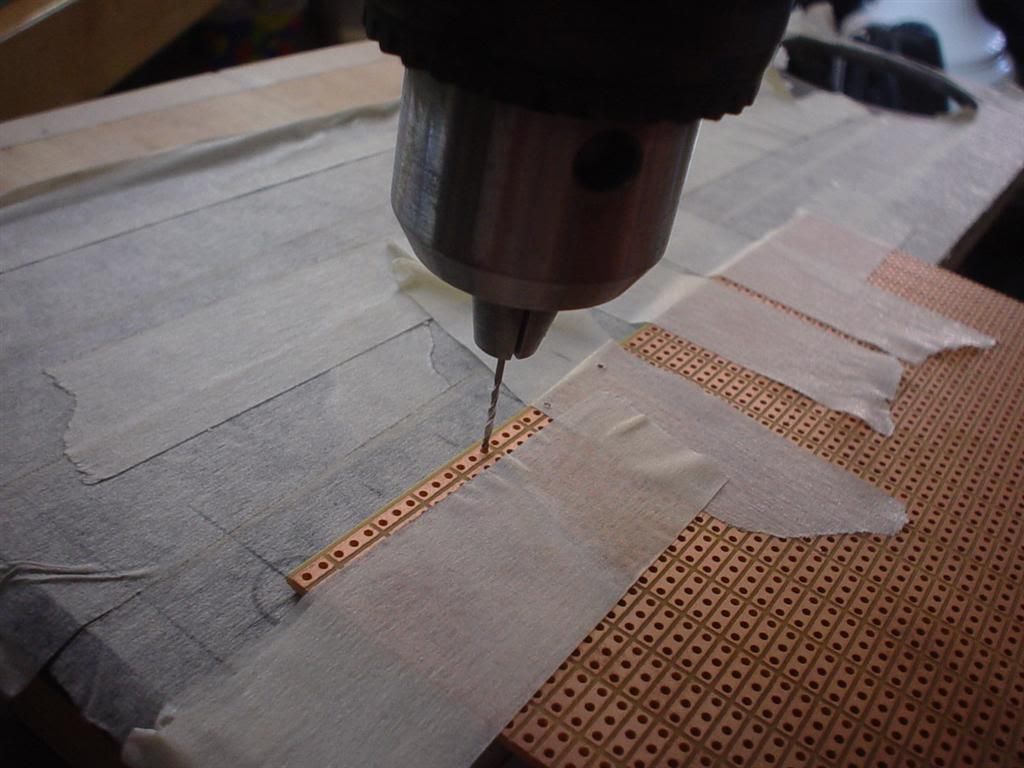
(CLICK TO ZOOM)
The holes where perfectly aligned. Here I have used a 3 mm drill to enlarge the holes a little bit to get a better aim with the drillpress when heading on to the big 12mm and the 7 mm drills.

(CLICK TO ZOOM)
Here is a sneek peak of the front. Still need to fabricate the 12mm main power button. But so far, I am more than satisfied.
(CLICK TO ZOOM)
On with the zoom mechanism.
This was the first method i was working on.. I spent alot of hard work trying to get the design to work, but it was to hard. Hardest part was to get the holes in the plastic to align perfect with the metal rods. IN the end..it turned out very wiggly or it was totaly jamed. I don't want to think about how many hours I have wasted on the zoom mechanism design, but I'm shure its more than 25hours of head scratching.
(CLICK TO ZOOM)
I have seen people use these type of sliding rails in other projectors but I didn't think they would work any good. They look so wiggly and unstable. But when I found one of these laying around in a shop nearby it blew my mind. It was just the perfect thing, very firm and stable in the sliding. How could I bee so stupid to doubt on these things.
(CLICK TO ZOOM)
... the lengt I need

(CLICK TO ZOOM)
The new triplet lens holder...
(CLICK TO ZOOM)
..with both of the triplet spacers I fabricated earlier

(CLICK TO ZOOM)
Attaching the sliding part to the bottom of the lens holder..
(CLICK TO ZOOM)
...and the sliding part and the rail together. The zoom mechanism is done and it slides great and is very stable..
(CLICK TO ZOOM)
Now I need to attach it to the case bottom...but that's another story 😉
/GNU
amazing!!
hi, gnu,
your pj is really great! An amazing look and concept - especially the new zoom mechanism for your triplet and your steel buttons!!
I'm very excited to see more fotos of the further progress! Your ideas are a great inspiration for many other diy projectors. So please don't stop your documentation 🙂
i'm looking forward to your next results!
bye
Re: amazing!!
Thx a lot for the encouraging comments einthoven. Glad you like both the zoom and the buttons 😛 Don't worry...the updates will keep coming, okay they might be a little bit slow sometimes but there will be more.
Yeah I relly hope someone will use some of my ideas in their projects. Would love that..and please send me the link if some of you do. Would be nice too see how it worked out for you.
Take care
/GNU
einthoven said:hi, gnu,
your pj is really great! An amazing look and concept - especially the new zoom mechanism for your triplet and your steel buttons!!
I'm very excited to see more fotos of the further progress! Your ideas are a great inspiration for many other diy projectors. So please don't stop your documentation 🙂
i'm looking forward to your next results!
bye
Thx a lot for the encouraging comments einthoven. Glad you like both the zoom and the buttons 😛 Don't worry...the updates will keep coming, okay they might be a little bit slow sometimes but there will be more.
Yeah I relly hope someone will use some of my ideas in their projects. Would love that..and please send me the link if some of you do. Would be nice too see how it worked out for you.
Take care
/GNU
hi, gnu
i'm going to start my first diy pj in some weeks.
Of course I'll send you the link when my online documentation starts 🙂 so you can see how your ideas spread 😉)
I already have many ideas of design and technic but I'm still in planning phase
The best inspiration I found in all the diy forums is your project! So there are many things I could solve like you did.
I hope you'll be not too angry if I copy some of your ideas 1:1 😉
But its only for my private use 🙂 - although your case has commercial potential! (Apple should build such solid cases for the Powerbooks / MacBookPro's! ...Steel-Keys ... not plastic!! 🙂 )
Your case design really should be patented 😉) the alu brushing methode is just GREAT! Million times better than "raw" aluminium or wood only painted with black spray.
one question... what kind of transparent spray did you use to give the brushed aluminium surfaces the grease-resistant finish?
You wrote it was a spray for this special purpose - but i didn't find such a aluminium protection spray in my local stores.
Do you have the name or any idea where to get such a spray?
Perhaps I could also use normal transparent spray.
One final suggestion:
When your machine runs, get a lumen meter for the fine tuning. (if you don't have one)
The precise distance between reflector, Lamp and Condensor can affect the final light intesity drastically, how shown in many diy diaries.
Bye and good luck with the following steps...
E.
Hi einthoven
Would love to se the progress of your project. What type of projector are you building? 7" or 15" or other? Feel free to use my ideas for personal use 🙂.
Apple..hehe yeah i love their designs. They have turned the old grey box of computers into stylish pieces of art. Working for apple would be a dream come true as I will soon start my designengineer studies.
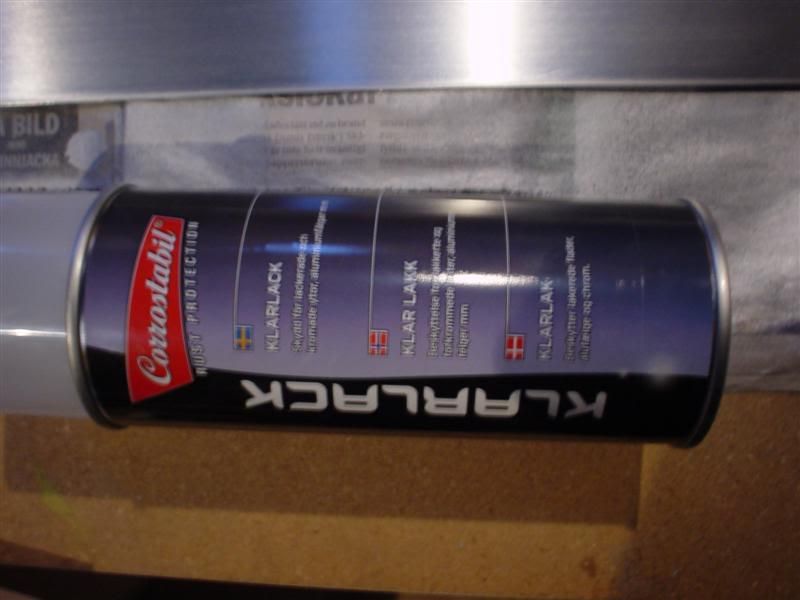
The Spray I used was a clear-coat spray for aluminium car rims. It feels a little bit thicker than normal clear coat but I'm not shure. The brand is "Corrostabil" and it seems to be one of their sprays in the "rust protection" series. I guess you will find something suitable in the car spray shelfs as those sprays seem to be a little bit more heavy duty. Try different clear coats on a spare piece of alu or whatever you will use it on. I think I tried 3 different types before I found this one.
Yes i will try to find a lumen meter to meshure the lumen output. I guess I will also try different types of reflectors and se witch one is the best.
Bye...and Good luck to you too
/GNU
Would love to se the progress of your project. What type of projector are you building? 7" or 15" or other? Feel free to use my ideas for personal use 🙂.
Apple..hehe yeah i love their designs. They have turned the old grey box of computers into stylish pieces of art. Working for apple would be a dream come true as I will soon start my designengineer studies.
The Spray I used was a clear-coat spray for aluminium car rims. It feels a little bit thicker than normal clear coat but I'm not shure. The brand is "Corrostabil" and it seems to be one of their sprays in the "rust protection" series. I guess you will find something suitable in the car spray shelfs as those sprays seem to be a little bit more heavy duty. Try different clear coats on a spare piece of alu or whatever you will use it on. I think I tried 3 different types before I found this one.
Yes i will try to find a lumen meter to meshure the lumen output. I guess I will also try different types of reflectors and se witch one is the best.
Bye...and Good luck to you too
/GNU
hi, gnu
'designengineer studies' sounds great 🙂
I always loved art and design... but now I study sth totally different 😀
If you ever work at Apple's Design Studios.. tell them, the HAVE to use
METAL keys and the mechanic "under the keys" should be metal too and it should be screwed, not just glued 🙂
(I had a PowerBook, but there a several things that should be improved!! Especially the keypad - its built too cheap)
Thanks for the spray img 🙂)
Will try to find it ... or sth like it.
At the moment I'm only planning my built of the pj ... no time to begin in the next weeks ...
but it definitive will be a 8" HAMI. 15" would be muuch too big ... i could't live in my appartement any more 😉
7" ... (16:9) is a very good choice (the case will be smaller) ... but I like the tv receiver from HAMI LCD .. so I think it will be a 8" HAMI Pj.
The reflector is really a problem... Those glass reflectors from daylight projectors actually are too small for those big lamps we use. But DIY reflectors (aluminium, steel etc.) reflect too much InfraRed to the lcd an fresnels ... they melt.
That's really a problem that still has to be solved 😉
My personaly idea was a transparent, temperature resistant, round glass (from the supermarket or else) to be sprayed with car aluminium spray as reflector. I wonder if it would reflect less IR. Need time to try if it works ..
Do you have the glass refl. from www.exclusiv-online.com?
Any plans to 'dremel' it for a better fit of the lamp?
so long
gn8
- Status
- Not open for further replies.
- Home
- General Interest
- Everything Else
- The Moving Image
- DIY Projectors
- The_Gnu's Lilliput projector (lot of pics)