Interesting project. I've got an Ariston RD IIs that I've been thinking of working on. I too want to eliminate the suspension which has become spastic over the decades. The bearing and the platter are wonderful as is the Grace tonearm.
An update so far.
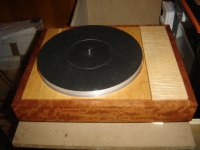
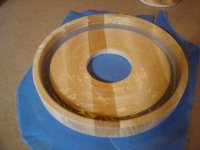
Plinth is assembled and glued. First coat of shellac on. First arm board temporarily installed for sizing. Used curly maple as originally planned as it was planed to desired thickness already. Will make a couple of boards out of different woods shortly.
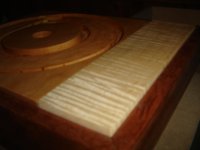
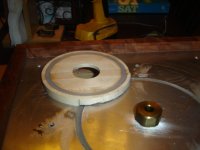
This is one rigid plinth. From the underside can see bearing cup turned out of wood as well as a bearing plate cup. I needed to increase the k factor of the bearing plate with more silicone to be able to support the load. The silicone is about 1cm thick. There is room for mass if need be. I will do the similar for the tonearm plate albeit a little thinner. That pocket has room for mass as well.
I do plan on encasing the bearing in sand to dampen any bearing noise.
I turned the cups from wood because I had some blanks laying around to fit the bill. Plus it will also be a good absorber. Hopefully I will get to finish mounting everything permanently this weekend and possibly listen to it.
I am out of spikes for feet so need to order some of those. Wish I had a metal lathe.
Plinth is assembled and glued. First coat of shellac on. First arm board temporarily installed for sizing. Used curly maple as originally planned as it was planed to desired thickness already. Will make a couple of boards out of different woods shortly.
This is one rigid plinth. From the underside can see bearing cup turned out of wood as well as a bearing plate cup. I needed to increase the k factor of the bearing plate with more silicone to be able to support the load. The silicone is about 1cm thick. There is room for mass if need be. I will do the similar for the tonearm plate albeit a little thinner. That pocket has room for mass as well.
I do plan on encasing the bearing in sand to dampen any bearing noise.
I turned the cups from wood because I had some blanks laying around to fit the bill. Plus it will also be a good absorber. Hopefully I will get to finish mounting everything permanently this weekend and possibly listen to it.
I am out of spikes for feet so need to order some of those. Wish I had a metal lathe.
Attachments


absolutely beautiful...
looks incredible. I have a few pieces of Teak on reserve for a Linn-a-like (or a Xerses-a-like 🙂), a nice match for the "219". I also have an old Dual 1019 idler wheel I'd like to get into a decent plinth. I think I like the idea of a rim drive or idler more than a belt drive, though...But I love the "old school" simplicity of the aesthetics of the Linn...
looks incredible. I have a few pieces of Teak on reserve for a Linn-a-like (or a Xerses-a-like 🙂), a nice match for the "219". I also have an old Dual 1019 idler wheel I'd like to get into a decent plinth. I think I like the idea of a rim drive or idler more than a belt drive, though...But I love the "old school" simplicity of the aesthetics of the Linn...
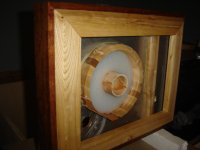
Two Steps forward One Back
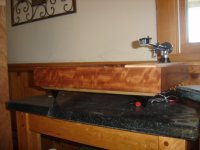
Little bit of a reversal in the design. I mis-measured the motor shaft length and ended up with the pully too low. Had to think about it for a little and came up with a better plan that I think will be even better in the long term. Removed the aluminum motor plate and turned a new one out of wood that raises the mount up by 1/2 inch. This fit into the aluminum plate. I put a silicon isolation ring on it as well, by doing this I eliminated an asymetrical suspension the originally existed. The silicone does not like to adhere to aluminum very well so the wodd provide for long term stability.
Made a second mistake when I routed out the recess for the new mount. Not thinking, I reset the depth too low and cut a section of the top. Oh well, back to the shop and a new plate is glued up drying.
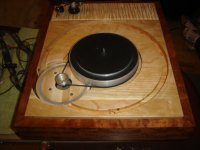
I temporarily set the tone arm in and intalled the platter. Dimensions are good. When you tap on the platter, there is NO ring or detectable resonance. I don't think there is any need for mass here.
Some photos of progress, enjoy.
Little bit of a reversal in the design. I mis-measured the motor shaft length and ended up with the pully too low. Had to think about it for a little and came up with a better plan that I think will be even better in the long term. Removed the aluminum motor plate and turned a new one out of wood that raises the mount up by 1/2 inch. This fit into the aluminum plate. I put a silicon isolation ring on it as well, by doing this I eliminated an asymetrical suspension the originally existed. The silicone does not like to adhere to aluminum very well so the wodd provide for long term stability.
Made a second mistake when I routed out the recess for the new mount. Not thinking, I reset the depth too low and cut a section of the top. Oh well, back to the shop and a new plate is glued up drying.
I temporarily set the tone arm in and intalled the platter. Dimensions are good. When you tap on the platter, there is NO ring or detectable resonance. I don't think there is any need for mass here.
Some photos of progress, enjoy.
Attachments

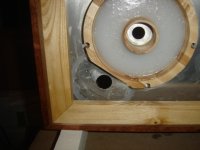
It does look like a sondek, but not by original intention. It is not a fully suspended platter and tonearm like the sondek. Just has isolation dampners built in to the top plate. Rigid enough to hold dimensions constant, but soft enough to have dampening. The silicone I use is almost like sorbothane.
Of course. I meant the external looks. Which are classic. I like the Sondek for looks. How soon you guess it will be ready for a spin?
If all goes well, tomorrow, for a quick test ride and a simple set-up. I want to give it a good finish, so once I test it and make sure everything is right, will take it apart and put the final coats on it.
First qualitative tests are good. No hum, or anything wild. First impression is that it is pitch black. In general it is a step forward. I am certainly not going to re-assemble the old one to get back to were I was. Too early to say anymore.
Good work SGregory...... So, if I have the design right so far, you've got a new solid top plate thats covered in a veneer of wood. The armboard is also mounted rigidly to this? And you have then gone to decouple the bearing and motor from that top plate?
Looks great, very neat TT - very classic looks and may well end up beating the LP12 (which is kinda ironic as the RD80 was a poor mans linn).
I know I mentioned the armageddon PS before - but I thought I should mention that someone has a mark kelly motor PCB + maxxon motor for sale in the swap meet area. Would be worth checking out if you were thinking of going the DC route later.
Fran
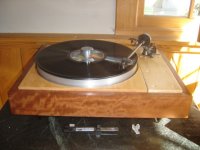
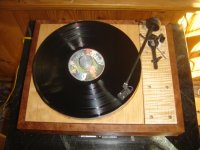
Roughed together
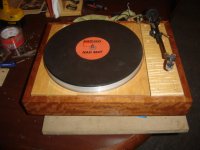
Just a few photo's of the pheonix playing some music. All that is done for set up is set the VTA, VTF and a crude alignment. Need to do a little more fitting to get the antiskate properly functional.
So far I continue to be pleased with the change.
P.S. And yes I need to set the speed. And measure.
Just a few photo's of the pheonix playing some music. All that is done for set up is set the VTA, VTF and a crude alignment. Need to do a little more fitting to get the antiskate properly functional.
So far I continue to be pleased with the change.
P.S. And yes I need to set the speed. And measure.
Attachments

Last edited:
Ah, yes the pics tell a thousand words. Love the way the wood comes up around the bottom of the platter.....
Fran
Fran
A tap you can hear some quiet LF resonance, you have to give it a pretty firm rap to get anything significant. How do you like that for quantitative science. Tells me that the LF energy isn't being sunk as well as it need to. I can tap anywhere on the stand including the legs and get similar results. Unlike the old table very little HF energy is getting through.
I have in my plans to put the stand on spikes to tie it to the concrete under the carpet and pad. Might do that this evening.
I could also go the route of an isopod between the table and stand I guess if the spike don't work.
I have in my plans to put the stand on spikes to tie it to the concrete under the carpet and pad. Might do that this evening.
I could also go the route of an isopod between the table and stand I guess if the spike don't work.
- Status
- Not open for further replies.
- Home
- Source & Line
- Analogue Source
- "The Phoenix" an Ariston Audio RD80 TT Rebuild