The diameter of SB17NRXC35-8 drivers measures to be 171mm
That allows 1.5mm all round. The later drawings (other designs) I allowed 1mm all round and that would make i 173mm. I am working on another design (not DIY) right now and the boxes are commercially made and I talked to them about it and because they can make it very accurate and they will make it 0.5mm and only 1mm diameter added overall. But it is really up to you, are you going to do it by hand, I would make it 173mm rather 174mm. So I will leave it up to you. The 7mm recess stays the same.

Thanks Joe. I'm going to cut it CNC so probably will make that value a bit smaller. Good I asked this question.That allows 1.5mm all round. The later drawings (other designs) I allowed 1mm all round and that would make i 173mm. I am working on another design (not DIY) right now and the boxes are commercially made and I talked to them about it and because they can make it very accurate and they will make it 0.5mm and only 1mm diameter added overall. But it is really up to you, are you going to do it by hand, I would make it 173mm rather 174mm. So I will leave it up to you. The 7mm recess stays the same.
Thanks Joe. I'm going to cut it CNC so probably will make that value a bit smaller. Good I asked this question.
Good indeed, I would do that too.
I don't think I will get much more from this set of speakers. Although I admit that the effect surprised me so much. Of course, in a positive sense. Sound very nice.
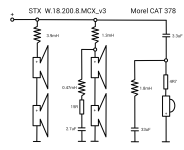
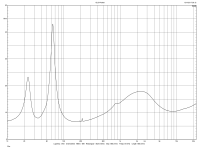
The final changes I made after free space measurements are very subtle. I decided to respond to the diaphragm resonance at around 4kHz by inserting a notch filter. I also changed the damping of the tweeter.
I still haven't connected the impedance correctors to the circuit.
Crossover layout:
The final changes I made after free space measurements are very subtle. I decided to respond to the diaphragm resonance at around 4kHz by inserting a notch filter. I also changed the damping of the tweeter.
I still haven't connected the impedance correctors to the circuit.
Crossover layout:
Attachments
"NBAC" Update:
Please consider the below as only preliminary comments.
I current have them running with the CDC tweeter, but keep in mind that the Scan-Speak D2608 tweeter is the target. To use the CDC tweeter, I have had to mangle the waveguide greatly in order to avoid troughs and suck-outs and get a smoother response above 2Kz. Essentially the centre 42mm is gauged out, a gasket inserted, and I was able to get a reasonable result at 2m and 15° off axis. From the results I have seen from other waveguides for the CDC that are 3D printed, the results could be a bit better.
I have two Crossover sets made ready. (1) The CDC uses a 4.7uF cap series tweeter, I have some Jantzen here. (2) The other Crossover I have made is for the D2608 with waveguide as is, this uses 1.8uF Audyn True Copper Max series caps. This lower 1.8uF value is because the tweeter is 8 Ohm.
The idea is to have some friends over to listen to the (1) CDC version, then change over to the (2) D2608 and other Crossover and see how that sounds. Invite guys back and for them to listen.
The (1) CDC is very problematic, for reason I have touched on earlier. Much lower sensitivity and low impedance. But I am surprised how well I have managed, after spending countless hours on it, but I am still of the impression that what I am listening to is more due to the NBAC driver than the tweeter.
So how does it sound?
Well, it's different alright. But the fundamental Elsinore character still shines through as the dominant character.
But that doesn't answer the question. What it reminds me of is that it is making the Elsinores sound more like a ribbon speaker. It's highly precise, perhaps a bit cooler but also more vivid and immediate. Of the three Elsinores, the ULD are somewhere in the middle, the MFC on the left is maybe a bit rounder and warmer, but not at the expense of being imprecise or loose. The MFC is a safe bet and the price is right. The ULD are of course way more expensive. I like what I hear in the NBAC midbass driver, but this is a sound that takes no prisoners, and it may not be everyone's cup of tea.
But I still see that all three versions still have so much in common.
The (2) NBAC with D2608 might still be the overall winner over the CDC tweeter, and maybe address the balance, but to be honest, not sure until then, but it is my gut feeling that they balance each other out. The NBAC providing the attack and projection of sound and rounded off by a silk dome tweeter that should not be underrated.
But... I could live with the NBAC/CDC version in my system right now. But the rest of system really needs to be one that steps up to the plate. I would think tube amp recommended, but a really top-drawer and not mushy sounding. Source equipment also has to match, and you got thrills?
I am hoping to be able to report on the NBAC/D2608 variation in about two weeks. It might really come up trumps (oops! no pun intended) and dial back the CDC without any loss at all.
Yes, this has taken some time, but in reality it has not. The above few paragraphs does not reveal the effort involved.
The NBAC/D2608 is what my money is on, to get that 'magic' balance right.
PS: Just as an afterthought, a 4.7uF series cap from True Copper Max or the Miflex copper, would be way to big. The D2608 that I will be using the 1.8uF Copper caps, it will have an advantage there, and it will just fit on the PCB. The 4.7uF Red Jantzen is good, but not in the same league. So the D2608 will have an advantage there, and maybe needs it.
Last edited:
Question regarding damping material used.
On the website it mentions 100% polyester is used now instead of wood/Dacron mix.
Website specifies R3.0 Polymax.
https://pricewiseinsulation.com.au/product/bradford-polymax-ceiling-insulation/
This one has a thickness of 180mm. How do you get the desired thickness, it does not seem not come in layers that you can peel off?
Also when you remove thickness means R value is lowered too? Does that mean we could have started with a lower R value ?
Website specifies R3.0 Polymax
I have actually been using R3.5 Bradford Polymax. The problem is that you may have to buy a whole bag of them and then what do you do with the rest? Not a problem if you regular do this kind of work, but if you are only doing one pair.
https://pricewiseinsulation.com.au/...qUl804hewvuuXzm8ZWLCsVe2fgtHK8TxoC0kQQAvD_BwE
How's the NBAC/CDC version fares when driven through your March Audio Purifi amp? You still think tube amps the way to go with them?But... I could live with the NBAC/CDC version in my system right now. But the rest of system really needs to be one that steps up to the plate. I would think tube amp recommended, but a really top-drawer and not mushy sounding. Source equipment also has to match, and you got thrills?
Thanks Joe. That's true te rest will be a waste. I'll have to find if they or anyone else sell them by meter.I have actually been using R3.5 Bradford Polymax. The problem is that you may have to buy a whole bag of them and then what do you do with the rest? Not a problem if you regular do this kind of work, but if you are only doing one pair.
https://pricewiseinsulation.com.au/...qUl804hewvuuXzm8ZWLCsVe2fgtHK8TxoC0kQQAvD_BwE
View attachment 1203346
So any R3.5 polyester batting in correct thickness would do right? Also how did you cut them into correct thickness (pic doesn't seem like they have layers that you can peel off)?
anyone else sell them by meter.
So any R3.5 polyester batting in correct thickness would do right?
They come by the sheet, get two if you can.
Yes, R3.5 is just perfect for the job.
How's the NBAC/CDC version fares when driven through your March Audio Purifi amp?
Yiou must have been reading my mind. I am hoping to connect them up later today.
Last edited:
Hi Joe, how did you cut them into correct thickness tho?
As you have mentioned don't make it too dense I would assume it won't be a good idea to use those sheets without getting the thickness right.
As you have mentioned don't make it too dense I would assume it won't be a good idea to use those sheets without getting the thickness right.
Use a really good heavy duty scissors, I use these:


https://www.bunnings.com.au/fiskars-203-2mm-8-amplify-scissors_p6010587
These are good to have in your tool box for future work too.
How you keep the cuts straight? I have developed my own technique that would require a video and a lot of hassle and it mind not even suit you? But you can find a way, the key is good scissors to start with.
The inside lining in front of the Main Brace, a sheet 160mm wide is cut. Then it is cut into two layers, that is halfway thickness. These are the both also cut into half thickness and that way you end up with the required 4 layers/pieces, about an inch thick. Clean them up with the scissors.
I have my way of doing it, but try to work it out yourself.

The five pieces on the left does one box - some needs the length cut as per below:
Double for second box.
Hope that helps.
How are you going find the polyester material?
https://www.bunnings.com.au/fiskars-203-2mm-8-amplify-scissors_p6010587
These are good to have in your tool box for future work too.
How you keep the cuts straight? I have developed my own technique that would require a video and a lot of hassle and it mind not even suit you? But you can find a way, the key is good scissors to start with.
The inside lining in front of the Main Brace, a sheet 160mm wide is cut. Then it is cut into two layers, that is halfway thickness. These are the both also cut into half thickness and that way you end up with the required 4 layers/pieces, about an inch thick. Clean them up with the scissors.
I have my way of doing it, but try to work it out yourself.
The five pieces on the left does one box - some needs the length cut as per below:
2 x 1200mm High, 160mm Wide and quarter thickness). Used as Front Damping
1 x 850mm High, 110mm Wide and full thickness. Used as Centre Rear Damping
2 x 1100mm High, 50mm Wide and full thickness. Used as Corner Rear Damping
1 x 850mm High, 110mm Wide and full thickness. Used as Centre Rear Damping
2 x 1100mm High, 50mm Wide and full thickness. Used as Corner Rear Damping
Double for second box.
Hope that helps.
How are you going find the polyester material?
Attachments

There is a saw you can buy from Bunnings that's designed for cutting insulation.Hi Joe, how did you cut them into correct thickness tho?
As you have mentioned don't make it too dense I would assume it won't be a good idea to use those sheets without getting the thickness right.
https://www.bunnings.com.au/bahco-5...e_6Q_DIKFBweOv0uBqYaAp1MEALw_wcB&gclsrc=aw.ds
How about that, but not an el cheapo at AUD $49, which is probably a good thing. I am definitely going to take a look at that, but will it work on polyester fibres?.
Look out Bunnings! I am coming!

Look out Bunnings! I am coming!
https://pricewiseinsulation.com.au/product/insulation-knife/
These kind of knives that use the long snap off blades work really well when you extend the blade out all the way. Fibreglass kills the blades pretty quick but polyester not so much.
Bunnings has a reasonable looking version by Trojan for about the same price.
These cut clean and don’t create much dust. Use a piece of wood or spirit level as a straight edge and it can be very neat.
- Home
- Loudspeakers
- Multi-Way
- The "Elsinore Project" Thread