The tape shown on the pictures you posted. Right below the terminals.
(Das gelbe Krepp unter den Anschlussterminals)
(Das gelbe Krepp unter den Anschlussterminals)
Oh okay, sorry ;-)
We taped the speakers just to protect them while i soldered the cables. Of course we removed every piece of tape 🙂
We taped the speakers just to protect them while i soldered the cables. Of course we removed every piece of tape 🙂
Coming together.

These are the "wrong" GW-1058s, but the Qts/Vas numbers aren't too far off the original HP-10W numbers. They're not as deep as the HP's so I'll have to put shims between the speakers and the center braces, but that's not a major issue.
These are the "wrong" GW-1058s, but the Qts/Vas numbers aren't too far off the original HP-10W numbers. They're not as deep as the HP's so I'll have to put shims between the speakers and the center braces, but that's not a major issue.
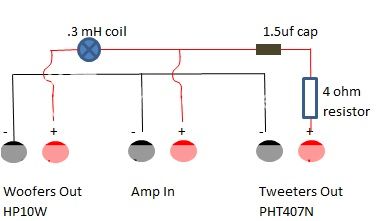
Hey, can you guys help me with the cross-over for the Paudio tweeters/HP10W woofers? I found two diagrams. The first shows the resistor on the positive and the cap on the negative. The second shows them both on the positive.
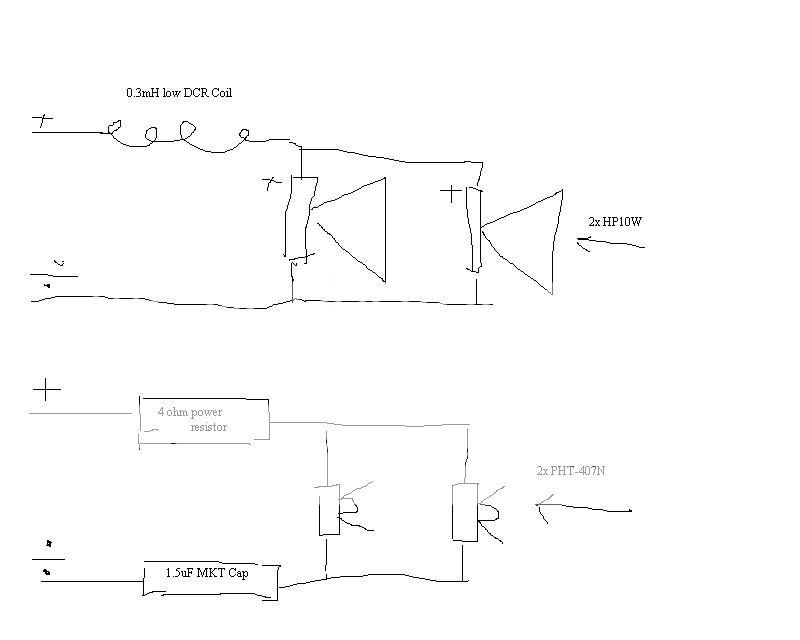
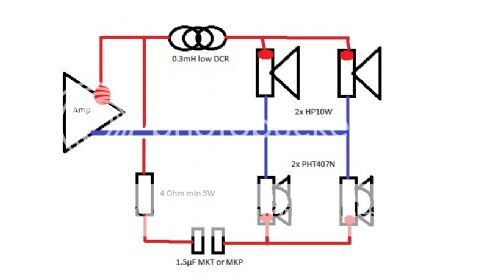
Electrically, it makes no difference. Every electron that goes through the resistor also goes through the cap. (and through the tweeters) Personally, I'd put them both on the same side as it makes constructing the tweeter crossover a tiny bit easier.Hey, can you guys help me with the cross-over for the Paudio tweeters/HP10W woofers? I found two diagrams. The first shows the resistor on the positive and the cap on the negative. The second shows them both on the positive.
Thanks. I'll have to figure out the final layout on the board, but I like to use terminal strips and will have a basic layout like so:
Hey Guys!
After our first festival with the built BOOMHILDE we want to say A HUUUUUGGGGEEEE THANK YOU!!!
You Guys helped us a lot and you were never mean to us despite some stupid questions. I will keep following this thread and I hope that i can give some small tips back to the community.
BEST REGARDS!
After our first festival with the built BOOMHILDE we want to say A HUUUUUGGGGEEEE THANK YOU!!!
You Guys helped us a lot and you were never mean to us despite some stupid questions. I will keep following this thread and I hope that i can give some small tips back to the community.
BEST REGARDS!
Another quick (perhaps dumb) question. Do you use the rubber edge on the metal speaker grills? I am using the parts express ones? I think I have seen pictures of it both ways.
Another quick (perhaps dumb) question. Do you use the rubber edge on the metal speaker grills? I am using the parts express ones? I think I have seen pictures of it both ways.
You must remove the rubber edge.
Thanks
I am doing imperial measurements so the end box will be 12" X 36". However, when I measure everything, my depth is over 12". See below.
Front Baffle .47" (12mm Baltic)
Woofer & Grill 5.375"
Brace .47
Woofer & Grill 5.375"
Back Baffle .47"
Total = 12.17"
Do people shave down the center brace so it fits??
I am not going to do the translation between metric and inch and assess the tolerance stack up. If you make it to the specified sizes it will all *just* fit therefore I would recommend staying as close to the original dimensions as you can.
Will do.
I just realized that there will be some compression of the gasket foam when screwed down and it may fit. We are talking a hair over 1/16th" on each side.
I just realized that there will be some compression of the gasket foam when screwed down and it may fit. We are talking a hair over 1/16th" on each side.
I would use my router and take a skim cut of 1/16 if it were me. Remember there will be some extra thickness due to glue and you are going to require some are going to require some serious clamping to get that compression. When I did my glue ups they were done 1 baffle at a time. This means the center brace would be bowed for the second glue up. Just another point to consider.
You could also screw the driver to the front baffle to get the required compression. Just be mindful of the baffle thickness and screw length.
You could also screw the driver to the front baffle to get the required compression. Just be mindful of the baffle thickness and screw length.
Last edited:
Thanks.
I was planning on screwing them down and that might help get most of what I need, but I can also skim them.
I am going to re-measure again tonight because when I do the metric conversion, I still come out a bit wide for the original metric spec.
I think I remember you from the mini thread. This will be my third adventure into boominator world.
There's a foam gasket on the front of the woofer that compresses, that'll make up the difference.
It depends on how you intend to mount the grill. If you mount it inside the case, trapped between the speaker and cabinet, then NO. If you intended mounting it outside the cabinet with grill holders, then YES.
I remeasured last night without the rubber gasket and it added up to less than my anticipated width and enough room for the glue so I think I am ok. I'll do a final measurement once I have all the wood and skim if necessary.
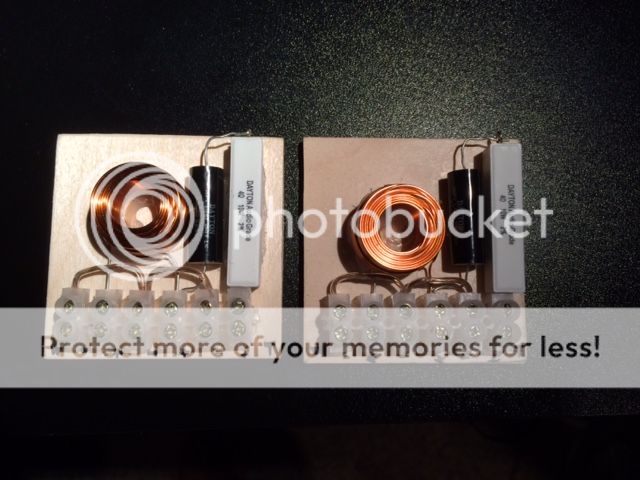
I also put together the crossovers. Relatively easy compared to others I've done. Gave the raw drivers a listen. Sounded promising. Single woofertweeter combo not in a box pushing 87db off an iPhone. I was impressed by the detail in both the woofer and the tweeter.
I also put together the crossovers. Relatively easy compared to others I've done. Gave the raw drivers a listen. Sounded promising. Single woofertweeter combo not in a box pushing 87db off an iPhone. I was impressed by the detail in both the woofer and the tweeter.
That is great! Post some pictures when you get a moment. I think we all like to see what others do with their builds.
Here is the completed xover. Love terminal strips. Only had one solder point on each. I may add a zip tie to the coil. I use industrial Velcro to secure the xovers and the battery in the compartment so they stay put.
Last edited:
Here is the completed xover. Love terminal strips. Only had one solder point on each. I may add a zip tie to the coil. I use industrial Velcro to secure the xovers and the battery in the compartment so they stay put.
Deffo use zip tie on the coil, I just used hot glue only and it came loose from the vibrations, was a pig trying to secure it again through the port handle....
- Home
- Amplifiers
- Class D
- The Boominator - another stab at the ultimate party machine