Lost eden, great that you are continuing.
One thing... When you cut your wood, try to keep the saw moving along in one steady pass, without slowing down... That's when the burn marks appear on your cuts.
One thing... When you cut your wood, try to keep the saw moving along in one steady pass, without slowing down... That's when the burn marks appear on your cuts.
It does not matter if it is on the - or + terminal.
so + filter to - speaker
- filter to + speaker
and for example + Filter to + terminal, - to -?🙂
correct?🙂
Lost eden, great that you are continuing.
One thing... When you cut your wood, try to keep the saw moving along in one steady pass, without slowing down... That's when the burn marks appear on your cuts.
I do keep the saw moving at a steady speed, I think the issue is that speed is too slow! This is only my third or fourth project using a tracksaw, so I'm very much still learning as I go.
Can this speaker be a good candidate?
3"
Dayton Audio DMA80-8 3" Dual Magnet Aluminum Cone Full-Range Driver 8 Ohm
QTS=0.47 FS=97.6Hz
4"
https://www.parts-express.com/Dayto...ne-Full-Range-Driver-8-Ohm-295-591?quantity=1
QTS=0.63FS=72Hz
3"
Dayton Audio DMA80-8 3" Dual Magnet Aluminum Cone Full-Range Driver 8 Ohm
QTS=0.47 FS=97.6Hz
4"
https://www.parts-express.com/Dayto...ne-Full-Range-Driver-8-Ohm-295-591?quantity=1
QTS=0.63FS=72Hz
Mas, the 3" looks nice, should work, but I haven't done any sims to confirm... A little busy right now.
The 4" FR looks a bit rock'n'roll up high, but will give you more bass.
The 4" FR looks a bit rock'n'roll up high, but will give you more bass.
Many thanks for the replies Bjorn and Perceval, now I have something to chew on while finishing other projects.
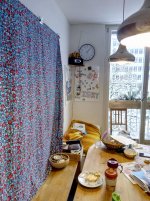
First implementation of this corner speaker would be mono, in the kitchen. It is quite sterile kitchen (white cupboards, stone floor), so a nice wooden plate in the corner would make it warmer and hopefully give better sound than the currently used Dual DAB.
Best, Erik
First implementation of this corner speaker would be mono, in the kitchen. It is quite sterile kitchen (white cupboards, stone floor), so a nice wooden plate in the corner would make it warmer and hopefully give better sound than the currently used Dual DAB.
Best, Erik
Attachments
I do keep the saw moving at a steady speed, I think the issue is that speed is too slow! This is only my third or fourth project using a tracksaw, so I'm very much still learning as I go.
Make repeated shallow cuts and try to keep the saw moving forward.
Any possibility of the work hinging and trapping the blade?
Also.... Cut say 2mm oversize, then do a light trim to finished size?
Also, also... Many teeth work well for crosscuts in real wood. If doing a rip cut, get a blade with many less teeth.
Which blade for my Festool tracksaw? - YouTube
Honestly I'm pretty sure it's simply a case of just needing to spend more time using the saw to familiarise myself with how fast to move it. Right now I take things (too) slow, because it's instinctive to take things slow when being careful with a new power tool. Making extra cuts, instead of doing it in a single pass, would only exacerbate the issue.
And don't worry, I make very sure to firmly support/clamp the work pieces to avoid pinching the blade - kickbacks are something I have no desire to ever experience!
Finally got around to building the second one. Turns out the blade that came with my tracksaw was warped & rubbing - I did some investigating after noticing that it only ever burned the wood on one side. I was planning to buy a new blade with a higher tooth count anyway, so it's no great loss.
Attachments

lost eden in my experience a blade for plywood with higher tooth count did not work well in my project I always use a regular blade and a paper tape, the key point is go fast and in a regular way on the cutting without stop......all the best
Like I said the original blade is clearly warped on one face, which explains why my cuts were only scorching on one side, so it needed replacing regardless. The consensus I've found talking with some experienced woodworkers online is that 24T (what the original blade is) is designed for quickly breaking down large sheets when you're not overly concerned with the finish, while a higher tooth count should be used when you have the time to take things slower & you care more about the finish.
The fact that it's only the side my cuts on the warped face of the blade that have been scorching indicates that my technique is actually fine. If I had been moving far too slow, or allowing the saw to stop moving (which I never did), then the other side of the cuts would also show scorching.
The fact that it's only the side my cuts on the warped face of the blade that have been scorching indicates that my technique is actually fine. If I had been moving far too slow, or allowing the saw to stop moving (which I never did), then the other side of the cuts would also show scorching.
Attachments
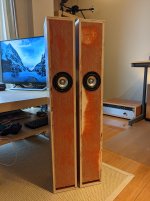
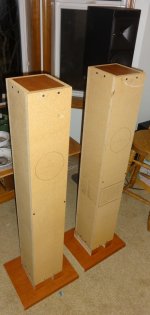
Two is better than one. 😉Finally got around to building the second one
What does the team sound like?
Two is better than one. 😉
What does the team sound like?
As far as I can tell, they sound exactly the same as the original ugly MDF ones that somebody else cut (badly!) for me... But they already sounded great anyway & these new ones look a lot nicer... plus there's certainly more sense of achievement knowing that I did all the work myself 🙂
I'm always amazed at how much low end these things have, it's hard to believe it's a 3" driver with a Fs >100Hz!
My prototype build for my ting tang walla-walla bing band w5-2143s. At least I got the formaldehyde label centered ;') Was fun getting my mojo workin' with drill press, hand drill, jig saw, table saw and carpenter's saw. Plus all the markings, rails to guide my unsteady hands and got them this far with no cuts / blood!
I dare not cutout the speaker mounting, as the 16mm floor underlay is like gingerbread - it WILL break at the thin part during handling. I dont own 6 - 12 clamps, so the screws will have to suffice to hold pieces together while the adhesive dries. This assembly is just to check if everything I cut up all fits. See how they're going to look in my bedroom.
I'm going to do something unusual with the adhesive and will follow up with pics when done. Stuff is supposed to be ready for pickup at home-deep in early February. They will be bright white when completed.
Thinkin' hard about how to cutout the 5" circle, without resorting to the jig-saw. Which would look like Guy Fawkes after the rack signature if I did...
Attachments
Last edited:
You could try one of these things, if you don't have a router and a circle-cutting jig:
Mibro Adjustable-Radius Hole Cutter|Rockler Woodworking and Hardware
Mibro Adjustable-Radius Hole Cutter|Rockler Woodworking and Hardware
Thanks so much!
I got this one, prodded in the right direction - 7/8"-5" Adjustable Circle Hole Cutter Wood Drywall Drill Bit Saw Round Cutting 91044245144 | eBay
Plum forgot such things exist!
Cabinet is partially assembled, have been / will be painting for days to get it ready to stuff and mount the driver.
I got this one, prodded in the right direction - 7/8"-5" Adjustable Circle Hole Cutter Wood Drywall Drill Bit Saw Round Cutting 91044245144 | eBay
Plum forgot such things exist!
Cabinet is partially assembled, have been / will be painting for days to get it ready to stuff and mount the driver.
I got the tool today and - ooof! - it does plunge through a scrap piece, if I come in from both sides. That's not possible with my cabinet as built. So I'll have to use it to scribe a deep line and chase that with the jig saw...
Looking at how the speaker fits into the 16mm MDF, it appears its rear vents are almost completely blocked. I havent seen any details of how this is typically addressed for the W5 2143. I guess I'll have to pick an angle for the jig saw blade and hope for the best.
Is there a better way? Rear mounting the driver is not an option, with the cabinets as built. I've limited skill and cant mill out recesses or fancy beads about the speaker cutout. What's a "peasant" woodworker to do? I'm kinda stuck and would like to address this in some reasonable, doable way.
Thanks for any help!
I got the tool today and - ooof! - it does plunge through a scrap piece, if I come in from both sides. That's not possible with my cabinet as built. So I'll have to use it to scribe a deep line and chase that with the jig saw...
Looking at how the speaker fits into the 16mm MDF, it appears its rear vents are almost completely blocked. I havent seen any details of how this is typically addressed for the W5 2143. I guess I'll have to pick an angle for the jig saw blade and hope for the best.
Is there a better way? Rear mounting the driver is not an option, with the cabinets as built. I've limited skill and cant mill out recesses or fancy beads about the speaker cutout. What's a "peasant" woodworker to do? I'm kinda stuck and would like to address this in some reasonable, doable way.
Thanks for any help!
Hi there,
I have the same Tabaq made with 16mm plywood and W5 2143 but there is no problem at all about the rear vent or the driver, what I think is not right in your Tabaq is the port extension, from the picture looks like not right, but I can be wrong.....all the best
I got the tool today and - ooof! - it does plunge through a scrap piece, if I come in from both sides. That's not possible with my cabinet as built. So I'll have to use it to scribe a deep line and chase that with the jig saw...
Looking at how the speaker fits into the 16mm MDF, it appears its rear vents are almost completely blocked. I havent seen any details of how this is typically addressed for the W5 2143. I guess I'll have to pick an angle for the jig saw blade and hope for the best.
Is there a better way? Rear mounting the driver is not an option, with the cabinets as built. I've limited skill and cant mill out recesses or fancy beads about the speaker cutout. What's a "peasant" woodworker to do? I'm kinda stuck and would like to address this in some reasonable, doable way.
Thanks for any help!
Use the tool on one side of the board, but do not let it come all the way through. Flip the board, insert the drill bit into the same hole, and finish cutting. Clean cuts on both sides.
Best way to chamfer the edges of the hole to let the driver breathe is with a small router. You don't need one of those monster routers, just a cheap small handheld one is fine for this kind of small job. You can also use it to round the corners of the enclosure later as well.
Otherwise, a small cylinder sand paper that fits on a drill could be used to create the chamfer easily

- Home
- Loudspeakers
- Full Range
- TABAQ TL for Tangband