New poster, frequent reader. I have built two sets of Super Pensils. They are fantastic once burned in.
As Dave said, you definitely want to brace them. I would also add acoustical insulation to walls, where you can. You don't need wool felt, something like pink R-20 batt insulation works fine.
A neat, cheap addition that will add a lot for very little (who doesn't like that?) are sorbothane hemisphere decoupling feet. The trick is selecting the correct load from the ordering chart that maximizes the lowest durometer rating (30 duro). You also want to have them near fully loaded, or they won't do anything. Some physics jargon I can't fully explain... Read this thread for more info:
An inexpensive speaker tweak that works! - Gearslutz
I use ceramic spikes on one of my sets, and it's also nice but ridiculously expensive. I got mine for cheap from a buddy that owns a hifi shop. I definitely prefer to have my Super Pensils off the floor...
All the best, and I doubt you'll be disappointed with your SPs...
Thanks for the heads up on the volume thing, will do.
And I will follow the off center suggestion that was mentioned in the drawings.
Thanks, Greg
And I will follow the off center suggestion that was mentioned in the drawings.
Thanks, Greg
I would also add acoustical insulation to walls, where you can. You don't need wool felt, something like pink R-20 batt insulation works fine.
Something we always do near the driver, the fiberglas sinsulation needs to be a bit thicker than the 12mm cotton felt we use.
dave
This what I have come up, mostly out of necessity due to the fact that I have hardwood floors.
The felt under the pucks allow me to move them easily (the speakers I am currently running are 48" tall, not sure on the weight, you do not want to lift it yourself.
I can level them ( I am a carpenters son, true to the world means a lot).
Cost for me around $100.00.
The felt under the pucks allow me to move them easily (the speakers I am currently running are 48" tall, not sure on the weight, you do not want to lift it yourself.
I can level them ( I am a carpenters son, true to the world means a lot).
Cost for me around $100.00.
Attachments
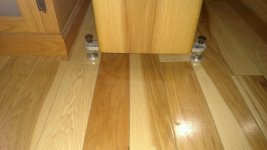
I use felt to. Either on the bottom of the speakers, or on something like the picture you have shown. Carpet is a breeding ground for all sorts of nasty small creatures.
dave
dave
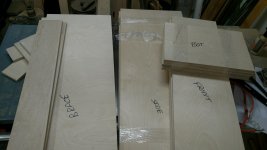
Well finally got back to this project and got all of my panels cut, using Baltic Birch.
After doing my panels the only question I have is the the two side brace heights.
Do not know if it is really critical or not but the original plans did not give a dimension.
Looks to me like they are in the 24" inch tall range, good to go?
After doing my panels the only question I have is the the two side brace heights.
Do not know if it is really critical or not but the original plans did not give a dimension.
Looks to me like they are in the 24" inch tall range, good to go?
Well finally got back to this project and got all of my panels cut, using Baltic Birch.
After doing my panels the only question I have is the the two side brace heights.
Do not know if it is really critical or not but the original plans did not give a dimension.
Looks to me like they are in the 24" inch tall range, good to go?
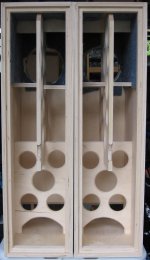
Yeah, 24" looks about right. Here's a pic of mine showing the bracing.
jeff
Attachments
Thank you sir.
Your pic provided me with some other info I was wondering about.
Did you put that material on the back as well?
Thanks, Greg
Your pic provided me with some other info I was wondering about.
Did you put that material on the back as well?
Thanks, Greg
Thank you sir.
Your pic provided me with some other info I was wondering about.
Did you put that material on the back as well?
Yes, just to the same height as the front. It's Ultratouch recycled denim, and not strictly necessary for this style of cab.
jeff
Looks promising! Can recycled cotton insulation be used for the damping, instead of the poly-fiber? Something like this: Metisse katoenisolatie | Eurabo
If you tease it out at least a bit. We used it in a couple of lines, including microTowers.
dave
dave
WoVe,
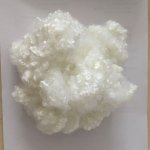
My understanding is that the felt like insulation material that you have shared the linked for can be used for "lining" the inside of the cabinet, and can be useful for bass reflex type cabinets. For a TL or MLTL cabinet (the Pensil is a MLTL variant), you need the loose poly-fill stuffing, preferably Dacron hollow fill. The poly-fill can be sourced from craft stores or even taken out of pillows. I have attached an image from Google search for your reference - when installing in the cabinet you will need to "tease" this out so that it is more fluffy.
With the lining material you can use a few pieces on the sides and back wall near the driver, to absorb "early reflections", but you still need to use the poly-fill material.
Attachments
Last edited:
Zia,
There is much less dense UltraTouch wall insulation that can be teased out and serve the same role as polystuff.
UltraTouch™ Denim Insulation << Bonded Logic
dave
There is much less dense UltraTouch wall insulation that can be teased out and serve the same role as polystuff.
UltraTouch™ Denim Insulation << Bonded Logic
dave
Thank you Dave. I actually have a some of that material too - used it in a P10 Half-Tower MLTL build and it worked out well.
The link WoVe posted has an image of a material that looked more compact and dense, like a felt. I guess it would be more difficult to tease that out. 🙂
The link WoVe posted has an image of a material that looked more compact and dense, like a felt. I guess it would be more difficult to tease that out. 🙂
I’d avoid T-nuts like the plague -use externally threaded inserts if you don’t want to trust the screws.
Over the beater part of a dozen years, I’d installed literally scores of Mark Audio drivers in a vast array of enclosures - sometimes swapping out multiple times in the same boxes and always found the supplied screws quite sufficient to the task. If you take a close look at them, the shank is constant diameter and the thread is deeper and coarser than many wood screws - with a properly sized pilot hole and careful pre-tapping, they work quite well in BB plywood.
If concerned about thickness of core remaining after rebating for flush mounting, I’d add another layer of the same material to the area of the driver before machining the through hole, and don’t forget to chamfer the rear side of the cut-out.
I didn't get any screws with my drivers.
Why the hate for t nuts?
Was already visiting the plan to add a 1/4 inch ring to the inside of the cabinet.
And I always chamfer the inside
Why the hate for t nuts?
Was already visiting the plan to add a 1/4 inch ring to the inside of the cabinet.
And I always chamfer the inside
- Home
- Loudspeakers
- Full Range
- Super Pensil 12 build