Thank for the reply. I would have preferred this post to be on the other thread, but as long as its educated, and decently thought out it is OK by me. Yes that is precisely the reason I machined the metal parts first. I don't have the vacuum bagging system though I do have all the supplies. The method I will use for the oven will be to either A build a "hot-box" with temp control and various other temperature apparatus. Or B stick it in the oven following strict Post-curing procedure. This procedure changes with the type of resin used so be careful. Sounds like you have a nice assortment of tools from which to work and build with. I did scavenge the Dayton for the motor and voice-coil. Why are you in need of only the voice-coil?
Last edited:

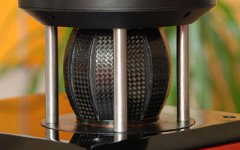
Realised working model
The following are both a picture, and a motion picture of a working mbl mid-range.
The following are the improvements that are yet to be added.
Use of wacker glue
Use of CA glue
Use of proper lamella aligning equipment
Use of "special sealing rubber"
Use of optimum resin to fiber ratio
Here is a link to the video of the working model playing. Note that all the distortion is merely from the microphone, none of it is heard in real life.
My Edited Video - YouTube
Attachments

Last edited:
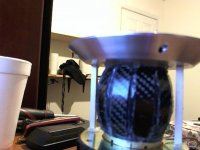
Looking good, man. Just to clarify, the picture on the left is of your speaker, and the picture on the right is of the manufacturer's speaker, correct?
Did you end up using the samurai carbon fiber for it or what weight in oz/yd did you use? How does it sound to you?
Did you end up using the samurai carbon fiber for it or what weight in oz/yd did you use? How does it sound to you?
Yes the speaker on the left is the clone, and the picture on the right is merely for a comparison. This was a really quick and dirty version. Most of it is incorrect, it was made quick and easy just for fun while I sort out the kinks and work on the advanced version. This is why I did not post any measurements. An advanced version will be coming out next week so stay tuned. The carbon weight I am using for experimenting is 5.7 twill weave. Samurai carbon fiber and vacuum/oven curing will be on the final version which again should kick things up a notch. The actual tonality is very neutral although the highs are missing. The music floats from the very air itself even when 1/2' from the speaker it all stays in focus. I hooked up aTang Band 1337sd and the mbl, and spread them about 5 feet the sound was very good and was the most holographic sound I’ve heard. So to say the least things are looking good.
Last edited:
Awesome. How many layers did you use of the 5.7 oz? The latest pic is a little blurry but I can't see any voids between the fibers. Well done. The real MBL looks like it is plain weave cut on a bias. What are you using for the surround.. Or the creased, foam-looking material between the lamellas? Also curious why you chose silicone glue over epoxy to secure the lamellas to the VC.
Keep up the good work.
Keep up the good work.
I have not seen either thread before, quite ambitious of the both of you.This project is inspired by this thread My MBL 101E replicas
Good luck, after all that hard work, even the slightest disappointment can be quite the cataclysmic heartbreaking.
Agree.
Congratulations on your achievements, but I think a summer vacation won't be enough, it's a *very* challenging project.
Nothing bad about that, you can always continue at a later date.
And .... good luck !!!!
Congratulations on your achievements, but I think a summer vacation won't be enough, it's a *very* challenging project.
Nothing bad about that, you can always continue at a later date.
And .... good luck !!!!
First official build ready
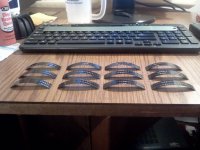
This has been a long time coming. The first official mbl clone build is ready to go, further post will show the final result and measurements. This is the set of lamellas for the first build. Test have been done to show the VF and FW contents which will be used and varied in further variations.
This has been a long time coming. The first official mbl clone build is ready to go, further post will show the final result and measurements. This is the set of lamellas for the first build. Test have been done to show the VF and FW contents which will be used and varied in further variations.
Attachments
First official build
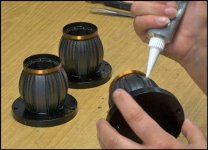
This has been a long time coming. The first official mbl clone build is here, further post will show the final result and measurements. This build has all the proper materials and dimensions as the real thing. The build I feel came out very nicely. I used job specific aligning rigs and shim with which I was able to get a near perfect alignment. Ofcourse there are improvements to be made in the construction of the clone.
This has been a long time coming. The first official mbl clone build is here, further post will show the final result and measurements. This build has all the proper materials and dimensions as the real thing. The build I feel came out very nicely. I used job specific aligning rigs and shim with which I was able to get a near perfect alignment. Ofcourse there are improvements to be made in the construction of the clone.
Attachments


Motion Video
Yes Bear a very long and arduous summer.
Here it is, a video recording of the first official mbl clone. The advancements in the construction and materials from the previous one is massive. There are still improvements. Right now it is playing without a spider. I Would like to here Diy Audio's input.
http://www.youtube.com/watch?v=8c8tZKAOA3Q
Sound Review
The sound is pretty clean with nicely rounded mids and highs. There seems to be no peak in the frequency graph, like should be expected with composites. The sound is big and open with a tactile texture to the instruments. I have high hopes for this project, seeing how this is only the first of many revisions. The video does not do the clone justice.
Member
Joined 2003
Impressive!
I also wanted to make two mid balls for deskop use, just need one (or two!)free summer!.
till the free summer arrives, I'm still struggling with a pair of home made mini maggies.
I'd like to know the frec response of your mid units. May be they are scalable to almost "full range" on low power..
keep the good work
Pedro
let's do mini melons!
I'm still thinking about these speakers...
From the pictures I can't see if the gap between the petals of the diy version is sealed. I can see the poliester damping inside but... must the spheres be airtight?
if so, how?
the mbl originals seem to have a rubber preshaped piece that fully seals the gaps, but can't imagine a diy substitute for that, one that let the petals flex more at the ecuator than on the poles...
more pics, please!
Another question is the ferrofluid damping.
use a comercial ferrofluid or a home one made will do the thing?
and... just pours the liquid into the gap and it stays there? just by magnetical force? any help?
go on, let's do mini melons!
Pedro
Lets do it!
Hello Karellen. From the lastest image only the lamellas and seal is shown. The poly-fill cannot be seen from the perspective shown. The seal is exactly the same dimensions and topology included. Total mass comes in at 7.00g. Ferro-fluid "adheres" to the magnetic parts of the motor. So far I have not used Ferro-fluid. I will upload a video recorded with a hifi microphone when I get home.
Hello Karellen. From the lastest image only the lamellas and seal is shown. The poly-fill cannot be seen from the perspective shown. The seal is exactly the same dimensions and topology included. Total mass comes in at 7.00g. Ferro-fluid "adheres" to the magnetic parts of the motor. So far I have not used Ferro-fluid. I will upload a video recorded with a hifi microphone when I get home.
Update
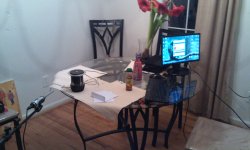
I have semi finished version 1.0. On the previous video filler, and tension rods had not been installed. The sound is much cleaner. The sound is a lot more focused without the tinny and hard sound of the previous video. The clone was recorded using an omni mic.
Link to video
223 - YouTube
New pictures of "completed rev 1.0".
Attachments
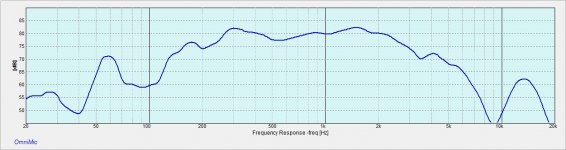
Frequency graph
Here is the frequency response graph. The measurement was indoors and taken at 1 meter. The graph seems good within 300 - 2khz. I will be paying close attention to bring the upper frequency up in the newer models.
Here is the frequency response graph. The measurement was indoors and taken at 1 meter. The graph seems good within 300 - 2khz. I will be paying close attention to bring the upper frequency up in the newer models.
Attachments
Last edited:
- Home
- Loudspeakers
- Planars & Exotics
- Summer Project - Replication of MBL loudspeaker 101mkII