Not surprising, the good ones are usually very well made. I have one too and I use it in much the same manner but not as a saw guide.I have a 4' drywall square,of all things, that is dead on.
Most of the framing squares I have were square for the first week or two. 😉
Different countries, different prices. It costs more than 100 bucks for a good one up here in the Great White North.If you have a $100+ saber saw
Sure you can. A good saw with an orbital cut or even a guide wheel will do 90° if you are familiar with jig sawing. But you are right, most won't get a 90° as no one ever showed them how to guide the saw properly and they just merrily push it on through the wood.You cannot get a 90* cut with a saber saw.
My apologies, so it's really just a hole fetish then? Or that we don't believe in equal opportunities for routers? 😉
On the subject of jig saws, IME about the most useless power tool made. I get a better cut in about the same time w/ my Ryoba hand saw. Any long cuts get the circular saw or the table saw.
On the subject of jig saws, IME about the most useless power tool made. I get a better cut in about the same time w/ my Ryoba hand saw. Any long cuts get the circular saw or the table saw.
if referring to the photos with braces - actually the holes were cut with hole saw, and the rabbets with dado blade on table saw - only the chamfers by router
Completely agree and always mystified by the elaborate bracing one typically sees. Need structural type bracing for a subwoofer internal pressures perhaps, but not for killing cabinet resonances.
. . . If you are willing to forgo the rear support for the driver, a simple 3/4"x2" brace up the long dimension to each panel is highly effective.
Bob
Completely agree and always mystified by the elaborate bracing one typically sees. Need structural type bracing for a subwoofer internal pressures perhaps, but not for killing cabinet resonances.
Bracing the back of the driver has a long history. I first saw it back when the Voigt pipe for the RS-1354 first appeared. At that time the brace was a long bolt through the back of the cabinet that applied pressure to the back of the driver. The idea was to prevent ringing in the driver basket. Granted that the basket of the RS-1354 was a bit light and the brace may have been effective. P10 evolved this idea into the "holey brace"which does two things -- it applies pressure to the back of the driver and ties the baffle to the back. I personally like to tie the baffle to the back with window braces above and below the driver. Whether any of this has actual value as never been shown by objective analysis.
Panel bracing, however is important, and more so as the panels get bigger. Longitudinal braces are necessary once panel widths approach 12", possibly less. I use them on all panels starting with ~8". On cabinets as large as the Pensil 10 and 12, one might consider two such braces asymmetrically placed.
Bob
FWIW, can we agree on "bracing of your favorite flavor is fine - but the results might be the same as mine" ?
Well folks, looks like I'm back in business. Seems there were some unnecessary tool offsets on my CNC router which caused all of my parts to come out a bit shy. This coupled with thin material resulted in an entire sheet of plywood scrapped.
Figured it all out and threw a sheet of material on to test out it's accuracy. Perfect! Everything came out perfect and I couldn't be more happy. Looks like I'll start the build process tomorrow and go find some pretty veneer to wrap them in. Any ideas what kind of veneer will look good with the blue hue of the 12P's? I'm thinking walnut since it'll start out purple and age really nice.
Cheers,
Steven
Well folks, looks like I'm back in business. Seems there were some unnecessary tool offsets on my CNC router which caused all of my parts to come out a bit shy. This coupled with thin material resulted in an entire sheet of plywood scrapped.
Figured it all out and threw a sheet of material on to test out it's accuracy. Perfect! Everything came out perfect and I couldn't be more happy. Looks like I'll start the build process tomorrow and go find some pretty veneer to wrap them in. Any ideas what kind of veneer will look good with the blue hue of the 12P's? I'm thinking walnut since it'll start out purple and age really nice.
Cheers,
Steven
maybe Dave can post some pictures of our recent MarKen build for these - book-matched black walnut paper backed, with 3 coats of clear coat finish looks really nice indeed ( matte NC lacquer in my case - cause I'm a lazy bugger with the finishing, and it's fully done in one day)
I've also had this sheet of birds-eye maple kicking around for a few months for which I have to figure out a good home - maybe those M10A10s with a solid walnut supra-baffle?
Zman i haven't had any time to start the build yet but hope to make some progress this weekend. My apologies for taking so long. Sometimes life throws curve balls.
-Steven
-Steven
Steven,
Sometimes a build takes longer than expected, especially if something gets in the way. Hope nothing serious at your end and all the best.
- Zia
Sometimes a build takes longer than expected, especially if something gets in the way. Hope nothing serious at your end and all the best.
- Zia
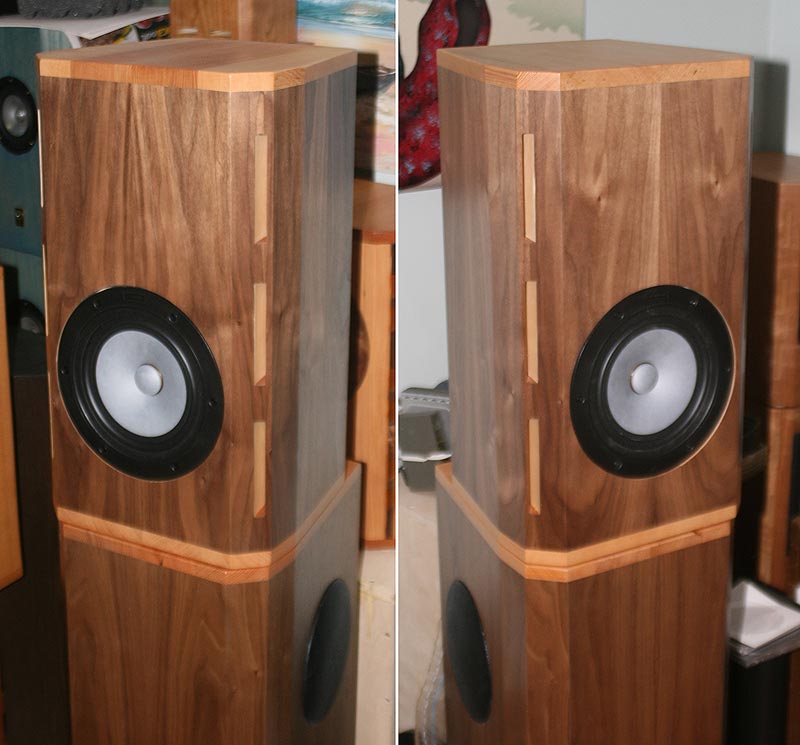
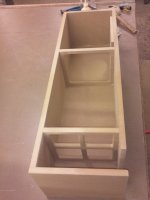
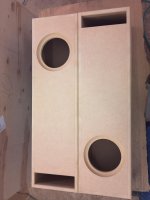
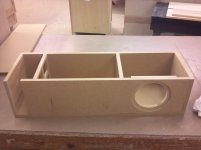
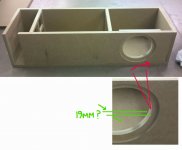
Well, I had a little time this morning to throw the enclosures together. Here are a few photos of the build. As you can see I opted for MDF, and a non-standard bracing. As of right now they are waiting in the finish room and have a couple coats of sealer already thrown on. Monday they will get an off-white paint sprayed onto them and should be fully mounted by Wednesday. I rounded over the front edges to give it a "softer" look and reduce diffraction.
Also, as you guys can see I added more material to the inside of the cutout. I added 1/2" more which gives 3/4" material to screw to. I did a small round-over on the inside edge of the cut-out but I don't think it's adequate as I believe that the driver will need more room to breathe. Soo.. with the enclosures already sealed up I'll just take a small sanding wheel and chamfer the inside edge a bit. Shouldn't be a problem, just a little time consuming.
Anyways, I'm excited that I've made progress on the enclosures and can't wait to listen to them next week. Hope you guys enjoy!
Cheers,
Steven
Attachments

Steven,
Don't mean to be a pain - but from the pics it looks like you didn't make a removable back.
That means you will have to put in and adjust stuffing via driver mount hole only.
For chamfering the insides of the hole a rasp works nicely (advice of Dave IIRC 🙂).
- Zia
Don't mean to be a pain - but from the pics it looks like you didn't make a removable back.
That means you will have to put in and adjust stuffing via driver mount hole only.
For chamfering the insides of the hole a rasp works nicely (advice of Dave IIRC 🙂).
- Zia
Zia, I didn't use a removable back. For a cabinet this small I don't mind pulling the driver out a time or two to adjust stuffing. It's just a personal preference of mine 🙂
Zia, I didn't use a removable back. For a cabinet this small I don't mind pulling the driver out a time or two to adjust stuffing. It's just a personal preference of mine 🙂
Great - so now sir on towards completion of the build and subsequent listening impressions! 🙂
BTW, you might consider some lining on the inside of the top of the cabinet and both sides of the driver.
...and a non-standard bracing
The issue with bracing that is perpendicular to the vertical sides is that it willperturb the 1/4 wl standing wave that makes a TL work.
dave
Also, as you guys can see I added more material to the inside of the cutout. I added 1/2" more which gives 3/4" material to screw to. I did a small round-over on the inside edge of the cut-out but I don't think it's adequate as I believe that the driver will need more room to breathe. Soo.. with the enclosures already sealed up I'll just take a small sanding wheel and chamfer the inside edge a bit. Shouldn't be a problem, just a little time consuming.
Cheers,
Steven
Hi Steven,
Great looking build and very nice work. Noting the side wall (front baffle) mounting thickness of 19-mm (3/4"), theres a higher risk of reflection onto the cone rear. Try to chamfer as much as possible. Maybe you could experiment with some off-cuts first to see much you can chamfer out.
The drivers don't need heavy tightening down. If your using our M4 screws, use a 3.9-mm or 4-mm to mark the hole centres by offering up the driver into the recess, then drill pilot holes to take the screw body. I'm not if the office so can't give you exact screws body dimensions. From my memory, a pilot hole of 2.4-mm is about right but check it.
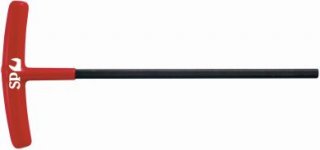
install the screws without the driver, the threads being made, remove the screws, then install the driver. That way you'll accurately feel the screws getting tight as the driver's fully pulled into the recess. Only a gentle tightening is required. Don't go nuts with a torque screw-driver, do it by hand (see T handle screw-driver pic), you'll feel the tightness allot better this way.
Cheers
Mark.
Attachments
Last edited:
- Status
- Not open for further replies.
- Home
- Loudspeakers
- Full Range
- StevenZ's Alpair 12P Build