MrSensitive said:just a small update to let you know that I started working on the enclosure..
instead of a beachball (they are never perfecetly round) i bought a styrofoam ball in a local hobby store.
the mold is finished, and sealed using a resin (recommended by the polyester shop guy)
i hope to lay the first layer of glass onto it tonight..
That Styrofoam ball sounds like a perfect solution, what diameter is it?
I'm curious.. did you make a negative mold or are you glasing over the outside of the sphere and melting it out afterwards?
On another note while everyones on the topic of alternative cabinet manufacture..
I Picked up an offcut of fibre reinforced cement tube at a local recycleing centre for AUD $10
Its 930mm (36.5") tall 378mm(15") inside diameter and walls about 22mm(7/8") thick and will make a nice enclosure of 104 litres(3.7cf) or 2 smaller enclosures at half that
It seems to cut as easily as MDF but is much stiffer.. actually a fantastic material for a sub.
Has anyone used this material before or know where to get a reliable supply of it?
I'm glazing the outside, afterwards i will 'melt' the styrofoam with aceton (not sure about the english name)
the ball is 40cm in diameter, and I'm going to use an 20cm sub
(Visaton TIW200 something)
I found some weak spots in the sealing, and had to give it another coat of resin before starting with the glass..
here's a picture of the mold.
the metal thingies on the top are placeholders for the holes, at the bottom of those there are bolts that will be encased with polyester
the ball is 40cm in diameter, and I'm going to use an 20cm sub
(Visaton TIW200 something)
I found some weak spots in the sealing, and had to give it another coat of resin before starting with the glass..
here's a picture of the mold.
An externally hosted image should be here but it was not working when we last tested it.
the metal thingies on the top are placeholders for the holes, at the bottom of those there are bolts that will be encased with polyester
OK, first three layers of Polyester are applied, this results in approx. 3 mm of wall thickness.
it already feels rock solid
I planned 1cm, so seven more layers to go..
pics will follow next week.
(due to the smell, my wife no longer approved of me working in our garage.., I can't really blame her..)
so now i'm working in my fathers workshop..
it already feels rock solid
I planned 1cm, so seven more layers to go..
pics will follow next week.
(due to the smell, my wife no longer approved of me working in our garage.., I can't really blame her..)
so now i'm working in my fathers workshop..
Im impressed,
How much does the glass and resin cost so far
Keep us posted on how much work is involved
How much does the glass and resin cost so far
Keep us posted on how much work is involved
thanks.
6m² of glass and 10Liters of Polyester for about 110€
My father is a sculptor, and he is willing to cast 3 spikes in solid Bronze for that little 'extra' 🙂
6m² of glass and 10Liters of Polyester for about 110€
My father is a sculptor, and he is willing to cast 3 spikes in solid Bronze for that little 'extra' 🙂
the 6m2 of glass and 10 liters of polyester, how far will it last? Will it be for 1 or 2 cubes, 1cm thick?
that's just enough for 1 sphere with a 40cm diameter.
the shop told me that you should take 1l of polyester per m²
the shop told me that you should take 1l of polyester per m²
First time I see this thread... anyway, I thought of a diffirent method in which we could also produce a round woofer... at least internaly (yeah yeah I know your goal is to look like those other jobbies), but it is still a practical way of creating a round cavity woofer to make use of the single resonance thing.
I would make a large cube box with no top.
Next I would also take a ball (the size of the cavity I want, onto the side of the ball I would glue a small length of tube, the diameter of which would allow the woofer to be mounted....
Now back to the box (boxes are neat cause you can put more speakers on top 🙂 ).
I would make a cement mixture containing lots of polystyrene chips (maybe chop up one of those swimming pool floating pole jobbies, in the food processor while the wife isn't there).
I would proceed to pour some of this mixture into the cube ,then in goes the ball, with the tube faceing up to where the woofer will mount. Now keep pouring the cement mixture till it covers the ball and the bottom bit of the pipe.
Leave to dry.
Rip tube out
Puncture ball and remove... and voila... now just remove the wooden frame, and you have, not just round cavity woofer boxes, but some pretty heavy ones at that, which should be able to handle anything you can fit in them...
 Crazy, I know
I would make a large cube box with no top.
Next I would also take a ball (the size of the cavity I want, onto the side of the ball I would glue a small length of tube, the diameter of which would allow the woofer to be mounted....
Now back to the box (boxes are neat cause you can put more speakers on top 🙂 ).
I would make a cement mixture containing lots of polystyrene chips (maybe chop up one of those swimming pool floating pole jobbies, in the food processor while the wife isn't there).
I would proceed to pour some of this mixture into the cube ,then in goes the ball, with the tube faceing up to where the woofer will mount. Now keep pouring the cement mixture till it covers the ball and the bottom bit of the pipe.
Leave to dry.
Rip tube out
Puncture ball and remove... and voila... now just remove the wooden frame, and you have, not just round cavity woofer boxes, but some pretty heavy ones at that, which should be able to handle anything you can fit in them...
Crazy, I knowI have thought about building a FG enclosure for speakers many times. I have used FG for building sub enclosures and kick pods in many car, including mine. When I get some extra time and money I think I will be building a bacnkloaded horn with a sphere for a speaker mount/compression chamber.
I'm halfway trough the glassing (extremely boring and dirty job)
5 layers applied, should result in 5mm the sphere feels like it could stop a car without breaking..
small picture:
the surface is not perfect, but after all 1à layers, a layer of the finest glass sheet will be applied, after that it will be finished with polyester filler.
5 layers applied, should result in 5mm the sphere feels like it could stop a car without breaking..
small picture:
An externally hosted image should be here but it was not working when we last tested it.
the surface is not perfect, but after all 1à layers, a layer of the finest glass sheet will be applied, after that it will be finished with polyester filler.
progress report
after a few day's of doing nothing I could continue working on the orb.
I finished 7 layers, and could start removing the first mold.
the place where the sub will be mounted is allready 1cm thick, I added more layers there..
next picture shows the mounting of the nest mold, this allows me to glass the rest of the sphere and add a recess for the driver. (the white stuff is the exact outer diameter of the driver)
another 3 - 4 layers of glass needed..
after a few day's of doing nothing I could continue working on the orb.
I finished 7 layers, and could start removing the first mold.
the place where the sub will be mounted is allready 1cm thick, I added more layers there..
An externally hosted image should be here but it was not working when we last tested it.
next picture shows the mounting of the nest mold, this allows me to glass the rest of the sphere and add a recess for the driver. (the white stuff is the exact outer diameter of the driver)
another 3 - 4 layers of glass needed..
An externally hosted image should be here but it was not working when we last tested it.
looks great!
i havent read through this entire thread, but i assume the amp will be external? how will you deal with wiring?
keep up the good work.
i havent read through this entire thread, but i assume the amp will be external? how will you deal with wiring?
keep up the good work.
yes, amp will be external..
Hypex DS 2.0
wiring? I just mount two bindingposts at the back of the orb, making sure it is airtight.
Hypex DS 2.0
wiring? I just mount two bindingposts at the back of the orb, making sure it is airtight.
that looks nice..
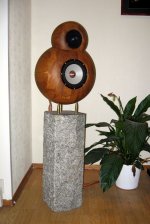
my first plan was to glue ringed sections of MDF together and sand the hell out of it.. but that would have been a bit to much work..
my first plan was to glue ringed sections of MDF together and sand the hell out of it.. but that would have been a bit to much work..
Re: Not sub
Looks great,
Recessing the driver too.. fantastic!
I love watching a work in progress. I can barely imagine the amount of labour this must be taking.
Worth every second! Much respect to you
A very impressive show of wood working skills.
I like that sculpture can be merged with DIY audio projects.
MrSensitive said:after a few day's of doing nothing I could continue working on the orb.
I finished 7 layers, and could start removing the first mold.
the place where the sub will be mounted is allready 1cm thick, I added more layers there..
An externally hosted image should be here but it was not working when we last tested it.
next picture shows the mounting of the nest mold, this allows me to glass the rest of the sphere and add a recess for the driver. (the white stuff is the exact outer diameter of the driver)
another 3 - 4 layers of glass needed..
An externally hosted image should be here but it was not working when we last tested it.
Looks great,
Recessing the driver too.. fantastic!
I love watching a work in progress. I can barely imagine the amount of labour this must be taking.
Worth every second! Much respect to you
Cobra2 said:- but my friends (GBT) DIY Dynabel Exact (Seas). Turned out from laminated oak.
Arne K
A very impressive show of wood working skills.
I like that sculpture can be merged with DIY audio projects.
Re: Re: Not sub
thanks..
it does take some time...but as you say.. worth every seconds.
and we do need something to keep us busy during the weekends dont we 🙂
there are a few more pictures here:
http://users.pandora.be/MrSensitive/OrbSub/
filgor said:
Worth every second! Much respect to you
thanks..
it does take some time...but as you say.. worth every seconds.
and we do need something to keep us busy during the weekends dont we 🙂
there are a few more pictures here:
http://users.pandora.be/MrSensitive/OrbSub/
To those who know him:
Another Hobby giveaway 😀
Job well done! Can't wait to come over and test it out!
(Mental note: get "Tuning Beats" from a friend)
P.S. If we break it, you could use the experience to create a second one a lot faster, no?
Another Hobby giveaway 😀
Job well done!
Can't wait to come over and test it out! (Mental note: get "Tuning Beats" from a friend)
P.S. If we break it, you could use the experience to create a second one a lot faster, no?
- Status
- Not open for further replies.
- Home
- Loudspeakers
- Subwoofers
- spherical enclosure