You have been doing this DIY speaker thing for a while, probably built a couple of proven designs from people like Zaph , Troels Gravesen, Paul Carmody or any number of other successful designers.
Perhaps you started out like me, cobbling together random drivers with off the shelf or textbook crossovers, but never quite worked out why they didn’t work out as well as you imagined. You bought books like David Weems' “Designing Building and testing your own speaker system” and Vance Dickasons "Loudspeaker Design Cookbook" and have decided it is time to design something from scratch.
Alternately you may have followed AllenB’s excellent tutorial "Designing Crossovers Without Measurements" but have decided to take it to the next level and do measurements in which case Joseph D'Appolito's book "Testing Loudspeakers" and his article "Testing Loudspeakers, Which Measurements Matter" will be useful.
If you haven’t done any of the above you may want to have a look at Paul Carmody’s excellent FAQ "Proven Designs" first, which covers why you should build a proven design as your first project .
If you have got this far and are still game then read on 😉
Note that I am not an expert, I am just a guy who has been playing with speakers for the better part of 30 years, I’ve learnt quite a lot just by experimenting, a lot from reading and I’ve probably forgotten at least half of what I at one point knew or understood (or thought I understood!!).
As I don’t have expertise in all areas (some might claim in any!) I’m thinking that I will put in a number of placeholder posts, with the idea that members with more experience in those areas can write a post and I (or another Moderator) can paste the content into the relevant placeholder post. I’m also happy for this to be more of a live thread with suggestions for corrections or additions to the core posts taken on board and potentially amended.
There are many different design philosophies, and it is not my intent to try and cover them all, though where appropriate different directions may be suggested. I’m not interested in starting any religious wars on design choices 😉
The intent of this thread is to give someone a starting point and things to think about rather than a prescription on how to do it. I am an advocate of simulation as part of the design process so later posts will feature this, but even if you don't want to simulate hopefully you will still find the thread useful.
So lets get started!
Lets keep this thread uncluttered, A separate Designing your own speaker from scratch discussion thread has been created.
Please use that thread for questions and discussions or suggestions and we will try and add just relevant content to this thread 🙂 non complying posts may be mercilessly moved to the other thread 😉
.
Last edited:
Step 1. Determine your basic needs.
This may sound easy enough but it can be quite a difficult task. There are many things that you need to consider here.
Things to think about:
This may sound easy enough but it can be quite a difficult task. There are many things that you need to consider here.
Things to think about:
- Is SAF (Spouse Appreciation Factor) something you need to consider? This can be one of the biggest influences on your design constraints. Better to bounce it off your spouse first, and get them involved in the process, getting buy in, rather than to go ahead and design your dream speaker and then find you’re in a “Your speakers go, or I go!!” type situation (unless that is actually what you desire)

. - What are your space constraints (may not be relevant if SAF above is a strong factor). Hoffman’s Iron law says you can only have 2 out of the following three things: 1) Bass Extension, 2) Efficiency, 3) A small enclosure. If space is a constraint then you are going to have to sacrifice Bass Extension or efficiency. This leads into a salient point. Designing a speaker is all about compromises. You need to work out which ones you can live with and which ones you can’t.
.
- How loud do they need to play? This is not such an easy question either as it will be influenced by other factors such as room size and listening distance. If you are only going to use them for quiet listening in your lounge room this is probably not going to be as much of an issue. If you want them to use them at parties then that is a very different situation.
. - How will I use them (this should maybe have come before the above point). If you want to use them for Home Theatre use then you will probably have some different design considerations to a stereo setup for pure music reproduction. A subwoofer that shakes the windows when an explosion goes off in a movie may not be necessary for casual music listening.
. - What sort of amplification are you planning to use? Low power valve amps will tend to dictate that you go for high sensitivity, but if you have high powered solid state amplification then sensitivity will be less of an issue, but power handling might be more important.
. - What sort of Box (or lack thereof) do you want? This may seem like a simple question at first, but there are so many possibilities. Sealed Enclosures, Vented enclosures, Transmission Lines, Horns, Open Baffle to name a few. Your decision here will have an impact on the drivers you choose. More so for the woofer, but in the case of horns it will affect choices for tweeter too!
. - What sort of polar pattern do I want? Unless you are going to listen to your speakers at a fixed point in an anechoic chamber or outside in a wide open space then the polar pattern is going to be a very important factor. There are many approaches here, Omnidirectional, bipoles, constant Directivity to name a few. None are the right choice, they are just different choices. You need to decide what your poison is. You may wish to have a read of this paper by Earl Geddes and this one from Wayne Parnham to get started (note I'm not advocating CD here). Again the decision here will likely be influenced by the intended use of the speakers, something that works extremely well for a dedicated listening position, may not be so great for use where there are multiple listeners in different positions across the room. Both horizontal and vertical polar response should be considered.
. - Will I build the cabinets (assuming you have cabinets!) myself or pay someone else to do it? This will have an impact on the overall cost of building the speakers.
. - Do I have all of the tools necessary to design and build these speakers? This is an area that may need a significant investement, which you may not have considered. Tools such as woodworking tools, Measurement Gear, Computers and Software are all needed. Unfortunately a lot of the free tools are Microsoft Excel based, and what's more only the windows based version of Excel works. So if you don't have a PC with excel (or a windows VM on your Mac with Excel), your "free" tools may not be so free!!
. - Do you plan to do a passive crossover or an active crossover? Don't fall into the trap of thinking that an active crossover will be much easier. If you want to do the crossover right it is going to be a lot of work whether you go passive or active.
.
- Perhaps most importantly. What is your budget?
Last edited:
Step 2. Short list some drivers.
Before we go any further I am going to suggest that as a first from scratch design you really, REALLY should limit yourself to a two way (note that if you are planning a full range read on as there is plenty of useful info up until we start talking about designing the crossover which is equally valid for a full range speaker).
You can always add a sub-woofer for augmentation of the bass, or depending on the design perhaps a pair of woofers added in separate cabinets at a later date can transform them into three ways when you are ready for the next level of challenge!
Now that we have that out of the way (perhaps I should have mentioned it in the previous section) we have pretty much limited the choice of drivers. Although there are examples of 2 ways with 10” or even larger drivers, you are probably better off looking at 8” or smaller (even 8” is pushing it). Once again the compromises come in!! Smaller drivers will be hard pressed to deliver deep bass (or loud deep bass), BUT they will play higher before getting too directional. You may of course be making a pair of speakers for your computer desk in which case 8” drivers are probably not going to be practical anyway 😉!
Things to Consider (in no particular order of importance)
Directivity:
Lets keep this thread uncluttered, A separate Designing your own speaker from scratch discussion thread has been created.
Before we go any further I am going to suggest that as a first from scratch design you really, REALLY should limit yourself to a two way (note that if you are planning a full range read on as there is plenty of useful info up until we start talking about designing the crossover which is equally valid for a full range speaker).
You can always add a sub-woofer for augmentation of the bass, or depending on the design perhaps a pair of woofers added in separate cabinets at a later date can transform them into three ways when you are ready for the next level of challenge!
Now that we have that out of the way (perhaps I should have mentioned it in the previous section) we have pretty much limited the choice of drivers. Although there are examples of 2 ways with 10” or even larger drivers, you are probably better off looking at 8” or smaller (even 8” is pushing it). Once again the compromises come in!! Smaller drivers will be hard pressed to deliver deep bass (or loud deep bass), BUT they will play higher before getting too directional. You may of course be making a pair of speakers for your computer desk in which case 8” drivers are probably not going to be practical anyway 😉!
Things to Consider (in no particular order of importance)
Directivity:
This refers to whether the speaker radiates sound only in one direction or in all directions. The degree of directivity generally changes with frequency becoming more directive as frequency rises (this can be seen in the manufacturers curves as the off axis measurements spl starts to drop away from the on axis level at higher frequencies, most manufacturers will show some off axis measurements, often at 30 deg and 60deg off axis. The other thing that affects this is the size of the driver. The bigger the woofer you go for (provided that you are aiming for a wide dispersion) the lower the frequency you will need to cross the tweeter over at. A lot of people end up going for a 6.5” woofer as a good compromise.
Generally you do not want to be crossing over in a range where the speaker is becoming directional; as it will affect how well the drivers blend together (you want a seamless crossover that doesn’t stick out). Another thing to look for is off axis curves that closely follow the on-axis curves just at a lower level. Wild variances in the off axis response indicate breakup and resonances which may cause undesirable sounds if they are too close to the pass band.
Cost of Drivers:
Another thing that I will suggest is NOT to go for the most expensive drivers you can get your hands on/afford. Expensive drivers used badly will almost always sound worse than cheap (within reason) drivers used well. As a first design I would aim for drivers that have a smooth frequency response, minimal breakup and a nice roll-off*. Dealing with driver anomalies in the crossover can be quite a challenge. For your first design you are better off not having to worry about this sort of thing.
Frequency Response:
The two most important factors in predicting subjective listening preferences as researched by Toole are smoothness of on axis and off axis frequency response (I highly recommend reading this whitepaper by Toole "Audio - Science in the service of Art" ).
Drivers with wildly fluctuating response curves are best avoided. Note that sharp dips in frequency response tend to not be very audible, but peaks in frequency response (if not dealt with) do tend to be very audible. Also wide shallow dips or peaks are also a lot more problematic. When looking at manufacturers curves be aware that not all are taken under the same conditions. The easiest ones to compare are those that have been taken on an IEC Baffle. Note that a gently rising response should be much easier to deal with than something with sharp response peaks. Many drivers have "breakup peaks" in the region just before they run out of steam. Drivers with very rigid cones such as metal coned drivers tend to exhibit more severe breakup peaks. These peaks are caused by resonances in the cone. They can be dealt with with notch filters but you are best crossing over way below these peaks, and drivers like this are best avoided if you are doing your first crossover design.
Sensitivity:Drivers with wildly fluctuating response curves are best avoided. Note that sharp dips in frequency response tend to not be very audible, but peaks in frequency response (if not dealt with) do tend to be very audible. Also wide shallow dips or peaks are also a lot more problematic. When looking at manufacturers curves be aware that not all are taken under the same conditions. The easiest ones to compare are those that have been taken on an IEC Baffle. Note that a gently rising response should be much easier to deal with than something with sharp response peaks. Many drivers have "breakup peaks" in the region just before they run out of steam. Drivers with very rigid cones such as metal coned drivers tend to exhibit more severe breakup peaks. These peaks are caused by resonances in the cone. They can be dealt with with notch filters but you are best crossing over way below these peaks, and drivers like this are best avoided if you are doing your first crossover design.
Depending on your other requirements worked out above, sensitivity may be more or less important. As a general rule, the lower the power of your amplifier, the more sensitive you want your drivers to be. This is a pretty general statement, but speakers that are 10db more efficient will be perceived as being twice as loud for the same applied power. To get twice the volume by adding more power, you need to increase the power ten fold!! Lets look at this another way. To get the same SPL level as set of 95db sensitivity speakers driven with 10W from a set of 85db sensitivity speakers (quite common) you will need to drive those 85db speakers with 100W!
Once you have decided on a general sensitivity target though, it’s not quite as simple as just getting drivers with that sensitivity. In most cases you will need to consider the effects of baffle step (which will be discussed later). For now assume that you need your bass drivers to be at least 4db more efficient than the minimum sensitivity target !
Except in the domain of pro drivers it is often difficult to find a midbass driver that is more efficient than the tweeter. This is one of the reasons for dual woofer designs) Usually the tweeter will end up needing to be padded down. A probably safe rule of thumb would be that in general your tweeter could be up to 3db less efficient than your woofer without causing any issues
Also be careful when comparing sensitivity. Most manufacturers these days report sensitivity as nn db 2.83V /1M However some still report it as being nn db 1W/1M The problem with the 1W/1M measurement is that lower impedance speakers draw more current for a given voltage. For an 8 ohm driver 1W is 2.83V of drive voltage. For a 4 ohm driver 2.83V of drive voltage is actually 2W of power . Since your amplifier is a voltage source, it makes most sense to compare drivers sensitivity at a given voltage drive level rather than at a wattage level.
Power Rating:Once you have decided on a general sensitivity target though, it’s not quite as simple as just getting drivers with that sensitivity. In most cases you will need to consider the effects of baffle step (which will be discussed later). For now assume that you need your bass drivers to be at least 4db more efficient than the minimum sensitivity target !
Except in the domain of pro drivers it is often difficult to find a midbass driver that is more efficient than the tweeter. This is one of the reasons for dual woofer designs) Usually the tweeter will end up needing to be padded down. A probably safe rule of thumb would be that in general your tweeter could be up to 3db less efficient than your woofer without causing any issues
Also be careful when comparing sensitivity. Most manufacturers these days report sensitivity as nn db 2.83V /1M However some still report it as being nn db 1W/1M The problem with the 1W/1M measurement is that lower impedance speakers draw more current for a given voltage. For an 8 ohm driver 1W is 2.83V of drive voltage. For a 4 ohm driver 2.83V of drive voltage is actually 2W of power . Since your amplifier is a voltage source, it makes most sense to compare drivers sensitivity at a given voltage drive level rather than at a wattage level.
This gives an idea as to what level of continuous power the driver will handle without burning out its voice coil. For smaller drivers like mid-ranges or tweeters, this will normally be specified with a particular crossover frequency and slope. This figure is probably less important than you think, unless you have a huge room, or will be using the speakers for for parties. Most speakers will handle transients much higher than their rated power (for a short time). A clipping amp however changes those transients into much longer duration pulses (basically a square wave which delivers maximum power) which can easily fry tweeters. Solution, don’t turn your amp up to clipping levels!
Impedance:
The main consideration here is going to be “what is your amplifier happy with?” If your Amplifier is rated only for loads of 8 ohms or higher, you will not want to be choosing 4 ohm drivers. There are some schools of thought that even if your amplifier is rated for 4 ohms (or less) that using 8 ohm speakers will result in better sound, however this is tentative at best and will likely only affect lower quality amplifiers that struggle to deliver the extra current a four ohm load demands.
One of the common misconceptions is that all of the drivers need to be of the same impedance. This is not correct. If your amplifier is happy with a four ohm load, you could equally use a 4 ohm woofer with an 8 ohm tweeter, an 8 ohm woofer with a four ohm tweeter, a four ohm woofer with a 4 ohm tweeter, or an 8 ohm woofer with an 8 ohm tweeter. Another misconception about impedance is that if you take an 8 ohm woofer and 8 ohm tweeter then because they are wired in parallel that the overall impedance will be 4 ohms. Again, this is not correct. The crossover makes the impedance below (for the high pass) and above (for the low pass) the crossover point much higher, and a high impedance in parallel with a low one, approximates the low one.
Crossover Frequency:One of the common misconceptions is that all of the drivers need to be of the same impedance. This is not correct. If your amplifier is happy with a four ohm load, you could equally use a 4 ohm woofer with an 8 ohm tweeter, an 8 ohm woofer with a four ohm tweeter, a four ohm woofer with a 4 ohm tweeter, or an 8 ohm woofer with an 8 ohm tweeter. Another misconception about impedance is that if you take an 8 ohm woofer and 8 ohm tweeter then because they are wired in parallel that the overall impedance will be 4 ohms. Again, this is not correct. The crossover makes the impedance below (for the high pass) and above (for the low pass) the crossover point much higher, and a high impedance in parallel with a low one, approximates the low one.
What crossover point am I aiming for?
This is an important question when it comes to driver choice as it will have a big impact. Perhaps a better question is “Do I care what the crossover frequency will be?” For a lot of people this is absolutely critical and they have very strong beliefs as to where it should be. Me personally? I think that as long as you do a good job of it, it shouldn’t matter too much where it is 😀 That aside you need to choose drivers that will not be misbehaving because you are trying to cross them too low or two high. In the case of tweeters, if you cross them too low you will get high distortion. In the case of woofers if you cross them too high you may have problems with breakup peaks, and increasing directivity (which depending on your other design goals may or may not be a problem).
T/S parameters:This is an important question when it comes to driver choice as it will have a big impact. Perhaps a better question is “Do I care what the crossover frequency will be?” For a lot of people this is absolutely critical and they have very strong beliefs as to where it should be. Me personally? I think that as long as you do a good job of it, it shouldn’t matter too much where it is 😀 That aside you need to choose drivers that will not be misbehaving because you are trying to cross them too low or two high. In the case of tweeters, if you cross them too low you will get high distortion. In the case of woofers if you cross them too high you may have problems with breakup peaks, and increasing directivity (which depending on your other design goals may or may not be a problem).
This is more for the woofer than for tweeters (as tweeters are generally sealed back), but is very important if you have decided on a particular type of enclosure. Not all drivers are suitable for all types of enclosures/alignments. In the next section, simulation will be covered, make sure you read that before you finalize any driver choice!
Even for tweeters, there are two T/S parameters that you will want to pay attention to. Fs (driver resonance) and Xmax (if provided and not all manufacturers do). FS is probably the most important, as it will largely determine how low a crossover you can achieve. There is an old rule of thumb that you should cross over at least two octaves higher than the tweeters resonant frequency. That would mean a tweeter with resonant frequency of 1Khz should not be crossed over lower than 4 Khz!!! This may be true if using a single cap on the tweeter, but with higher order (electrical) crossovers you can relax that rule. I generally use the rule of thumb that you should cross at least an octave higher than the resonant frequency. The X-MAX for a tweeter will also give you an indication as to how low you can cross it. two tweeters with the same resonant frequency, but different x-max will have different power handling capabilities. The one with higher x-max will be able to cross over lower without rising distortion.
* Ideally the roll-off will be a smooth 12db/ocatave. This should simplify things when designing the crossover making the attainment of a desirable acoustic slope easier. This is a nice to have, but don't sweat it if the roll-off isn't text book perfect. Whist looking for a nice example driver with smooth FR no nasty breakup and smooth roll off for demonstrating simulation I realized just how hard this actually is!! 😉\Even for tweeters, there are two T/S parameters that you will want to pay attention to. Fs (driver resonance) and Xmax (if provided and not all manufacturers do). FS is probably the most important, as it will largely determine how low a crossover you can achieve. There is an old rule of thumb that you should cross over at least two octaves higher than the tweeters resonant frequency. That would mean a tweeter with resonant frequency of 1Khz should not be crossed over lower than 4 Khz!!! This may be true if using a single cap on the tweeter, but with higher order (electrical) crossovers you can relax that rule. I generally use the rule of thumb that you should cross at least an octave higher than the resonant frequency. The X-MAX for a tweeter will also give you an indication as to how low you can cross it. two tweeters with the same resonant frequency, but different x-max will have different power handling capabilities. The one with higher x-max will be able to cross over lower without rising distortion.
Lets keep this thread uncluttered, A separate Designing your own speaker from scratch discussion thread has been created.
Last edited:
Step 3. Doing some simulation (introduction)
So now we get some bits of wood, glue them together and put the drivers in it right? Well it would be nice if it were that simple, but as usual it’s not! 😉
In the simplest case of a sealed enclosure you might be able to get away with it, but it would almost certainly be non-optimal. For any of the other options, except maybe open baffle (which I am not really experienced with) there is going to be a lot more to it.
This is why I am a proponent of simulation! Before you even purchase any drivers I strongly suggest you simulate how your short listed drivers will perform in your chosen style of cabinet. Whether that be sealed, vented, transmission line, horn, open baffle or whatever. There are two types of Simulation that I think are important. Firstly the simulation of the driver in the enclosure giving the estimated frequency response curve, and secondly the effects of baffle step. If you are going for a more specific design goal such as Constant Directivity then other simulation types will probably be important.
Now as I only have experience with conventional boxes (of the sealed and vented type) any examples I give here are going to be based on those two types, but at the end of this section I will give links to simulation software (or guidelines) that can be used for other types of enclosures. If someone wants to write up a section for other types such as horns, transmission lines or Open baffle then please feel free to do so and I can add it into this section.
Likely the first thing you want to find out is “will my short listed driver work in the application I envisage”? Depending on the T/S parameters the driver may be more or less suitable for particular applications. By using a simulation program you will be able to find out before you purchase whether your choice will fit with your plans, or whether you need to continue your search.
There are many programs that can do simulation of enclosure volumes for sealed and vented enclosures. My personal favourite is unibox (which is excel based). Another popular program is winISD. Basically with one of these programs you enter the T/S parameters (at this stage obtained from the manufacturers data sheet) into the program and it will generally give you an indication as to a suggested application, it will also show you “standard” designs. These standard designs will usually be alignments with a QTS of 0.707.
One thing to be aware of here, just because the program says standard design is X litres and Y tuning (in the case of vented) doesn’t mean that is your only option! You can change the volume up or down, and if going vented you can change the tuning frequency as well. Try playing with values to see what effect they have.
Now one thing I will warn you about. With a 6” driver (as mentioned was a good compromise) you are not going to get ground shaking bass with a sealed box (many will argue you won't get it with vented either 😛). I have been living with my MTM’s for a few years now and they only have two 5” drivers in sealed enclosures with an F3 around 80Hz. They are surprisingly good, but they really do need something to fill in the lower bass. Hint Hint, unless you are planning a sub or some helper woofers down the track, and you want deep bass, you probably want to look at vented, transmission line, or some other type of alignment. The other option would be drivers with high power handling and a linkwitz transform in a sealed implementation.
Simulation tool links
The next two posts will cover box modelling, and then Baffle Step modeling.
Lets keep this thread uncluttered, A separate Designing your own speaker from scratch discussion thread has been created.
So now we get some bits of wood, glue them together and put the drivers in it right? Well it would be nice if it were that simple, but as usual it’s not! 😉
In the simplest case of a sealed enclosure you might be able to get away with it, but it would almost certainly be non-optimal. For any of the other options, except maybe open baffle (which I am not really experienced with) there is going to be a lot more to it.
This is why I am a proponent of simulation! Before you even purchase any drivers I strongly suggest you simulate how your short listed drivers will perform in your chosen style of cabinet. Whether that be sealed, vented, transmission line, horn, open baffle or whatever. There are two types of Simulation that I think are important. Firstly the simulation of the driver in the enclosure giving the estimated frequency response curve, and secondly the effects of baffle step. If you are going for a more specific design goal such as Constant Directivity then other simulation types will probably be important.
Now as I only have experience with conventional boxes (of the sealed and vented type) any examples I give here are going to be based on those two types, but at the end of this section I will give links to simulation software (or guidelines) that can be used for other types of enclosures. If someone wants to write up a section for other types such as horns, transmission lines or Open baffle then please feel free to do so and I can add it into this section.
Likely the first thing you want to find out is “will my short listed driver work in the application I envisage”? Depending on the T/S parameters the driver may be more or less suitable for particular applications. By using a simulation program you will be able to find out before you purchase whether your choice will fit with your plans, or whether you need to continue your search.
There are many programs that can do simulation of enclosure volumes for sealed and vented enclosures. My personal favourite is unibox (which is excel based). Another popular program is winISD. Basically with one of these programs you enter the T/S parameters (at this stage obtained from the manufacturers data sheet) into the program and it will generally give you an indication as to a suggested application, it will also show you “standard” designs. These standard designs will usually be alignments with a QTS of 0.707.
One thing to be aware of here, just because the program says standard design is X litres and Y tuning (in the case of vented) doesn’t mean that is your only option! You can change the volume up or down, and if going vented you can change the tuning frequency as well. Try playing with values to see what effect they have.
Now one thing I will warn you about. With a 6” driver (as mentioned was a good compromise) you are not going to get ground shaking bass with a sealed box (many will argue you won't get it with vented either 😛). I have been living with my MTM’s for a few years now and they only have two 5” drivers in sealed enclosures with an F3 around 80Hz. They are surprisingly good, but they really do need something to fill in the lower bass. Hint Hint, unless you are planning a sub or some helper woofers down the track, and you want deep bass, you probably want to look at vented, transmission line, or some other type of alignment. The other option would be drivers with high power handling and a linkwitz transform in a sealed implementation.
Simulation tool links
Hornresp is probably the most commonly used simulation program for those designing horns. There is also a thread here Hornresp - diyAudio
MJK's mathcad worksheets are the original tool for Transmission line modeling. If you go to Quarter Wavelength Loudspeaker Design there is a lot of info on transmission line speakers. Note that the link on that page is password protected. Go here to see how to get the worksheets MJK Worksheets - Page 2 - diyAudio
Transmission Line from Leonard Audio is a newer program for modelling transmission line speakers with the advantage that it does not need mathcad.
Speak from Earl Geddes I have not tried this but believe that it has waveguide modelling.
AKABAK This is probably the most powerful simulation tool available, but also has the biggest learning curve! It will only work on 32bit versions of windows. an excellent tutorial is available on this thread http://www.diyaudio.com/forums/multi-way/90362-akabak-simulator.html (see post 14)
BoxSim from visaton could be your one stop shop!
UniBox (my favourite for "standard" enclosures)
winisd There is the standard and pro version, I think the pro version is alpha (ie may be quite buggy). A lot of people swear by it, I've never particularly warmed to it.
VituixCad Is another option I have started to use recently and has box modeling (and so much more!) VituixCAD
There are plenty of other options too. These are the main ones I can think of off the top of my head. MJK's mathcad worksheets are the original tool for Transmission line modeling. If you go to Quarter Wavelength Loudspeaker Design there is a lot of info on transmission line speakers. Note that the link on that page is password protected. Go here to see how to get the worksheets MJK Worksheets - Page 2 - diyAudio
Transmission Line from Leonard Audio is a newer program for modelling transmission line speakers with the advantage that it does not need mathcad.
Speak from Earl Geddes I have not tried this but believe that it has waveguide modelling.
AKABAK This is probably the most powerful simulation tool available, but also has the biggest learning curve! It will only work on 32bit versions of windows. an excellent tutorial is available on this thread http://www.diyaudio.com/forums/multi-way/90362-akabak-simulator.html (see post 14)
BoxSim from visaton could be your one stop shop!
UniBox (my favourite for "standard" enclosures)
winisd There is the standard and pro version, I think the pro version is alpha (ie may be quite buggy). A lot of people swear by it, I've never particularly warmed to it.
VituixCad Is another option I have started to use recently and has box modeling (and so much more!) VituixCAD
The next two posts will cover box modelling, and then Baffle Step modeling.
Lets keep this thread uncluttered, A separate Designing your own speaker from scratch discussion thread has been created.
Last edited:
Step 3a. Box modelling
SO without further ado, I’ll show some sims of a driver I found, that fitted most of the criteria I’ve mentioned thus far. It’s an SB acoustics SB17MFC35-8 6.5" Poly Cone Woofer. It does have a broad peak from about 3K to 8K but hopefully it won’t be too hard to deal with.
As celef has pointed out in the discussion thread, a simulation is only an approximation and there is no substitute for actually building and measuring a box. A simulation is a good starting point and if you have the time and resources available, building a prototype before committing to your final build is always a good idea! This page from Troels is worth a read if you are planning to do a bass reflex enclosure vent tuning
As mentioned I use Unibox for doing simulations so the following graphs are produced with unibox. You can of course do manual calculations, lookup tables or whatever other method you want to arrive at your box volume, but I like to simulate.
Pretty much all simulation programs give you recommended alignments, but you do not have to use them! They make a good starting point, but you have quite a lot of latitude when it comes to the final design. You can try trading off size and extension to suit your needs. At some point you will find that going too far makes the compromises unworkable.
Unibox suggests a vented enclosure for the SB driver, with a “Standard Design” being a 32.5L box with 34.9Hz tuning. Note that I always model with 0.2 ohms of series resistance, as this is a little more realistic than having zero resistance wires between the amp and the speaker. It DOES make a difference to the modelling.
Below are a series of plots for close to the recommended volume and also for a reduced volume (let’s say 32L was bigger than we wanted for our project).
The parameters used for the two sizes of box are shown below:
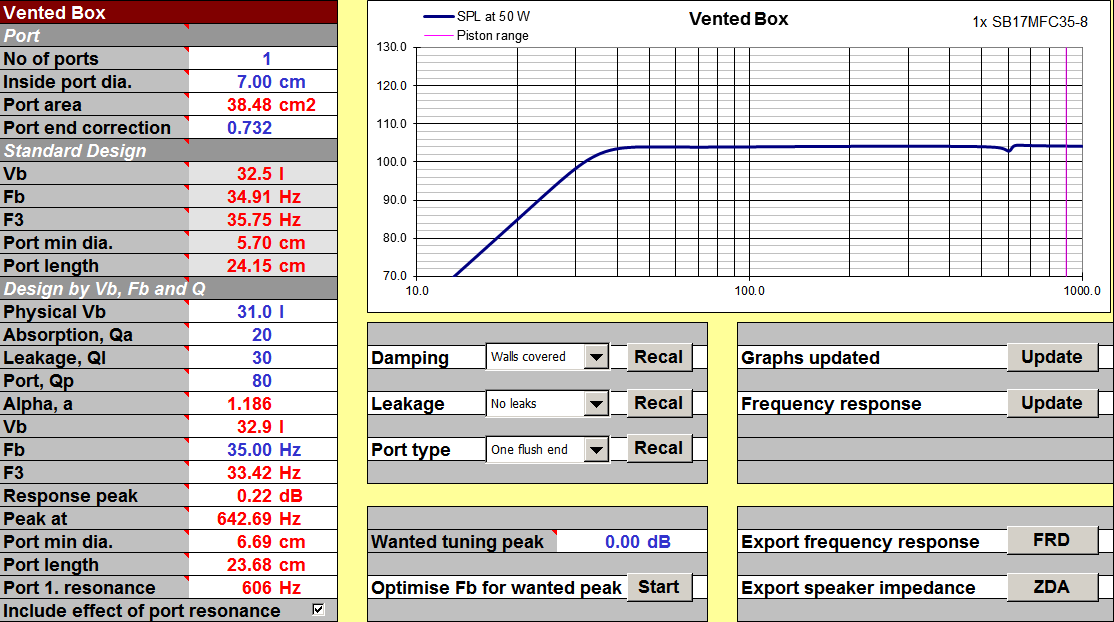
First the 31L box
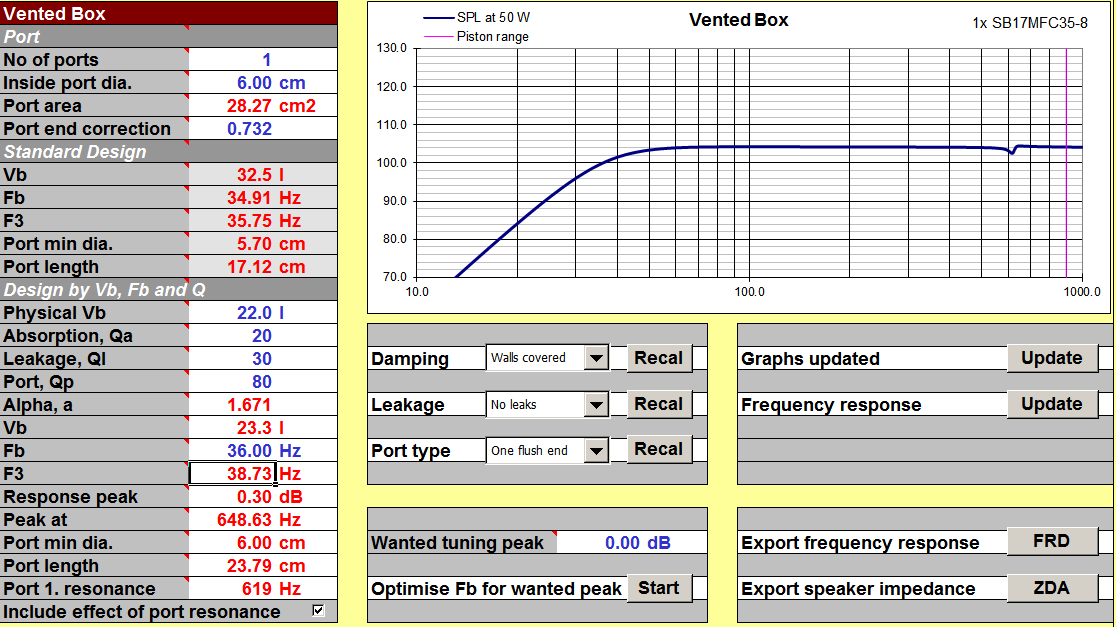
Then the 22L box.
UniBox produces a lot of plots other than just spl which are available under the Closed Box tab and vented box tabs. The main ones I concentrate on are the SPL graph, the excursion graph, the port air speed graph, and the step response graph. These are good graphs to look at to see how the various compromises we make can affect the overall design. First the approx. 33L recommended box is shown, and then some comparisons of a smaller 22L vented box. Note that as I added lining on the walls of the enclosure I went with a 31L box (which has effective volume of around 32.9L)
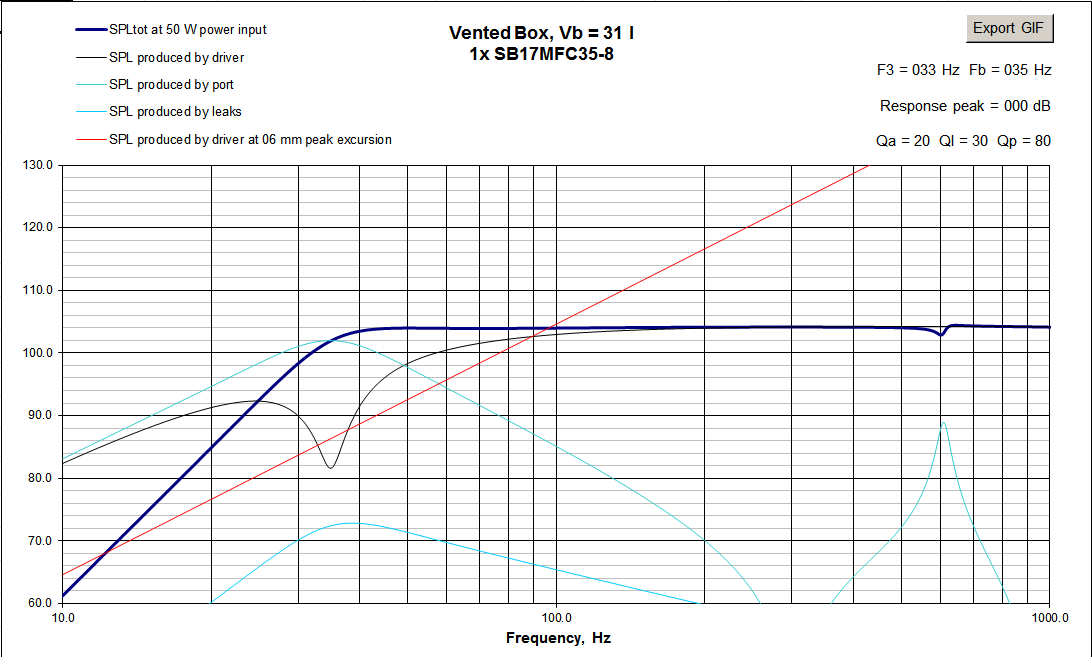
The above graph has quite a lot of information in it. The SPLtot is the main thing we are interested in. but it is also interesting to look at the other things that combine to create this “theoretical” final SPL. Note the dip around 600Hz which is a result of the port resonance. For a design where the port resonance will be in the passband of the driver you want to try and minimize it*. This is one of the trade-offs. A low tuning, or a big diameter port will tend to create lower (and bigger) port resonances. More on this a bit later.
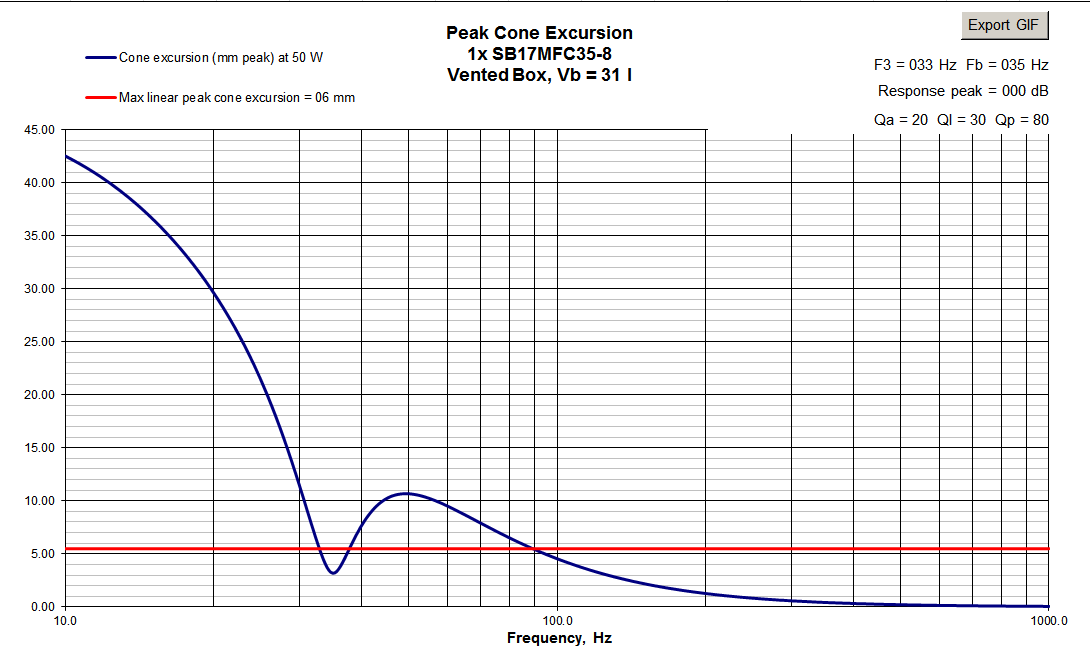
This graph shows the theoretical excursion of the driver when driven with 50W of power. The red line represents the X-Max of the driver, if the cone excursion is exceeding this then it is into non-linear territory. Ideally you want to limit power to a level less than the X-Max. If you go above X-Mech (which I think for this driver is probably around 8mm) then you may cause mechanical damage! Note that this driver is rated at 60W power handling in the spec sheet. This is what the voice coil will handle. The design of the enclosure will have a bearing on the power handling from a mechanical perspective (rather than electrical). Note that I have been told that this graph is VERY conservative and not something to worry too much about. If you have a read of A Test. How much Voltage (power) do your speakers need? you may see why.
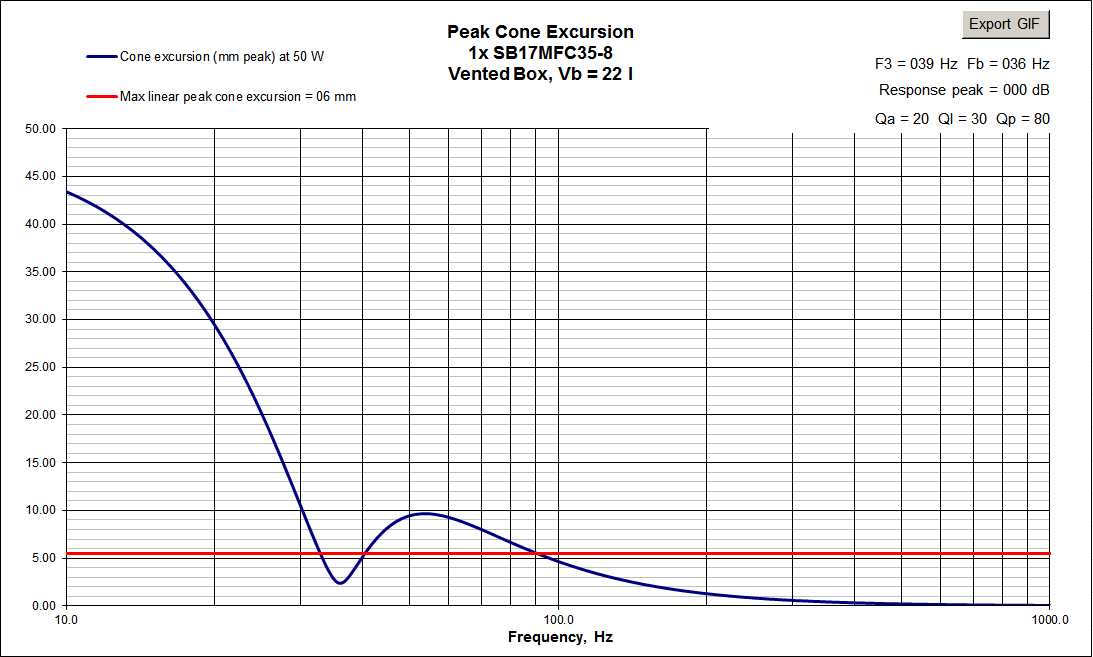
In comparison here is the excursion of the 22L enclosure. You can see that the power handling is slightly better. Note that different drivers will show bigger or smaller differences in power handling when changing things like box volume and tuning frequency.
Next we will take a look at the port air speed graph.
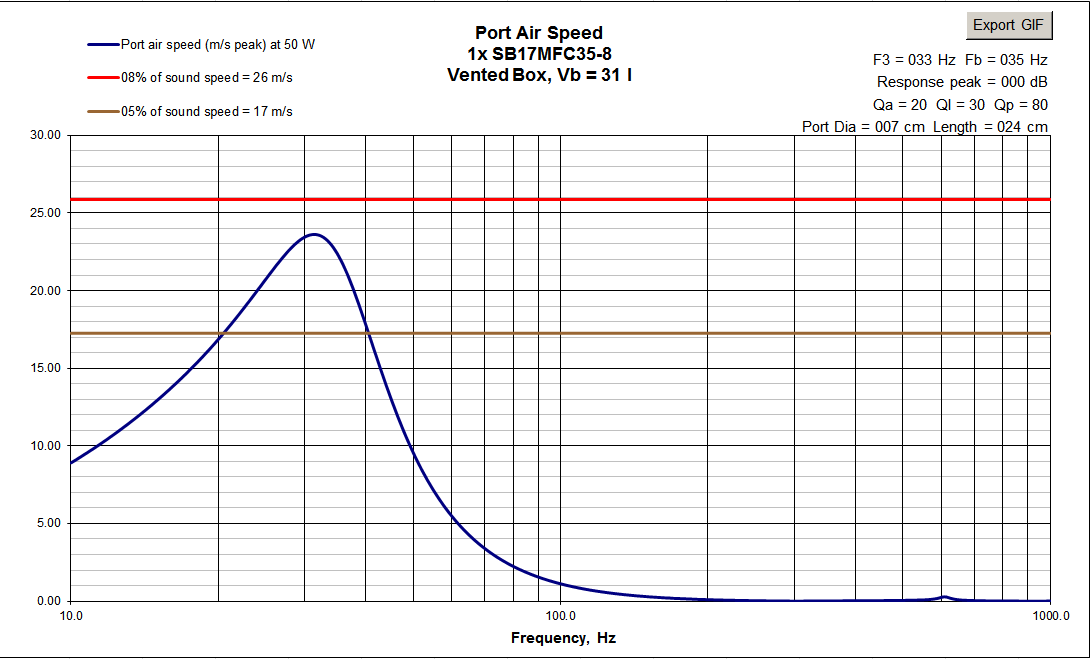
This graph shows the port air speed with 50W input. If the 8% line is exceeded then you may hear chuffing noises from the port when driven hard. The best way to reduce the port air speed is to increase the diameter. This will have the effect that the port needs to be longer to achieve the same box tuning, and the port resonance frequency will be lower and generally of higher amplitude, thus it is necessary to find a balance. The smaller the box volume the more tricky it is to get this balance.
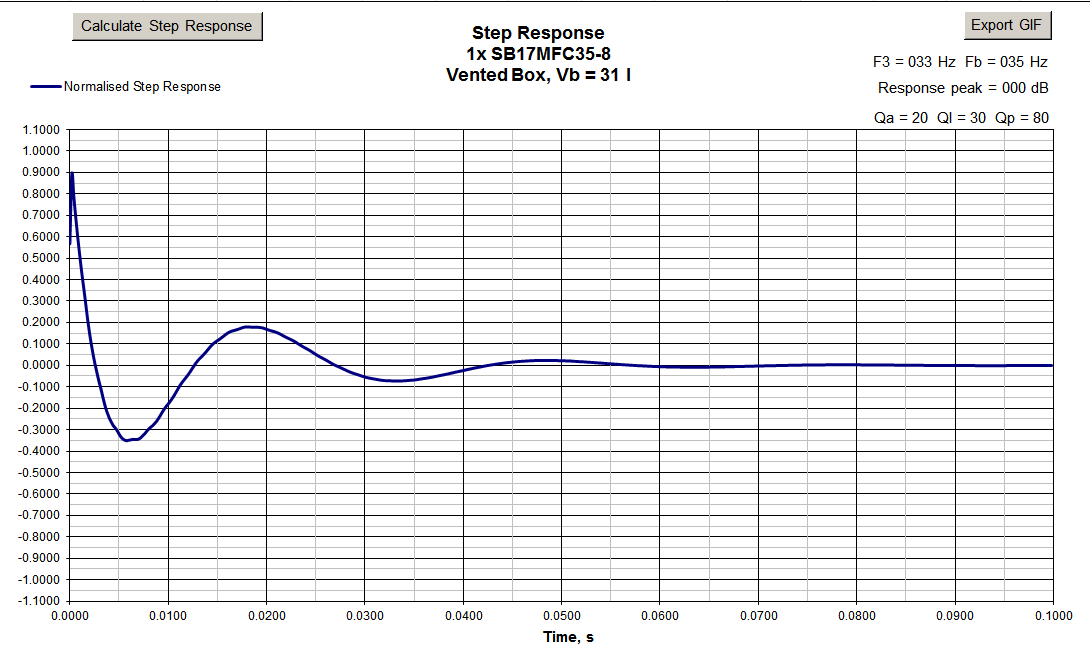
Finally we have the step response. This shows us how quickly the driver cone returns to rest after an excitation signal is applied. The other thing that will show up here is port resonances. These will show as a smaller ripple superimposed on the main Step response. You can see a very small amount on the graph above. Once again we see our trade-off’s here. Below is a comparison of the same driver in a 10L sealed enclosure to show the difference in step response.
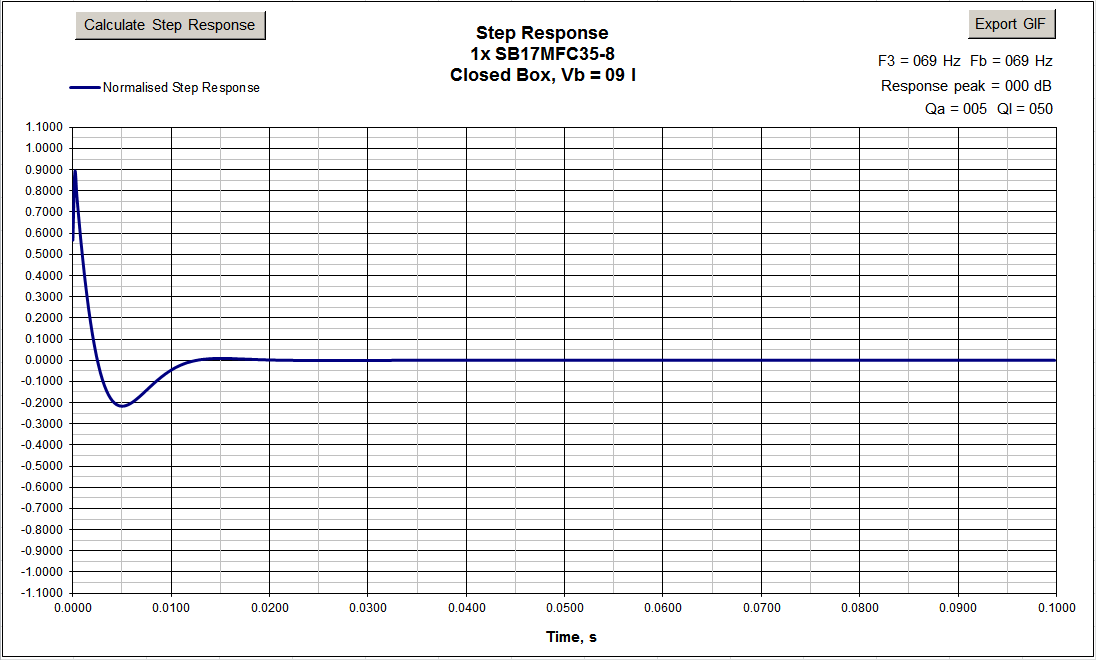
The tradeoff with the sealed alignment is much poorer bass extension, as can be seen in the next graph.
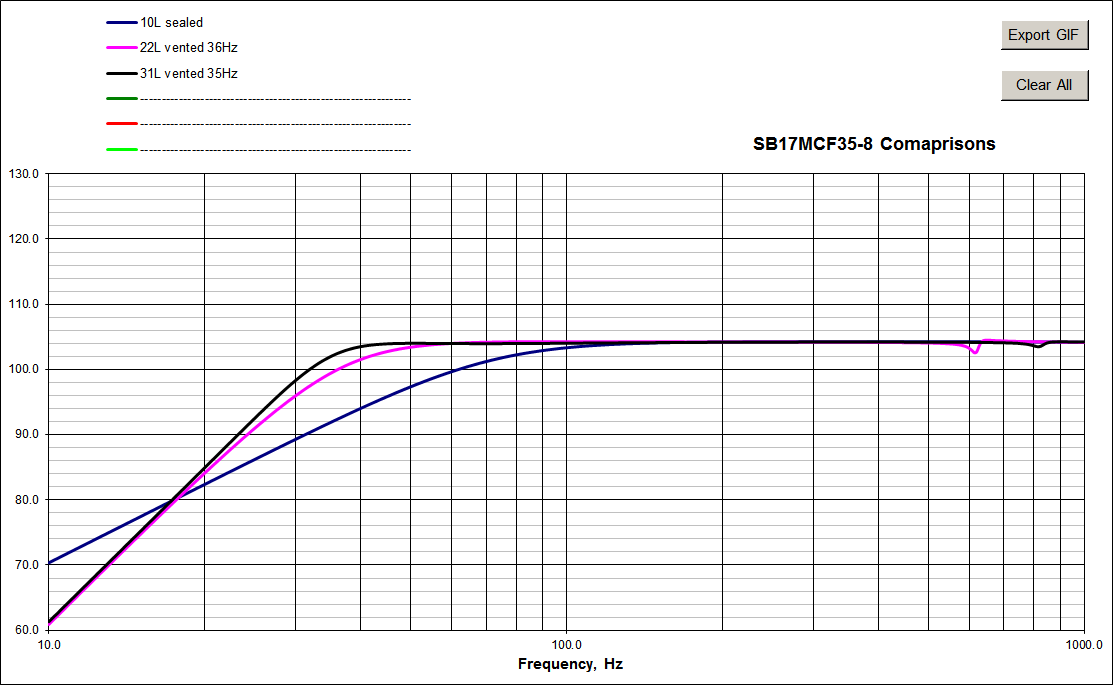
The above shows our modeled drivers spl with three different configurations. A 10L sealed enclosure, 22L vented tuned to 36Hz and 31L vented tuned to 35Hz. It helps to demonstrate some of the trade-offs, the step response graph below shows some more!
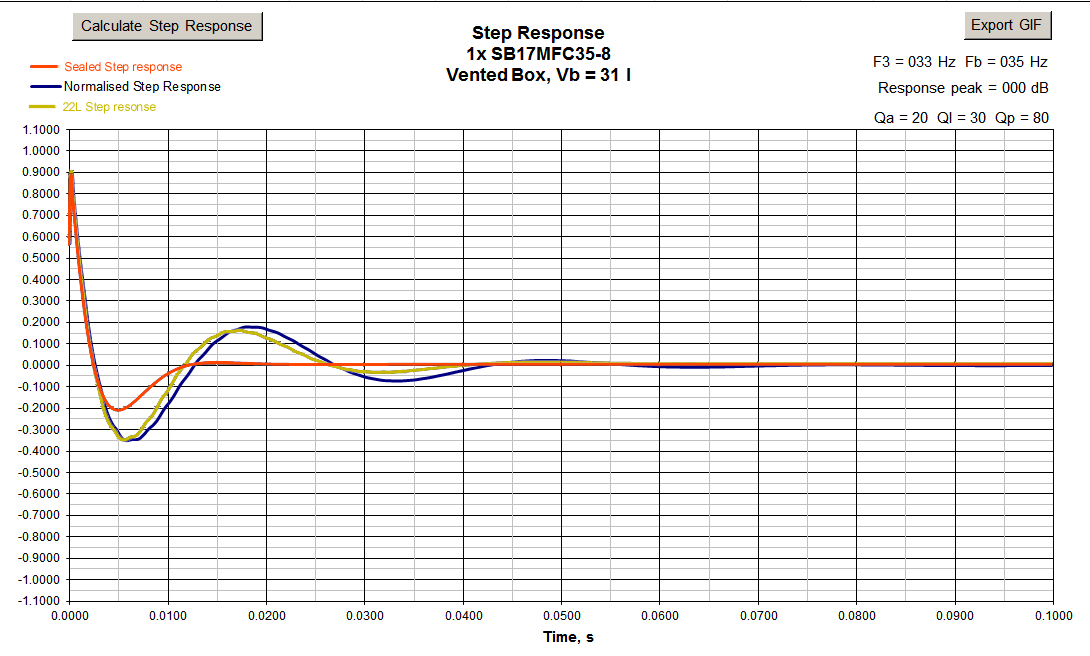
Note that unibox cannot superimpose step responses like the above. This has been done in Photoshop to demonstrate the difference between the three alignments. You can see that the sealed has the best step response, and that the smaller box has a slightly better step response than the bigger one. When looking at the spl graphs as well we can see that our bass extension is at the expense of step response.
One thing I didn’t go into above is how I arrive at the tuning frequency when changing the box volume. Basically I just increase or decrease the tuning frequency until I find the point where the F3 stabilises, and then choose the lowest tuning frequency that achieves that F3. The range of tuning frequencies that will achieve a given F3 will vary from driver to driver, but could be from a few 100 mHz to a few Hz. Note that this is just what I do. It is not the conventional method. There are conventional alignments for Bass reflex. Do a google search and you will find alignments like the butterworth and BB4, in reality there is a continuum of alignments which a box modelling program allows you to explore.
Just as a final comparison Below are a couple of graphs where the only thing changed was the port diameter (and length).
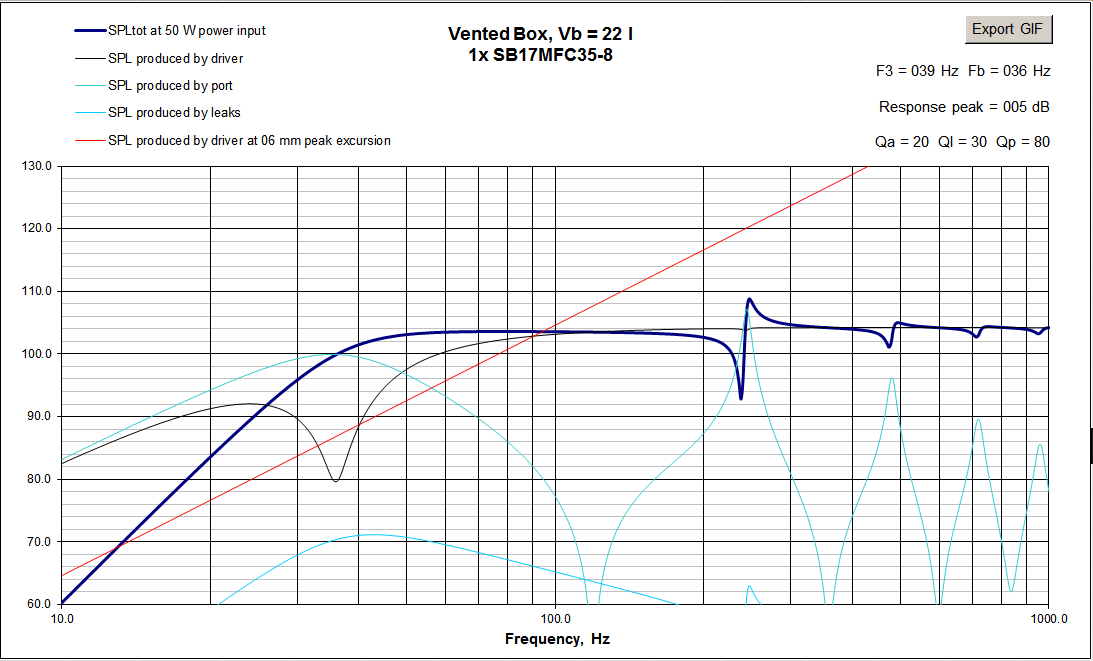
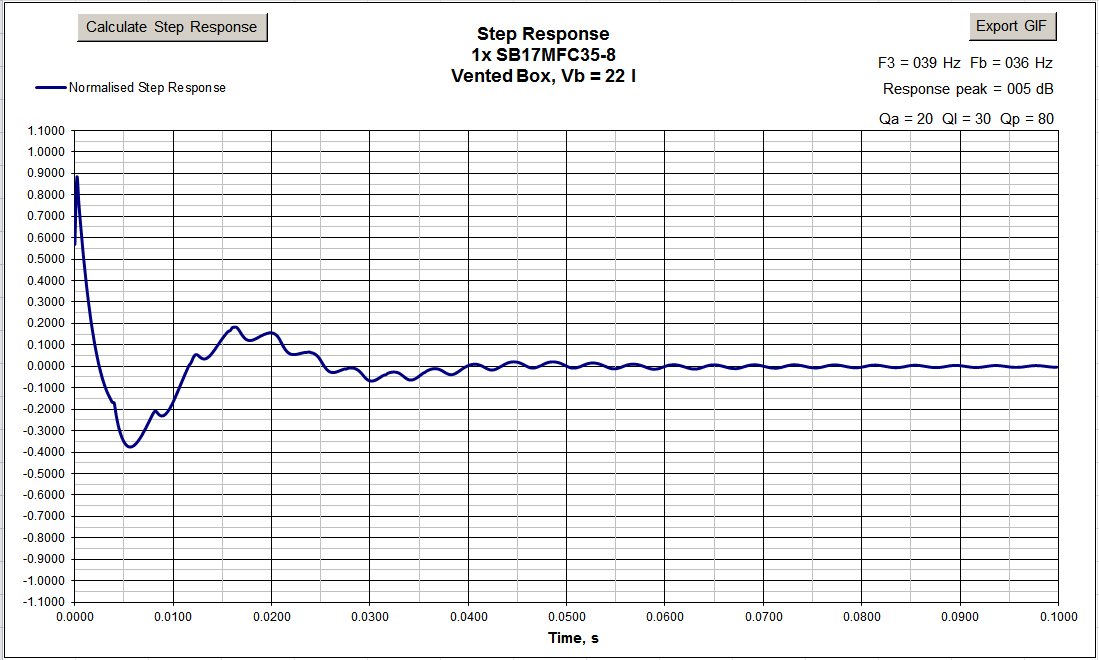
This is an extreme example where I increased the port diameter from 60mm to 100mm whilst keeping the box tuning the same. However this shows how going with a bigger port (to reduce the chance of chuffing) can have an adverse effect on other areas. It also demonstrates that if you are simulating without considering port resonances you may get a nasty surprise! The other thing worth mentioning is that the port length increased from approx 24cm to approx 70cm!
After doing simulation such as the above we may decide that the driver is just what we need. However depending on what our design goals were, we might find that what looked like a good candidate is not such a good choice after all. This is why it is important to get an idea of how a particular driver will perform before making the purchase. From the above sims we can see that this driver should be good for relatively low power applications and is quite suitable for cabinet volumes between 22L and 35L much smaller and the driver starts to peak (note I did not show the effects of this above).
That pretty much wraps up part a. In part b we will look at simulating the effects of baffle step.
* Some additional discussion here
Lets keep this thread uncluttered, A separate Designing your own speaker from scratch discussion thread has been created.
.
SO without further ado, I’ll show some sims of a driver I found, that fitted most of the criteria I’ve mentioned thus far. It’s an SB acoustics SB17MFC35-8 6.5" Poly Cone Woofer. It does have a broad peak from about 3K to 8K but hopefully it won’t be too hard to deal with.
As celef has pointed out in the discussion thread, a simulation is only an approximation and there is no substitute for actually building and measuring a box. A simulation is a good starting point and if you have the time and resources available, building a prototype before committing to your final build is always a good idea! This page from Troels is worth a read if you are planning to do a bass reflex enclosure vent tuning
As mentioned I use Unibox for doing simulations so the following graphs are produced with unibox. You can of course do manual calculations, lookup tables or whatever other method you want to arrive at your box volume, but I like to simulate.
Pretty much all simulation programs give you recommended alignments, but you do not have to use them! They make a good starting point, but you have quite a lot of latitude when it comes to the final design. You can try trading off size and extension to suit your needs. At some point you will find that going too far makes the compromises unworkable.
Unibox suggests a vented enclosure for the SB driver, with a “Standard Design” being a 32.5L box with 34.9Hz tuning. Note that I always model with 0.2 ohms of series resistance, as this is a little more realistic than having zero resistance wires between the amp and the speaker. It DOES make a difference to the modelling.
Below are a series of plots for close to the recommended volume and also for a reduced volume (let’s say 32L was bigger than we wanted for our project).
The parameters used for the two sizes of box are shown below:
First the 31L box
Then the 22L box.
UniBox produces a lot of plots other than just spl which are available under the Closed Box tab and vented box tabs. The main ones I concentrate on are the SPL graph, the excursion graph, the port air speed graph, and the step response graph. These are good graphs to look at to see how the various compromises we make can affect the overall design. First the approx. 33L recommended box is shown, and then some comparisons of a smaller 22L vented box. Note that as I added lining on the walls of the enclosure I went with a 31L box (which has effective volume of around 32.9L)
The above graph has quite a lot of information in it. The SPLtot is the main thing we are interested in. but it is also interesting to look at the other things that combine to create this “theoretical” final SPL. Note the dip around 600Hz which is a result of the port resonance. For a design where the port resonance will be in the passband of the driver you want to try and minimize it*. This is one of the trade-offs. A low tuning, or a big diameter port will tend to create lower (and bigger) port resonances. More on this a bit later.
This graph shows the theoretical excursion of the driver when driven with 50W of power. The red line represents the X-Max of the driver, if the cone excursion is exceeding this then it is into non-linear territory. Ideally you want to limit power to a level less than the X-Max. If you go above X-Mech (which I think for this driver is probably around 8mm) then you may cause mechanical damage! Note that this driver is rated at 60W power handling in the spec sheet. This is what the voice coil will handle. The design of the enclosure will have a bearing on the power handling from a mechanical perspective (rather than electrical). Note that I have been told that this graph is VERY conservative and not something to worry too much about. If you have a read of A Test. How much Voltage (power) do your speakers need? you may see why.
In comparison here is the excursion of the 22L enclosure. You can see that the power handling is slightly better. Note that different drivers will show bigger or smaller differences in power handling when changing things like box volume and tuning frequency.
Next we will take a look at the port air speed graph.
This graph shows the port air speed with 50W input. If the 8% line is exceeded then you may hear chuffing noises from the port when driven hard. The best way to reduce the port air speed is to increase the diameter. This will have the effect that the port needs to be longer to achieve the same box tuning, and the port resonance frequency will be lower and generally of higher amplitude, thus it is necessary to find a balance. The smaller the box volume the more tricky it is to get this balance.
Finally we have the step response. This shows us how quickly the driver cone returns to rest after an excitation signal is applied. The other thing that will show up here is port resonances. These will show as a smaller ripple superimposed on the main Step response. You can see a very small amount on the graph above. Once again we see our trade-off’s here. Below is a comparison of the same driver in a 10L sealed enclosure to show the difference in step response.
The tradeoff with the sealed alignment is much poorer bass extension, as can be seen in the next graph.
The above shows our modeled drivers spl with three different configurations. A 10L sealed enclosure, 22L vented tuned to 36Hz and 31L vented tuned to 35Hz. It helps to demonstrate some of the trade-offs, the step response graph below shows some more!
Note that unibox cannot superimpose step responses like the above. This has been done in Photoshop to demonstrate the difference between the three alignments. You can see that the sealed has the best step response, and that the smaller box has a slightly better step response than the bigger one. When looking at the spl graphs as well we can see that our bass extension is at the expense of step response.
One thing I didn’t go into above is how I arrive at the tuning frequency when changing the box volume. Basically I just increase or decrease the tuning frequency until I find the point where the F3 stabilises, and then choose the lowest tuning frequency that achieves that F3. The range of tuning frequencies that will achieve a given F3 will vary from driver to driver, but could be from a few 100 mHz to a few Hz. Note that this is just what I do. It is not the conventional method. There are conventional alignments for Bass reflex. Do a google search and you will find alignments like the butterworth and BB4, in reality there is a continuum of alignments which a box modelling program allows you to explore.
Just as a final comparison Below are a couple of graphs where the only thing changed was the port diameter (and length).
This is an extreme example where I increased the port diameter from 60mm to 100mm whilst keeping the box tuning the same. However this shows how going with a bigger port (to reduce the chance of chuffing) can have an adverse effect on other areas. It also demonstrates that if you are simulating without considering port resonances you may get a nasty surprise! The other thing worth mentioning is that the port length increased from approx 24cm to approx 70cm!
After doing simulation such as the above we may decide that the driver is just what we need. However depending on what our design goals were, we might find that what looked like a good candidate is not such a good choice after all. This is why it is important to get an idea of how a particular driver will perform before making the purchase. From the above sims we can see that this driver should be good for relatively low power applications and is quite suitable for cabinet volumes between 22L and 35L much smaller and the driver starts to peak (note I did not show the effects of this above).
That pretty much wraps up part a. In part b we will look at simulating the effects of baffle step.
* Some additional discussion here
Lets keep this thread uncluttered, A separate Designing your own speaker from scratch discussion thread has been created.
.
Last edited by a moderator:
Step 3b simulating baffle step.
So you have simulated the driver in an enclosure and are happy that it will perform to your requirements, you’ve decided to purchase and now you are going to build a box right? Well there is another thing that you need to know about, and that is baffle step.
At its most basic, baffle step is the phenomenon that occurs as the wavelength of the frequencies being reproduced approaches the dimensions of our baffle. For frequencies much shorter in length than our baffle dimensions the baffle effectively appears to be an infinite baffle. However once we start approaching the baffle dimensions the sound stars to wrap around the baffle and we no longer get the re-enforcement to the sound wave that the baffle provides. There is a transition from full reinforcement down to no re-enforcement which shows a gradual 6db drop.
As usual it’s not quite that simple. In reality we have peaks and troughs in the response as well which can wreak havoc with our Frequency response. In the worst case you may get a dip at a frequency where there is already a dip in the driver. If we are savvy we may in fact be able to help fill in a dip in the driver’s response with a peak in the baffle step response! A much more thorough explanation + a simple circuit that can be used to deal with basic baffle step at line level is available here Baffle Step Compensation
For this reason I highly recommend that before you finalize your cabinet design you perform some simulations to find out what effect on the frequency response your baffle dimensions will have (and how they will help or hinder your choice of driver). We may be jumping the gun here a bit, so you may also want to read the next section on cabinet design in conjunction with this section.
There has been a trend towards having very narrow cabinets. This may be due to aesthetics, but I have also heard (but do not know if it is true) that narrow cabinets are better for imaging. Unfortunately Narrow cabinets also appear to be the worst for producing large peaks and dips in the response.
There are a number of programs available that allow you to simulate baffle step. I will list a few below:
Tolvan data's The edge
Jeff Bagby’s Baffle Difraction and Boundary Simulator spreadsheet
Jeff Bagby’s Frequency Response Modeller spreadsheet
The FRD consortiums Baffle Diffraction Simulator spreadsheet (works with complex baffle shapes)
Kimmo's Vituixcad Which is a full blown speaker design package.
I have worked out the dimensions of a box that will have our 22L nominal enclosure volume. This actually highligts a very important aspect that perhaps needs mention in the previous section on simulating the box volume. After additional volume for the speakers, port and bracing are added the box volume increased around 20%. I decided to go with 18mm ply and when we take the wall thickness into account our overall volume increases by a whopping 50%!! our 22L (internal volume) box has become a 33L overall volume box.
The overall external dimensions of the box are: 513mm X 229mm X 287mm This is using a prime ratio of 487:197:293 (or 2.472:1:1.487) This should give an asthetically pleasing box and we have the flexibility of using either the 229mm or 287mm dimension as our baffle width. We will model both in one of the baffle step modeling apps and see what we get.
Below is an animation of the changes in baffle step response with the driver moving up the baffle in the vertical plane. Jeff Bagbies Baffle Diffraction and Boundary simulator spreadsheet was used. You can see that depending on the placement the dips and peaks change quite a bit.
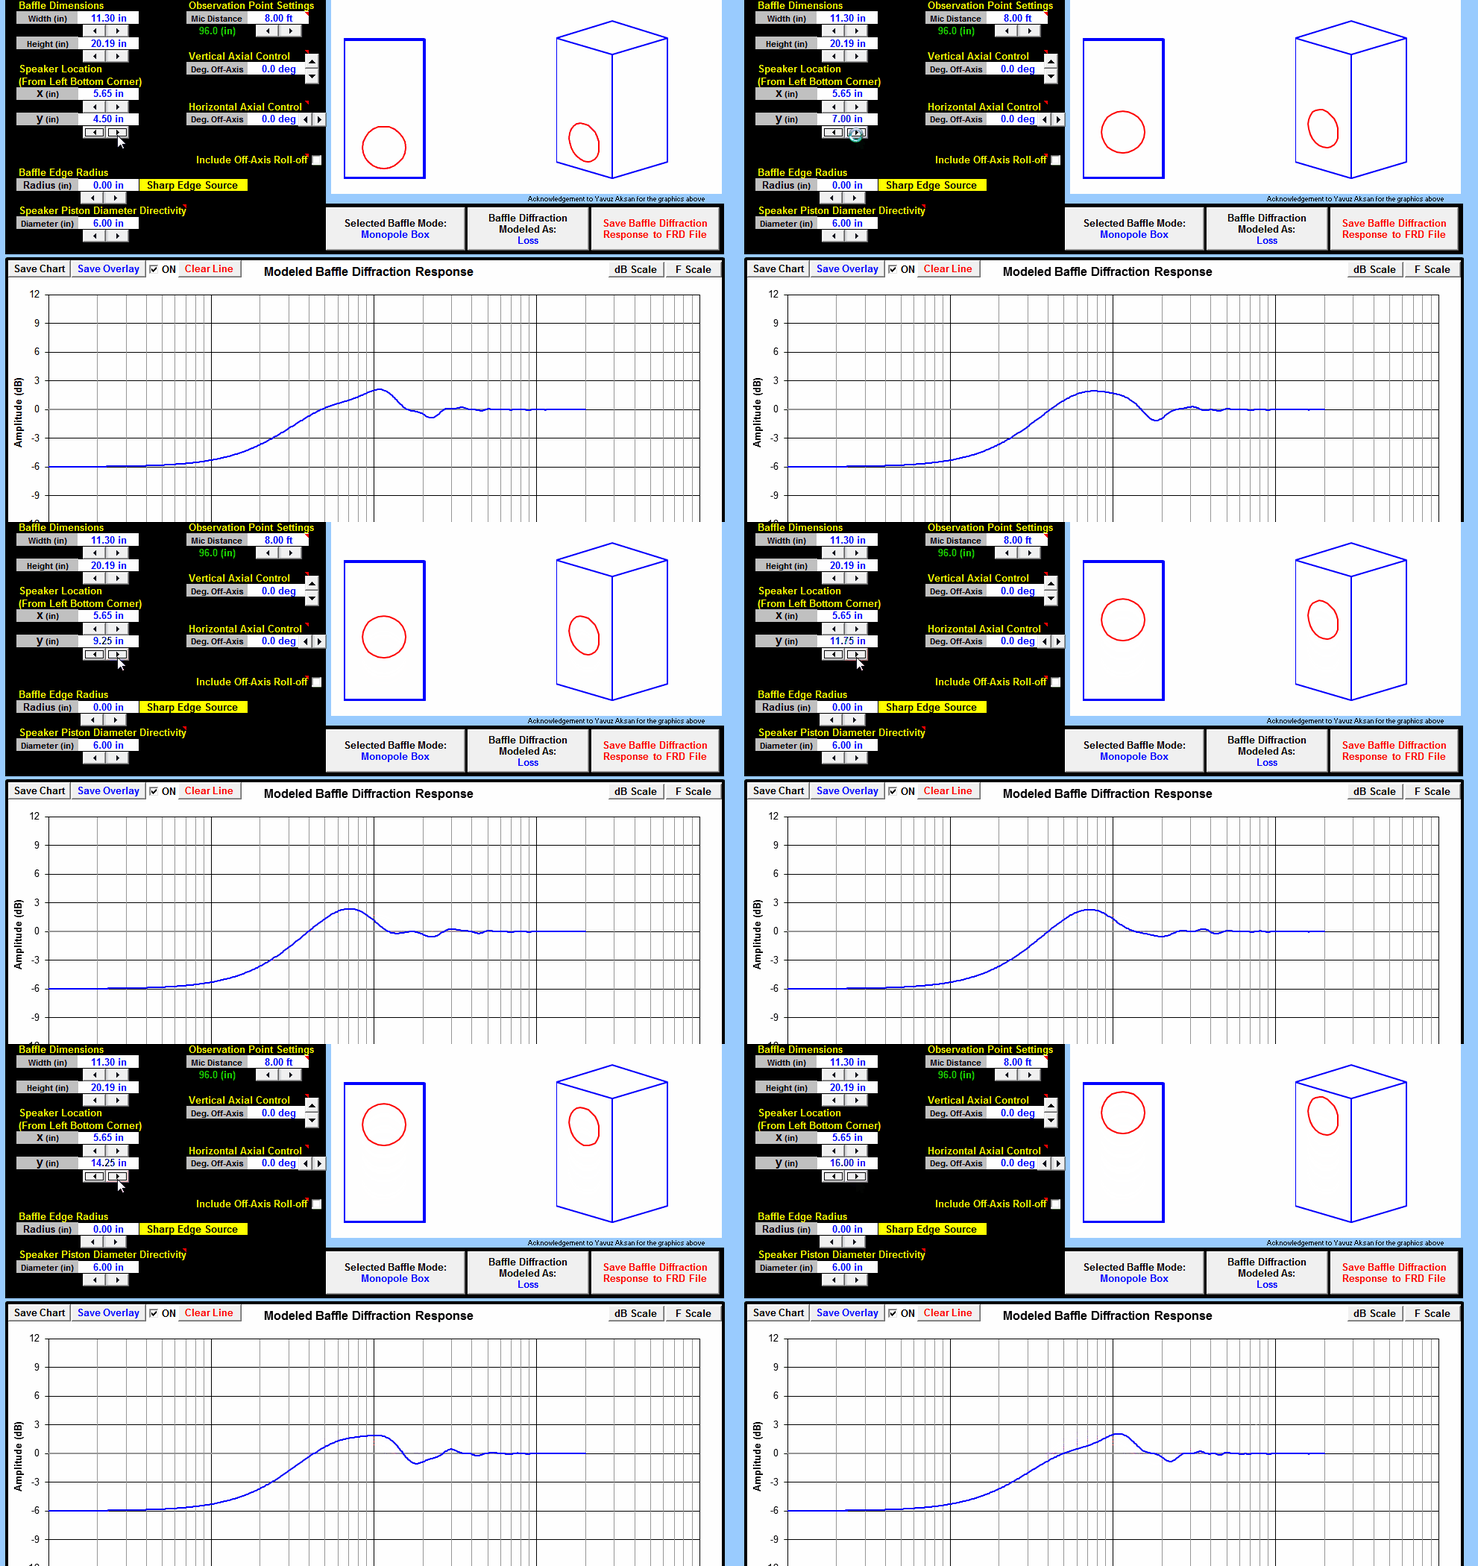
This gives us a pretty good idea of what sort of response anomalies the baffle is going to introduce. If we want an even better idea, we can spltrace the manufacturers curve and import it into Jeff's other spreadsheet the frequency response modeler, this may help us to fine tune the response to avoid worsening any natural dips in the drivers response or accentuating natural peaks. If we are really lucky we may be able to compensate for them.
Note that we can move the driver off centre as well and this will also have an effect on the baffle diffraction (usually smoothing it out). There are trade-offs (as usual) in doing so, in that you will not get symmetrical off axis response. The baffle step can be dealt with (including humps) in the crossover, off axis irregularities will be best dealt with using room treatment or speaker placement. If you are considering non-central positioning of the drivers it would pay to do some research on what the pros and cons of doing so are.
Lets keep this thread uncluttered, A separate Designing your own speaker from scratch discussion thread has been created.
.
So you have simulated the driver in an enclosure and are happy that it will perform to your requirements, you’ve decided to purchase and now you are going to build a box right? Well there is another thing that you need to know about, and that is baffle step.
At its most basic, baffle step is the phenomenon that occurs as the wavelength of the frequencies being reproduced approaches the dimensions of our baffle. For frequencies much shorter in length than our baffle dimensions the baffle effectively appears to be an infinite baffle. However once we start approaching the baffle dimensions the sound stars to wrap around the baffle and we no longer get the re-enforcement to the sound wave that the baffle provides. There is a transition from full reinforcement down to no re-enforcement which shows a gradual 6db drop.
As usual it’s not quite that simple. In reality we have peaks and troughs in the response as well which can wreak havoc with our Frequency response. In the worst case you may get a dip at a frequency where there is already a dip in the driver. If we are savvy we may in fact be able to help fill in a dip in the driver’s response with a peak in the baffle step response! A much more thorough explanation + a simple circuit that can be used to deal with basic baffle step at line level is available here Baffle Step Compensation
For this reason I highly recommend that before you finalize your cabinet design you perform some simulations to find out what effect on the frequency response your baffle dimensions will have (and how they will help or hinder your choice of driver). We may be jumping the gun here a bit, so you may also want to read the next section on cabinet design in conjunction with this section.
There has been a trend towards having very narrow cabinets. This may be due to aesthetics, but I have also heard (but do not know if it is true) that narrow cabinets are better for imaging. Unfortunately Narrow cabinets also appear to be the worst for producing large peaks and dips in the response.
There are a number of programs available that allow you to simulate baffle step. I will list a few below:
Tolvan data's The edge
Jeff Bagby’s Baffle Difraction and Boundary Simulator spreadsheet
Jeff Bagby’s Frequency Response Modeller spreadsheet
The FRD consortiums Baffle Diffraction Simulator spreadsheet (works with complex baffle shapes)
Kimmo's Vituixcad Which is a full blown speaker design package.
- The edge is probably the easiest to use to get an idea of what the effect (on a flat response) the baffle geometry will have.
- The FRD consortium spreadsheet is able to simulate complex baffle shapes but is also quite difficult to use.
- Jeff's Baffle Difraction and Boundary Simulator spreadsheet has the added benefit of allowing you to model boundary reinforcement effects as well as the baffle step (ie to some degree how the speaker will perform in your room).
- Jeff's Frequency Response Modeller spreadsheet has the added benefit that you can take an infinite baffle frequency response file and model how it will be effected by the baffle geometry.
- Kimmo's Vituixcad includes crossover simulation with off axis measurements. See the documentation for more info.
I have worked out the dimensions of a box that will have our 22L nominal enclosure volume. This actually highligts a very important aspect that perhaps needs mention in the previous section on simulating the box volume. After additional volume for the speakers, port and bracing are added the box volume increased around 20%. I decided to go with 18mm ply and when we take the wall thickness into account our overall volume increases by a whopping 50%!! our 22L (internal volume) box has become a 33L overall volume box.
The overall external dimensions of the box are: 513mm X 229mm X 287mm This is using a prime ratio of 487:197:293 (or 2.472:1:1.487) This should give an asthetically pleasing box and we have the flexibility of using either the 229mm or 287mm dimension as our baffle width. We will model both in one of the baffle step modeling apps and see what we get.
Below is an animation of the changes in baffle step response with the driver moving up the baffle in the vertical plane. Jeff Bagbies Baffle Diffraction and Boundary simulator spreadsheet was used. You can see that depending on the placement the dips and peaks change quite a bit.
This gives us a pretty good idea of what sort of response anomalies the baffle is going to introduce. If we want an even better idea, we can spltrace the manufacturers curve and import it into Jeff's other spreadsheet the frequency response modeler, this may help us to fine tune the response to avoid worsening any natural dips in the drivers response or accentuating natural peaks. If we are really lucky we may be able to compensate for them.
Note that we can move the driver off centre as well and this will also have an effect on the baffle diffraction (usually smoothing it out). There are trade-offs (as usual) in doing so, in that you will not get symmetrical off axis response. The baffle step can be dealt with (including humps) in the crossover, off axis irregularities will be best dealt with using room treatment or speaker placement. If you are considering non-central positioning of the drivers it would pay to do some research on what the pros and cons of doing so are.
Lets keep this thread uncluttered, A separate Designing your own speaker from scratch discussion thread has been created.
.
Last edited:
step 3c Tracing Manufactureres Data
This step is optional (IF you plan to do real measurements for your crossover modeling, or design the crossover by ear), but has been added for those of us that really want to know (within reason) how our speaker is going to behave either before purchasing or starting to build.
There are tools available which allow you to trace a manufacturers frequency response and impedance curves to create frd (Frequency response data files) and zma (impedance files) which can be used for simulating driver behaviour and crossovers. Later on We will be using these types of files (hopefully from real measurements you have performed on the speakers) for doing crossover simulation. There is nothing to stop you from tracing these manufacturer curves though and simulating the entire speaker before you have spent a cent on drivers or wood.
There are three tools that I know of for tracing SPL curves.
* spltrace from the FRD consortium SPL Tools
* FPGraphTracer from fprawn labs FPGraphTracer : fprawn labs
* Vituix Cad from Kimmo Vituixcad
* splcopy from nth technologies SPL Copy - Speaker Frequency Response Automatic Trace Tool
note: even if you plan to use FPGraphTracer or Vituixcad, do download spltrace as well, as you will need the splview program for "normalizing" your traced frd files (possibly not if you use vituixcad).
The spltrace utility is pretty labour intensive and so I tend to prefer the FPGraphTrace or Vituixcad programs. They can have problems though. You will need to get a copy of a manufacturers curves in a graphic format (I prefer png) I tend to use a screengrab tool (mwsnap is my tool of choice) and save the file as a png (I think spltrace can only read jpg or bmp) so as not to get any jpg artifacts which can confuse the programs.
Sometimes the program will have trouble with the colours of the lines (not enough difference between them and grid lines or off axis lines) in those cases I find it easiest to load the png file into windows paint and trace over the line in another very different colour.
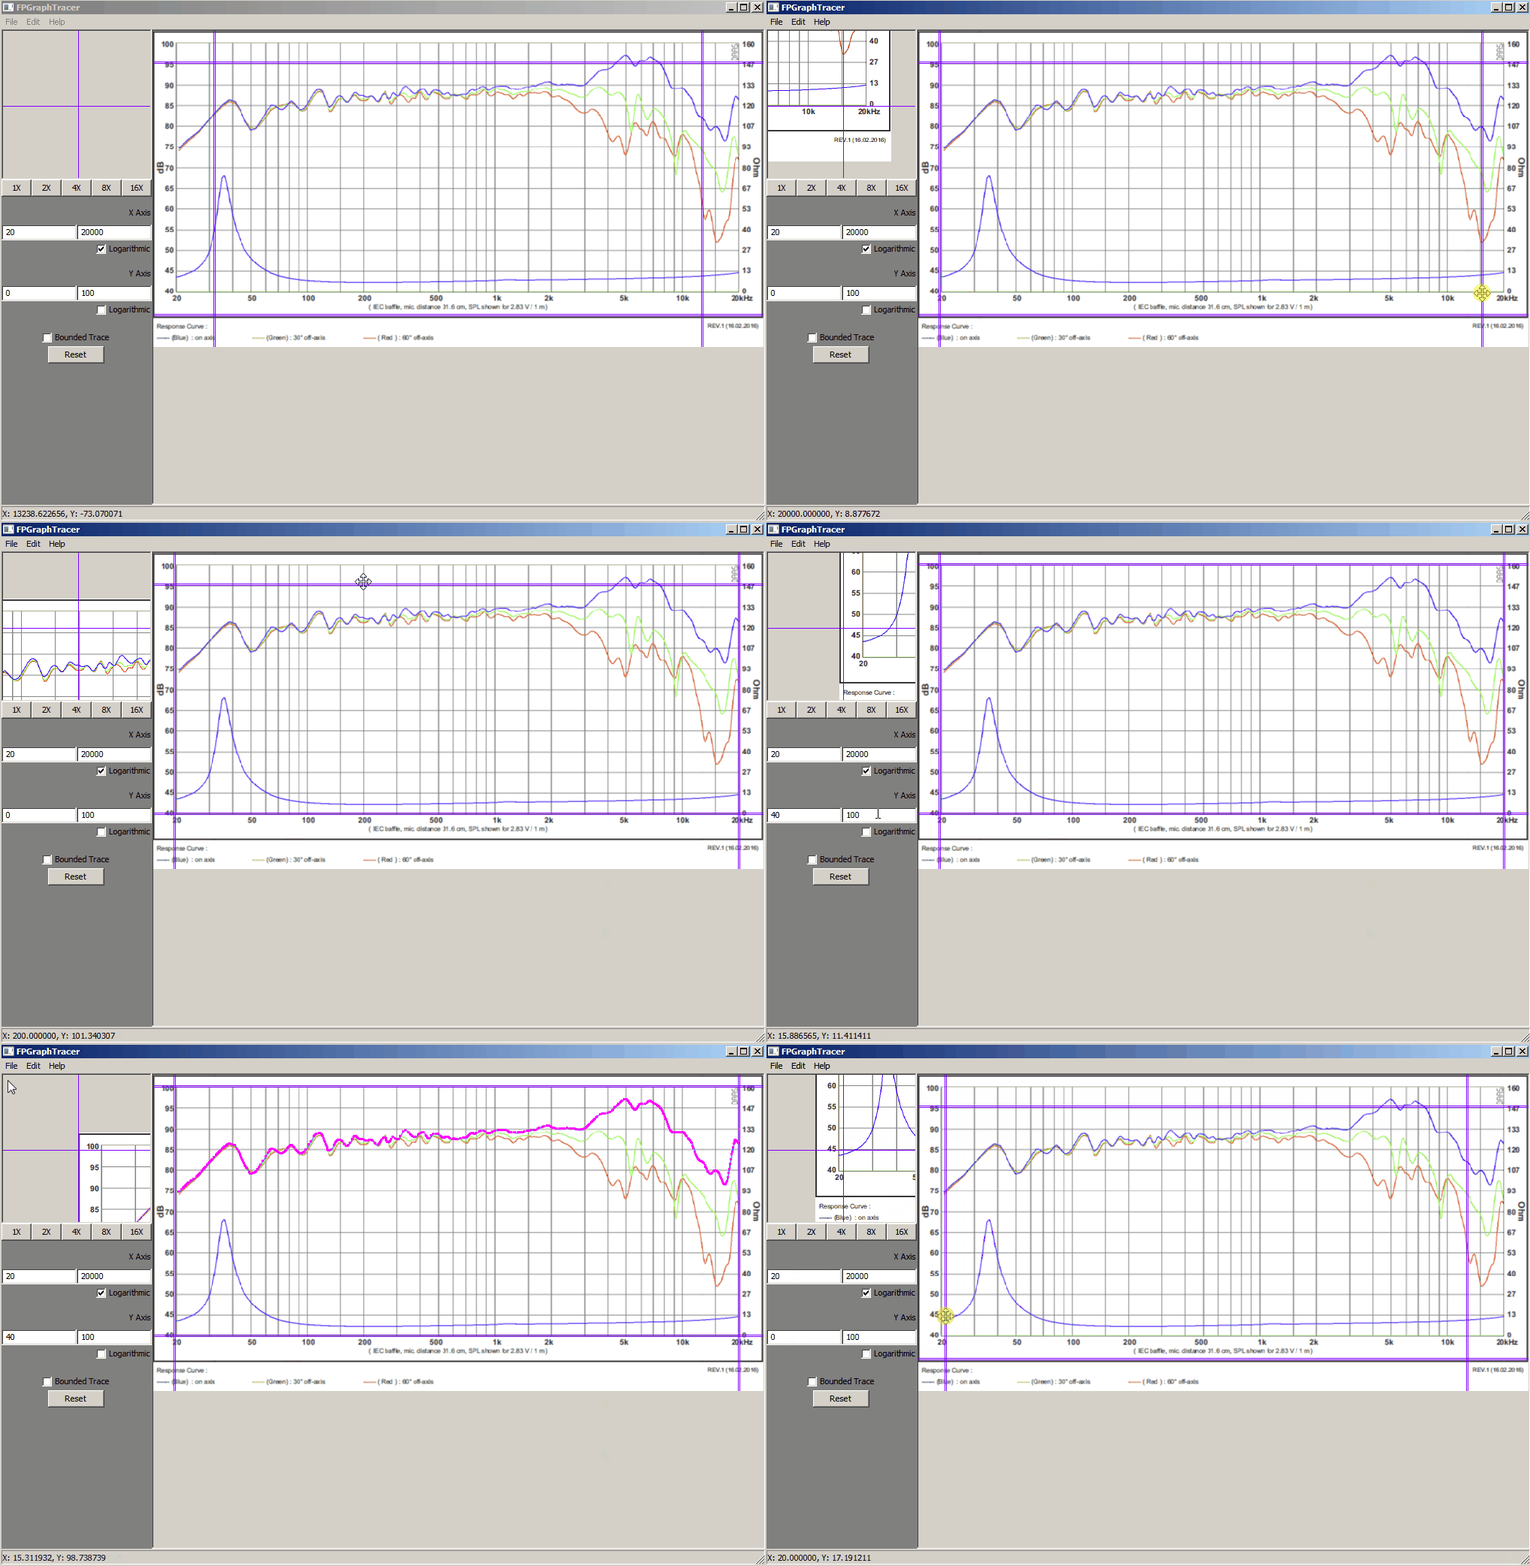
FPGraphTrace seems to be the simplist and quickest option and I have provided a demo below: Once you have a suitable screen grab of an spl curve you can load it into FPGraphTrace, configure low and high frequencies, low and high spl, and start tracing. The animation below shows tracing of heof the spl curve, but tracing of the impedance curve is basically the same, just adjust the values for the Y axis and take note whether it is a linear or logarithmic scale and select (or not) the tick box accordingly.
Note that we are not done yet. There are a few more steps required before we have usable frd's and Zma's.
The next step is to normalize the frd curves. We want data from 20 Hz to 20Khz and the traced file may not have this full range. If you have used the vituixcad trace utility then I think from memory that it will extrapolate automatically so the below may not be necessary in that case.
Start up splview and load the traced frd file. go to tools/normalize menu and then set the low frequency to 20 and the high frequency to 20000 I normally change to per decade. Save the new frd file as the same name with normalized suffix. See the dialog box below:

after you hit ok you will see that any gaps at the low or high end are filled in with a 12db / octave slope from the last point down to 20 or up to 20Khz.

The next step we need to do is to extract the minimum phase. There are a number of spreadsheets that have this functionality. The one attached in this post is the simplest. I'm not sure where I got it, but it is by Jeff Bagby and Paul Verdone, Jeff's later spreadsheets which also have phase extraction utilities in them are available here --> Jeff Bagby's Software Page . Load the spreadsheet and load in the frd, click the extract phase button and save the new frd (I usually give it a minimum_phase tag).
Note that you should also do this for the ZMA (impedance) trace.
You now have some files that can be used for simulating a crossover and baffle effects! If you don't have the equipment for true measurements, you can even use these for designing the crossovers, which should give better results than any online crossover calculator will.
Lets keep this thread uncluttered, A separate Designing your own speaker from scratch discussion thread has been created.
This step is optional (IF you plan to do real measurements for your crossover modeling, or design the crossover by ear), but has been added for those of us that really want to know (within reason) how our speaker is going to behave either before purchasing or starting to build.
There are tools available which allow you to trace a manufacturers frequency response and impedance curves to create frd (Frequency response data files) and zma (impedance files) which can be used for simulating driver behaviour and crossovers. Later on We will be using these types of files (hopefully from real measurements you have performed on the speakers) for doing crossover simulation. There is nothing to stop you from tracing these manufacturer curves though and simulating the entire speaker before you have spent a cent on drivers or wood.
There are three tools that I know of for tracing SPL curves.
* spltrace from the FRD consortium SPL Tools
* FPGraphTracer from fprawn labs FPGraphTracer : fprawn labs
* Vituix Cad from Kimmo Vituixcad
* splcopy from nth technologies SPL Copy - Speaker Frequency Response Automatic Trace Tool
note: even if you plan to use FPGraphTracer or Vituixcad, do download spltrace as well, as you will need the splview program for "normalizing" your traced frd files (possibly not if you use vituixcad).
The spltrace utility is pretty labour intensive and so I tend to prefer the FPGraphTrace or Vituixcad programs. They can have problems though. You will need to get a copy of a manufacturers curves in a graphic format (I prefer png) I tend to use a screengrab tool (mwsnap is my tool of choice) and save the file as a png (I think spltrace can only read jpg or bmp) so as not to get any jpg artifacts which can confuse the programs.
Sometimes the program will have trouble with the colours of the lines (not enough difference between them and grid lines or off axis lines) in those cases I find it easiest to load the png file into windows paint and trace over the line in another very different colour.
FPGraphTrace seems to be the simplist and quickest option and I have provided a demo below: Once you have a suitable screen grab of an spl curve you can load it into FPGraphTrace, configure low and high frequencies, low and high spl, and start tracing. The animation below shows tracing of heof the spl curve, but tracing of the impedance curve is basically the same, just adjust the values for the Y axis and take note whether it is a linear or logarithmic scale and select (or not) the tick box accordingly.
Note that we are not done yet. There are a few more steps required before we have usable frd's and Zma's.
The next step is to normalize the frd curves. We want data from 20 Hz to 20Khz and the traced file may not have this full range. If you have used the vituixcad trace utility then I think from memory that it will extrapolate automatically so the below may not be necessary in that case.
Start up splview and load the traced frd file. go to tools/normalize menu and then set the low frequency to 20 and the high frequency to 20000 I normally change to per decade. Save the new frd file as the same name with normalized suffix. See the dialog box below:
after you hit ok you will see that any gaps at the low or high end are filled in with a 12db / octave slope from the last point down to 20 or up to 20Khz.
The next step we need to do is to extract the minimum phase. There are a number of spreadsheets that have this functionality. The one attached in this post is the simplest. I'm not sure where I got it, but it is by Jeff Bagby and Paul Verdone, Jeff's later spreadsheets which also have phase extraction utilities in them are available here --> Jeff Bagby's Software Page . Load the spreadsheet and load in the frd, click the extract phase button and save the new frd (I usually give it a minimum_phase tag).
Note that you should also do this for the ZMA (impedance) trace.
You now have some files that can be used for simulating a crossover and baffle effects! If you don't have the equipment for true measurements, you can even use these for designing the crossovers, which should give better results than any online crossover calculator will.
Lets keep this thread uncluttered, A separate Designing your own speaker from scratch discussion thread has been created.
Attachments
Last edited:
Step 3d Checking Polar response
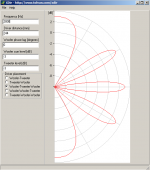
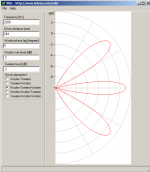
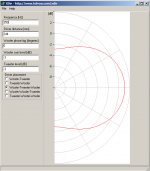
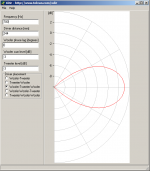
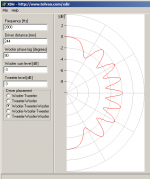
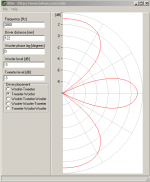
I recently became aware of another tool for simulating vertical polar response. The tool is Xdir Tolvan Data
The simulation is simple but gives a very good idea as to the effects of different placement of speakers on the baffle, how centre to centre spacing affects the polar response, and how phase tracking also affects the polar response.
Below are some images that show the simulated polar response of my own MTM. The first is as it was actually implemented.
You should be able to see from the parameters in the input to the sim the differences. The 5th plot with 90 deg difference between the drivers is interesting!
The 6th plot shows an TM implementation to give an idea of the difference between an MTM and TM implementation as far as vertical polar response goes, if "traditional" higher crossover points are being implemented.
Note that when I modeled these I had -3db summing, but my actual implementation is 4th order bessel acoustic with -6db summing. In reality this only makes a magnitude difference on the graph.
The 7th plot shows the TM with 90 deg phase shift, this demonstrates the often mentioned "tilt"
I'm not 100% sure about the CTC spacing in this tool when it comes to MTM's so I'm a bit hesitant to rely on it (I can't tell if you are supposed to enter CTC one woofer to tweeter, or CTC between the woofers... obviously the results are quite different depending on which you do!!
Oh well. I thought it interesting just the same 🙂 This post will likely get edited in future.
Lets keep this thread uncluttered, A separate Designing your own speaker from scratch discussion thread has been created.
Attachments
Last edited:
Step 4. designing some cabinets
OK so we are finally getting somewhere! We have a volume for our enclosure and we now just make a box with that internal volume and get building right? You guessed it. It’s not quite that simple 😉
There are actually a lot of things to consider at this point. We will continue with the assumption that we are building a two way, and it is a reasonably safe (though not an absolute given) assumption that the tweeter will be sealed back. This simplifies things in that we only really need one enclosure volume (if you have two different speakers with open backs, then they need to be isolated from each other). As this is a tutorial, and I’m not particularly imaginative, for the purposes of demonstration we will design a pretty standard rectangular box 🙂
Things to consider here are:
Now that you have had a think about those lets expand a bit.
Enclosure materials:
What volume will things like the drivers themselves, the ports(and it is the entire volume of the port that needs to be considered), the bracing and the crossover (if going passive) take up inside your cabinet? The volume of all of these things needs to be estimated and added to the volume that was determined in our earlier simulation step.
Will we have any issues with things like pipe resonances? A tall skinny cabinet may have undesirable resonances that will affect it’s sound, unless you are designing something like a Mass Loaded Transmission line (ML-TL) This is a subject unto itself but if you are interested in persuing this then the following link will be helpful Transmission Line Modelling Software - diyAudio
OK so we have worked out how much extra volume we need for other things that will be in the box, the simplest way to get to an actual box design now is to use a tool! A couple that I know of are:
boxycad available for download at Charlie Laub's site http://audio.claub.net/boxycad2.xls
boxsim (this is more than just a box design program) Page not found | Visaton
boxnotes Boxnotes - Free Speaker Design Software
I've not used any of these in the past (I've done it the hard way, with a pen, paper and calculator. What you need to keep in mind is that it is the internal dimensions that matter for vour volume!
The last speaker I designed I ended up using some 3D cad software to do the plans for the box itself (after first having done it on paper), though you can of course use pencil and paper 🙂 I used this excellent program http://www.ptc.com/cad/elements-direct/modeling/express
Lets keep this thread uncluttered, A separate Designing your own speaker from scratch discussion thread has been created.
OK so we are finally getting somewhere! We have a volume for our enclosure and we now just make a box with that internal volume and get building right? You guessed it. It’s not quite that simple 😉
There are actually a lot of things to consider at this point. We will continue with the assumption that we are building a two way, and it is a reasonably safe (though not an absolute given) assumption that the tweeter will be sealed back. This simplifies things in that we only really need one enclosure volume (if you have two different speakers with open backs, then they need to be isolated from each other). As this is a tutorial, and I’m not particularly imaginative, for the purposes of demonstration we will design a pretty standard rectangular box 🙂
Things to consider here are:
- What material will the enclosures be made out of?
- What finish do you want on the enclosures (this may be more important to decide early than you think!)
- Are you building a simple box or something more complex?
- What are your woodworking skills and what tools do you have (you may be going to outsource the cabinetry)
- What shape cabinet do you envisage.
- Is time alignment of the driver’s one of your considerations (if you don’t know what this means skip to the section on crossover design).
- Will you need to get your floor re-enforced to handle the weight 😉
- If your cabinet is vented, will you use a port tube, a slot vent or something else (perhaps a passive radiator or variovent). Where will the vent be located?
- How will you Brace (if at all) your cabinet.
- Do you intend to chamfer the baffle or make round overs?
- If you are desiging with a passive crossover will it be mounted internally?
- Do you want a floor stander or something that can be put on a shelf or stand?
Now that you have had a think about those lets expand a bit.
Enclosure materials:
MDF and chipboard are popular because they are easy to work with. Not because they are ideal materials to make a cabinet out of! HDF is another option that is better than MDF but it is harder to get and more expensive. MDF has the added disadvantage that the dust is toxic. If you use MDF make certain you wear a face mask when cutting, routing or sanding!
Void less Marine Ply is perhaps the best choice (note I have only ever used MDF but will in the future be looking to use Ply) It is stronger and stiffer than MDF and will not warp or swell if it gets damp.
Bamboo ply is also an interesting option.
Natural Wood. Although this may be tempting from an aesthetic point of view, it will almost certainly not be a good idea. Natural wood tends to have imperfections and also will expand and shrink leading to cracking. It’s not impossible to use but unless you know exactly what you are doing it is probably best avoided.
There are many other options, some I have seen are things like concrete This is a guide to using acoustic concrete. - diyAudio corian, fibreglass, aluminium. But we will stick to the basics here 😉
Cabinet finish:Void less Marine Ply is perhaps the best choice (note I have only ever used MDF but will in the future be looking to use Ply) It is stronger and stiffer than MDF and will not warp or swell if it gets damp.
Bamboo ply is also an interesting option.
Natural Wood. Although this may be tempting from an aesthetic point of view, it will almost certainly not be a good idea. Natural wood tends to have imperfections and also will expand and shrink leading to cracking. It’s not impossible to use but unless you know exactly what you are doing it is probably best avoided.
There are many other options, some I have seen are things like concrete This is a guide to using acoustic concrete. - diyAudio corian, fibreglass, aluminium. But we will stick to the basics here 😉
Yes you really should think about this (especially if SAF is a consideration). Why? Because if you don’t think of it till after you build the cabinets you might have difficulty getting the finish you want. For example, say you make a set of lovely cabinets with rounded edges. You now have some lovely Blackwood veneer to apply. How to get it to wrap around the rounded edges??
Or you have made some nice functional MDF enclosures and you now want to spray them piano black. MDF has a nasty habit of sucking up everything you throw at it, and also being very difficult to get a good finish on the end grain. You may end up needing to put a layer of epoxy over it which may be an added expense you hadn’t considered.
The other reason is that once you build them if you haven’t thought of this first, you may end up just leaving them unfinished (ie raw whatever material you made them out of). Once you screw the drivers in and start listening to them you may never want to actually finish them!
Time alignment:Or you have made some nice functional MDF enclosures and you now want to spray them piano black. MDF has a nasty habit of sucking up everything you throw at it, and also being very difficult to get a good finish on the end grain. You may end up needing to put a layer of epoxy over it which may be an added expense you hadn’t considered.
The other reason is that once you build them if you haven’t thought of this first, you may end up just leaving them unfinished (ie raw whatever material you made them out of). Once you screw the drivers in and start listening to them you may never want to actually finish them!
You have a number of different options here, Some are more complicated than others. Pretty much all of them will require prototyping and measurement. Note that time alignment is a nice to have, not an essential, so you can ignore this if you wish.
Some options are:
A sloping baffle.
A stepped baffle.
Using a waveguide on the tweeter.
Using a shallow woofer with a horn loaded tweeter.
Use a dsp (or analog delay network) to time align the drivers.
OK now that we have thought about all of the above lets get down to brass tacks. Is there anything else we need to think about? Yes! Some options are:
A sloping baffle.
A stepped baffle.
Using a waveguide on the tweeter.
Using a shallow woofer with a horn loaded tweeter.
Use a dsp (or analog delay network) to time align the drivers.
What volume will things like the drivers themselves, the ports(and it is the entire volume of the port that needs to be considered), the bracing and the crossover (if going passive) take up inside your cabinet? The volume of all of these things needs to be estimated and added to the volume that was determined in our earlier simulation step.
Will we have any issues with things like pipe resonances? A tall skinny cabinet may have undesirable resonances that will affect it’s sound, unless you are designing something like a Mass Loaded Transmission line (ML-TL) This is a subject unto itself but if you are interested in persuing this then the following link will be helpful Transmission Line Modelling Software - diyAudio
OK so we have worked out how much extra volume we need for other things that will be in the box, the simplest way to get to an actual box design now is to use a tool! A couple that I know of are:
boxycad available for download at Charlie Laub's site http://audio.claub.net/boxycad2.xls
boxsim (this is more than just a box design program) Page not found | Visaton
boxnotes Boxnotes - Free Speaker Design Software
I've not used any of these in the past (I've done it the hard way, with a pen, paper and calculator. What you need to keep in mind is that it is the internal dimensions that matter for vour volume!
The last speaker I designed I ended up using some 3D cad software to do the plans for the box itself (after first having done it on paper), though you can of course use pencil and paper 🙂 I used this excellent program http://www.ptc.com/cad/elements-direct/modeling/express
Lets keep this thread uncluttered, A separate Designing your own speaker from scratch discussion thread has been created.
Last edited:
Step 4a. Introduction to enclosure construction
The following content has been written by tcpip who kindly volunteered to fill in this segment! Thanks tcpip! 🙂
Introduction to enclosure construction
My speaker guru, the friend from whom I've learned perhaps 90% of what I know about speaker design and construction, has been building speakers for a few decades. He says that the quality of a finished pair of speakers probably depends 5-10% on driver selection, 40% on enclosure construction, and the remaining 50% on crossover design. He doesn't understand why people build poorly braced enclosures and then use $300 drivers on them.
The aim of the design of the enclosures is to add the right amount of resonance at the right frequency for the woofer driver to shape the overall frequency of the speaker at the bottom end of its range. This is done by using T/S parameters, modelling the behaviour of the driver and box volume, and then arriving at the right box volume. Some speakers add to this by using bass reflex ports, passive radiators, etc. The final aim of all this designing is to tune the low frequency response of the speaker as a whole. This box modelling stage, at least for sealed boxes and bass reflex boxes, gives you the volume of the enclosure, not its shape or construction.
The aims of the construction of enclosures of conventional box speakers are
In other words, the enclosure must be completely dead or inert, and must not vibrate at all when the speaker is playing at the loudest volume you'll use it at. The best speaker enclosures therefore will be made if you build its walls with concrete or cast metal quarter inch thick. (Some pro monitor speakers are actually made with cast aluminium enclosures and are very inert.)
We are a DIY crowd, not owners of giant factory facilities in China, so we can't cast metal to make our enclosures, and concrete is a difficult material to work with. So we use MDF. It must be noted that MDF or plywood, which is used for speaker enclosures 99.999% of the time, are used because they are convenient and cost-effective, not because they are acoustically the best choice.
Once we understand this, we start working on how to make MDF or plywood enclosures which are as inert as a concrete block. The knuckle test (rap the enclosure walls with your knuckles and see if it sounds hollow) is an excellent test to see how inert speaker walls are. One of the biggest and most obvious differences between really high-end speaker enclosures ($10,000 a pair and above) and mid-range speakers (floorstanders costing $1,000-2,000 a pair) is in the inertness of the enclosures.
One word which summarises how to make inert yet hollow enclosures which don't sound hollow in the knuckle test: bracing. The basic idea of bracing is to add structures like sheets, beams, rods, inside the enclosure to prevent the surfaces of the enclosure from vibrating.
A tutorial on bracing with two examples
We will start with one example: a floor-stander MTM design built in the early 2000s. The drawing below shows its external shape and size (dimensions in centimetres).
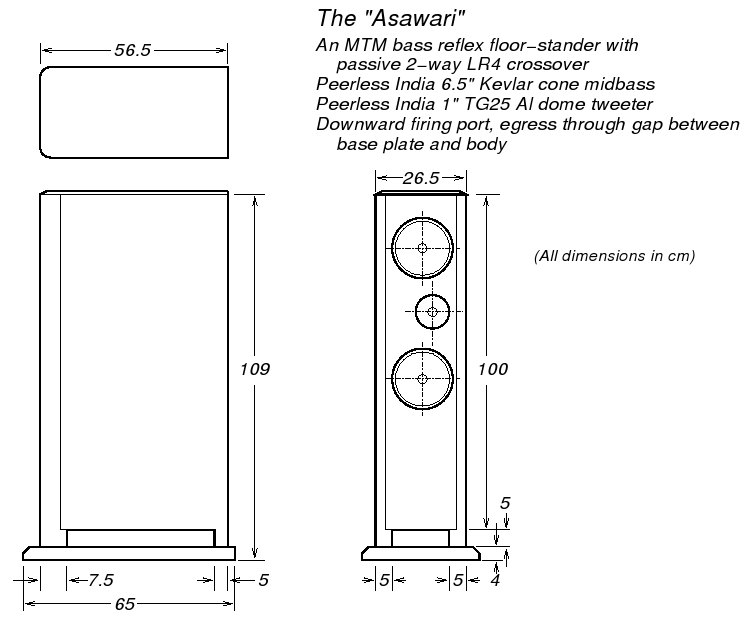
As you can see, it's a big rectangular box. Its insides is a different story. The drawing below shows a cutaway view of the internal bracing.
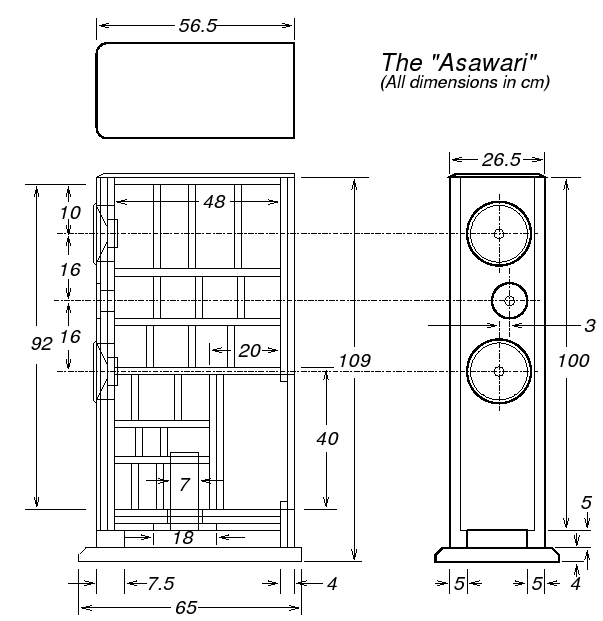
Basically, the (large) sidewalls of the enclosure would have vibrated loudly if they were not made rigid by putting bracing every 7-10 inches. That's what the internal structure does. The internal structure is made out of sheets of ply, which are glued together and fixed to the walls from the inside with both Araldite and wood screws. Araldite gives you the joint strength you need, but that joint itself does not form well unless you hold the adhesive surfaces pressed together hard for the first 24 hours when it sets. To ensure this, you drill holes into the walls from the outside, and screw the walls to the bracing sheets. The screws go into the bracing sheets edgeways. The screws serve little purpose once the Araldite has set, but then you can't remove them at that point -- they too are set into the Araldite and ply.
The drawing below shows the sizes and shapes of the ply sheets used to make the bracing (ignore the piece at the bottom of the drawing where a tube is fixed to a square piece of ply -- that was used for the ducted port for this speaker -- it's not part of bracing.)
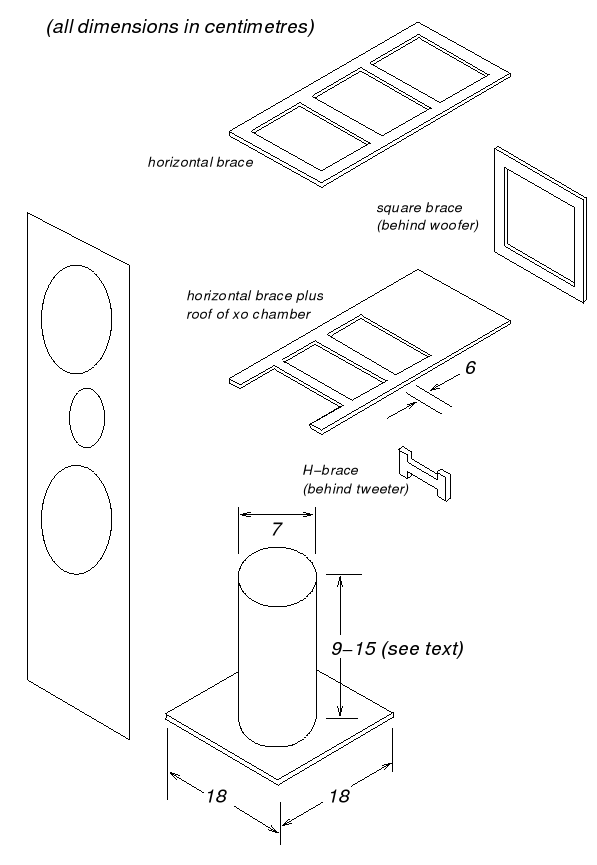
Below is a photo of the half-complete enclosure with the internal bracing fitted:
In the photo above, the front and rear baffles are yet to be fitted. This allows the carpenter free access to assemble and fix complicated internal bracing very tightly. The front and rear baffles are fixed last.
The next example is for a large woofer enclosure for a two-box, 3-way speaker design. The upper enclosure held the midrange and tweeter, and the lower enclosure held just a 10" woofer. This is a large box, a metre tall.
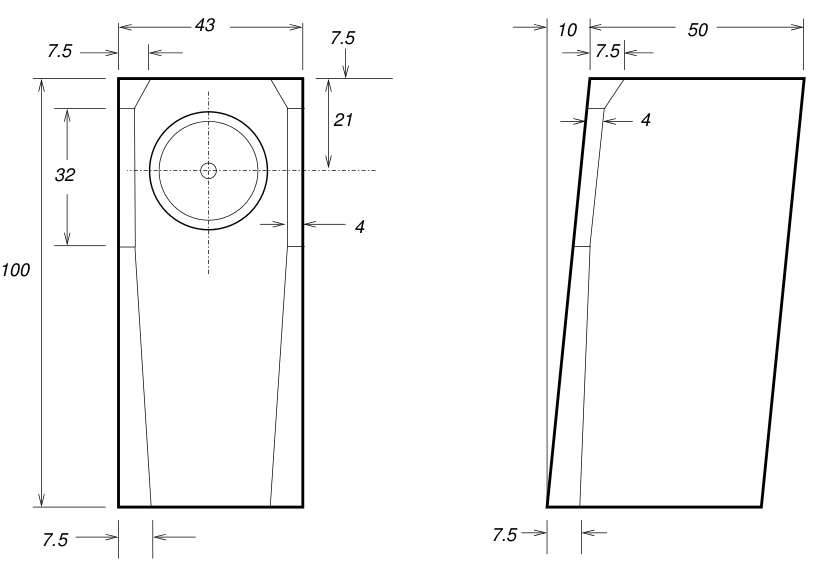
The internal bracing diagram for this enclosure is below:
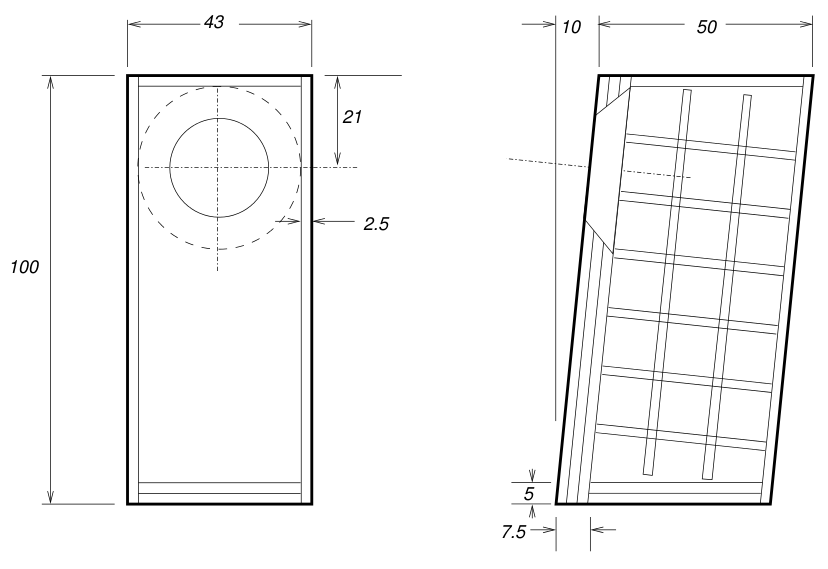
A bunch of pieces of plywood are assembled to make the internal bracing enclosure. These pieces are shown in the diagram below:
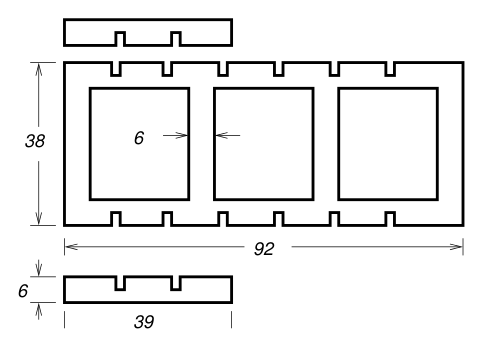
Once these pieces are assembled, they make a light, airy, very rigid standalone sub-assembly, as shown in the photo below:
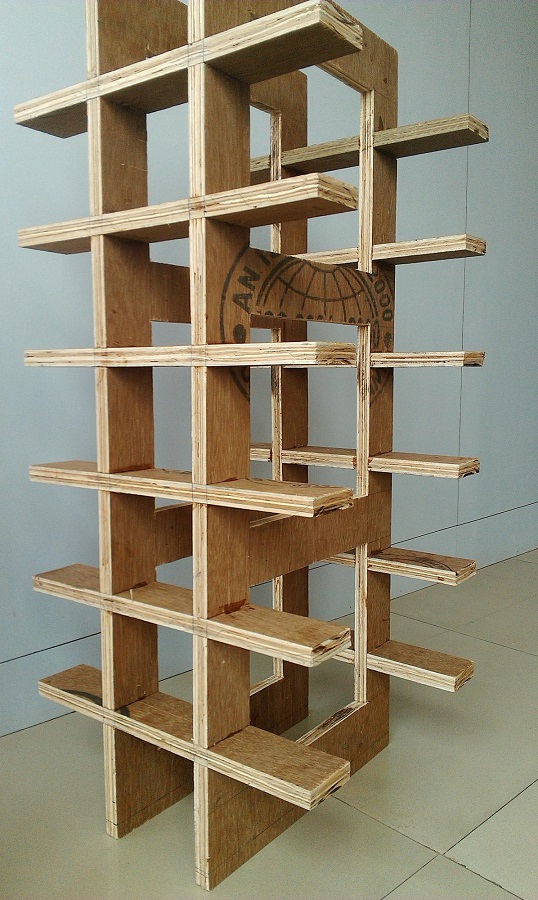
And once this sub-assembly is inserted into the shell of the enclosure, the photo below shows the half-complete enclosure with the bracing fitted:
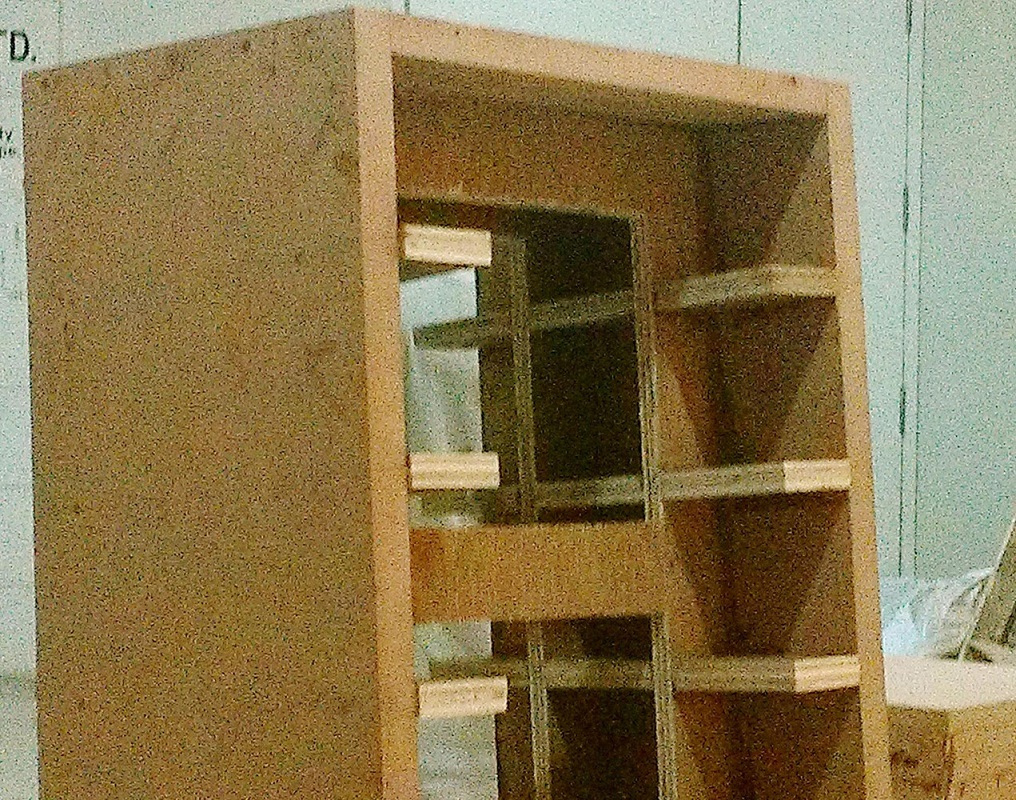
These examples were taken from the construction of the Asawari and the construction of the Darbari, in case you want to see what those projects looked like.
Some boxes are self-braced
Some boxes require the construction of sophisticated internal chambers or pathways to handle the rear wave of the driver. Two examples are back-loaded horns (BLH) and MLTL (mass loaded transmission lines).
Here is a photo of a BLH under construction:
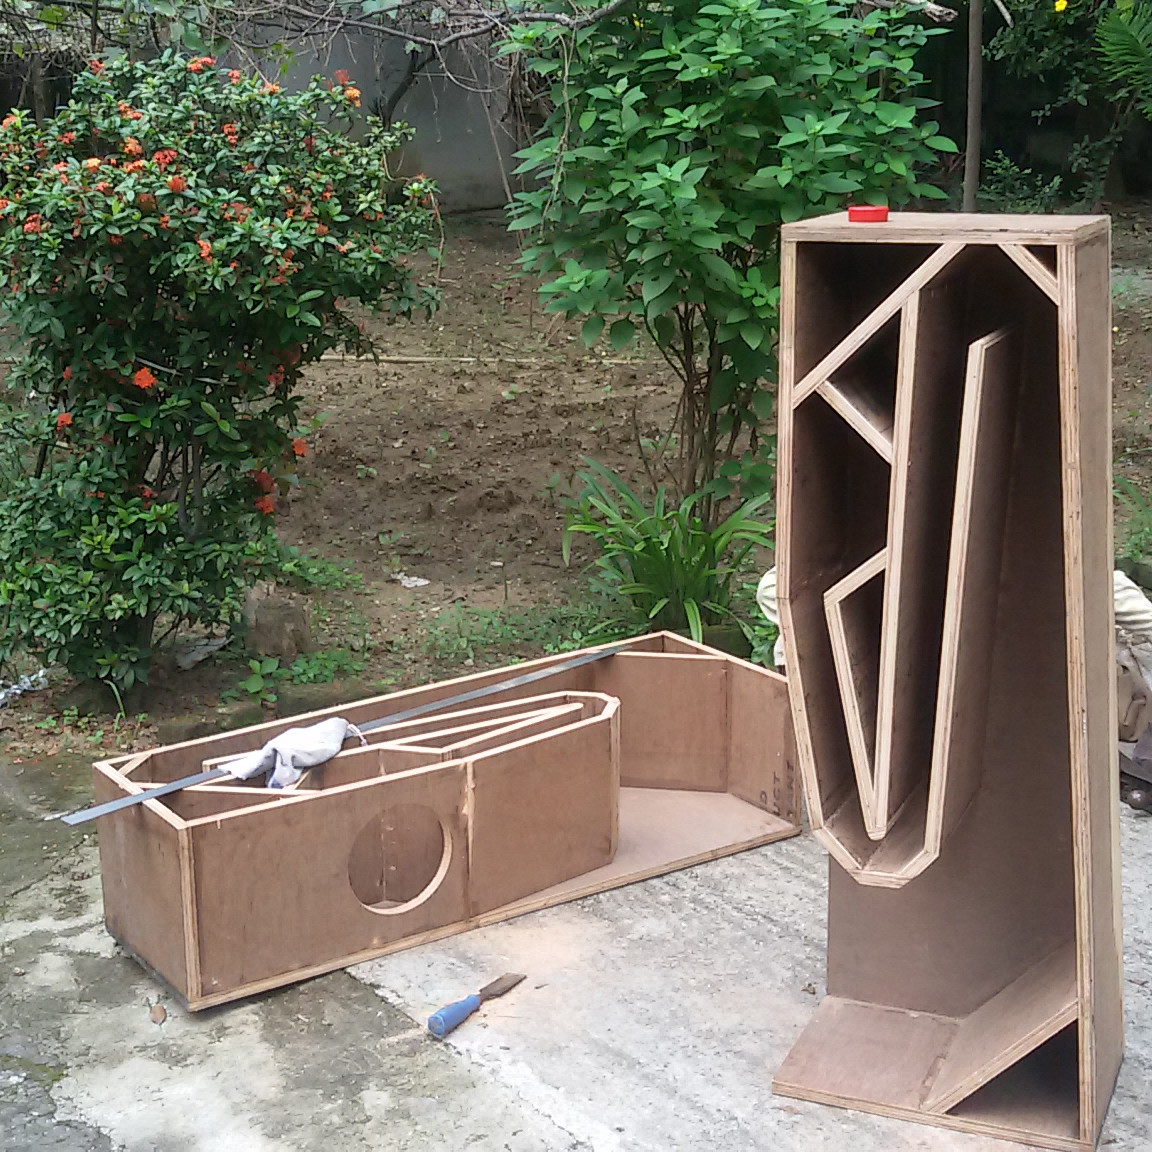
This sort of speaker needs the enclosure to have a long and tapering channel to guide the rear wave of the driver. The most convenient DIY way to make such a channel is to make a folded channel by placing partitions inside the enclosure as shown. These partitions are made of ply sheets which fix against the two sidewalls, thus bracing the sidewalls so well that no further bracing is needed.
Therefore, the entire challenge of bracing for inert enclosures is bypassed for BLH or MLTL enclosures most of the time.
Editors note: Below is an example where a speaker box was divided into three chambers (it is an MTM) The partitions effectively brace the larger volume that would be there if the speaker had a shared volume for the drivers. It was not considered necessary to perform any additional bracing to that shown. The reason for the two pieces making up the partitions is that the inner pieces are shorter to allow room for the rear chamber of the tweeter. This was a simple but jointed box and the quarter dowel was used in the corners to provide more rigidity.
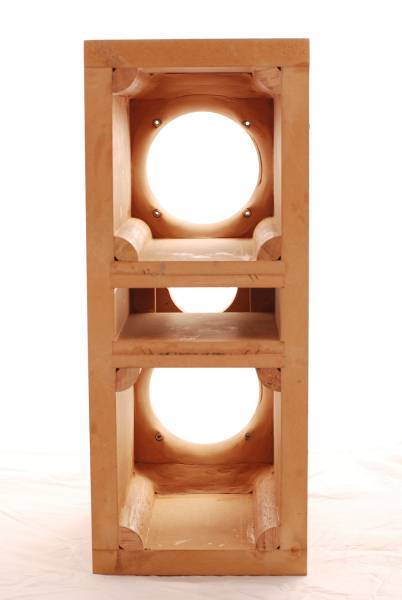
Another small speaker I created I used dowel for bracing. This is supposed to be for nearfield (computer) listening. The box walls are very thin.
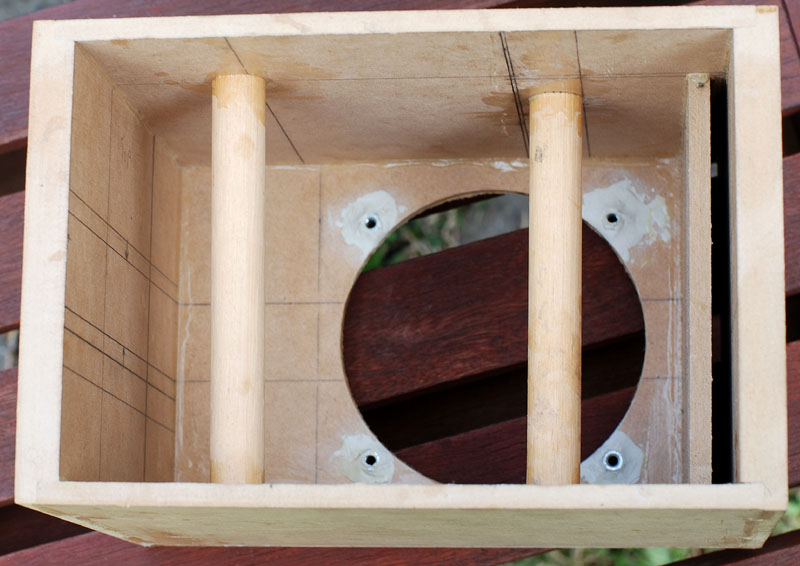
The tricky thing with this was getting the dowel the right length! 🙂
End editors note.
My basic rules of good enclosure construction
Note that these are one DIY builder's rules. Every DIYer will have a different set of rules.
Note that bracing has no connection with the material you may choose to use to fill the enclosure. This filling absorbs standing waves, and you may use Acousta-fill, glass wool, or other fibres as you see fit. This is completely orthogonal to bracing of the enclosure surfaces.
Construction tools
Other than the usual woodworking tools, you will need a woodworking router. I will share what I have learned about routers. This will be hard to understand if you've never really seen a woodworking router in action -- a router is nothing like a drilling machine or a saw, though it is a little bit of both, functionally. I will suggest that complete newbies look for router tutorials on YouTube.
Routers have shank diameters which depend on how heavy or large the router is. You get routers which can only take up to 6mm or quarter-inch shank bits. You get 8mm shank routers. And then you get the 12mm or half-inch shank routers. These are the diameters of the shanks of the largest router bit which the router can accept.
I suggest you go for the 12mm or half-inch shank spec routers straightaway, even if you feel you don't need such a heavy-duty router, because the choice of bits you get expands sharply with the 12mm size. One of my prized bits is the 1" roundover bit, which allows me to shape an edge of my boxes with a perfect 1" radius (not 1" diameter) rounding. This bit has a cutting edge which is 2" in diameter. It will never be built with a thin shank -- it needs a half-inch shank.
You need just four bits, strictly speaking, for speaker building:
A note on bevelling the midrange cutouts from the inside: some speaker builders who I respect a lot (including John Krutke of ZaphAudio) say that the cutout of a midrange driver actually acts as a ducted port, and encourages standing waves inside it. So if you're building your front baffle with two sheets of 1" thick MDF like I do, and your midrange cutout is 5" in diameter, you are effectively creating a tube of 2" length and 5" diameter, which will generate standing waves, which will then break through the midrange cone and be audible in front of the speaker, completely messing up the midrange purity. The only way to kill those standing waves is to make the midrange cutout have sloping sidewalls, as shown in the cutaway diagram of a small MTM standmount enclosure below:
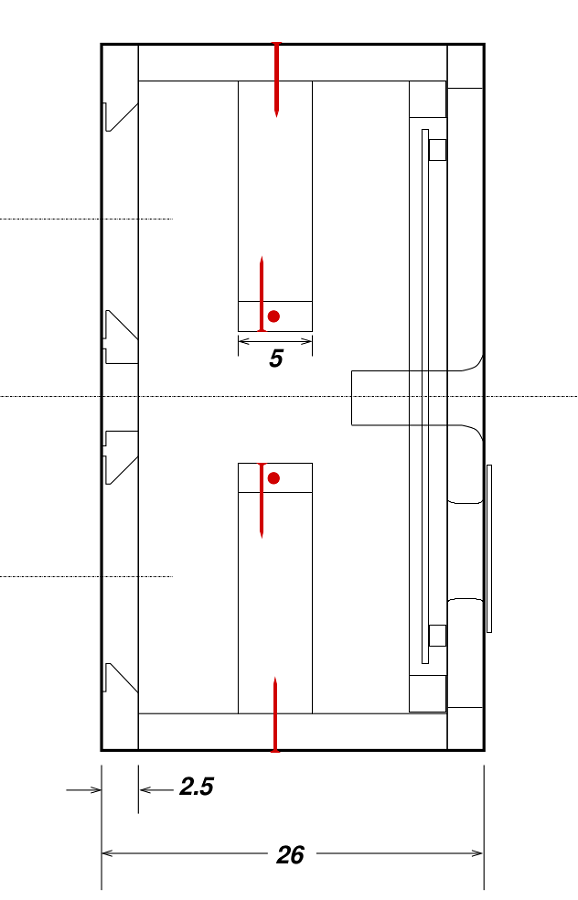
The front baffle is to the left of this diagram, and the two midbass cutouts are clearly shown. From the outer side, the cutouts have a recess of 3-4mm to allow the flanges of the drivers to sink in and mount flush with the baffle surface. From the inner side, the cutouts have been shaped with a 45-degree router bit to make them open out towards the inner side. This avoids standing wave formation. The tweeter has no rear wave, therefore there is no danger of standing waves, therefore the tweeter cutout has a recess on the front, but no sloping walls on the inside.
Mounting the crossover
This post will not talk about the design and assembly of the crossover. We will only talk here about how to physically construct it.
I find it best to fit a sheet of 6mm plywood on the inner surface of the rear baffle. I raise this sheet from the inner surface of the rear baffle by mounting the sheet on four (or six for large sheets) nylon feet of the kind carpenters fix below the legs of chairs. These light, small round feet "raise" the crossover mounting sheet about half an inch above the rear baffle surface, thus allowing me to pass wires below this sheet. The crossover components are mounted on the inner surface of this mounting sheet, and the wires which connect the crossover components to the binding posts, etc all pass in the half-inch gap between this sheet and the rear baffle.
I think my crossovers work well but are assembled in a somewhat ad hoc and primitive way with point-to-point soldering. Others use terminal blocks and do a better job.
Router bits you need
A router is essential for building good speakers.
No one taught me how to use a router, which router to buy, and what bits I need. I learned all of these by buying these things, trying them out, realising my mistakes, and wasting time and money. I actually bought two routers before I stabilised on my current (third) one. So, this post may help save your time and money.
Buy a router with a half-inch or 12mm shank specification, as I had said earlier. The bits you need are exactly four, and are shown below. I buy all my bits from reputed sellers on eBay and I've never had a lemon in my track record of at least 12 bits so far.
The straight bit
You need one bit like the ones below, with blade length at least 50% longer than the sheet thickness. My sheets are 25mm, so I use straight bits with at least 40mm long blades.
Note that the bit above does not have any ball bearings. The photo below is of a bit with a ball bearing at its tip. Avoid those. They cannot be plunged into the sheet -- they need you to drill a leader hole first before they can be inserted. This slows you down.
Note that straight bits are tall and slender like the Girl From Ipanema, and therefore they break. This is the only type of bit which breaks during use. Keep one or two spare bits.
The bottom cleaning bit
This bit is needed to cut recesses to sink the speaker driver into the front baffle. As we had said earlier, tweeters must be flush mounted. I mount all drivers flush, for better looks. The bit looks very similar to the straight bit, except that it's shorter and wider. One key point about this bit is that the two blades from the two sides touch at the centre, making the bit perfect to plunge into a virgin area of the sheet and start cutting recesses.
How wide a diameter do you need? I would say anything between half inch and an inch. How long must the blades be? Ideally, longer than the deepest recess you will cut. I've never had to cut recesses deeper than about 6mm, so you can choose bits whose blades are 10-12mm long.
You use this bit in a two-step process when cutting a hole for a driver. For tweeters:
For a midrange or midbass unit:
The V-groove or 45-deg bevel bit
This bit is for cutting 45-degree bevels to edges of cutouts. I use it to scallop out the cutout for a midrange or midbass driver from the inside. I have also done similar scalloping for woofer cutouts, but they are probably not needed.
This type of bit is frequently available with a ball bearing at the tip. Those are not useful.
The 1" radius roundover bit
This is used (at least in my case) only for one purpose: to do roundover finishing of the outer edges of front baffles. This is one place where I don't plunge the bit into the middle of a sheet -- I always slide the bit into the edge of the sheet. Here, a ball bearing at the tip may actually be useful, and will prevent mistakes if your grip on your router shakes and the bit is in danger of cutting into the baffle.
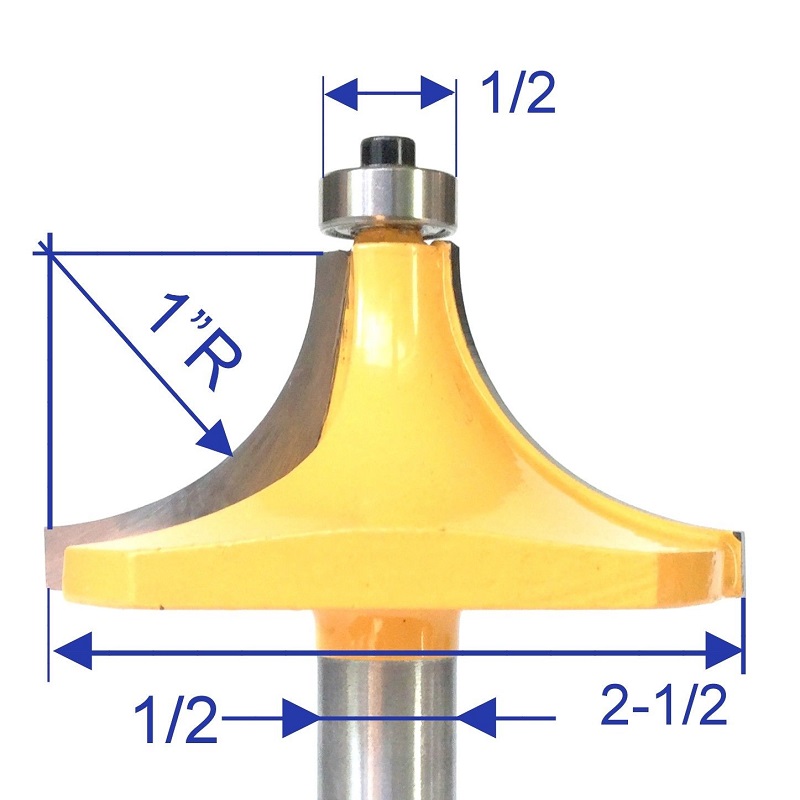
Note that I am not endorsing any specific product or vendor. These are just handy examples.
Lets keep this thread uncluttered, A separate Designing your own speaker from scratch discussion thread has been created.
The following content has been written by tcpip who kindly volunteered to fill in this segment! Thanks tcpip! 🙂
Introduction to enclosure construction
My speaker guru, the friend from whom I've learned perhaps 90% of what I know about speaker design and construction, has been building speakers for a few decades. He says that the quality of a finished pair of speakers probably depends 5-10% on driver selection, 40% on enclosure construction, and the remaining 50% on crossover design. He doesn't understand why people build poorly braced enclosures and then use $300 drivers on them.
The aim of the design of the enclosures is to add the right amount of resonance at the right frequency for the woofer driver to shape the overall frequency of the speaker at the bottom end of its range. This is done by using T/S parameters, modelling the behaviour of the driver and box volume, and then arriving at the right box volume. Some speakers add to this by using bass reflex ports, passive radiators, etc. The final aim of all this designing is to tune the low frequency response of the speaker as a whole. This box modelling stage, at least for sealed boxes and bass reflex boxes, gives you the volume of the enclosure, not its shape or construction.
The aims of the construction of enclosures of conventional box speakers are
- to not transmit any of the rear wave sound waves of the driver through the enclosure surfaces
- to absorb direct reflections of the rear wave of the driver and not let it emerge through the driver cone as reflected waves
In other words, the enclosure must be completely dead or inert, and must not vibrate at all when the speaker is playing at the loudest volume you'll use it at. The best speaker enclosures therefore will be made if you build its walls with concrete or cast metal quarter inch thick. (Some pro monitor speakers are actually made with cast aluminium enclosures and are very inert.)
We are a DIY crowd, not owners of giant factory facilities in China, so we can't cast metal to make our enclosures, and concrete is a difficult material to work with. So we use MDF. It must be noted that MDF or plywood, which is used for speaker enclosures 99.999% of the time, are used because they are convenient and cost-effective, not because they are acoustically the best choice.
Once we understand this, we start working on how to make MDF or plywood enclosures which are as inert as a concrete block. The knuckle test (rap the enclosure walls with your knuckles and see if it sounds hollow) is an excellent test to see how inert speaker walls are. One of the biggest and most obvious differences between really high-end speaker enclosures ($10,000 a pair and above) and mid-range speakers (floorstanders costing $1,000-2,000 a pair) is in the inertness of the enclosures.
One word which summarises how to make inert yet hollow enclosures which don't sound hollow in the knuckle test: bracing. The basic idea of bracing is to add structures like sheets, beams, rods, inside the enclosure to prevent the surfaces of the enclosure from vibrating.
A tutorial on bracing with two examples
We will start with one example: a floor-stander MTM design built in the early 2000s. The drawing below shows its external shape and size (dimensions in centimetres).
As you can see, it's a big rectangular box. Its insides is a different story. The drawing below shows a cutaway view of the internal bracing.
Basically, the (large) sidewalls of the enclosure would have vibrated loudly if they were not made rigid by putting bracing every 7-10 inches. That's what the internal structure does. The internal structure is made out of sheets of ply, which are glued together and fixed to the walls from the inside with both Araldite and wood screws. Araldite gives you the joint strength you need, but that joint itself does not form well unless you hold the adhesive surfaces pressed together hard for the first 24 hours when it sets. To ensure this, you drill holes into the walls from the outside, and screw the walls to the bracing sheets. The screws go into the bracing sheets edgeways. The screws serve little purpose once the Araldite has set, but then you can't remove them at that point -- they too are set into the Araldite and ply.
The drawing below shows the sizes and shapes of the ply sheets used to make the bracing (ignore the piece at the bottom of the drawing where a tube is fixed to a square piece of ply -- that was used for the ducted port for this speaker -- it's not part of bracing.)
Below is a photo of the half-complete enclosure with the internal bracing fitted:
In the photo above, the front and rear baffles are yet to be fitted. This allows the carpenter free access to assemble and fix complicated internal bracing very tightly. The front and rear baffles are fixed last.
The next example is for a large woofer enclosure for a two-box, 3-way speaker design. The upper enclosure held the midrange and tweeter, and the lower enclosure held just a 10" woofer. This is a large box, a metre tall.
The internal bracing diagram for this enclosure is below:
A bunch of pieces of plywood are assembled to make the internal bracing enclosure. These pieces are shown in the diagram below:
Once these pieces are assembled, they make a light, airy, very rigid standalone sub-assembly, as shown in the photo below:
And once this sub-assembly is inserted into the shell of the enclosure, the photo below shows the half-complete enclosure with the bracing fitted:
These examples were taken from the construction of the Asawari and the construction of the Darbari, in case you want to see what those projects looked like.
Some boxes are self-braced
Some boxes require the construction of sophisticated internal chambers or pathways to handle the rear wave of the driver. Two examples are back-loaded horns (BLH) and MLTL (mass loaded transmission lines).
Here is a photo of a BLH under construction:
This sort of speaker needs the enclosure to have a long and tapering channel to guide the rear wave of the driver. The most convenient DIY way to make such a channel is to make a folded channel by placing partitions inside the enclosure as shown. These partitions are made of ply sheets which fix against the two sidewalls, thus bracing the sidewalls so well that no further bracing is needed.
Therefore, the entire challenge of bracing for inert enclosures is bypassed for BLH or MLTL enclosures most of the time.
Editors note: Below is an example where a speaker box was divided into three chambers (it is an MTM) The partitions effectively brace the larger volume that would be there if the speaker had a shared volume for the drivers. It was not considered necessary to perform any additional bracing to that shown. The reason for the two pieces making up the partitions is that the inner pieces are shorter to allow room for the rear chamber of the tweeter. This was a simple but jointed box and the quarter dowel was used in the corners to provide more rigidity.

Another small speaker I created I used dowel for bracing. This is supposed to be for nearfield (computer) listening. The box walls are very thin.
The tricky thing with this was getting the dowel the right length! 🙂
End editors note.
My basic rules of good enclosure construction
Note that these are one DIY builder's rules. Every DIYer will have a different set of rules.
- Use at least 20mm thick sheet for enclosure construction. Weight matters, for obvious reasons, and the small extra cost of thicker stock is negligible compared to the cost of my time and energy.
- Use MDF or void-less ply sheets for enclosures. Void-less ply may be Baltic birch ply or very good marine ply. Void-less means there shouldn't be any small air gaps or voids in the sheet. Do not use particle board -- it's too light and low on rigidity.
- Use at least two sheets of your chosen stock for the front baffle. The absolute and complete rigidity of the front baffle has to be ensured at all costs, since it is the most prone to vibrate, and will smear the soundstage the most if it radiates sound waves.
- I use plywood for bracing even when I use MDF for the outer shell of the enclosure. Plywood, I feel, is more rigid than MDF. Bracing does not need void-free ply -- only the enclosure surfaces do. You can create a bracing structure using 2"x2" strips of timber too -- you don't need to use sheets.
- Optionally, use heavy lining for the inner surfaces of the enclosure shell. Ordinary bitumen felt is of little use -- it's too light. I have used EVA (ethyl vinyl acetate) sheets once -- each sheet was some 2-3mm thick, and had a weight of 4kg/sq-metre. I used three such sheets in a stack on the inner side-walls of the Asawari. Similarly heavy material may be used. For later builds, I have stopped looking for such linings, because I find good bracing to be more effective.
- Design your bracing so that the edges of the braces are not more than about 8" apart where they fix onto the walls.
- If you want to go super-careful, use double-sheet for the rear baffle too.
- I always round the edges of the front baffle with a 1" radius router bit, to enhance appearance and even out the edge reflections of the tweeter's output. Some people use a 45-degree bevel cut instead of a rounding cut. Some people don't do any edge treatment at all. I don't think about it any more -- I just do it blindly always nowadays, because I have the router and (hard to find) bit, and I like the final appearance.
- Tweeters must be flush mounted. This means that you not only need to make a cutout to push the tweeter in, you also need a recess on the outer surface of the front baffle so that the tweeter flange sinks into the recess and becomes flush mounted. This is very difficult to do well without a woodworking router.
- Keep the rear baffle removable. Fix the front baffle permanently. This makes the front baffle more rigid and also improves its appearance and finish. The rear baffle carries the crossover, at least in my designs, therefore you need to remove it to do internal wiring, crossover mounting, etc.
- Don't fix anything with nails. Nails come loose with time. Use wood screws wherever you may have thought of nails. And always use Araldite (any good epoxy adhesive with body) together with wood screws, not screws alone. Be obsessive about having joints which will last rigidly a hundred years. Rigidity is everything.
Note that bracing has no connection with the material you may choose to use to fill the enclosure. This filling absorbs standing waves, and you may use Acousta-fill, glass wool, or other fibres as you see fit. This is completely orthogonal to bracing of the enclosure surfaces.
Construction tools
Other than the usual woodworking tools, you will need a woodworking router. I will share what I have learned about routers. This will be hard to understand if you've never really seen a woodworking router in action -- a router is nothing like a drilling machine or a saw, though it is a little bit of both, functionally. I will suggest that complete newbies look for router tutorials on YouTube.
Routers have shank diameters which depend on how heavy or large the router is. You get routers which can only take up to 6mm or quarter-inch shank bits. You get 8mm shank routers. And then you get the 12mm or half-inch shank routers. These are the diameters of the shanks of the largest router bit which the router can accept.
I suggest you go for the 12mm or half-inch shank spec routers straightaway, even if you feel you don't need such a heavy-duty router, because the choice of bits you get expands sharply with the 12mm size. One of my prized bits is the 1" roundover bit, which allows me to shape an edge of my boxes with a perfect 1" radius (not 1" diameter) rounding. This bit has a cutting edge which is 2" in diameter. It will never be built with a thin shank -- it needs a half-inch shank.
You need just four bits, strictly speaking, for speaker building:
- a straight bit, at least 35mm or 1.5" long, to do straight cuts (cutouts with vertical walls)
- a bottom-cleaning bit of at least half-inch diameter, to cut recesses for speaker mounting (so that the speaker flange will mount flush with the surface of the front baffle)
- a 45-degree bevelled bit of 1" height (2" bit diameter) so that you can slope the sides of the cutout for your midrange drivers from the inside (more on this below).
- a 1" roundover bit, with 1" height and 2" bit diameter, to do rounding of the edges of the front baffles.
A note on bevelling the midrange cutouts from the inside: some speaker builders who I respect a lot (including John Krutke of ZaphAudio) say that the cutout of a midrange driver actually acts as a ducted port, and encourages standing waves inside it. So if you're building your front baffle with two sheets of 1" thick MDF like I do, and your midrange cutout is 5" in diameter, you are effectively creating a tube of 2" length and 5" diameter, which will generate standing waves, which will then break through the midrange cone and be audible in front of the speaker, completely messing up the midrange purity. The only way to kill those standing waves is to make the midrange cutout have sloping sidewalls, as shown in the cutaway diagram of a small MTM standmount enclosure below:
The front baffle is to the left of this diagram, and the two midbass cutouts are clearly shown. From the outer side, the cutouts have a recess of 3-4mm to allow the flanges of the drivers to sink in and mount flush with the baffle surface. From the inner side, the cutouts have been shaped with a 45-degree router bit to make them open out towards the inner side. This avoids standing wave formation. The tweeter has no rear wave, therefore there is no danger of standing waves, therefore the tweeter cutout has a recess on the front, but no sloping walls on the inside.
Mounting the crossover
This post will not talk about the design and assembly of the crossover. We will only talk here about how to physically construct it.
I find it best to fit a sheet of 6mm plywood on the inner surface of the rear baffle. I raise this sheet from the inner surface of the rear baffle by mounting the sheet on four (or six for large sheets) nylon feet of the kind carpenters fix below the legs of chairs. These light, small round feet "raise" the crossover mounting sheet about half an inch above the rear baffle surface, thus allowing me to pass wires below this sheet. The crossover components are mounted on the inner surface of this mounting sheet, and the wires which connect the crossover components to the binding posts, etc all pass in the half-inch gap between this sheet and the rear baffle.
I think my crossovers work well but are assembled in a somewhat ad hoc and primitive way with point-to-point soldering. Others use terminal blocks and do a better job.
Router bits you need
A router is essential for building good speakers.
No one taught me how to use a router, which router to buy, and what bits I need. I learned all of these by buying these things, trying them out, realising my mistakes, and wasting time and money. I actually bought two routers before I stabilised on my current (third) one. So, this post may help save your time and money.
Buy a router with a half-inch or 12mm shank specification, as I had said earlier. The bits you need are exactly four, and are shown below. I buy all my bits from reputed sellers on eBay and I've never had a lemon in my track record of at least 12 bits so far.
The straight bit
You need one bit like the ones below, with blade length at least 50% longer than the sheet thickness. My sheets are 25mm, so I use straight bits with at least 40mm long blades.
Note that the bit above does not have any ball bearings. The photo below is of a bit with a ball bearing at its tip. Avoid those. They cannot be plunged into the sheet -- they need you to drill a leader hole first before they can be inserted. This slows you down.
Note that straight bits are tall and slender like the Girl From Ipanema, and therefore they break. This is the only type of bit which breaks during use. Keep one or two spare bits.
The bottom cleaning bit
This bit is needed to cut recesses to sink the speaker driver into the front baffle. As we had said earlier, tweeters must be flush mounted. I mount all drivers flush, for better looks. The bit looks very similar to the straight bit, except that it's shorter and wider. One key point about this bit is that the two blades from the two sides touch at the centre, making the bit perfect to plunge into a virgin area of the sheet and start cutting recesses.
How wide a diameter do you need? I would say anything between half inch and an inch. How long must the blades be? Ideally, longer than the deepest recess you will cut. I've never had to cut recesses deeper than about 6mm, so you can choose bits whose blades are 10-12mm long.
You use this bit in a two-step process when cutting a hole for a driver. For tweeters:
- First, from the outer surface of the baffle, cut a recess groove (not a through-cut) using this bottom cleaning bit whose outer diameter is 1mm larger than the flange diameter of your tweeter. (100mm flange diameter is very common for dome tweeters.)
- Then, from the outer surface, use a straight bit to make a through hole of the diameter needed for tweeter to fit in.
For a midrange or midbass unit:
- First, from the outer surface of the baffle, cut a recess groove (not a through-cut) using this bottom cleaning bit, 1mm larger in diameter than the flange diameter.
- Then, from the inner side of the baffle, use the 45-degree bevel bit to make a cutout which will be a through cut, with 45-degree sloping sidewalls.
- If, like me, you use two sheets for your front baffle, then you will need to do the 45-degree cutouts in the two sheets one by one, carefully calculating the incremental diameter.
The V-groove or 45-deg bevel bit
This bit is for cutting 45-degree bevels to edges of cutouts. I use it to scallop out the cutout for a midrange or midbass driver from the inside. I have also done similar scalloping for woofer cutouts, but they are probably not needed.
This type of bit is frequently available with a ball bearing at the tip. Those are not useful.
The 1" radius roundover bit
This is used (at least in my case) only for one purpose: to do roundover finishing of the outer edges of front baffles. This is one place where I don't plunge the bit into the middle of a sheet -- I always slide the bit into the edge of the sheet. Here, a ball bearing at the tip may actually be useful, and will prevent mistakes if your grip on your router shakes and the bit is in danger of cutting into the baffle.
Note that I am not endorsing any specific product or vendor. These are just handy examples.
Lets keep this thread uncluttered, A separate Designing your own speaker from scratch discussion thread has been created.
Last edited:
Step 5. Designing the Crossover
This is the easy bit right? Just go to an online calculator put in the frequency you want to crossover at and it will spit out the values right? Or just go to partsexpress and purchase a ready made crossover that crosses over at a suitable frequency.
If only it were this easy. If speakers had a completely flat frequency response, and a completely flat impedance, and the distance from each driver to your ears was the same then yes that would work*, however that is not the case in reality and we need to take these things into account.
A crossover filter does not just cut off the frequency at a particular frequency, it gradually rolls off the speakers responses over a fairly large range. In this range BOTH drivers are adding together to form the sound. For this to work ideally, both drivers need to be adding together equally and need to be in phase with each other through this range.
Lets see what happens with our theoretically flat speaker with a completely flat impedance using our text book crossover. For this we have two speakers which are both 90db efficient, completely flat and have a completely flat 8 ohms resistance. Now if you had such drivers you wouldn't be making a crossover in the first place, but it serves to demonstrate what is happening.
The schematic is for a textbook 2nd order linkwitz riley crossover at 3Khz. Calculated using this online calculator Speaker Crossover Calculators by V-Cap

The graph is showing the summed response of the two drivers and the rolloff of each driver. See how wide the range is where it is both drivers that are summing together to make the flat response (It's almost from 200Hz through to 20Khz)!
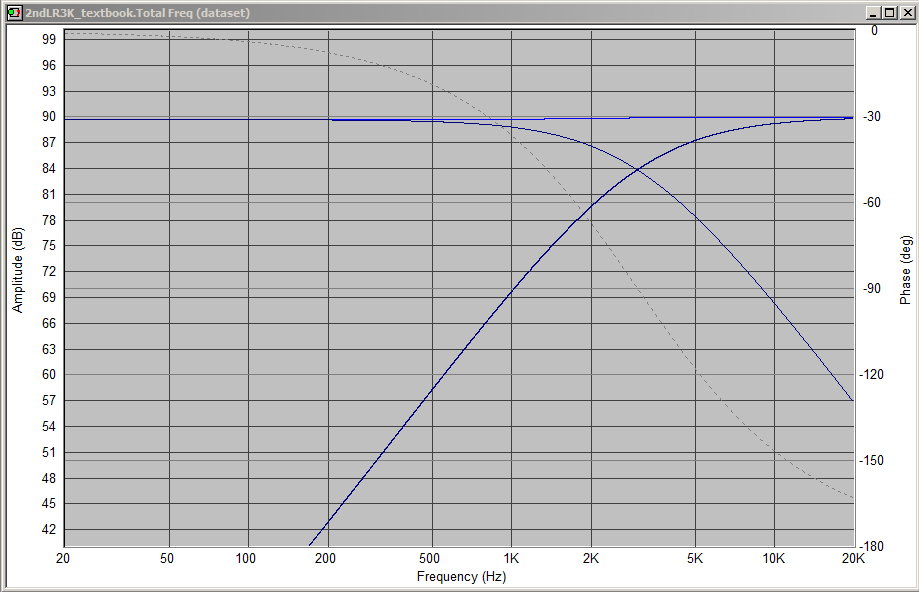
Note how there is a step in the frequency response. This is due to the resistance inherent in the inductor which is in series with the woofer. For this sim I used 0.29 ohms for the DCR of the coil. It is not too significant but it does show that even with our perfect drivers we have not got a perfectly flat result with out text book crossover.
Next we will show what happens if we use actual impedance curves for real drivers (but still with our perfectly flat frequency response). I've chosen a Dayton RS150P-8 for the woofer and a Morel DMS37 for the tweeter, as I happen to have frd and zma's for both. Everything is the same except for the real-impedance curves being used in the sim.
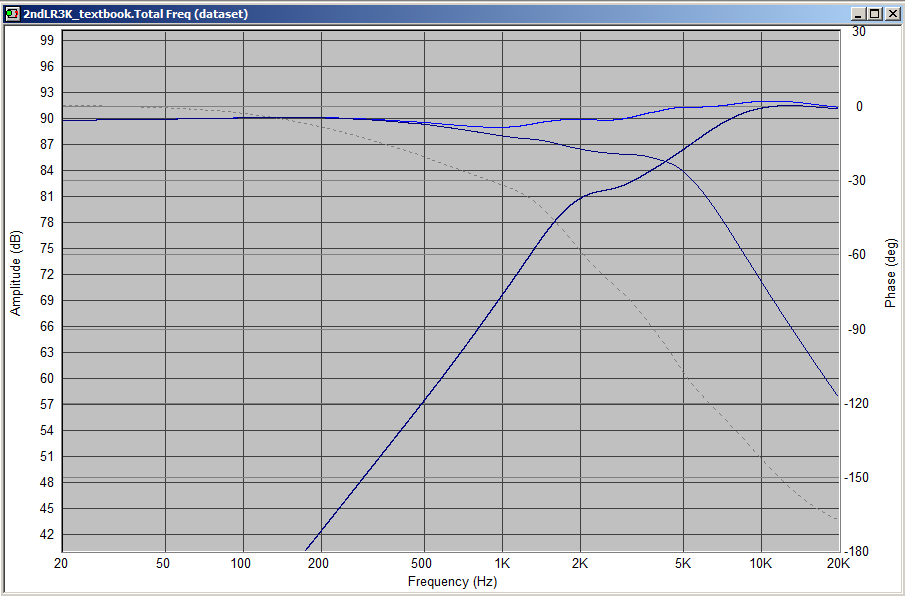
Whoah!! What happened to our nice flat response!! Textbook crossovers only give a text book response with a flat impedance, which the above demonstrates very well 🙂. Now it is possible to greatly improve this by using impedance compensation on the drivers, but that is not necessarily something you need to do as you will see later when we do a more optimal crossover.
So now we add in the real responses of the Dayton and Morel drivers and see what we get.
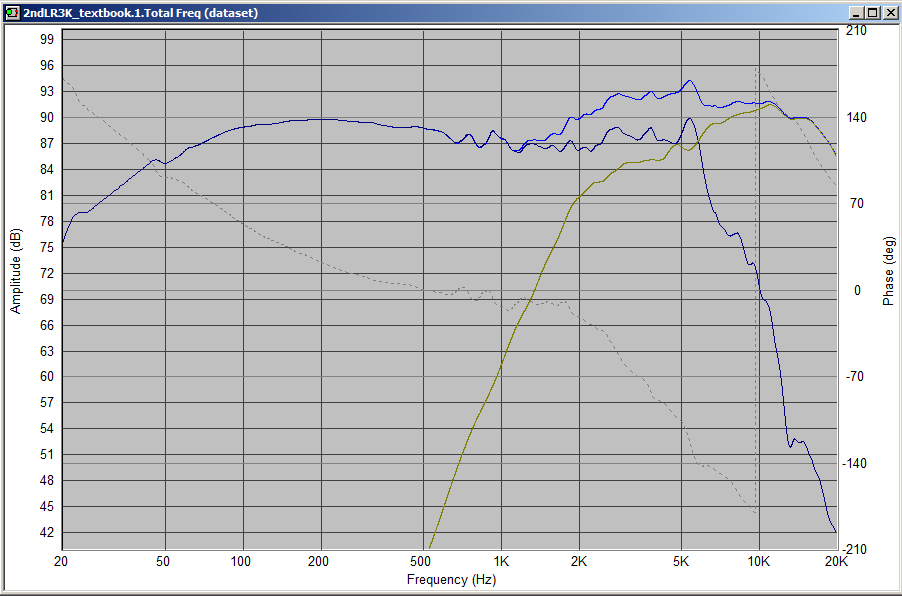
Probably not really what we want! So you can see that if we just used our text book crossover with our two new drivers, that we would likely have a bit of a tweaking job on our hands!
Note that even the above is a very crude estimate of what would really happen, as we have not taken into account how the baffle effects the frequency response of our drivers, or how differences in driver offset on the baffle affects their phase relationship to each other, in reality the above probably looks even better than it would in real life!
One of the things that people starting out with crossover design fail to grasp is that it is the acoustic rolloff of the speaker that is the real goal not the electrical order of the filter. When we say we want a 2nd order linkwitz riley crossover, that doesn't necessarily mean that it will be an electrical linkwitz riley filter (for newbies I would actually suggest that a fourth order LR or bessel filter is much more likely to give them results that they will be happy with, 2nd order acoustic filters are not easy!) After having said that, what I come up with later, does appear to be a 2nd order electrical filter on both the woofer and the tweeter, but it doesn't always have to be. When doing 4th order targets I have achieved it with 2nd order on the woofer and 3rd order on the tweeter, it all depends on the drivers and the frequency you cross them at.
We can demonstrate this concept by adding some target slopes to the third graph. The red lines in the fourth graph are our target 2nd order L/R at 3Khz. These show how our speaker should roll off to get the best blending (assuming we also get the phase right, but more on that a bit later).
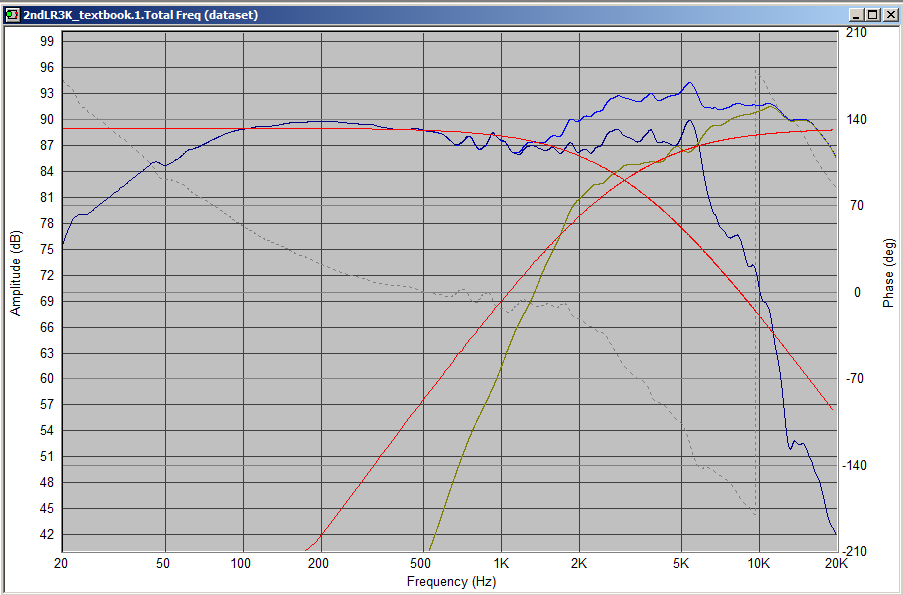
As can be seen the drivers are not following the target curves very well at all and the resulting frequency response is pretty awful. I'm sure if you got a result like this you would not be happy and wondering where you had gone wrong! We would be looking at quite a lot of tweaking by ear to sort out this mess, and without actually knowing whether it was the woofer, the tweeter or both that is causing the issue we would be stabbing in the dark.
So instead we can do some virtual tweaking and see what the results are with our sim. As previously stated I have not properly prepared these FRD's or put in proper offsets for drivers so this result is invalid, but is useful for demonstration purposes.
I spent maybe an hour playing around with some tweaks to get a result that is roughly +- 1.5db from approx 70 hz to 16Khz. It also has a good deep reverse null (meaning the drivers are in phase at the crossover frequency). Now of course I already have experience so that makes it faster, but I'm sure that trying to tweak this by ear would take an awful lot longer!
The new circuit is below:
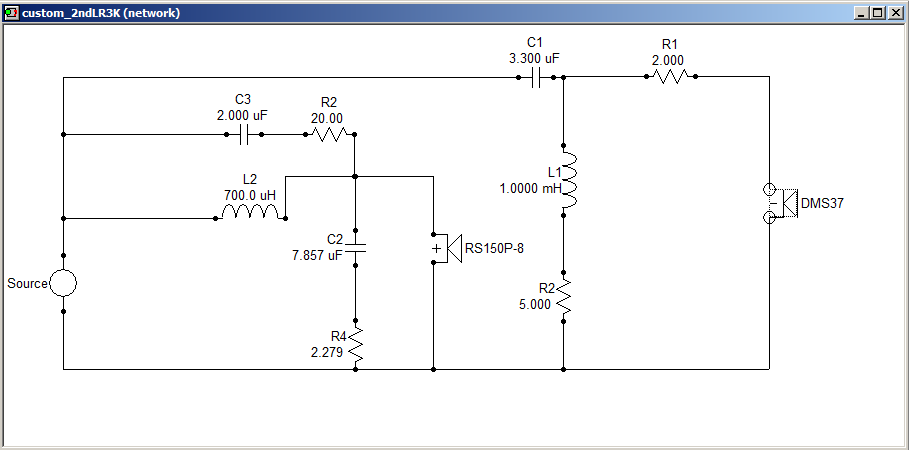
You can see that there has been a few additions, and also changes to values from our original textbook crossover. I used the optimizer on C2 and R4 which is why they have strange looking values, I would normally change them to the nearest standard value but was being lazy.
Below is the resulting frequency response using this new crossover.
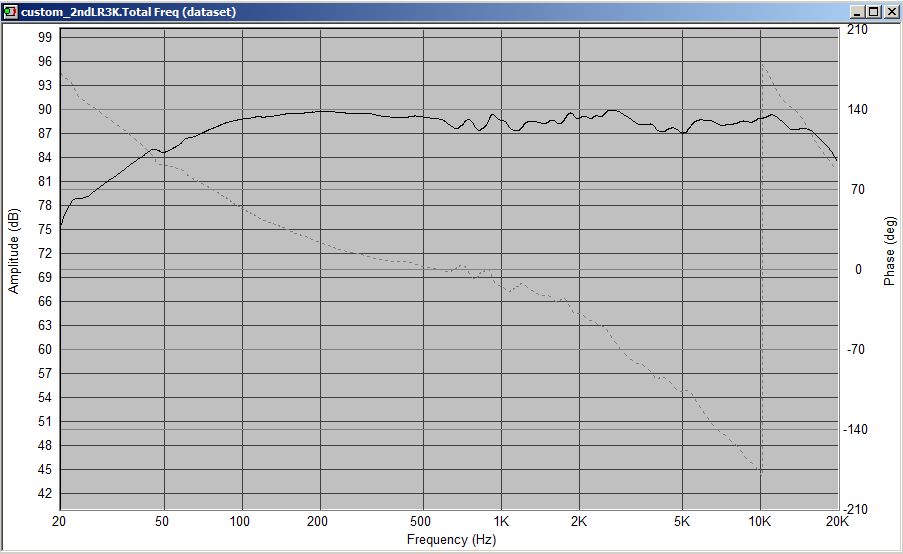
Looks quite a bit better doesn't it?
Next is the reverse null response which shows how well (or not) the drivers are in phase at the crossover frequency.
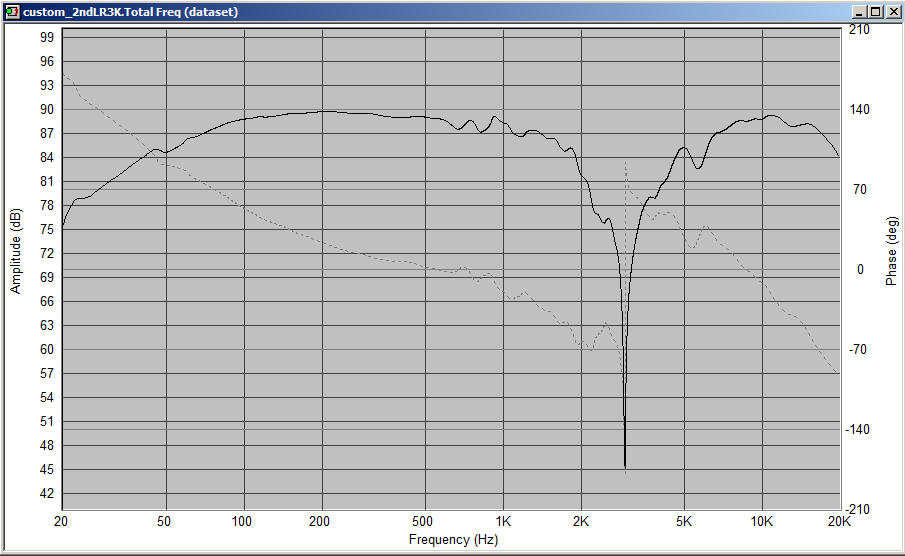
Now we show the individual driver responses and how well they track to the target LR2 curves. Also this graph shows each drivers phase. They do overlap at the crossover frequency but in general the overlap is fairly small, ideally you would have a much wider range where the drivers are in phase...
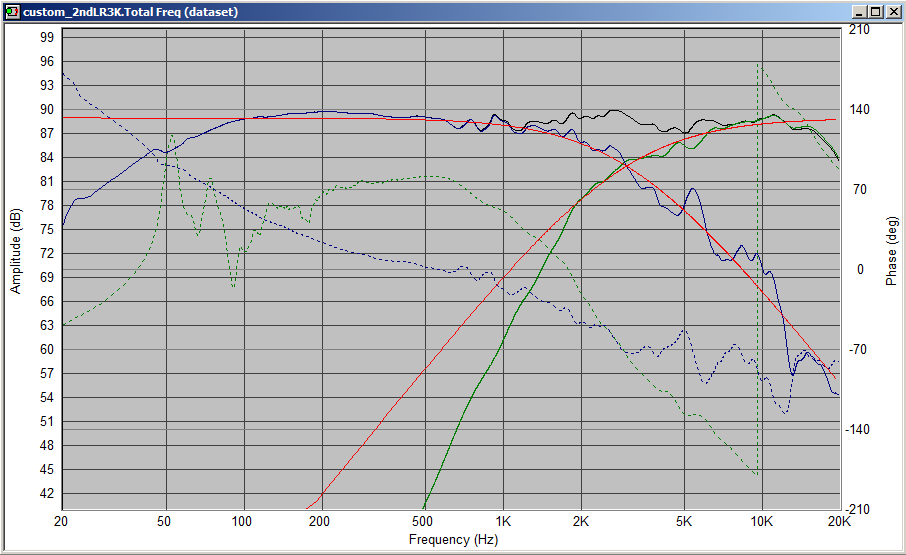
The coil and resistor on the tweeter circuit are there for phase adjustment only. Without them the tweeter follows the target curve better at lower frequencies but the phase alignment is bad at the crossover point.
One last image shows the difference between our custom crossovers response (black) compared to our textbook crossover (blue).
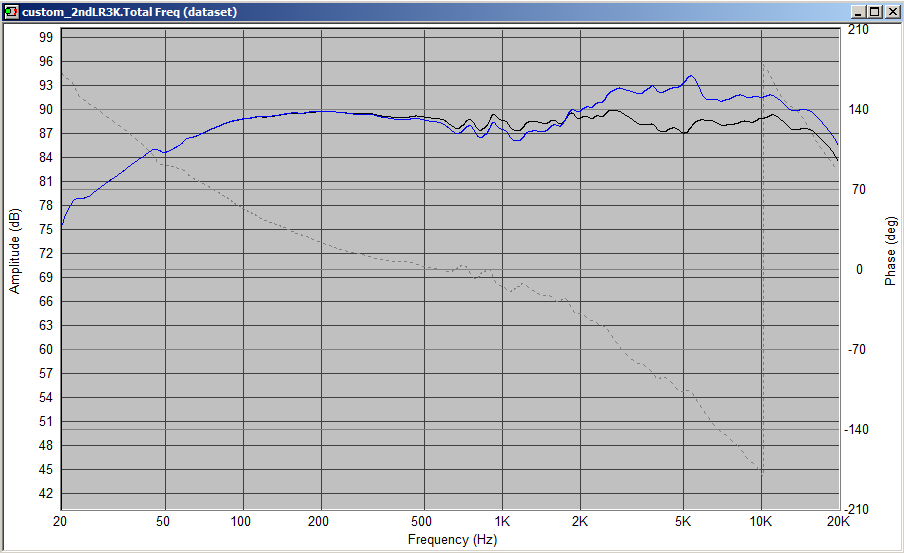
Hopefully this has helped show why a text-book crossover almost certainly will not give you the result that you want.
*if such drivers existed, there would not be any need for a crossover in the first place 😉
Lets keep this thread uncluttered, A separate Designing your own speaker from scratch discussion thread has been created.
This is the easy bit right? Just go to an online calculator put in the frequency you want to crossover at and it will spit out the values right? Or just go to partsexpress and purchase a ready made crossover that crosses over at a suitable frequency.
If only it were this easy. If speakers had a completely flat frequency response, and a completely flat impedance, and the distance from each driver to your ears was the same then yes that would work*, however that is not the case in reality and we need to take these things into account.
A crossover filter does not just cut off the frequency at a particular frequency, it gradually rolls off the speakers responses over a fairly large range. In this range BOTH drivers are adding together to form the sound. For this to work ideally, both drivers need to be adding together equally and need to be in phase with each other through this range.
Lets see what happens with our theoretically flat speaker with a completely flat impedance using our text book crossover. For this we have two speakers which are both 90db efficient, completely flat and have a completely flat 8 ohms resistance. Now if you had such drivers you wouldn't be making a crossover in the first place, but it serves to demonstrate what is happening.
The schematic is for a textbook 2nd order linkwitz riley crossover at 3Khz. Calculated using this online calculator Speaker Crossover Calculators by V-Cap
The graph is showing the summed response of the two drivers and the rolloff of each driver. See how wide the range is where it is both drivers that are summing together to make the flat response (It's almost from 200Hz through to 20Khz)!
Note how there is a step in the frequency response. This is due to the resistance inherent in the inductor which is in series with the woofer. For this sim I used 0.29 ohms for the DCR of the coil. It is not too significant but it does show that even with our perfect drivers we have not got a perfectly flat result with out text book crossover.
Next we will show what happens if we use actual impedance curves for real drivers (but still with our perfectly flat frequency response). I've chosen a Dayton RS150P-8 for the woofer and a Morel DMS37 for the tweeter, as I happen to have frd and zma's for both. Everything is the same except for the real-impedance curves being used in the sim.
Whoah!! What happened to our nice flat response!! Textbook crossovers only give a text book response with a flat impedance, which the above demonstrates very well 🙂. Now it is possible to greatly improve this by using impedance compensation on the drivers, but that is not necessarily something you need to do as you will see later when we do a more optimal crossover.
So now we add in the real responses of the Dayton and Morel drivers and see what we get.
Probably not really what we want! So you can see that if we just used our text book crossover with our two new drivers, that we would likely have a bit of a tweaking job on our hands!
Note that even the above is a very crude estimate of what would really happen, as we have not taken into account how the baffle effects the frequency response of our drivers, or how differences in driver offset on the baffle affects their phase relationship to each other, in reality the above probably looks even better than it would in real life!
One of the things that people starting out with crossover design fail to grasp is that it is the acoustic rolloff of the speaker that is the real goal not the electrical order of the filter. When we say we want a 2nd order linkwitz riley crossover, that doesn't necessarily mean that it will be an electrical linkwitz riley filter (for newbies I would actually suggest that a fourth order LR or bessel filter is much more likely to give them results that they will be happy with, 2nd order acoustic filters are not easy!) After having said that, what I come up with later, does appear to be a 2nd order electrical filter on both the woofer and the tweeter, but it doesn't always have to be. When doing 4th order targets I have achieved it with 2nd order on the woofer and 3rd order on the tweeter, it all depends on the drivers and the frequency you cross them at.
We can demonstrate this concept by adding some target slopes to the third graph. The red lines in the fourth graph are our target 2nd order L/R at 3Khz. These show how our speaker should roll off to get the best blending (assuming we also get the phase right, but more on that a bit later).
As can be seen the drivers are not following the target curves very well at all and the resulting frequency response is pretty awful. I'm sure if you got a result like this you would not be happy and wondering where you had gone wrong! We would be looking at quite a lot of tweaking by ear to sort out this mess, and without actually knowing whether it was the woofer, the tweeter or both that is causing the issue we would be stabbing in the dark.
So instead we can do some virtual tweaking and see what the results are with our sim. As previously stated I have not properly prepared these FRD's or put in proper offsets for drivers so this result is invalid, but is useful for demonstration purposes.
I spent maybe an hour playing around with some tweaks to get a result that is roughly +- 1.5db from approx 70 hz to 16Khz. It also has a good deep reverse null (meaning the drivers are in phase at the crossover frequency). Now of course I already have experience so that makes it faster, but I'm sure that trying to tweak this by ear would take an awful lot longer!
The new circuit is below:
You can see that there has been a few additions, and also changes to values from our original textbook crossover. I used the optimizer on C2 and R4 which is why they have strange looking values, I would normally change them to the nearest standard value but was being lazy.
Below is the resulting frequency response using this new crossover.
Looks quite a bit better doesn't it?
Next is the reverse null response which shows how well (or not) the drivers are in phase at the crossover frequency.
Now we show the individual driver responses and how well they track to the target LR2 curves. Also this graph shows each drivers phase. They do overlap at the crossover frequency but in general the overlap is fairly small, ideally you would have a much wider range where the drivers are in phase...
The coil and resistor on the tweeter circuit are there for phase adjustment only. Without them the tweeter follows the target curve better at lower frequencies but the phase alignment is bad at the crossover point.
One last image shows the difference between our custom crossovers response (black) compared to our textbook crossover (blue).
Hopefully this has helped show why a text-book crossover almost certainly will not give you the result that you want.
*if such drivers existed, there would not be any need for a crossover in the first place 😉
Lets keep this thread uncluttered, A separate Designing your own speaker from scratch discussion thread has been created.
Last edited:
Step 5a Using Manufacturers curves.
So this part is just about what we need to do with those traced manufacturers curves if we are to have a chance of approximating the response on our real baffle and in our real box. Note that this is just an approximation, Ideally you want real measurements of the final implementation for designing your crossover, but as you will hopefully see this can be useful for fine tuning your design before you even cut any wood. Obviously this is optional 🙂
There are a few things about using manufacturers measurements that make them not ideal fro modeling our crossover.
1. They are likely taken on an IEC baffle or an infinite baffle (though sometimes they may even be baffleless). Unless we are planning on mounting our speakers baffles into our wall or have the speakers hard up against a wall then we are most likely going to have to take the baffle step into account.
2. The box (or lack of) used when testing woofers will affect the low end response in the manufacturers curves. Some manufacturers do state all measurement conditions, a lot don't. Most common would be a sealed box (which may vary in size depending on the woofer under test, but 20L is a good guess) or alternatively the driver is just mounted on a large baffle with no box behind. Seas is one company that provides excellent information on their measurement setup DATASHEETS
So what we are going to talk about here is manipulating those manufacturers curves so that we can make them more applicable to our intended use. This guide by Dave Dal farra http://audio.claub.net/software/DaveDalFarra/Simple%20Loudspeaker%20Design%20ver2.pdf is where I first learned about doing these things and is recommended reading 🙂
I'm going to use vituixcad and Jeff Bagby's Baffle diffraction Simuator spreadsheet for doing these steps. We will use the SB17-MFC35-8 that we traced earlier and an SB26STCN-C000-4 tweeter which I have chosen simply because I like the look of it for a not too expensive tweeter.
Now depending on how far you want to take things, we can in fact subtract the IEC baffle response (both SB drivers were measured on an IEC baffle) before we apply our own baffle effects to the measurements. It's an additional step but if you want the highest accuracy it is probably worth doing. If you just want to get a ball park idea how the drivers will go in your design then you can probably skip it (Note that that comment should not make you think that this method is super accurate, but it is better than using the raw manufacturers curves).
Now something I wasn't aware of is that the IEC baffle is not a fixed size but in fact varies depending on driver size. From what I have been able to find it seems that for drivers smaller than 8" it is the same size, but for drivers bigger than 8" it scales up in proportion to the baffle dimensions for the 8" driver. I've done a spreadsheet (attached) which calculates the baffle dimensions and offset for the speaker based on this info I found from the IEC paper on the subject.
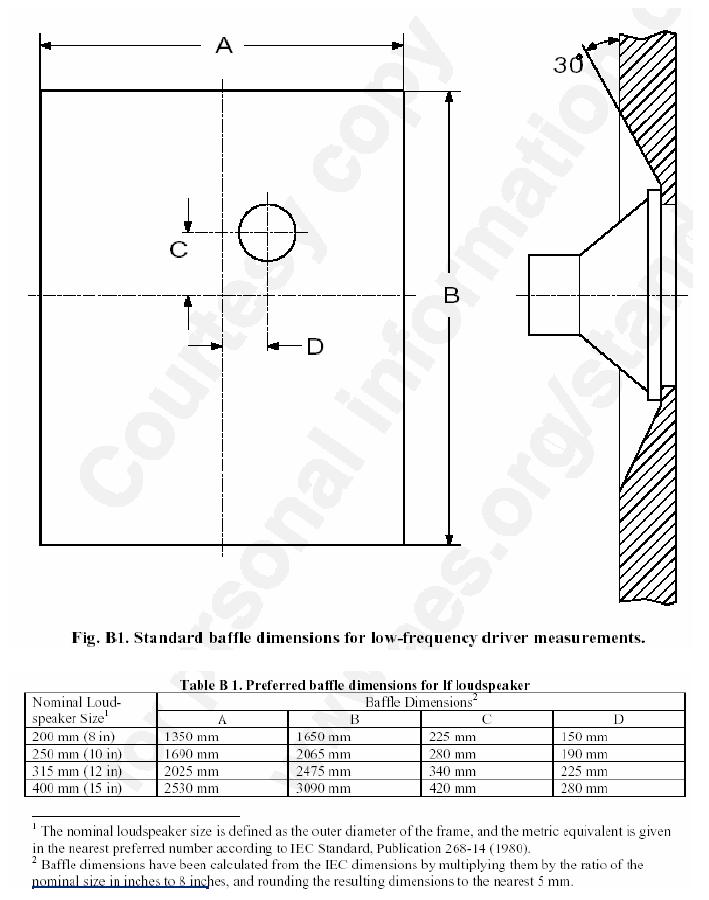
Putting the baffle dimensions for 8" speaker into Jeff's spreadsheet and changing driver diameter to 6" and measurement distance to 12 inches (to match our 6" SB driver and measurement conditions) We have the below:
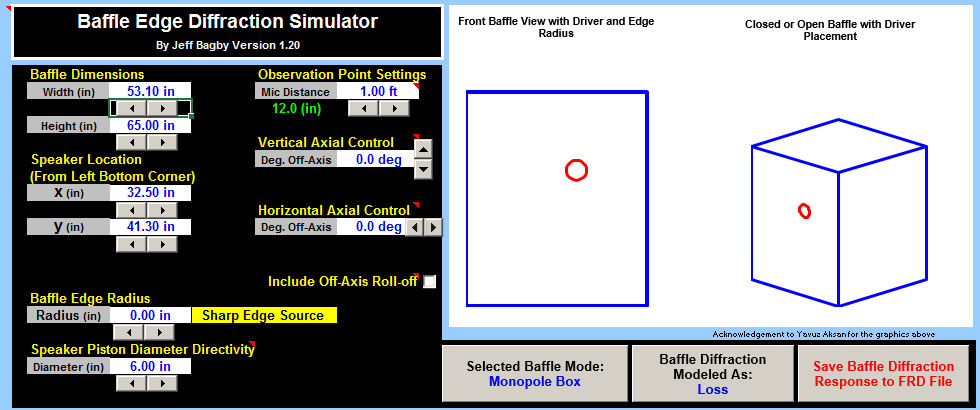
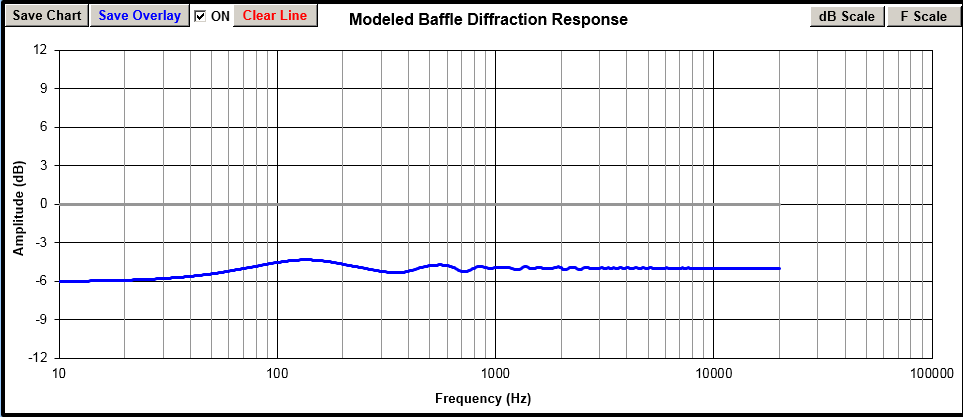
We can save the above diffraction curve and subtract it from our manufacturers measurement to get a true infinite baffle response. However we need to scale the measurement first as we need it to have a zero db reference, and the frd file produced by the baffle diffraction modeler changes the loss if the distance is under 1M. This is necessary because we are going to use divide and multiply functions to subtract our IEC baffle and add in our own baffle, and they need to be at the same baseline or it will mess up our results.
Vituix cad has a calculator menu under tools. We can load our IEC baffle diffraction into slot A in the calculator (you will need to adjust the y axis to show the curve as it is under 0db) when we do this we can see that our measurement is centered on -5db (see below)
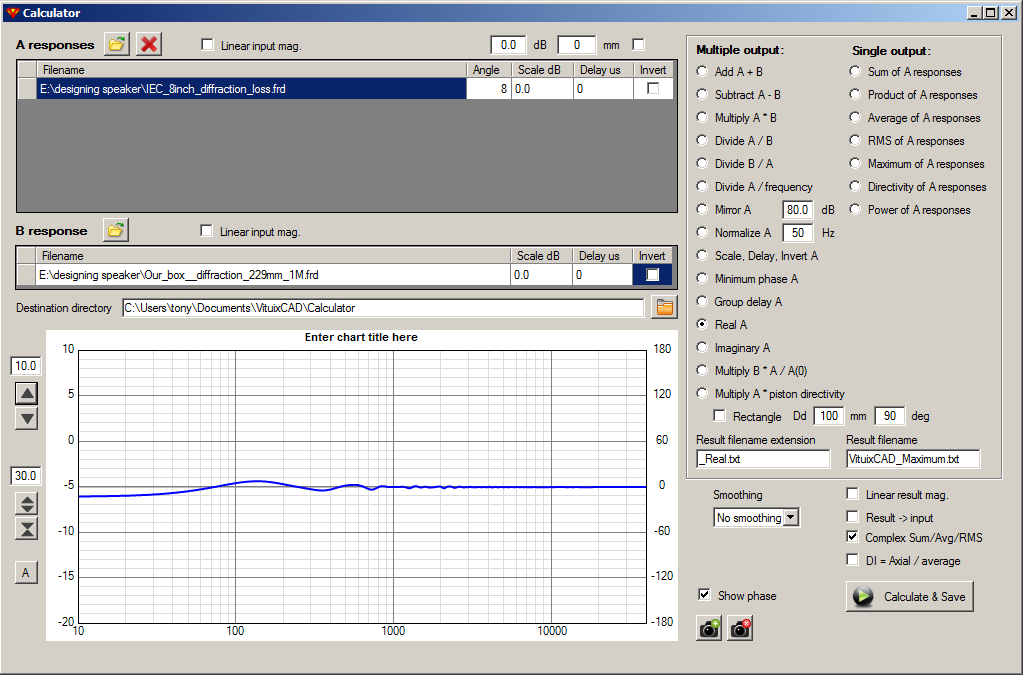
We can now delete this from slot A as we know we need 5db of offset, which can be applied in the scale db box above the measurement. We actually want to load our baffle diffraction file into slot B, and our manufacturers curve into slot A. We will have to readjust the Y scale again when we load our manufacturers curve.
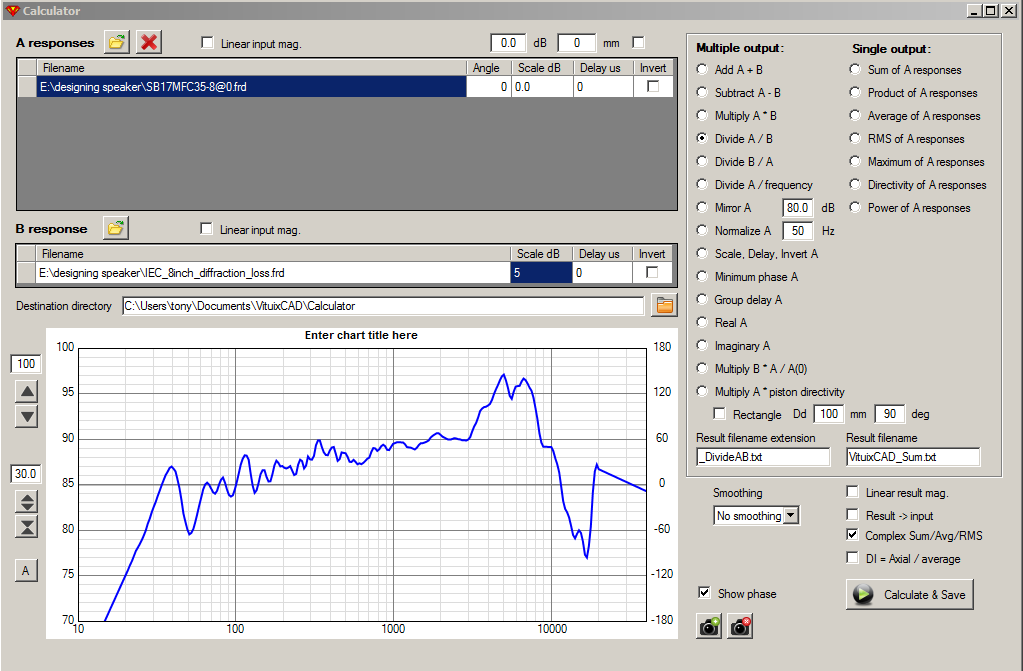
The image above shows our manufacturer curve loaded and the IEC baffle subtracted from the response. The difference is quite subtle, but will be more pronounced if the manufacturers curve you are using was measured at a distance of 1M (and you used that distance when doing the baffle sim). It's not intuitive, but to subtract a response you do not use the subtract function, you use the divide function.
We can now save this modified response curve using the calculate and save button. Pay attention to the dialog box that pops up, it tells you where the frd was saved! You will probably want to copy it somewhere more convenient (and rename it to something that you know what it is) as next time you do a calculation it may overwrite what you have just saved. We will use this just saved response curve for applying our proposed baffle response to.
We now need to calculate the baffle diffraction effect of our own baffle. For this I would recommend setting the distance at at least 3ft (1M) as it will give us a more realistic diffraction (unless you are designing nearfield monitors). Back in the first baffle step post (post #6) we came up with a box with dimensions 513mm X 229mm X 287mm I've done sims with both 513H X 287mm wide, and 513H X 229mm wide, I'm leaning towards the narrower baffle, as the response peak is lower with the narrower baffle (which was a bit of a surprise).
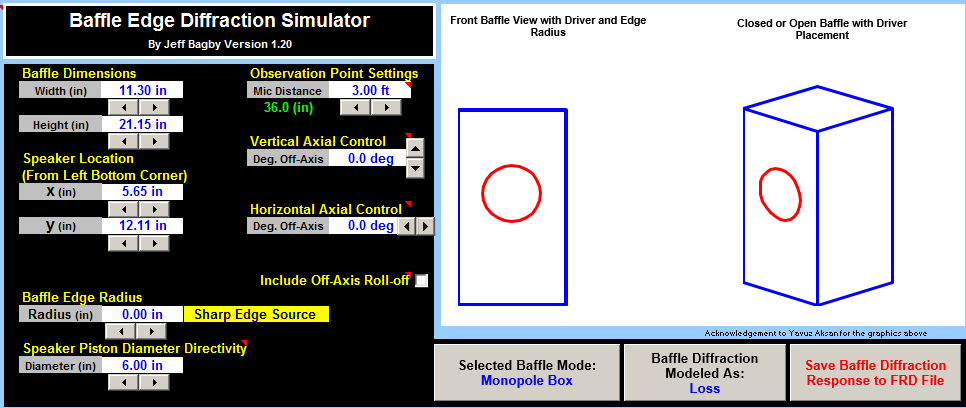
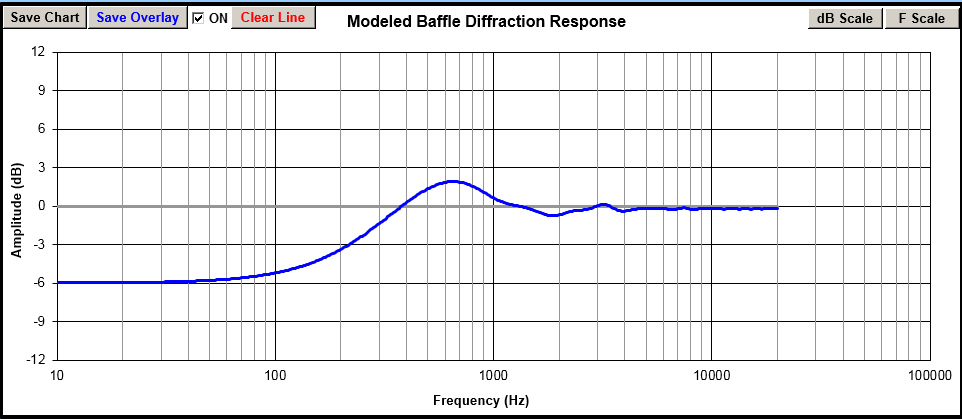
This is the baffle effect for our 287mm wide baffle. As you can see when this is applied to our manufacturers measurement it is going to look quite a bit different.
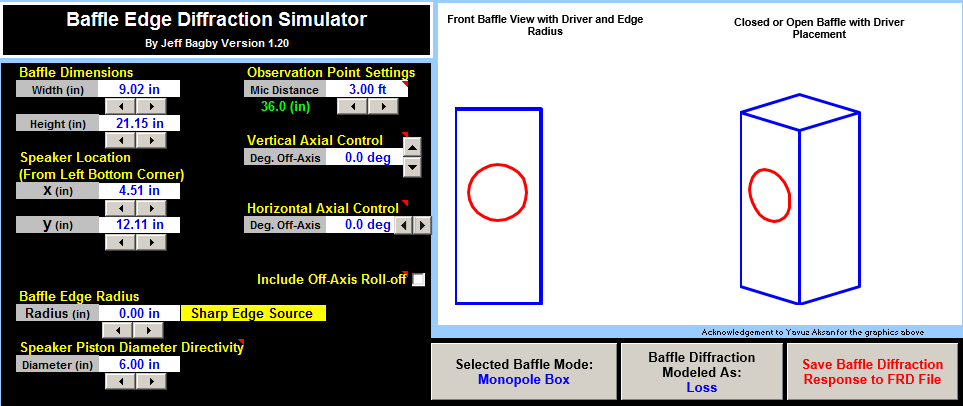
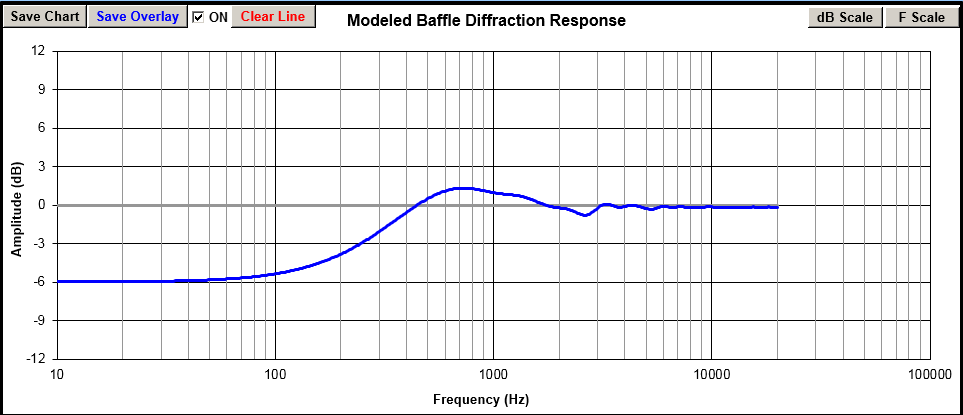
This is with the 229mm wide baffle. My gut feeling is that this will give the better result, but we will apply both and compare to see.
With both of the above sims I decided to leave the woofer centered (horizontally) on the baffle and moved it up and down in the sim until I found something I was happy with. This is where you potentially can try and use the dips and bumps in frequency response to counteract dips and bumps in the speakers response. It won't always work out though, sometimes they can coincide making things much worse, but that is why we want to do this step! Better to be forewarned rather than get a nasty surprise!
Note that you should be able to model the IEC baffle in vituix cad as well. We will use vituixcad for subtracting and adding our baffle effects.
So assuming we have saved the above two baffle responses, we can now load these (along with our IEC baffle corrected response into vituix cad, and apply the baffle step. Load the IEC baffle corrected response into slot A and the baffle simulation we want to apply into slot B. Then use the multiply A X B option.
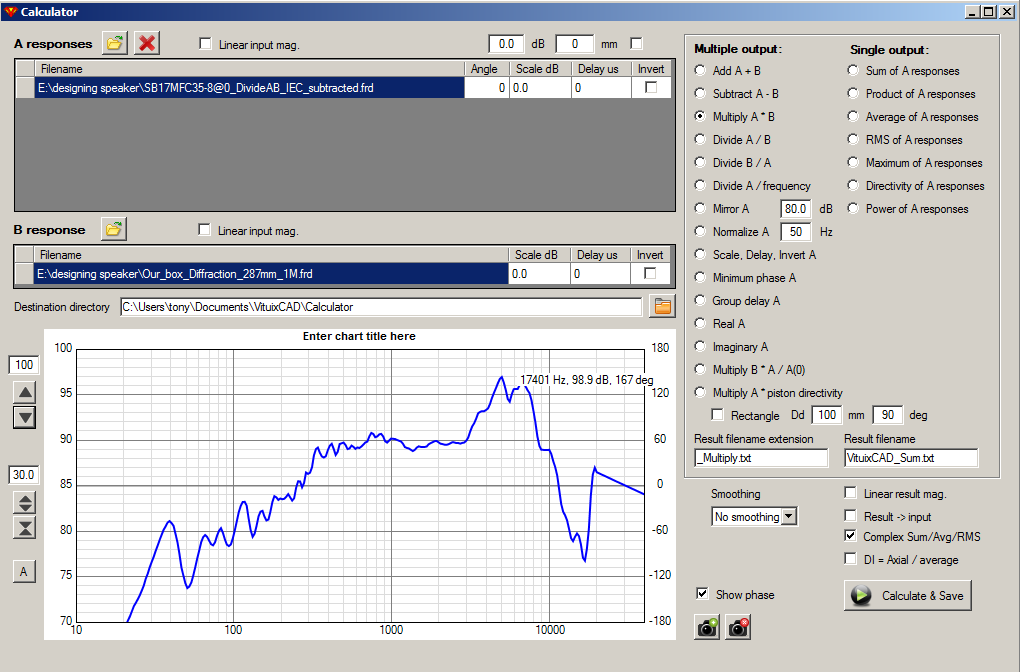
You can swap between no baffle step and baffle step by toggling between "real A" and Multiply A * B Click on the calculate and save button, and go grab the resulting file and copy it somewhere useful, changing the name to indicate which baffle width it was. I did the same with the 229mm width baffle.
I then loaded each of the original manufacturers curve, the 287mm baffle and the 229mm baffle resposnes into speaker workshop (an old favourite) to put each on the same graph to compare.
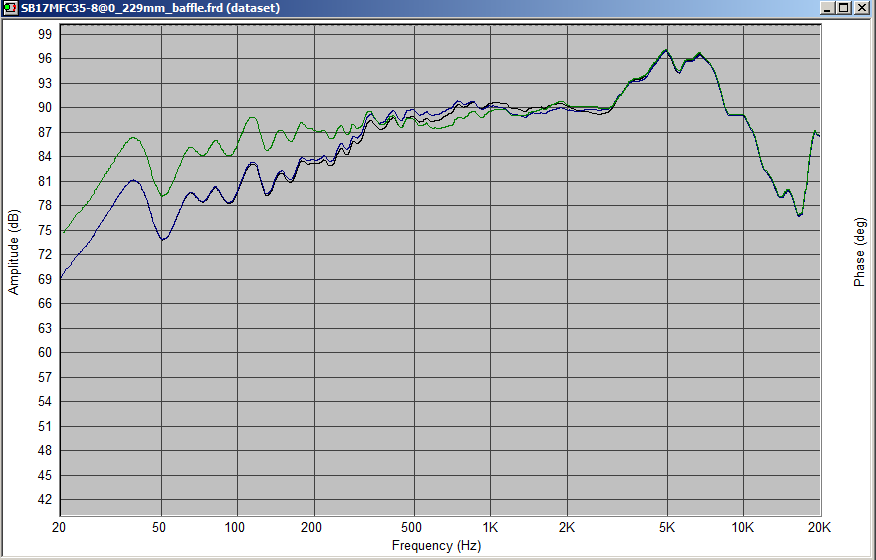
Green is the original manufacturer curve. Blue is the 287mm baffle, and black is the 229mm baffle. One thing is apparent, the bass drops off quite significantly under about 320Hz with either of our chosen baffles!
We can follow the same approach for the tweeter, you may be surprised by how much of an effect the baffle can have on it too.
I chose a small face tweeter from SB accoustics an SB26STCN-C000-4 for the hypothetical speaker I am building. The below screenshot shows how the diffraction looks when I place the tweeter very close to the midbass (reducing the distance between the tweeter and the midbass helps to control lobing).
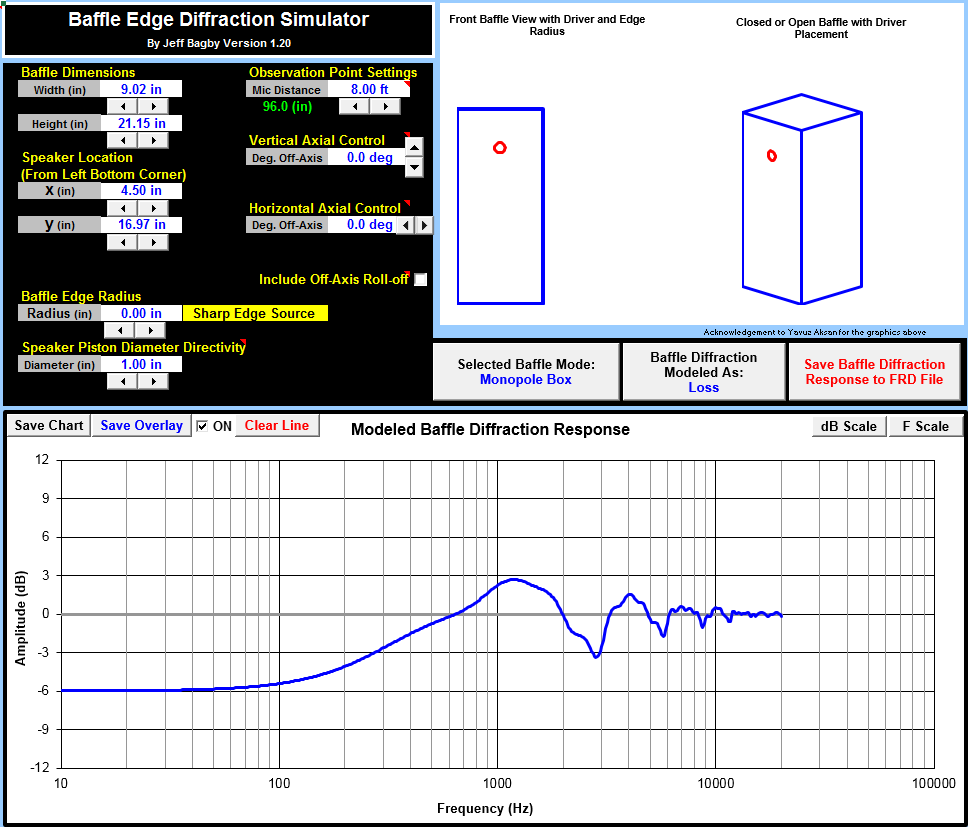
Sorry for the change in image size, I got a new laptop with a higher resolution screen..... Anyway what this shows us is that our tweeter is also going to diverge from what we thought was a quite a flat response if we place it on the baffle in this position, and we just have a standard sharp 90deg edge on our baffle.
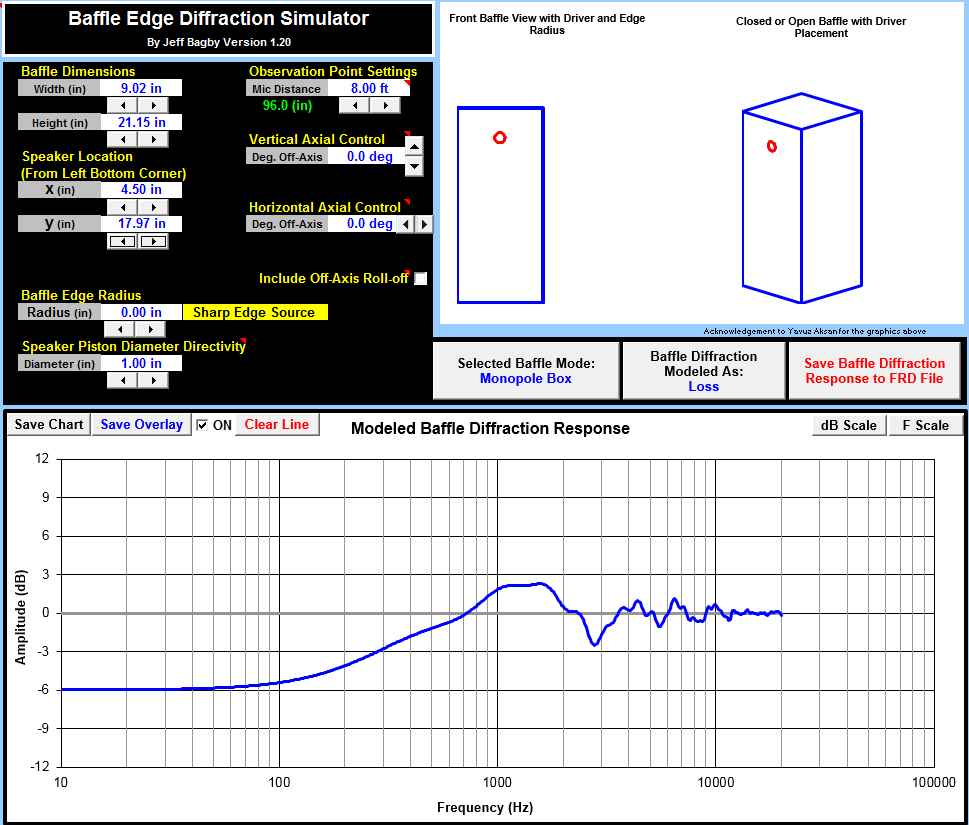
It does get somewhat better if we move it up the baffle around an inch. This is where those tradeoffs come in again! We can move it up a bit to smooth it somewhat but it may have an effect on how we design the crossover as the distance between M and T will be greater.
We could of course revisit our M's placement and see whether moving it up a bit seems acceptable. You may be starting to see the value in doing these sims. It is pretty quick to get a rough estimate of how your baffle design and layout is going to potentially affect your speakers performance. You can save a lot of time and resources! Imagine how much more time and resources is required to keep making new baffles to test another configuration!
But there is another trick we have up our sleeve. We can round or chamfer the baffle edges (felt may also be an option). Lets see what happens if we put a 1" radius on our baffle. Note I'm not sure if this is a chamfer or a roundover, more complex sims such as the FRD consortium one can do both.
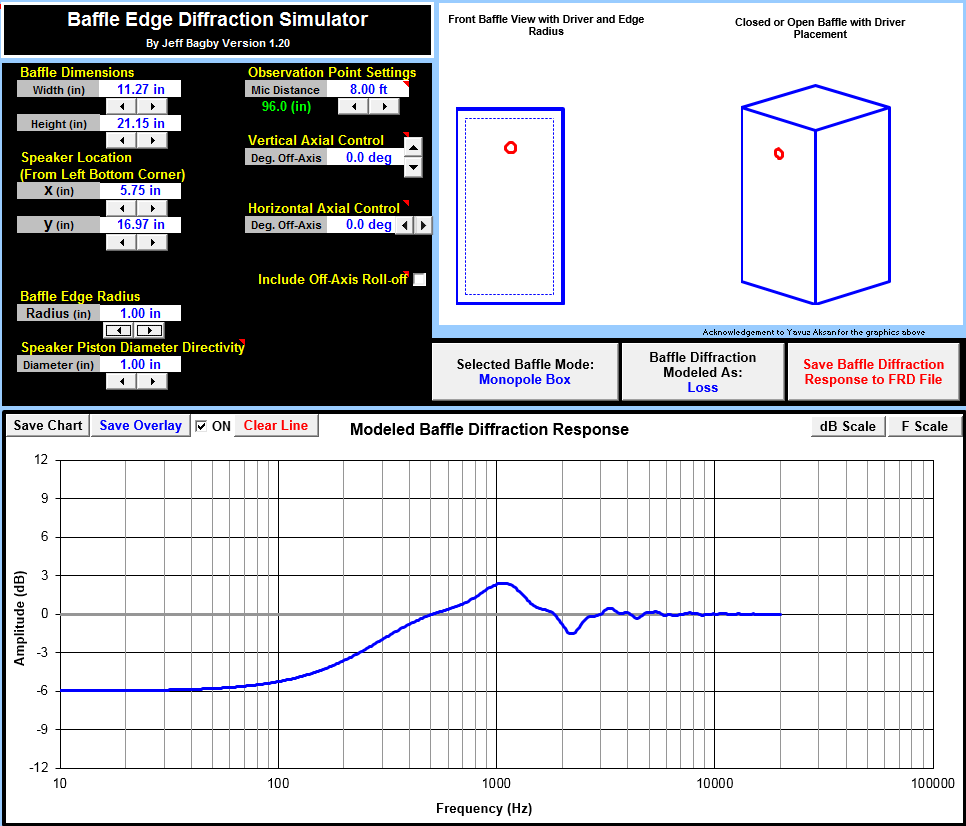
This is the original positioning close to the midbass but with a 1" radius on the edge. As you can see it is significantly smoother. Note that my own experience using a 1" chamfer was that I probably should not have done the chamfer on the bottom of the baffle. In my Case the speaker sits on top of another speaker (sub) and the chamfer forms a cavity that actually introduces some anomalies which are not there without it. This was a good lesson for me about why it is smart to do a prototype!! It's not major so I decided to live with it.
Having found the above we may want to go back and revise the midbass sim (and check that there is enough space now on our baffle to accommodate it!!). Once we have settled on a baffle configuration we can apply our midbass and tweeter Baffle diffraction curves and we are ready for the next step.
I was originally going to cover how to deal with the difference that our box alignment may make in this post as well, but since it is getting so long we might put that into a separate post! A hint of what I'm talking about is in this post https://www.diyaudio.com/forums/multi-way/325406-project-revised.html#post5505274
Oh and I probably should re-iterate. There is no substitute for doing real measurements of the speakers in their actual enclosure. All of the above is to give us an idea, and hopefully help us with design decisions before we cut any wood. It probably can get you a better result (or perhaps I should say starting point) than you would get if you didn't do any measurements at all, but ideally we want to be doing proper measurements in order to get the best idea of what is really going on with our speaker.
One other important point! The effects of the bass drop showing in the baffle step sims above will vary depending on the speaker placement and room, and that needs to be considered when designing the crossover. If you design to completely compensate for this theoretical drop, in a real life setting you will quite likely end up with something out of balance.
Lets keep this thread uncluttered, A separate Designing your own speaker from scratch discussion thread has been created.
So this part is just about what we need to do with those traced manufacturers curves if we are to have a chance of approximating the response on our real baffle and in our real box. Note that this is just an approximation, Ideally you want real measurements of the final implementation for designing your crossover, but as you will hopefully see this can be useful for fine tuning your design before you even cut any wood. Obviously this is optional 🙂
There are a few things about using manufacturers measurements that make them not ideal fro modeling our crossover.
1. They are likely taken on an IEC baffle or an infinite baffle (though sometimes they may even be baffleless). Unless we are planning on mounting our speakers baffles into our wall or have the speakers hard up against a wall then we are most likely going to have to take the baffle step into account.
2. The box (or lack of) used when testing woofers will affect the low end response in the manufacturers curves. Some manufacturers do state all measurement conditions, a lot don't. Most common would be a sealed box (which may vary in size depending on the woofer under test, but 20L is a good guess) or alternatively the driver is just mounted on a large baffle with no box behind. Seas is one company that provides excellent information on their measurement setup DATASHEETS
So what we are going to talk about here is manipulating those manufacturers curves so that we can make them more applicable to our intended use. This guide by Dave Dal farra http://audio.claub.net/software/DaveDalFarra/Simple%20Loudspeaker%20Design%20ver2.pdf is where I first learned about doing these things and is recommended reading 🙂
I'm going to use vituixcad and Jeff Bagby's Baffle diffraction Simuator spreadsheet for doing these steps. We will use the SB17-MFC35-8 that we traced earlier and an SB26STCN-C000-4 tweeter which I have chosen simply because I like the look of it for a not too expensive tweeter.
Now depending on how far you want to take things, we can in fact subtract the IEC baffle response (both SB drivers were measured on an IEC baffle) before we apply our own baffle effects to the measurements. It's an additional step but if you want the highest accuracy it is probably worth doing. If you just want to get a ball park idea how the drivers will go in your design then you can probably skip it (Note that that comment should not make you think that this method is super accurate, but it is better than using the raw manufacturers curves).
Now something I wasn't aware of is that the IEC baffle is not a fixed size but in fact varies depending on driver size. From what I have been able to find it seems that for drivers smaller than 8" it is the same size, but for drivers bigger than 8" it scales up in proportion to the baffle dimensions for the 8" driver. I've done a spreadsheet (attached) which calculates the baffle dimensions and offset for the speaker based on this info I found from the IEC paper on the subject.
Putting the baffle dimensions for 8" speaker into Jeff's spreadsheet and changing driver diameter to 6" and measurement distance to 12 inches (to match our 6" SB driver and measurement conditions) We have the below:
We can save the above diffraction curve and subtract it from our manufacturers measurement to get a true infinite baffle response. However we need to scale the measurement first as we need it to have a zero db reference, and the frd file produced by the baffle diffraction modeler changes the loss if the distance is under 1M. This is necessary because we are going to use divide and multiply functions to subtract our IEC baffle and add in our own baffle, and they need to be at the same baseline or it will mess up our results.
Vituix cad has a calculator menu under tools. We can load our IEC baffle diffraction into slot A in the calculator (you will need to adjust the y axis to show the curve as it is under 0db) when we do this we can see that our measurement is centered on -5db (see below)
We can now delete this from slot A as we know we need 5db of offset, which can be applied in the scale db box above the measurement. We actually want to load our baffle diffraction file into slot B, and our manufacturers curve into slot A. We will have to readjust the Y scale again when we load our manufacturers curve.
The image above shows our manufacturer curve loaded and the IEC baffle subtracted from the response. The difference is quite subtle, but will be more pronounced if the manufacturers curve you are using was measured at a distance of 1M (and you used that distance when doing the baffle sim). It's not intuitive, but to subtract a response you do not use the subtract function, you use the divide function.
We can now save this modified response curve using the calculate and save button. Pay attention to the dialog box that pops up, it tells you where the frd was saved! You will probably want to copy it somewhere more convenient (and rename it to something that you know what it is) as next time you do a calculation it may overwrite what you have just saved. We will use this just saved response curve for applying our proposed baffle response to.
We now need to calculate the baffle diffraction effect of our own baffle. For this I would recommend setting the distance at at least 3ft (1M) as it will give us a more realistic diffraction (unless you are designing nearfield monitors). Back in the first baffle step post (post #6) we came up with a box with dimensions 513mm X 229mm X 287mm I've done sims with both 513H X 287mm wide, and 513H X 229mm wide, I'm leaning towards the narrower baffle, as the response peak is lower with the narrower baffle (which was a bit of a surprise).
This is the baffle effect for our 287mm wide baffle. As you can see when this is applied to our manufacturers measurement it is going to look quite a bit different.
This is with the 229mm wide baffle. My gut feeling is that this will give the better result, but we will apply both and compare to see.
With both of the above sims I decided to leave the woofer centered (horizontally) on the baffle and moved it up and down in the sim until I found something I was happy with. This is where you potentially can try and use the dips and bumps in frequency response to counteract dips and bumps in the speakers response. It won't always work out though, sometimes they can coincide making things much worse, but that is why we want to do this step! Better to be forewarned rather than get a nasty surprise!
Note that you should be able to model the IEC baffle in vituix cad as well. We will use vituixcad for subtracting and adding our baffle effects.
So assuming we have saved the above two baffle responses, we can now load these (along with our IEC baffle corrected response into vituix cad, and apply the baffle step. Load the IEC baffle corrected response into slot A and the baffle simulation we want to apply into slot B. Then use the multiply A X B option.
You can swap between no baffle step and baffle step by toggling between "real A" and Multiply A * B Click on the calculate and save button, and go grab the resulting file and copy it somewhere useful, changing the name to indicate which baffle width it was. I did the same with the 229mm width baffle.
I then loaded each of the original manufacturers curve, the 287mm baffle and the 229mm baffle resposnes into speaker workshop (an old favourite) to put each on the same graph to compare.
Green is the original manufacturer curve. Blue is the 287mm baffle, and black is the 229mm baffle. One thing is apparent, the bass drops off quite significantly under about 320Hz with either of our chosen baffles!
We can follow the same approach for the tweeter, you may be surprised by how much of an effect the baffle can have on it too.
I chose a small face tweeter from SB accoustics an SB26STCN-C000-4 for the hypothetical speaker I am building. The below screenshot shows how the diffraction looks when I place the tweeter very close to the midbass (reducing the distance between the tweeter and the midbass helps to control lobing).
Sorry for the change in image size, I got a new laptop with a higher resolution screen..... Anyway what this shows us is that our tweeter is also going to diverge from what we thought was a quite a flat response if we place it on the baffle in this position, and we just have a standard sharp 90deg edge on our baffle.
It does get somewhat better if we move it up the baffle around an inch. This is where those tradeoffs come in again! We can move it up a bit to smooth it somewhat but it may have an effect on how we design the crossover as the distance between M and T will be greater.
We could of course revisit our M's placement and see whether moving it up a bit seems acceptable. You may be starting to see the value in doing these sims. It is pretty quick to get a rough estimate of how your baffle design and layout is going to potentially affect your speakers performance. You can save a lot of time and resources! Imagine how much more time and resources is required to keep making new baffles to test another configuration!
But there is another trick we have up our sleeve. We can round or chamfer the baffle edges (felt may also be an option). Lets see what happens if we put a 1" radius on our baffle. Note I'm not sure if this is a chamfer or a roundover, more complex sims such as the FRD consortium one can do both.
This is the original positioning close to the midbass but with a 1" radius on the edge. As you can see it is significantly smoother. Note that my own experience using a 1" chamfer was that I probably should not have done the chamfer on the bottom of the baffle. In my Case the speaker sits on top of another speaker (sub) and the chamfer forms a cavity that actually introduces some anomalies which are not there without it. This was a good lesson for me about why it is smart to do a prototype!! It's not major so I decided to live with it.
Having found the above we may want to go back and revise the midbass sim (and check that there is enough space now on our baffle to accommodate it!!). Once we have settled on a baffle configuration we can apply our midbass and tweeter Baffle diffraction curves and we are ready for the next step.
I was originally going to cover how to deal with the difference that our box alignment may make in this post as well, but since it is getting so long we might put that into a separate post! A hint of what I'm talking about is in this post https://www.diyaudio.com/forums/multi-way/325406-project-revised.html#post5505274
Oh and I probably should re-iterate. There is no substitute for doing real measurements of the speakers in their actual enclosure. All of the above is to give us an idea, and hopefully help us with design decisions before we cut any wood. It probably can get you a better result (or perhaps I should say starting point) than you would get if you didn't do any measurements at all, but ideally we want to be doing proper measurements in order to get the best idea of what is really going on with our speaker.
One other important point! The effects of the bass drop showing in the baffle step sims above will vary depending on the speaker placement and room, and that needs to be considered when designing the crossover. If you design to completely compensate for this theoretical drop, in a real life setting you will quite likely end up with something out of balance.
Lets keep this thread uncluttered, A separate Designing your own speaker from scratch discussion thread has been created.
Last edited:
step 5b doing a real crossover sim
Stay tuned.
Lets keep this thread uncluttered, A separate Designing your own speaker from scratch discussion thread has been created.
Stay tuned.
Lets keep this thread uncluttered, A separate Designing your own speaker from scratch discussion thread has been created.
Last edited:
placeholder
future posts.
Lets keep this thread uncluttered, A separate Designing your own speaker from scratch discussion thread has been created.
future posts.
Lets keep this thread uncluttered, A separate Designing your own speaker from scratch discussion thread has been created.
Last edited:
placehoder
future posts.
Lets keep this thread uncluttered, A separate Designing your own speaker from scratch discussion thread has been created.
future posts.
Lets keep this thread uncluttered, A separate Designing your own speaker from scratch discussion thread has been created.
Last edited:
placeholder
Lets keep this thread uncluttered, A separate Designing your own speaker from scratch discussion thread has been created.
Lets keep this thread uncluttered, A separate Designing your own speaker from scratch discussion thread has been created.
Last edited:
placeholder
Lets keep this thread uncluttered, A separate Designing your own speaker from scratch discussion thread has been created.
Lets keep this thread uncluttered, A separate Designing your own speaker from scratch discussion thread has been created.
Last edited:
placeholder
Lets keep this thread uncluttered, A separate Designing your own speaker from scratch discussion thread has been created.
Lets keep this thread uncluttered, A separate Designing your own speaker from scratch discussion thread has been created.
Oh and just in case all of my footers scare anyone off. If you do have any supplementary material to post (as I am only scratching the surface), suggestions or corrections, then please do so in this thread 🙂
I've put a number of placeholder posts. I may not use them all, the idea is just to give me enough room to finish what is somewhere (still not fully gelled) in my brain. I was originally going to wait till I had finished all of the material before posting, but it had sat idle for over three years, and was awakened by a post by fatmarley, so after some prompting by Planet10 I decided to bite the bullet and put it out there.
Tony.
Dead link 🙁It’s an SB acoustics SB17MFC35-8 6.5" Poly Cone Woofer.
https://sbacoustics.com/product/6in-sb17mfc35-8/
- Home
- Loudspeakers
- Multi-Way
- So you want to design your own speaker from scratch!
