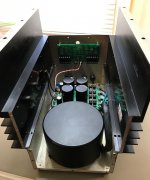
Just a quick sneak peek of what I'm working on.. Old hardwired cap multiplier PS ripped out, CLC with active bridge installed. Quite a bit more rail voltage and capacitance than what it had. Test fit / mockup of the butchered... uh modified Stasis FE here. Doing some careful trace gymnastics to add a single-ended emitter follower with CCS to drive the autoformer.
Attachments


It's SS R.3, STASIS / STASISSY FE, DIY FE '22, NP discrete opamp article .pdf figure 14-B..... put in a blender and see what pours out.... 
20dB gain power amp. Front End= 14.5dB gain + passive VAS autoformer / OS= 5.5dB
(I'm going to tie the FE output to "8J" on SissySIT pcb.)
This is just a more elegant / different version of something I was messing with a couple of years ago.... BA2018 + Jensen autoformer (wired +6dB) + F4
(I'm going to tie the FE output to "8J" on SissySIT pcb.)
This is just a more elegant / different version of something I was messing with a couple of years ago.... BA2018 + Jensen autoformer (wired +6dB) + F4
Last edited:

1st monoblock reassembled, and it plays. Not too good straight from cold start. But improving quickly after some run-in. I think everything needs a little time to settle down. Need to get the other channel completed now for a proper test. So, who wins in the octagon... hot dog discrete vs integrated OPA828/buffer FE, CLC vs Cap Mx PS, 22.5 vs 28 volt rails, 6db vs 12db Cinemag, active bridge vs legacy bridge, fancy cap vs fru fru cap.... "are you ready?".. "are you ready?".. "lets get it on!!"... 
Attachments

Those power supply boards are nice, and they fit perfect in there. I attached a couple of inductors to the floor of my chassis so I removed the big .15 ohm power resistors to go CLC there. Used tall standoffs to raise the board up. I have XT60 connectors on everything to make life easier and be able to quickly try other options (i.e. CRC vs CLC).
Was able to get the 2nd channel up and going last night. Early first impressions.. and most of this stuff is subtle... Soundstage width about the same (very good), better and more noticeable depth. More exciting to listen to, more detail and resolution, more punch, more vivid. The previous configuration was maybe a little "dark" sometimes, smoother, and more laid back. The higher frequencies were maybe a touch more accurate with the old amps though. Need more time on everything. Both my ears and the hardware.
The amps are ultra quiet, can't tell they are powered on with the "ear-1mm-from-speaker-cone" test. So I'm definitely happy about that.
Great job. 👍
You have two major changes at the same time and it would be very interesting to know which building block brings specific improvement.
For comparison and discussion, it would be helpful to explain how do you evaluate soundstage depth. Is it how far behind loudspeakers is positioned main body of artist and instruments or is it relative difference in depth position of instruments on the stage, as perceived from the listening position?
You have two major changes at the same time and it would be very interesting to know which building block brings specific improvement.
This is what I would expect going from Cap Mx to CLC and some 4.5V higher supply rails. For the soundstage and details, hopefully you will be able to tell. It may be lucky synergy of both components.More exciting to listen to, more detail and resolution, more punch, more vivid.
For comparison and discussion, it would be helpful to explain how do you evaluate soundstage depth. Is it how far behind loudspeakers is positioned main body of artist and instruments or is it relative difference in depth position of instruments on the stage, as perceived from the listening position?
Hi tombo,
Yes you are right. Would be a more valuable learning experience to change one thing at a time to gain a better understanding. At some point I should try the "Blasphemy" IPS again, with this PS configuration. When I spoke of depth, there was one music selection in particular where vocals were up close and center (about even with speakers), with instruments ~8 feet back from there. Obviously the quality of the recording matters here to get the effect. Top flight hardware, along with good room acoustics compounds and magnifies the differences in source material, both good and bad I've found...
Yes you are right. Would be a more valuable learning experience to change one thing at a time to gain a better understanding. At some point I should try the "Blasphemy" IPS again, with this PS configuration. When I spoke of depth, there was one music selection in particular where vocals were up close and center (about even with speakers), with instruments ~8 feet back from there. Obviously the quality of the recording matters here to get the effect. Top flight hardware, along with good room acoustics compounds and magnifies the differences in source material, both good and bad I've found...
You guys are making me wish I would've gone CLC instead of Cap Mx now...This is what I would expect going from Cap Mx to CLC

The CapMx supply needs to have a bulk bypass capacitor on the output. At least 10,000 uF, and can benefit from up to 30,000 uF on each rail. It’s probably easy to add inside the chassis close to the channel boards.
The CapMx circuit is a good ripple eater, but it doesn’t provide good energy storage.
The CapMx circuit is a good ripple eater, but it doesn’t provide good energy storage.
Indeed, I did add 22mF at the output of mine per your earlier recommendation, which I very much appreciate Tungsten!
@von Ah
It's funny you mention that...
My MicroAudio SMPS is getting dusty now as it's awaiting ZM's release of the XA252.... 😉

I've heard very good things about Sam's SMPS in other DIY builds. This one has 132,000uF of Mundorf mlytics at the output.
Interested in seeing how this ends up as it goes against the grain of Class A LPS.
@von Ah
It's funny you mention that...
My MicroAudio SMPS is getting dusty now as it's awaiting ZM's release of the XA252.... 😉
I've heard very good things about Sam's SMPS in other DIY builds. This one has 132,000uF of Mundorf mlytics at the output.
Interested in seeing how this ends up as it goes against the grain of Class A LPS.
That's a beast! Don't let more dust gather. Sami's SMPS are great. I have a few of them in my various builds -- Class A, Class AB, Class D...
I'm a little backward in my power supply journey as I'm now in the middle of building my first linear power supply: full-on CLC in its own chassis, to play around with different Class A amps.
I'm a little backward in my power supply journey as I'm now in the middle of building my first linear power supply: full-on CLC in its own chassis, to play around with different Class A amps.
- Home
- Amplifiers
- Pass Labs
- SissySIT R.3