
I noticed that instead of a cone of light I got a bar
Heya Will the reason this is happening is because you arent using a point source light. 😉
Trev🙂
because you arent using a point source light
I was thinking that - I guess that I will have to find a better
light source
I will go with a Metal Halide setup
500W halogen would work but the heat would kill my
small room - and a 250w Metal Halide should be as
bright as a 500w halogen and a lot less heat
250-300w is as high as I want to go to save power
So now I have to find a cheap Metal Halide setup that will
work in a projector 😕

and I still want to gut the OHP and put in a wooden box
and hang from the ceiling - like a real projector
will1384 said:
I was thinking that - I guess that I will have to find a better
light source
I will go with a Metal Halide setup
500W halogen would work but the heat would kill my
small room - and a 250w Metal Halide should be as
bright as a 500w halogen and a lot less heat
250-300w is as high as I want to go to save power
So now I have to find a cheap Metal Halide setup that will
work in a projector 😕
and I still want to gut the OHP and put in a wooden box
and hang from the ceiling - like a real projector
Heya will, sorry for the late reply buddy i missed this post for some reason 🙂 .
All i can say is your definatley on the right track, moving from halogen to metal halide is the only way to go, as you know halogen are just too hot and the light colour is just too yellow.
A 250w metal halide like the one diylabs sells puts out 2x of what a 500w halogen puts out, from memory the 500w halogen puts out 10000lm, while the 250w hqi metal halide bulbs put out 20000lm, beleive me you see the difference. The bulb i recomend you to get is a hqi metal halide with it being double ended and carrying the fc2 sockets, (the same as diylabs). The one i use is hard to find in the usa but its the best for this aplication, its a hqi-tsd with an inbuilt uv filter, it also has a higher colour temperature being 5100k.
The metal halide is also a point source, you will have far less image dramas now then you thought possible moving from the halogen, you will get a very nice image 😉.
Another thing ill bring up as you mentioned is the heat, a 250w mh bulb will put out atleast half the heat of the halogen and yet yeald more light.
Besure to keep us posted on your progress Will, and keep up the great work and ideas.
Trev🙂
Here is some of the mesurements of the Apollo 15000
OHP - Its close - I used a tape mesure
17 1/4 inch max focus - between the bottom of lens assembly
and top of OHP
10 7/8 inch min focus - between the bottom of lens assembly
and top of OHP
Fensnell 11 1/4 inch by 11 1/4 inch
projector hight 9 1/2 inch without focus arm
projector hight 22 3/4 inch with focus arm - not lens assembly
projector hight 27 inch with focus arm and lens assembly
Frensnell is 7 3/4 inch above the bottom metal of the light fixture
Sharp QA-1250 13 inch wide, 10 5/8 long, 2 1/8 thick
I am getting the measurements so I can make a box to
put it all in - I may just buy a trunk or big tool box ,ect ect
my wood working skills suck - a steamer trunk would look
better than my lop sided hand made box and easy to work on
I looked around - diyprojectorcompany.com is just
about the cheapest I found for the 250w HQI metal
halide setup But thats still $160 + $12 shipping -
You could get the old style ballast that cost about
$40 and buy the big lamp and mogul Socket
but all of that still costs about $80 and the ballast
its huge and heavy +hot and its harder to work
with - I went with the HQI it will be here next week
A 500w to 600w halogen flood light would have
worked but thats way to hot and electricity cost
money
I would like to use this a lot, every day - So in the long
run its worth the cost
I will start a new post in "DIY Projectors" when I gut
the OHP and make a projector
Thanks
will, I'm planning the same. If it means anything to you, you can save a few inches of space by moving the left side curcuit board over to the other. its not much but the other advantage would be having all plug inputs, power switch and speaker on one side. They are just regular wires as you probly know. You could move the buttons too if you're real keen, getting everything on one panel.
Im gonna do that, trim the plastic case with a dremel and re-seal for airflow over the lcd.
No money for a light as yet, but in a month or so I get a break from uni and I'll get my *** into gear.
Looking forward to seeing how the panel perfroms with a decent light behind it, I love my set up as-is, but I always think it could be a lot better with a few more lumens. Keep us informed!
I will leave the panel alone - its so dusty here - I would be
better for me to clean the out side of the unit than
the lcd and scratch it
- Its so dusty here I will have to clean it every month or 2
its just harsh on stuff like that here - so the more protection
the better - I will just get a huge trunk and put it all in -
it will be hung from the ceiling and I am lazy - its easy to
work on when the box just opens up easy - and has a handle
already so its easy to take some ware
here is the new post
http://www.diyaudio.com/forums/showthread.php?s=&threadid=44839
and what it looks like now
http://www.diyaudio.com/forums/showthread.php?s=&threadid=44839
and what it looks like now
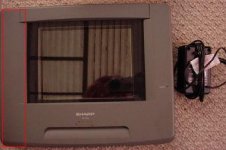
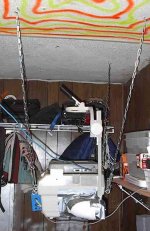
I put it all in a trunk got it working and then messed it up
by trying to make it better - I have worked a week on the
trunk staying up late nights - And I need a break -
Now I have put all of it back into the old OHP just to take a
break
Have a laugh and look at this funky nasty waste of duct tape
 - but it works - and I got to watch some TV - every one
thats sean it has died laughing, Sad thing, me to
- I thought I would share it - I will wait a week and decide
what to do
by trying to make it better - I have worked a week on the
trunk staying up late nights - And I need a break -
Now I have put all of it back into the old OHP just to take a
break
Have a laugh and look at this funky nasty waste of duct tape
- but it works - and I got to watch some TV - every onethats sean it has died laughing, Sad thing, me to
- I thought I would share it - I will wait a week and decide
what to do
Attachments
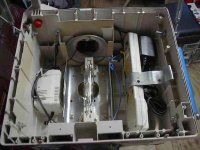
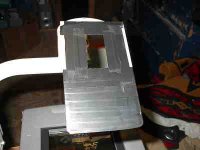
One last image - I had to use a lot of duct tape
to cover the holes dont worry I am using 2 12v fans
1 in and 1 out and 4in sewer pipe for air ducts and
to stop the light - I ran it for 6 hours and only luke
warm air came out - the only heat damage was the
yellowing from UV light - well this it for this ugly duck
on to bigger and better things
to cover the holes dont worry I am using 2 12v fans
1 in and 1 out and 4in sewer pipe for air ducts and
to stop the light - I ran it for 6 hours and only luke
warm air came out - the only heat damage was the
yellowing from UV light - well this it for this ugly duck
on to bigger and better things
Attachments

I have been using for a week - I almost melted my frensel
- I think air is getting traped at the top, inside of the
OHP, I am still getting only luke warm air out the vent fan
I removed the frensel and put it in top of the OHP
and then set the LCD panel on top - This is just temp
I am waiting for my MkIII projector kit
If you do retrofit a OHP with a HQI put a fan for a vent
as far up at the top as you can blowing out or you might
melt something
- Status
- Not open for further replies.
- Home
- General Interest
- Everything Else
- The Moving Image
- Lighting and OHP
- Sharp QA-1200 - and seting up a room