Thank You
Attachments

A search for US Amps 100HC may return more results.
This all came from different forums:
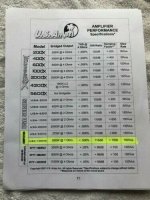
Specs per 92 catalog/ USA-100HC
----------------------------------------
4ohm-50x2
2ohm-100x2
1ohm-200x2
.5ohm-400x2
Bridged@1ohm=800
2x8awg powerwire input
THD <.009%
IMD <.03
Signal to noise ratio 115db
Frequency response 5hz-50khz
Slew rate 150Vus
Input sensitivity 250mv/10V
Vari-loud/NO
Preamp outputs/NO
Active crossover/NO
FUSE/100A
DIMENSIONS 7.7x2.3x20 inches
Damping factor 1000
This all came from different forums:
Specs per 92 catalog/ USA-100HC
----------------------------------------
4ohm-50x2
2ohm-100x2
1ohm-200x2
.5ohm-400x2
Bridged@1ohm=800
2x8awg powerwire input
THD <.009%
IMD <.03
Signal to noise ratio 115db
Frequency response 5hz-50khz
Slew rate 150Vus
Input sensitivity 250mv/10V
Vari-loud/NO
Preamp outputs/NO
Active crossover/NO
FUSE/100A
DIMENSIONS 7.7x2.3x20 inches
Damping factor 1000
Attachments
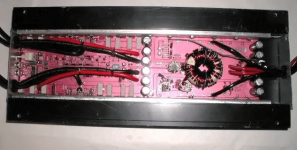
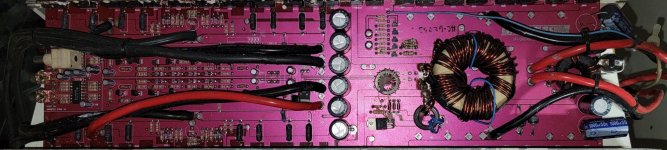
My appreciation goes beyond words sir. Not only the leg work but the photos and documentation are a GOD send. I'm gonna do a quick visual comparison of my amp against the pic provided and look for anything obviously wrong. I'm a problem finder/solver by nature, but unfortunately not an electrician or an audio technician. I do agree with you on the restoration and agree that she may work now. So with the info, you provided along with my love for vintage ill find someone I trust to test her and we'll see where she stands. Thanks again and ill keep ya updatedIMO absolutely worth bringing it to working order if it is not already.
It appears from what I can find you have the early version of the 100HC.
The manual below shows some more info on the 100HC on pg 15.
(0)zeroHow much experience do you have with amplifier repair?
I strongly suggest that you read the following page to help prevent making simple mistakes:
http://www.bcae1.com/repairbasicsforbcae1/repairbasics.htm
Was the amplifier disassembled when you received it?
http://www.bcae1.com/repairbasicsforbcae1/repairbasics.htm
Was the amplifier disassembled when you received it?
You bet!My appreciation goes beyond words sir. Not only the leg work but the photos and documentation are a GOD send. I'm gonna do a quick visual comparison of my amp against the pic provided and look for anything obviously wrong. I'm a problem finder/solver by nature, but unfortunately not an electrician or an audio technician. I do agree with you on the restoration and agree that she may work now. So with the info, you provided along with my love for vintage ill find someone I trust to test her and we'll see where she stands. Thanks again and ill keep ya updated
(0)How much experience do you have with amplifier repair?
No, it wasn't. Yes, I was very meticulous in keeping up with the parts and documenting and making notes. I knew from my research and common sense that me asking you guys to tell me what was in the box wouldn't be fair if I hadn't at least opened the box. No, I AM NOT entertaining any thoughts of making this a DIY What You Coulda Had story. I'm 51 with above average intelligence and a good bit of common sense, and I've learned over the years not to look a gift horse in the mouth. I helped a friend clean out a couple of storage buildings he bought and as payment he told me to pick what I wanted, knowing he had no interest in the music of today's time, I chose this amplifier and a custom-built enclosure holding a KICKER 15" L7 DVC 2ohm. All the wiring for installation and believe it or not 8 gauge speaker wire. When I realized that that particular sub, which I'm very familiar with may have been pushed by that amp which I've heard and heard of the legendary power they possess, 8 AWG speaker wire, and dual power and ground protruding from this no-nonsense shell I believed for a minute I had reached audio Valhalla. Also, I appreciate the information you attached as well. Although I have no intention of messing around with My Holy Grail i will most certainly read the article thoroughly.I strongly suggest that you read the following page to help prevent making simple mistakes:
http://www.bcae1.com/repairbasicsforbcae1/repairbasics.htm
Was the amplifier disassembled when you received it?
Even if the amplifier is in perfect working order, if you intend to use it, you have to make sure all mating surfaces between the heatsink-mounted semiconductors, the insulators and the heatsink are perfectly clean. Then heatsink compound has to be applied between surfaces. Then all heatsink-mounted semiconductors need to be firmly (but not overly tightly) clamped to the heatsink. There must be no electrical contact between the heatsink-mounted semiconductors and the heatsink.
If the amp is powered up, the heatsink-mounted semiconductors can overheat and fail within seconds if they are not clamped to the heatsink.
If the amp is powered up, the heatsink-mounted semiconductors can overheat and fail within seconds if they are not clamped to the heatsink.
@Perry Babin well I've read the column/article/study guide link you sent and thoroughly studied it along with researching some other similar subject matter to the point that I feel comfortable reassembling the amp. I've got a couple of questions if I may?! Which do you suggest thermal paste or heat sink paste compound? Where can/should I purchase, for lack of their real name, the little plastic, clear, square, insulators that go between the transistors and the heat sink? I used cotton swabs and cotton makeup removal pads and 50% isopropyl alcohol. Multiple publications agreed, even suggesting cotton & alcohol. I appreciated your interest and respected your knowledge and that you and @Oppenheimer cared enough to offer suggestions and pass on that knowledge. Now if you guys have washed your hands of the whole ordeal I would completely understand, but if you've got any other critics or suggestions I'll gladly take them. If we don't interact again please know that the inevitable success of this project is directly related to what I've learned here. Thanks again guys
I suggest Dow Corning 340 but any heatsink compound from a reputable distributor will work.
The insulators are mica. Buy those only from a reputable distributor if you have to buy any because others are likely to be different thicknesses and that can cause problems. Don't mix mica insulators from different sources behind groups of parallel-connected parts.
I'd suggest using 91% alcohol or acetone. Acetone can sometimes damage surfaces so you need to test on unknown surfaces but it dries quickly and cleans better than alcohol.
- Home
- General Interest
- Car Audio
- Seeking Direction and Knowledge