
This is a 2000W amplifier. One fuse on the 12V line is really unlikely. The supplies rails are likely upwards of +/- 75V and running bridged to get the output power.
I haven't repaired a lot of class D amps but usually what I've seen is blown output devices causing the protection to activate, keeping the amplifier from turning on. These are really tough to figure out without a schematic. You would likely have better luck posting your questions in the car audio section of the forum. Perry Babin knows the car amplifiers very well.
I haven't repaired a lot of class D amps but usually what I've seen is blown output devices causing the protection to activate, keeping the amplifier from turning on. These are really tough to figure out without a schematic. You would likely have better luck posting your questions in the car audio section of the forum. Perry Babin knows the car amplifiers very well.
In the middle of the board there's a optocoplur( spelled wrong I'm sure). My question to you is in this act as a relay?
No, the remote trigger is what you need to turn the amp on. Have you applied power to this along with main power input?
A computer power supply will probably cycle with the start-up surge. I do not see you being able to do anything positive until you can get a battery or high current 12 VDC (up to 14.4 VDC)power supply. So until you can at least power this amp up reliably, set it aside. You will not get anywhere with a computer power supply.
@Perry Babin, can you have a look?
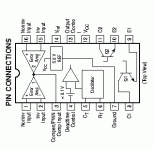
Unless otherwise instructed, place the black meter probe on the ground terminal of the amplifier for all DC voltage measurements.
Do not let your probe slip and short between terminals of the IC. If the probes are dull and likely to slip, sharpen them.
There is a 16 pin IC near the speaker terminals, post the DC voltage on all terminals using the attached pin numbering scheme. Copy and past the list into your reply.
Pin 1:
Pin 2:
Pin 3:
Pin 4:
Pin 5:
Pin 6:
Pin 7:
Pin 8:
Pin 9:
Pin 10:
Pin 11:
Pin 12:
Pin 13:
Pin 14:
Pin 15:
Pin 16:
Attachments
Last edited:
Great Perry,
That's the PWM power supply controller IC. An oscilloscope would be extremely handy right after this. Look up the data sheet for a TL494 or uPc494c chip for a better understanding.
Absolutely right! Reference common ground for everything. Clip the negative lead so you have a free hand. They do make insulated covers for some meter and oscilloscope probes so you don't easily short IC pins. As Perry mentioned, slipping with a meter probe can blow stuff up. Dull probes are a sure way to slip and short, no matter how steady you think your hands are.
Pin 1: 0 v
Pin 2: 0v
Pin 3: 0v
Pin 4: 0v
Pin 5: 0v
Pin 6: 0v
Pin 7: 0v
Pin 8: 0v
Pin 9: 0v
Pin 10: 0v
Pin 11: 0v
Pin 12: 0v
Pin 13: 0v
Pin 14: 0v
Pin 15: 0v
Pin 16: 0v
Pin 2: 0v
Pin 3: 0v
Pin 4: 0v
Pin 5: 0v
Pin 6: 0v
Pin 7: 0v
Pin 8: 0v
Pin 9: 0v
Pin 10: 0v
Pin 11: 0v
Pin 12: 0v
Pin 13: 0v
Pin 14: 0v
Pin 15: 0v
Pin 16: 0v
Yes had all three. But I didn't have voltages when I measured the 6 fuses which all are good. I would think 12 v should be present there as well.
And all those measurements including the ones taking for the fuses the black probe was on the Ground Terminal for everyone of them
Also taking advice of one of the other guys that was trying to help me, I'm using a car battery when I took those.
When you measure the resistance across the fuses (out of the amp fuse holders), what is the resistance you read across them?
With the supply connected, what's the DC voltage on the remote and B+ terminals (black probe on the ground terminal)?
Do you read the B+ terminal's voltage on every terminal of the fuse holders?
Do you read the B+ terminal's voltage on every terminal of the fuse holders?
12.86 on b+
12.87 on remote
With all 3 power wire properly connected and with the fuse pulled out of the fuse holders which therefore exposed a total of 12 terminals to be measured resulting in 0.0v on all twelve.
12.87 on remote
With all 3 power wire properly connected and with the fuse pulled out of the fuse holders which therefore exposed a total of 12 terminals to be measured resulting in 0.0v on all twelve.
You should have measure B+ voltage on half of the fuse holder terminals.
Post a photo of the bottom (solder side) of the amp showing the area including the B+ terminals and the fuse holder terminals.
Post a photo of the bottom (solder side) of the amp showing the area including the B+ terminals and the fuse holder terminals.
I still can't believe there is not some kind of fuse in the +12V feed line between a HIGH CURRENT source such as a large car battery and this 2 kW amplifier +12V main supply terminal.
I expect a >200A one, go figure.
If not a regular plug-in glass/ceramic/plastic type one, at least a tightly specified jumper wire or a "narrow" (for 200A that is) piece of track or a "diy type" one made out of a piece of copper wire inside a ceramic tube or ....,.
In any case, with black probe firmly attached to ground, follow-the-path from battery positive terminal to some PCB pad or track where said +12V should reach.
Clearly they are not reaching the fuse block, so that path is actually straight and simple.
Another possible culprit might be some kind of connector which lost contact or melted open inside.
"I still can't believe there is not some kind of fuse in the +12V feed line between a HIGH CURRENT source such as a large car battery and this 2 kW amplifier +12V main supply terminal.
I expect a >200A one, go figure."
The six fuses are in the 12V feed. They will be paralleled to handle the current.
I expect a >200A one, go figure."
The six fuses are in the 12V feed. They will be paralleled to handle the current.
- Home
- Amplifiers
- Solid State
- Same voltage everywhere