Your methods seem close to mine, except I used a PU floor clear coat. I put on 6 layers and polished to a mirror finish...

Was pretty happy with the results, until my enclosure cracked 🙁.
But what else to expect stacking 128 pieces of ply with ridged metal rods.
Anyway it's fixed but different now. I think I must have tried about 8 different recipe's for my stain/clear coat job. Never to be seen again 🙂.
That finish is exquisite. If you could just post 1 of the 8 recipes that worked best 🙂 for the benefit of others.
Lots of layers!

Neh.... this is lots of layers 😀

Coat yours inside and out after you're sure the wood is dry. It wasn't enough for me but you don't have metal rods going trough it. But wood will move, make sure you're prepared if something does happen. I certainly wasn't the only one to run into trouble: http://www.diyaudio.com/forums/full-range/167744-fe168e-sigma-teardrop-enclosure-17.html#post4118349
His "stack" wasn't that big...

A change in humidity is the enemy of these type of constructions. Make sure you have a backup plan, just in case. I'm hoping you won't need it.
I'll look up the recipe, I did record it somewhere in my huge thread.
This will get you going:
The 6 layers of PU could be done one day at the time, sand lightly in between layers.Thanks all for the encouragements 🙂.
The finish is 6 layers of polyurethane floor finish (oil based) over a nitro based dark antique stain (CBM 221).
Let it dry out for a couple of weeks. Next sand it lightly with 400 grid, followed by 600 grid and 1000 grid (all wet sanded). The polish was done mostly with McGuire automotive products.
A first polish with commandant #4 cleaner, a McGuire scratch-X remover after that, followed by a McGuire deep crystal polish.
I did it all by hand so it takes a while. An orbital polisher would speed things up but I have no experience with those.
The McGuire products are quite safe in use, they break down while polishing avoiding to ruin the finish.
The last polish was done with a piece of foam. I think with a bit of work you can get great results. It surprised me to get that much gloss. I already searched for ways to dull it somewhat until I realized our living room isn't equipped with the many neon lights I have in the garage 😀. In the day time it really looks classy.
On the first try I was a bit too aggressive with the 400 grid paper. There is really no need though, just use it lightly.
I got the best stain by opening up the pores prior to staining with white spirits if I remember correctly.
I also tried a floor soap on a few of my test pieces so try a few methods. I had it as a left over for oiling my oak wood floor.
If I recall correctly the white spirits worked well with the nitro based stain. It also held well beneath the PU floor finish.
It was a lot of work but gave excellent results, hard to photograph:

Last edited:
That's a very impressive design - and a whole lot of wood. What did the raw materials weigh? 🙂
5 full sheets of plywood so yea, not the most efficient technique 😱 they aren't too bad, well it's relative, all loaded up I bet they'll be 80lbs each min.
I have a lot of left over small pieces which will lend them well for another project so it's not all in waste.
I considered them and can easy swap the mids in the future, the alum come versions were well rated and I needed to start somewhere, good to hear your perspective/experience thanks! 😎I like the RS line of drivers also - wondered if you have considered the paper cone variety RS225P, RS100P, etc. I have the RS100P and RS100 (aluminum) and like the sound of the paper better - less ringing. I also have an aluminum RS225 and had to EQ the resonant peak down - not a big deal with minidsp. Recently just got some RS180P's and really like them too. They measured spot on TS wise with factory numbers and are nearly 90dB sensitive. One thing about 1.5in thick baffles is that you need to heavily undercut the driver holes to allow room to breathe.
And yea I have a 3/4" under round but in the way, the mids are literally sealed inside the hole bore! In the future I likely won't make the mid flange that thick in other builds.
Sent from my iPhone using Tapatalk
Last edited:
Your methods seem close to mine, except I used a PU floor clear coat. I put on 6 layers and polished to a mirror finish...
Was pretty happy with the results, until my enclosure cracked 🙁.
But what else to expect stacking 128 pieces of ply with ridged metal rods.
Anyway it's fixed but different now. I think I must have tried about 8 different recipe's for my stain/clear coat job. Never to be seen again 🙂.
Definitely familiar with your project! Love that finish, I'm still experimenting, with a test I did today with some silver stain and 4 coats of lacquer.
I'm worried about the cracking but hoping my smaller size and larger bonding surface area will help, wish me luck!
Wow a big day and I am exhausted but these are actual speaker enclosures now! =)
So here is where I started...

both final sides glued and ready for final routering. I saved matching outside panels so that each speaker has grain on the outside from the same tree, also chose oversized panels to give me the most options for choosing grain, etc. before final routering I filled any surface variations with wood putty and sanded them smooth, inevitably the router transfers imperfections really well from one layer to the next, by giving the last layer this sort of attention I could at least ensure the final panel had the smoothest edges. I also learned a little something along the way as well =)


Once I had the area where the router bit bearing would ride perfectly smooth I went to town with my Freud 1/2" flush cut bit (love the Freud bits btw!!), here is an example of the filler I did

And wala! So rewarding to see these in the flesh, I didn't CAD these up, just rough hand sketches, aside from some simple dimensions I jotted down for the purpose of buying wood and planning, these were completely planned and designed in my head. All dimensions are w/in about 1/8" of what I originally calculated and I didn't make any major mistakes, satisfaction is a great feeling =)


So, after some patting myself in the back...crap got real. As I laid the drivers out on the enclosure it occurred to me that I had to nail the routering and flush mounting of these drivers and I didn't want to ruin these boxes, ahh!!

So it was time for some practice, back when I build speakers these router jigs were a new thing and I used to be pretty good with a jig saw, but with the Jasper jig I want these to be perfect.
Here are all the practice and verification pieces I did
Midrange


Tweeter

8" midbass

10"

Ok nailed them all and I was feeling pretty good!
Cont...
So here is where I started...
both final sides glued and ready for final routering. I saved matching outside panels so that each speaker has grain on the outside from the same tree, also chose oversized panels to give me the most options for choosing grain, etc. before final routering I filled any surface variations with wood putty and sanded them smooth, inevitably the router transfers imperfections really well from one layer to the next, by giving the last layer this sort of attention I could at least ensure the final panel had the smoothest edges. I also learned a little something along the way as well =)
Once I had the area where the router bit bearing would ride perfectly smooth I went to town with my Freud 1/2" flush cut bit (love the Freud bits btw!!), here is an example of the filler I did
And wala! So rewarding to see these in the flesh, I didn't CAD these up, just rough hand sketches, aside from some simple dimensions I jotted down for the purpose of buying wood and planning, these were completely planned and designed in my head. All dimensions are w/in about 1/8" of what I originally calculated and I didn't make any major mistakes, satisfaction is a great feeling =)
So, after some patting myself in the back...crap got real. As I laid the drivers out on the enclosure it occurred to me that I had to nail the routering and flush mounting of these drivers and I didn't want to ruin these boxes, ahh!!
So it was time for some practice, back when I build speakers these router jigs were a new thing and I used to be pretty good with a jig saw, but with the Jasper jig I want these to be perfect.
Here are all the practice and verification pieces I did
Midrange
Tweeter
8" midbass
10"
Ok nailed them all and I was feeling pretty good!
Cont...
Next step was to carefully measure out driver center point locations and put in the 1/8" pilot holes. My digital calipers were very valuable for this as was a sharp pencil and spring loaded center punch

Let's get this party started!


And boom!


And here is where things left off for the night! I'm thrilled with the progress!

Next steps will be lots and lots of sanding, terminals, wiring, stuffing etc, and then staining and finishing, more to come!
BTW here is a test I did with some silver stain and 4 coats of lacquer, I like it but will be playing with some black stain too, even considering trying to do the front black and sides silver?

Let's get this party started!
And boom!
And here is where things left off for the night! I'm thrilled with the progress!
Next steps will be lots and lots of sanding, terminals, wiring, stuffing etc, and then staining and finishing, more to come!
BTW here is a test I did with some silver stain and 4 coats of lacquer, I like it but will be playing with some black stain too, even considering trying to do the front black and sides silver?
One thing about 1.5in thick baffles is that you need to heavily undercut the driver holes to allow room to breathe.
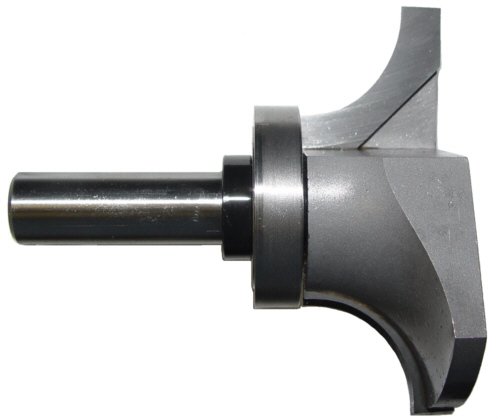
BTW I have this router bit on the way which should help out
And here is where things left off for the night! I'm thrilled with the progress!
Looks like this is coming along nicely.
Do chamfer the driver holes for driver breathing. Also any consideration for edge diffraction?
Do chamfer the driver holes for driver breathing. Also any consideration for edge diffraction?
Definitely I'll make sure they can breather.
Tell me more, what would you recommend?
As you can see I have a very narrow baffle as is.

Sent from my iPhone using Tapatalk
Definitely I'll make sure they can breather.
Tell me more, what would you recommend?
As you can see I have a very narrow baffle as is.
Sent from my iPhone using Tapatalk
The baffle do allow a nice round off on the edges. How about a large quarter round around the baffle? Obviously some thought will need to be given to making it look good?
Also, what is the spacing between the upper mid-range and the 8"? Will there be vertical off axis trouble at 400Hz XO?
The baffle do allow a nice round off on the edges. How about a large quarter round around the baffle? Obviously some thought will need to be given to making it look good?
Also, what is the spacing between the upper mid-range and the 8"? Will there be vertical off axis trouble at 400Hz XO?
Most I could do would be a 1/4" round over, worth doing you think?
Distance from midbass to the mids center to center is 8" and 18" respectively, as close as they can get to each other basically.
Sent from my iPhone using Tapatalk
Working on the internal wiring while it rains outside, the binding posts will be mounted through the back of the enclosure, I will be routering a 1/2" recess with 4-way connections for each driver/s

Most I could do would be a 1/4" round over, worth doing you think?
Distance from midbass to the mids center to center is 8" and 18" respectively, as close as they can get to each other basically.
Sent from my iPhone using Tapatalk
abrupt baffle edges can have measurable diffraction effects on the response. Further thats one thing DSP cant help with much. More experienced members should comment, but the general guideline is that large radius round off around the HF and Mid drivers are helpful.
Got some detail work done today.
I ported the mids that were severely shrouded by the baffle
I added some bracing to the center brace, 1" hardwood dowel
Sub enclosure
Midbass enclosure
Since all walls are 1.5" thick I needed to make a recess for the PE 1.5" long binding posts, I made a template with the router then used it to make the actual recesses.

The template on a practice piece
Final recess with holes drilled for binding posts and each 4-way pair
Started mounting drivers, just getting holes drilled and tapped, screws are #6 for kids/tweets and #8 for woofers, stainless steel, square drive
Still struggling with stain choice, I like black stain but this grain is gorgeous so I'm leaning towards silver

All surfaces sanded and perfectly smooth to 220grit
I ported the mids that were severely shrouded by the baffle
An externally hosted image should be here but it was not working when we last tested it.
I added some bracing to the center brace, 1" hardwood dowel
Sub enclosure
An externally hosted image should be here but it was not working when we last tested it.
Midbass enclosure
An externally hosted image should be here but it was not working when we last tested it.
Since all walls are 1.5" thick I needed to make a recess for the PE 1.5" long binding posts, I made a template with the router then used it to make the actual recesses.
The template on a practice piece
An externally hosted image should be here but it was not working when we last tested it.
Final recess with holes drilled for binding posts and each 4-way pair
An externally hosted image should be here but it was not working when we last tested it.
Started mounting drivers, just getting holes drilled and tapped, screws are #6 for kids/tweets and #8 for woofers, stainless steel, square drive
An externally hosted image should be here but it was not working when we last tested it.
Still struggling with stain choice, I like black stain but this grain is gorgeous so I'm leaning towards silver
All surfaces sanded and perfectly smooth to 220grit
An externally hosted image should be here but it was not working when we last tested it.
Driver test fit =)
Sent from my iPhone using Tapatalk
An externally hosted image should be here but it was not working when we last tested it.
Sent from my iPhone using Tapatalk
That looks really cool. Were you going to have round overs on any of the edges of sticking with the chiseled angular look?
Curious why you did not use an RS28A-4 to keep the whole system RS and all aluminum?
Curious why you did not use an RS28A-4 to keep the whole system RS and all aluminum?
That looks really cool. Were you going to have round overs on any of the edges of sticking with the chiseled angular look?
Curious why you did not use an RS28A-4 to keep the whole system RS and all aluminum?
Yea I'm leaving it angular, I wasn't sure what I was going to do until yesterday, but I liked the square edges as they were actually very difficult to produce and highlighting them made sense. It also works with the two tone color scheme I came up with which I'll post soon =)
The next speakers I build I'll leave more room on the mid/tweeter baffle to do a roundover there to avoid diffraction issues but there didn't end up being enough room and initially I was striving for the narrowest baffle possible.
I really wanted to use the Vifa XT25 in a project so that was the first driver I picked out, I also liked it's high power handling, but yea I seriously considered the Dayton tweeter and at one point was seriously considering switching to it.
I also really like the Vifa phase plug and though it's not a reference driver it actually matches visually very well.
Thanks for the comments!
Sent from my iPhone using Tapatalk
Got a bunch more detail work done yesterday including finalizing the cabinet finish, really pleased with how things turned out. Should have drivers mounted in the next day or two and ready for sound.
Drilled very tight holes for internal wiring, wore had to be pulled through with some force, then hole sealed with silicone sealant


After final sanding I had to make up my mind on finish, I really liked black and so does the wife but that end grain is so gorgeous and I hated to cover that up, I also wanted to do a dual tone, I finally arrived at keeping the front panel and lower back panel raw, really pleased with it!

Then for some coats of polyurethane


Finally got to install the binding posts, and start running wiring


Lining internal surfaces with egg crate foam


Next up wiring drivers and installation! =)
Sent from my iPhone using Tapatalk
Drilled very tight holes for internal wiring, wore had to be pulled through with some force, then hole sealed with silicone sealant
After final sanding I had to make up my mind on finish, I really liked black and so does the wife but that end grain is so gorgeous and I hated to cover that up, I also wanted to do a dual tone, I finally arrived at keeping the front panel and lower back panel raw, really pleased with it!
Then for some coats of polyurethane
Finally got to install the binding posts, and start running wiring
Lining internal surfaces with egg crate foam
Next up wiring drivers and installation! =)
Sent from my iPhone using Tapatalk
looking really good.
A thick MDF block on either side of the baffle, rounded off or faceted/beveled might look good with your finish and help diffraction at the same time
A thick MDF block on either side of the baffle, rounded off or faceted/beveled might look good with your finish and help diffraction at the same time
The speakers are coming along very nicely. I hope the chamfering for the RS100's was enough - that baffle still looks pretty thick.
When you get to the XO development stage - check out implementing the quasi transient perfect Harsch XO. You may have the perfect set of drivers to do that. The sound realism will be much better than a symmetric Linkwitz Riley.
In a nutshell, the Harsch XO applied to a 4 way are the following electro-acoustic target functions:
Woofer: BW4 LPF (~100Hz)
Mid bass: Bessel 2 HPF (~100Hz) + BW4 LPF (~700Hz)
Mid: Bessel 2 HPF (~700Hz) + BW4 LPF (~3.5kHz)
Tweeter: Bessel 2 HPF (~3.5kHz)
All drivers positive rising leading edge polarity.
Then set delay of each driver above at half the period of the XO frequency of that driver, working from woofer up (this includes acoustic offset). Do this in PCD or Xsim first.
More info here:
http://www.diyaudio.com/forums/multi-way/277691-s-harsch-xo.html
Here is the response and phase of a Harsch XO, do this for each XO section:
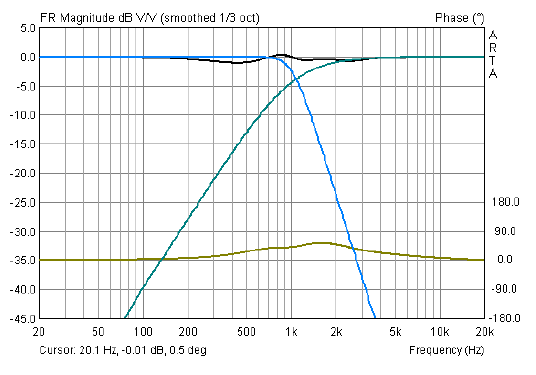
You can then get a step response that approximates a right triangle and phase is flat except for 55deg bump at XO point.
When you get to the XO development stage - check out implementing the quasi transient perfect Harsch XO. You may have the perfect set of drivers to do that. The sound realism will be much better than a symmetric Linkwitz Riley.
In a nutshell, the Harsch XO applied to a 4 way are the following electro-acoustic target functions:
Woofer: BW4 LPF (~100Hz)
Mid bass: Bessel 2 HPF (~100Hz) + BW4 LPF (~700Hz)
Mid: Bessel 2 HPF (~700Hz) + BW4 LPF (~3.5kHz)
Tweeter: Bessel 2 HPF (~3.5kHz)
All drivers positive rising leading edge polarity.
Then set delay of each driver above at half the period of the XO frequency of that driver, working from woofer up (this includes acoustic offset). Do this in PCD or Xsim first.
More info here:
http://www.diyaudio.com/forums/multi-way/277691-s-harsch-xo.html
Here is the response and phase of a Harsch XO, do this for each XO section:
You can then get a step response that approximates a right triangle and phase is flat except for 55deg bump at XO point.
Last edited:
- Status
- Not open for further replies.
- Home
- Loudspeakers
- Multi-Way
- RS4 - Digital 4-way XO, Long. Lam, Dayton Reference, Adcom System