Hey Damo, have you heard the 12 and 18 versions of roar?
No, I have only heard the ones I have built
The 3 per side was very good. I will be looking at building another pair soon to be able to run 4 a side.
Apart from the extra output of a 4th (which wont be much) it also allows me to explore the idea of a cardioide 2 forward 2 backward deployment which is needed i think for one of the regular events I have where we have sound limits some 200 metres away behind the system. Currently, the bass booms across that space and it is a problem.

I guess you used 18mm ply, i am puzzled cause on the forum everybody recommend 18mm ply but ev make 15mm ply subs, so is it feasible to shave some weight off by using slimmer ply? With the right bracingThe 3 per side was very good. I will be looking at building another pair soon to be able to run 4 a side.
I don't think its worth it, and it affects the dimensions which may affect the results. The weight saving wont be enough to turn them from a 2 man load job to a 1 man so I dont see the point. I built my first 4 using poplar core hardwood faced ply which is lighter than birch. there isnt really a noticable difference in moving them (supposedly about 10kgs lighter) and the stuff was a pig to work with (its fairly rubbish, basically, full of voids, warps, delaminates, a pig to work with. I'm hoping they wont fall apart over time). Lesson learned, just use birch.
I built my 3 ROAR15s using 15mm ply, with only the baffle in 18mm. Damo s is right about the bulkyness. Still, by rolling and roating them, I manage to move them with little effort, even transporting up- and downstairs.I guess you used 18mm ply, i am puzzled cause on the forum everybody recommend 18mm ply but ev make 15mm ply subs, so is it feasible to shave some weight off by using slimmer ply? With the right bracing
Finally, I found time to remodel them in 15mm with bracing (partly in 12mm) and make them CNC-able. Feel free to use the attached files as a starting ground for CNCing your own version. Already arranged and optimized as a flatpack.
Warning: These files include pockets and overlapping joints and are only meant for CNCing. When using standard tools, you would have to recalculate parts dimensions to build a 15mm version!
I modeled them to be used with
Adam Hall 3403
Neutrik NL4MP-ST
Millenium 100mm Wheels MkII
Once again, many thanks to martinsson and circlomanen for sharing this amazing design!
Best regards
Jami
Attachments
Nice! glad it worked great 4U !, so you stack them as a 3 box column ?
what drivers you end up using inside and what amps
what drivers you end up using inside and what amps
B&C 15TBW100 (before that, I used the 15TBX100 from my THAM15 builds). Powered by a Prokustk FP14000.
I used to stack them in a tower of 3, but had better results by stacking them horizontally (I will build 1 more (or even 3, once I can afford the wood) and stack 2x2.
Best results so far, though, were achieved using 3 in a row as an endfire array.
I used to stack them in a tower of 3, but had better results by stacking them horizontally (I will build 1 more (or even 3, once I can afford the wood) and stack 2x2.
Best results so far, though, were achieved using 3 in a row as an endfire array.
Hey there!
I've been following this thread and I am glad to see, there is some new activity here.
I am looking to build one or two ROAR 15 this summer, depending on finances...
It is going to be my first own speaker building project. I was considering THAM15 a while ago,
but found ROAR 15 now and I am super interested in building those to get a listen.
I would like to load them with one of the newer generation b&c drivers and would like to hear
your reasoning favoring either 15SW115 or 15DS115. What differences would you expect in response?
I have an old QSC Powerlight 4.0 and could supply one unit with 2800 W into 8 Ohms or two units
with 2000 W each into 4 Ohms load. Is this actually enough power to supply these units?
If you'd limit them to RMS load it would suffice, but maybe I am being to conservative about that.
Considering I would not like buying any new amps, would I be better off going for one of the
more oldschool drivers like 15TBX100?
Some more noob questions:
Do handles in the pipe have an effect on the response or does it simply not matter, because the
passband is low enough for waves bending around?
Where did you route your speaker cables? Did you follow the pipe using long cables or drill through
the driver baffle? If you did, how did you seal it?
I made 21" ported bins with strong drivers and fair amps, and it held up quite well. Those bins with more coupling to the air and narrower throats deserve more. I remember Beyma SB18 flexing quite a bit without double walls where needed.
I used all 8 of mine at a festival back in october. I had 2 stacks of 2 (with tops on) and 4 along the floor between the stacks. It was awesome in front, but created a power alley where off axis from the stack didnt have much bass, However, the sound level meter was also off axis so it helped make it look quieter than it really was. 😛B&C 15TBW100 (before that, I used the 15TBX100 from my THAM15 builds). Powered by a Prokustk FP14000.
I used to stack them in a tower of 3, but had better results by stacking them horizontally (I will build 1 more (or even 3, once I can afford the wood) and stack 2x2.
Best results so far, though, were achieved using 3 in a row as an endfire array.
Some more noob questions:
Where did you route your speaker cables? Did you follow the pipe using long cables or drill through
the driver baffle? If you did, how did you seal it?
I drilled through the driver baffle, right next to the driver separating bar at the bottom, which is where the connector plate was also installed. I used round cable the same size as the drill bit so it was tight pushing it through, then it was sealed completely in with the acrylic paint.
See crudely drawn image below. small orange circle is where Ive drilled through the baffle. Yellow outline is where the connector panel is located.
Hey there,
thanks for the reply! Seems easy enough.
I want to build the boxes from 18mm birch ply as suggested.
My wood supply shop has a cnc machine, so I would like to have rabbets in the side panels.
Any experience on how wide they have to be so you can fit the other parts in?
Anyone have an idea if I modeled this correctly for CNC? I went with 18.5 mm middling everything out.
And now I realize its not possible to attach DXF or DWG Files, so I have to ask my friend at work to
export again as STEP file.... Soon come.
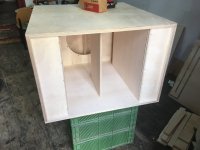
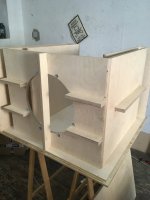
Here I have a CNC version for the side panels of the speakers.
The grooves are 18.5mm wide and 8mm deep. Don't forget to adjust all the 544mm parts to 560mm
in the cutlist to make up for the difference!
Check dimensions before using, plz. I did all the adjustment in measurement out of my head.
The grooves are 18.5mm wide and 8mm deep. Don't forget to adjust all the 544mm parts to 560mm
in the cutlist to make up for the difference!
Check dimensions before using, plz. I did all the adjustment in measurement out of my head.
Attachments
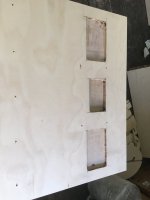
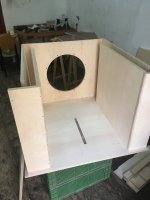
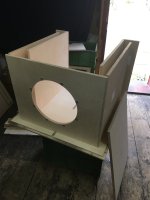
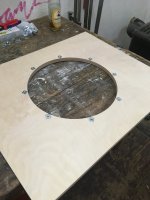
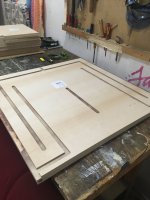
Hey there,
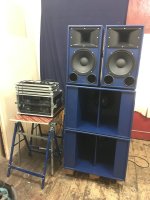
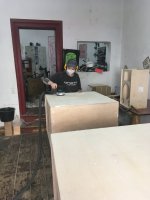
finally posting some pictures from my ROAR15 build.
I am very happy with the build and performance.
I am running them along two Celestion CKT-TF1225.
I am still in the process of good measuring and Crossover Design.
First measurements suggest Phase Alignment with somewhere between 7.95 to 8.25 ms of delay for the mid-top speakers
following Merlijn van Veens Relative/ Absolute method.
https://www.merlijnvanveen.nl/en/st...gnment-the-foolproof-relative-absolute-method
Along with the pictures comes an updated version of the 3D drawing used for CNC.
DM me for DXF. version of that file, as i can't upload that here and had to convert to stp.
Attachments
-
 IMG_2387.JPG429.7 KB · Views: 53
 -
 IMG_2376.JPG375.6 KB · Views: 49
 -
 IMG_2336.JPG586.6 KB · Views: 48
 -
 IMG_2326.JPG313.6 KB · Views: 52
 -
 IMG_2315.JPG262.3 KB · Views: 51
 -
 IMG_2311.JPG400.3 KB · Views: 55
 -
 IMG_2309.JPG348.5 KB · Views: 56
 -
 IMG_2306.JPG318.2 KB · Views: 50
 -
 IMG_2298.JPG382.3 KB · Views: 50
 -
 IMG_2296.JPG373.3 KB · Views: 52
 -
 IMG_2294.JPG422.3 KB · Views: 52
 -
 IMG_2289.JPG414.9 KB · Views: 50
 -
820x820_boden_deckel_topview.stp7.1 KB · Views: 39
- Home
- Loudspeakers
- Subwoofers
- ROAR15