Erocka, see Volken's reply (#1911) above, you really, really should take him up on the offer. He's the guy behind Hanze HiFi, a very good source of parts and information on the 124.
I did send him a PM, but never heard back.
View attachment 550523
Encouraged by Nigel started with experimenting with a magnetic floating motor trust bearing for the E50 motor , work in progress.
Just find the centre of the stator field. Easy to do as the motor will pull up or down when energised. Make it slightly pull down. The motor on it's side makes it more obvious. Should be a big difference on transmitted vibration. My patent on this was never filed. Greenwich University ( old Navy college ). Should be doing a new project this year with them. I am an electrical engineer who is allowed to work at degree level in mechanical engineering. I woke up one day and realised I am totally unqualified. Time served and in a similar field seems to be OK. George Stephenson also. If he had of been qualified his bridges would have been too weak for modern 100 ton plus loco's. They still stand.
Do you mean magnetic suspension inside the motor ? Or the whole motor is suspended ?View attachment 550523
Encouraged by Nigel started with experimenting with a magnetic floating motor trust bearing for the E50 motor , work in progress.
Thanks and regards.
Do you mean magnetic suspension inside the motor ? Or the whole motor is suspended ?
Thanks and regards.
Inside the motor floating rotor !
I did send him a PM, but never heard back.
Just checked my mailbox but no mail !
Thanks Mr. Volken. I don't remember but on the internet I have seen vintage turntables motors with magnetic disc on rotor. Don't know what purpose they are for. Will search the net and post.Inside the motor floating rotor !
Best Regards.
I think you are thinking of an eddy current brake like on the Garrard 301/401 motors. What Volken is talking about is different and relates to where the rotor sits in the internal magnetic field.
hi kevinkr,
It was inside the motor. Something like this.
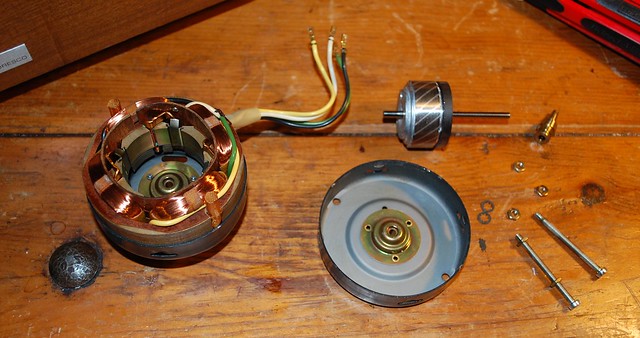
You can see black ring near the rotor. I think it is magnet. This is dual 1229 motor.
Best Regards
It was inside the motor. Something like this.
You can see black ring near the rotor. I think it is magnet. This is dual 1229 motor.
Best Regards
That magnet can't pull up the rotor, it is only able to pull it down.
I think that the magnet is here to give synchronous behaviour to the motor, because the motor seems to be asynchronous.
Very nice motor however.
I think that the magnet is here to give synchronous behaviour to the motor, because the motor seems to be asynchronous.
Very nice motor however.
hi kevinkr,
It was inside the motor. Something like this.
You can see black ring near the rotor. I think it is magnet. This is dual 1229 motor.
Best Regards
This is a invention to run a inductionmotor after starting synchrone with the magnet on top of the rotor running in the statorfield.
At the E50 motor I have mounted the magnet under the rotor so it float its also outside the running stator field.
That magnet can't pull up the rotor, it is only able to pull it down.
I think that the magnet is here to give synchronous behaviour to the motor, because the motor seems to be asynchronous.
Very nice motor however.
Looks to be from a Dual 1219 or 1229. Very nice pieces of machinery, those changers.
Garrard used the magnet trick in motors in a lot of their less expensive tables (1970s) vintage. The glue used gives up over time and the magnet separates from the rotor, it is very difficult to find the right spot to get the motor to run with any semblance of balance after this happens. (I fixed one with only partial success for a friend)
This seems to have been a cost cutting measure because their older synchronous motors had a more complex rotor and no magnet. I assume the ferrite magnet was cheaper than what it replaced.
This seems to have been a cost cutting measure because their older synchronous motors had a more complex rotor and no magnet. I assume the ferrite magnet was cheaper than what it replaced.
Hello
I am thinking to clean the 124 II main bearing sintered bronze bushings, via ultrasonic bath., without removing them from the bearing , as are in very good condition and I do not want to risk by removing and reassembling them. What do you think? That could be also an idea to clean the idler wheel bushing , stepped pulley and motor bushings etc. Ultrasonic cleaners as I heard remove grease , oil, and molecules of dirt to anything that is in the bath liquid very effectively , but also can remove paint.
I do not know if is secure and could be a new dedicated method and by using that all old oil will be removed - cleaned from sintered bronze parts , without the need of boiling-cooking them.
Regarding the main bearing, i think new oil will fill the pores, by filling the bearing with it and leaving it for 24 hours or more.
Your ideas are always useful.
I was using the standard simple method of simply cleaning the bearing from the factory old oil...I had put the Schopper oil, and after 6 months ,when I inspected the bearing , thrust pad etc , I realized that oil was greenish and smelled bad.😡
If ultrasonic cleaning is a good idea all procedure will be simple as we have to remove the bearing from chassis , the spindle from bearing and put it inside the ultrasonic bath for 5-10-15 minutes? It might not be needed to remove the bottom end , thrust pad etc.
I have realized that the new oil had by the time removed some of remaining molecules of the factory greasy old old oil that was hold in the pores of the sintered bronze bushings. So new lubrication should not be as effective as it should , as new fresh oil was mixed with the molecules of the greasy factory oil (and with some other oil types that might had been used through the years and owners of the tt) .
Not sure whether ultrasonic cleaning of the bushings is advisable or not. I've stuck to heat and absorbent lint free cloth in the one instance where I did not replace the main bearing bushings. (My lower hour MKII)
Some people claim that as part of the sintering process some carbon residue is left behind that you don't want to remove as it helps to control the flow of oil into and out of the bushing. I have no idea whether or not this is urban legend but for a time I believed it. To this day I don't use strong solvents with my bushings as a result, and so far so good.
FWIW I did not remove the bushings in the main bearing of my MKII because they had minimal use. I did heat the housing to expel oil from the bushings and mopped it out with a lint free cloth. I then mounted a new end cap and warmed the housing and filled it with warm 20 SAE weight oil and let it cool. I run my main bearings pretty wet and so far so good. (I have changed the oil several times to make sure none of the old stuff remained.)
I have a second table that has new bushings in the main bearing, those came from the "Spanish" seller referenced elsewhere in this thread. They've worked well. A friend later got a set of the same bushings which proved difficult to install and caused the spindle to bind a bit.
My second 124ii /sme 3009 MKII was a gift from an old friend who had used it for less than 100 hours 45 years ago.It is in mint condition but without maintenance as all the years was in the box at his garage.
When I turned the motor by hand I saw that was blocked due to dead -greasy lubricants inside the bearing after 45 years of use.... I avoid to open it as well as the other 124 II that I am using for years ,as I do not know the results of my work to open , clean , assemble and re assemble -readjust it.
I have put some 10 drops to motor spindle from the top of the motor and some to the bottom ,through the motor's hole and it seems that motors runs smoothly and fast. ON -OFF duration without the belt is about 20 seconds till it stops . After 10 hours of use I added some more drops of Schopper oil up and down .
Do you think that is ok that way? Or if I do not open motors of both my 124 II , clean and re lube them the way is described from specialists and users here ,my motors will not work properly and their life will be shortened?
The kindly gifted 124 is so new!!!! that I feel very stressed by the idea to unscrew open it , clean , re lube and adjust 😕the motor.
All other kind of maintenance , cleaning etc have been done. I also put a new idler wheel from Simone, his new bearing thrust plate , thick bronze bottom end , silicon motor suspension , gel mushrooms and shopper oil.
Thanks a lot
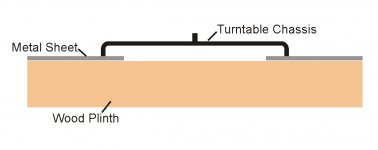
Plinth and chassis
Hi guys,
Just finished reading this entire thread. I don't actually own a thorens or any other idler turntable but am into all things vinyl. Most of this thread seems to have concentrated on bearings, motor and drive train. There are other areas that can be improved.
Many years ago I helped a friend restore a 301. The single biggest improvement made was the construction of a super heavyweight plinth. This was a 1/4" welded and powder-coated steel box with appropriate cutouts. This had 3/4" plywood glued to the inside. The cavity was then filled with multiple layers. These started with lead-shot loaded concrete and had multiple layers of reducing density ending in plaster of paris. The plywood had many screws protruding to anchor the concrete. The finished internal structure had a very organic look. The total mass was about 80kg and the resulting plinth was incredibly inert.
An other thing we did was to damping the chassis. We cut thick lead sheet to fit between all the cast ribs of the underside of the chassis. If I remember correctly we adhered these using a silicone rubber. This helped to paint a background to the music in blackest black.
Both of these methods should be equally applicable to a 124.
Niffy
Plinth : If we use a suitable material for the whole plinth instead of various layers of different material. And make cavities in them at important places to be filled with loose lead shots. And also put the turntable chassis which I presume is of cast iron on a cast iron sheet which is rested on the plinth (mentioned at the start) wouldn't it allow the easiest transfer of vibrations. The turntable chassis coupled directly with cast iron sheet would present least impedance of vibration and the sheet would be coupled to the wood plinth to cover the maximum surface area. (A rough drawing attached)
Regards.
Regards.
Attachments
Both of mine are directly mounted to heavy slate (80lb) multi-layer plinths. The thread is mostly about sorting out the mechanical issues inherent in the table and not necessarily about end use. There is a not a lot of agreement as to what constitutes an ideal plinth for this table; many people use classic (low mass) plinths while others like myself subscribe to the high mass approach, still others use constrained layer damping (can do with mine as well, but not currently implemented.)
For a number of years I used 12" tone arms mounted on the plinth, these days I am using a pair of Souther linear tracking tone arms mounted on arm boards bolted to the tables proper.
Outside of the still poor motor warm up behavior of my MKII I am pretty happy with the performance of both of these tables. Someday I will go to the Papst motor driven by a 3 phase controller..
- Home
- Source & Line
- Analogue Source
- Restoring and Improving A Thorens TD-124 MKII