I've got a Rega P3 and need to rewire the RB300 tonearm. It seems a lot of people use one set of wires at the headshell, which connect to internal tonearm wires, which then connect at the base plug to the interconnect wires.
Couldn't I just get a couple feet of Litz wire, for instance, and run it from the cartridge clips to the RCA plugs? It seems it would be optimal to reduce the number of connections in the signal path but I haven't been able to find discussion of it on the forum.
Thanks,
Jeff
Couldn't I just get a couple feet of Litz wire, for instance, and run it from the cartridge clips to the RCA plugs? It seems it would be optimal to reduce the number of connections in the signal path but I haven't been able to find discussion of it on the forum.
Thanks,
Jeff
Usually the cartridge to connector is on piece of wire (regas don't have detachable headshells) and after the connector at the base plug it changes to shielded wire. The turntable to phono amp is probably the most important place to have a good shield on the wire since its signal will be amplified so greatly. So really, it's about shielding and durability after the connector. It's not really feasible (due to size) to shield the tonearm wire. It has to be flexible and small. And the metal tonearm provides some shielding. One of the differences between the rega arms (rb300 vs 600, 700, etc.) is the wire. The basic design is the same across all the arms. Good thing is an RB300 is damn close to the TOTL Rega arms.
Rega also runs the ground down one of the turntable interconnects but that is different discussion. Other companies do it different.
Rega also runs the ground down one of the turntable interconnects but that is different discussion. Other companies do it different.
You can get a good harness of wire, 36 gauge or so with cloth covering (nothing stiff or it interferes with the tonearm movement and mistracks) and solder/superglue it to the current wire or run a heavier wire through and solder it to that and pull the heavier wire through. It takes an afternoon and there are explicit instructions on the net on how to do it. Try the audio asylum for a guide with pictures.
Couldn't I just get a couple feet of Litz wire, for instance, and run it from the cartridge clips to the RCA plugs? Yes and one piece is the best. Flexibility is more important than Litz. You will have to shield the wire as it comes out of the base of the tonearm.
Couldn't I just get a couple feet of Litz wire, for instance, and run it from the cartridge clips to the RCA plugs? Yes and one piece is the best. Flexibility is more important than Litz. You will have to shield the wire as it comes out of the base of the tonearm.
Jeff - if you do a quick Google search on the subject, you'll find that folks like Origin Live and Cardas offer complete rewire kits the Rega arm. It's been at least 15yrs since I did mine, and I was more that a bit surprised at the current pricing. 😀
I got a kit from somewhere that included just the section of wire for the arm, which was just long enough to terminate into RCA jacks and a chassis ground in a small Hammond aluminum box mounted adjacent to the tonearm.
Sure that's one more pair of solder connections than a minimalist might like, but it does afford the flexibility to use any RCA interconnects. A litz wire thin enough to snake through the tonearm bearing assembly will be very awkward to terminate into a male RCA plug, and remain incredibly fragile - that's a gauge of wire you want to solder as seldom as possible.
A litz wire thin enough to snake through the tonearm bearing assembly will be very awkward to terminate into a male RCA plug, and remain incredibly fragile - that's a gauge of wire you want to solder as seldom as possible.
The Litz wire I bought from the UK is actually quite robust, and very inexpensive if you're just buying the wire, and not a "kit".
jeff
Hi,
I used silk spun HF-copper-Litz for the rewire of my Rega300 and my DIY-Arm.
7x0.05 or 5x0.05mm^2 is a good choice.
Two of the wires were twisted together which resulted in low enough ohmic value and a even higher flexibility than a single wire design.
Then two strands were twisted together to give one cable for each stereo channel.
The twisting slightly increases the capacitance to ~50pF but also reduces noise sensitivity.
Besides the better looks it results in more 'defined' conditions and values - think about capacitances of wires against PE and against each other, or cross coupling between stereo channels, etc.
The copper litz is quite cheap and easy to source.
If it gives You a better gut feeling, You may even use silver HF-wire, but prizes and sourceability are much worse.
The internal wire ends at the solder pins of the arm connector from where a decent well-shielded cable runs to the preamp, either SE or balanced, depending on the preamp input connector.
It seems quite popular to omit with the arm connector and to extend the arm cable to the preamp input amd some even claim it to be the best way.
I'd like to ask those: "Best? In what regard?"
I doubt that one or two solder joints are audible at all.
I assume one rather can hear other effects of such more doubtful than well done cable design 😕
The ohmic resistance of those thin wires is just high enough to cause a small signal loss when using low output MC pickups.
Hot and cold wires of each channel need to be twisted together at least or well shielded to achieve sufficient noise immunity.
The close proximity of the wires and/or their close proximity to a shield results in increased capacitance, which may give issues with low-inductance MMs like the ATs.
Fixed lengths and cable parameters certainly don't count in for the 'Best'.
And finally will such self-made cablings not show the constancy and consistancy between several samples as even the cheapest professional commercial cables offer.
I can only recommend to change the internal wiring of the arm and to use a proper external cable.
jauu
Calvin
Thanks for your advice, everyone. I ended purchasing tonearm wires, phono cable, cartridge connectors, and RCA connectors from KAB, at about a quarter the price of the rewire kits and services. This is going to be a challenge, but I'm looking forward to fixing the TT and listening to records again.
I found detailed instructions at the Vinyl Engine. The part I'm most concerned about is fishing the wires through the rubber grommet between the arm and the base. I'm going to try soldering the new wires to the old ones and threading them through, and if that doesn't work, then I'll probably have to remove that grommet somehow.
Re: the ground wire -- is there opinion as to whether it's better to attach the arm ground wire to the metal tab on the base plug, as it is originally in the stock design, or run the ground wire out with the phono cable and attach it to the ground lug on the preamp?
guitar e strings are your friend, cut the e string into 4 sections then scrape and tin both ends then solder ends to old/new cable.
pop the rubber cap off (there is a plug in the middle that needs to be taken out or pushed through) at the headshell end. de solder or just cut the wires off at the base plug then solder them to the 4 lengths of e string. pull new wire through by using old wire till e strings are at the headshell end.
now comes the fun part, pull the headshell wires out the headshell plug if they snap its no biggie as this is what the estrings are for. dig the excess wire out the plug then heat the estrings up one at a time and thread through the plastic plug following the old wire holes. heating the estrings up before threading makes the holes slightly bigger. top tip, put some washy liquid on the estrings after have got them through the plug this lubricates the holes for the new cable to slide easier.
now just pull the new wire through the plug then fasten with the bung.. remember the bung at the beginning 🙂
then just solder up the ends to the bottom plug and bingo, new cables.
as for grounding, there is no point replacing the old arm base wire as its a pain in the arz to do as you have to take the stub off.
as for a gnd wire.. yes a single wire to the gnd case is always best. you need to get the dremmil out for that though as you need to drill a hole all the way through the bottom lug for the new gnd cable.
hope this helps.
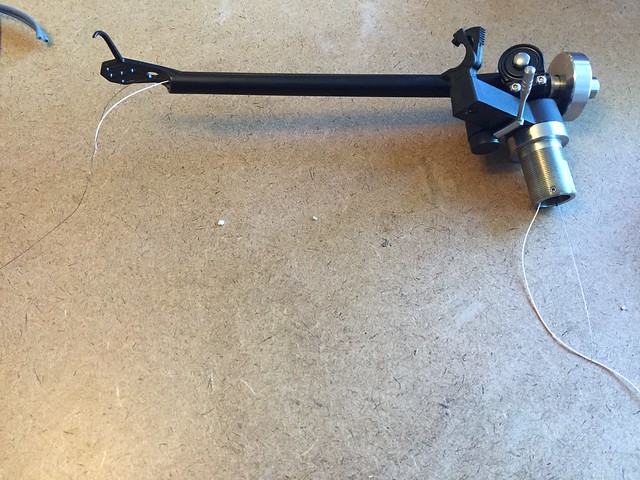
That's a very helpful description, Bibio, thank you. I started opening the arm for a closer look.
The rubber cap at the cartridge end appears to have thicker wires at the headshell end and thinner ones at the tube end. With no connectors visible, it seems they must be soldered together, and that the joints are inside the rubber cap.
 IMG_4483 by jeffdrouin, on Flickr
It also appears that the headshell wires might have been held in place by a super glue, as the surface of the rubber plug is shiny and a little mangled, and the wire do NOT want to budge.
 IMG_4482 by jeffdrouin, on Flickr
Any suggestions on getting these buggers out of there intact?
I've got some leftovers from the E string of my electric guitar to help thread the new wires through the arm.
The rubber cap at the cartridge end appears to have thicker wires at the headshell end and thinner ones at the tube end. With no connectors visible, it seems they must be soldered together, and that the joints are inside the rubber cap.
IMG_4483 by jeffdrouin, on FlickrIt also appears that the headshell wires might have been held in place by a super glue, as the surface of the rubber plug is shiny and a little mangled, and the wire do NOT want to budge.
IMG_4482 by jeffdrouin, on FlickrAny suggestions on getting these buggers out of there intact?
I've got some leftovers from the E string of my electric guitar to help thread the new wires through the arm.
to date i have never found a way of getting the wires out intact, i have always resorted to cutting them fairly close then pulling the rest of the inner copper strands out with small pliers/tweezers. the pvc sheath left inside the plug can then be collapsed with a long needle and pulled out.
yes they are soldered inside the rubber cap.
TBT i have always ended up mangling most of the caps and had to resort to using foam ear plugs as a new cap.
yes they are soldered inside the rubber cap.
TBT i have always ended up mangling most of the caps and had to resort to using foam ear plugs as a new cap.
Hi
I think it might help to prise out the little plastic plug in the middle of the rubber bung. This should loosen everything up (the plug is normally pushed in after installation to make the bung a tight fit in the arm tube). It would probably be best to snip the thin wires at the arm end and pull them outwards through the bung.
Don't worry if this doesn't work and the rubber piece is left unusable. There's nothing particularly special about this item and a replacement can be fabricated (one idea appears above this posting). The two rewiring kits I fitted to Rega arms actually came with a new one.
HTH
Mark
Thanks, markinuk. I removed the plug with needle nose pliers, which made it possible to remove some of the wires intact. I first had to cut the surface layer of glue with a hobby knife to be able to pull the old wires out of the bung. A couple of them broke inside the rubber bung, and I was able to remove them with tweezers or pry them out with a sewing needle and then pull with pliers. I then threaded the new wires through by soldering the ends with small guitar string clippings, which was easy.
Before dealing with the cartridge end, though, I had to thread the new tonearm wires through the base and out the cartridge end. To do that I first had to cut the small rubber tube in the arm, which took a long time with the hobby knife. In order to make the vertical cut, I had to manipulate the rubber tube with the knife tip so that it was positioned slightly sideways in the hole. I was then able to turn the cutting edge outward and run it up to the other hole in the tube, making a "vertical" cut, and it worked.
After that, I passed a long guitar string through the base and out the cartridge end of the arm. The instructions I used said to kink the end of the string to get it to pass under the horizontal bearing in the arm. I found that kinking the end made it impossible to pass the string through the base, so I used the straight end and tilted the arm into the upmost position and that worked just fine.
Once the guitar string was through, I left about 2" at the cartridge end with the lion share hanging out the base, and then soldered a tinned tonearm wire end to the guitar string just below the base opening. I was then able to gently pull the string at the cartridge end and thread the wire through, leaving a few inches of guitar string hanging out the base. I then desoldered the wire and taped it to the base and the headshell so it wouldn't move when I pulled the guitar string back toward the base, leaving a couple inches hanging out of the cartridge end. Then I soldered the next wire at the base opening and repeated.
The more wire that got into the arm, the harder it got to pull them through and they kept coming detached from the string. I noticed on one pull that another little rubber tube was coming out at the top opening of the base. So I cut that one with the hobby knife, too, which was much harder than the first one. I didn't damage the tonearm wires but did lose the ground wire, so I had to order a new one.
Once the bottom tube was out, the remaining wires threaded through with ease.
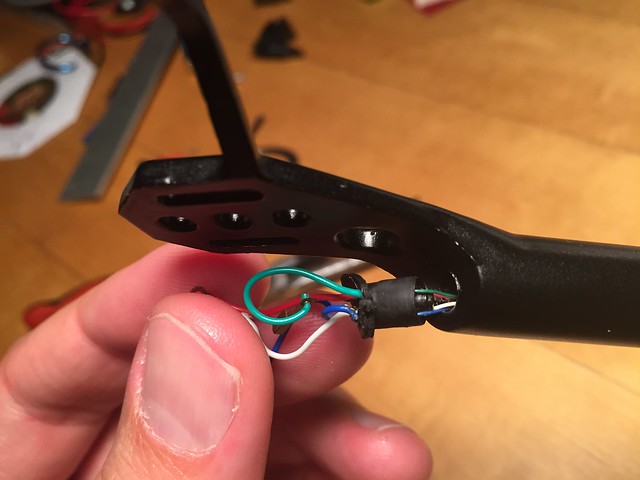
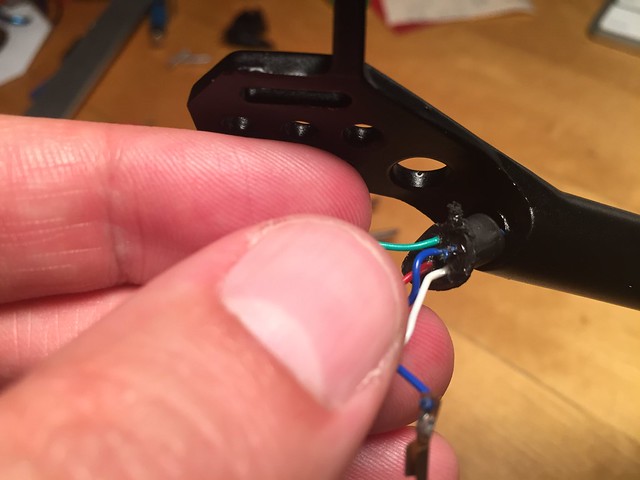
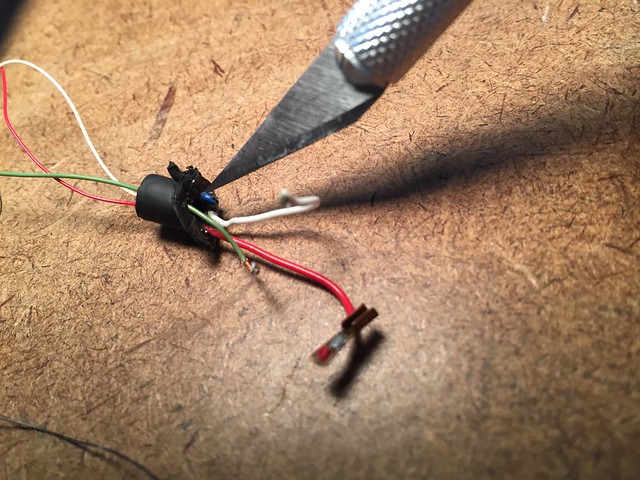
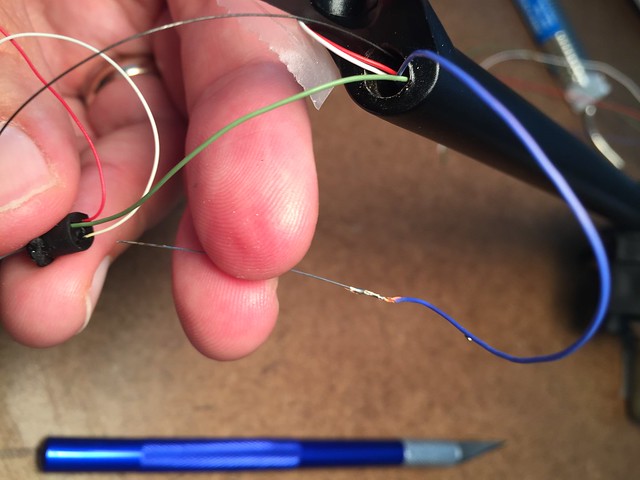
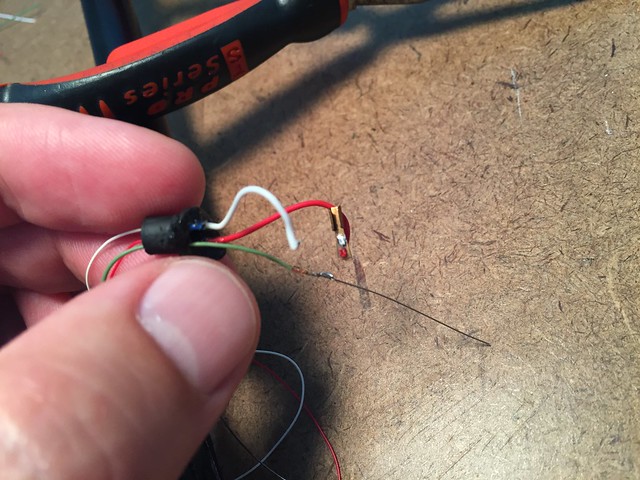
Now I have to solder the cartridge clips to the tonearm wire, drill a hole in the base plug, solder the phono wires to the tonearm wires, and solder the other ends of the phono wires to the RCA plugs.
Here are pics of the process thus far.
 IMG_4486 by jeffdrouin, on Flickr
 IMG_4490 by jeffdrouin, on Flickr
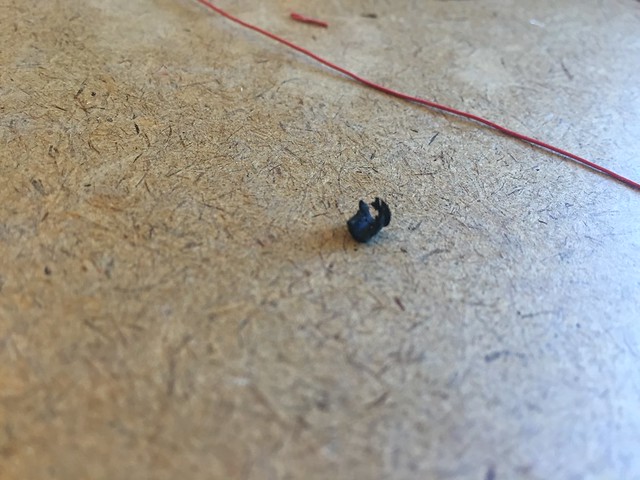
 IMG_4494 by jeffdrouin, on Flickr
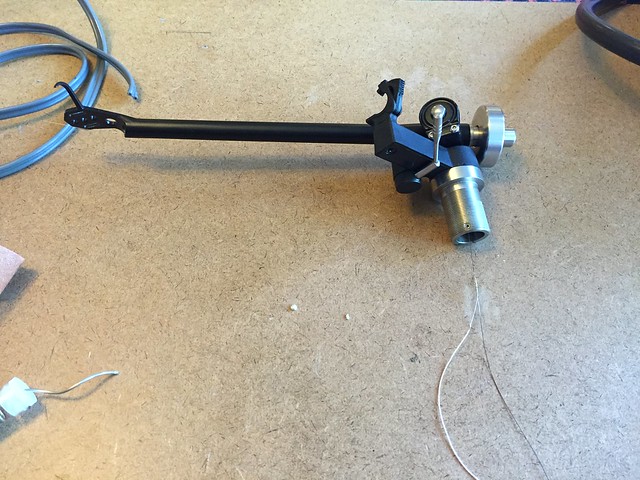
 IMG_4576 by jeffdrouin, on Flickr
 IMG_4577 by jeffdrouin, on Flickr
 IMG_4575 by jeffdrouin, on Flickr
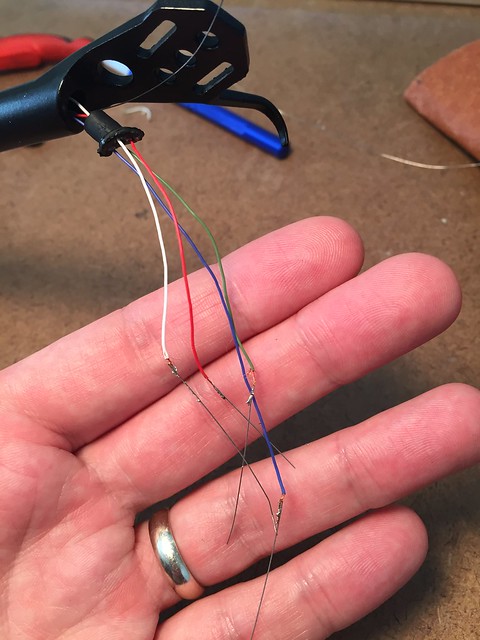 IMG_4579 by jeffdrouin, on Flickr
 IMG_4578 by jeffdrouin, on Flickr
NB: I'm using the SuperFlex Litz pure copper tonearm wire from KAB and it's very easy to work with. Limp as a noodle but the silicone jacket is incredibly durable and doesn't melt when soldering. Good stuff!
Before dealing with the cartridge end, though, I had to thread the new tonearm wires through the base and out the cartridge end. To do that I first had to cut the small rubber tube in the arm, which took a long time with the hobby knife. In order to make the vertical cut, I had to manipulate the rubber tube with the knife tip so that it was positioned slightly sideways in the hole. I was then able to turn the cutting edge outward and run it up to the other hole in the tube, making a "vertical" cut, and it worked.
After that, I passed a long guitar string through the base and out the cartridge end of the arm. The instructions I used said to kink the end of the string to get it to pass under the horizontal bearing in the arm. I found that kinking the end made it impossible to pass the string through the base, so I used the straight end and tilted the arm into the upmost position and that worked just fine.
Once the guitar string was through, I left about 2" at the cartridge end with the lion share hanging out the base, and then soldered a tinned tonearm wire end to the guitar string just below the base opening. I was then able to gently pull the string at the cartridge end and thread the wire through, leaving a few inches of guitar string hanging out the base. I then desoldered the wire and taped it to the base and the headshell so it wouldn't move when I pulled the guitar string back toward the base, leaving a couple inches hanging out of the cartridge end. Then I soldered the next wire at the base opening and repeated.
The more wire that got into the arm, the harder it got to pull them through and they kept coming detached from the string. I noticed on one pull that another little rubber tube was coming out at the top opening of the base. So I cut that one with the hobby knife, too, which was much harder than the first one. I didn't damage the tonearm wires but did lose the ground wire, so I had to order a new one.
Once the bottom tube was out, the remaining wires threaded through with ease.
Now I have to solder the cartridge clips to the tonearm wire, drill a hole in the base plug, solder the phono wires to the tonearm wires, and solder the other ends of the phono wires to the RCA plugs.
Here are pics of the process thus far.
IMG_4486 by jeffdrouin, on FlickrIMG_4490 by jeffdrouin, on FlickrIMG_4494 by jeffdrouin, on FlickrIMG_4576 by jeffdrouin, on FlickrIMG_4577 by jeffdrouin, on FlickrIMG_4575 by jeffdrouin, on FlickrIMG_4579 by jeffdrouin, on FlickrIMG_4578 by jeffdrouin, on FlickrNB: I'm using the SuperFlex Litz pure copper tonearm wire from KAB and it's very easy to work with. Limp as a noodle but the silicone jacket is incredibly durable and doesn't melt when soldering. Good stuff!
Last edited:
Well done, indeed - some challenges overcome there!
I should have mentioned (but had forgotten) that those two little rubber tubes in the pivot area can be pushed out with a suitably sized hex key inserted from the bottom of the arm pillar. In fact, the rewire kits I used came with one IIRC.
Obviously this needs to be done carefully, but it does work.
grand work there 🙂
the ground wire that goes up the through the base into the tomearm is connected at the stub threads by a copper clip. you either drill two holes with one threaded and countersunk at the bottom bearing end of the tube and attach a new ground there or take the stub off and solder new wire to the clip. the clip is a known problem area on the older arms.
the ground wire that goes up the through the base into the tomearm is connected at the stub threads by a copper clip. you either drill two holes with one threaded and countersunk at the bottom bearing end of the tube and attach a new ground there or take the stub off and solder new wire to the clip. the clip is a known problem area on the older arms.
The instructions I'm using say to use a rotary tool to grind away a patch of the anodized finish inside the tip of the arm at the cartridge end, thread a new ground wire through, and secure the exposed wire to the newly naked aluminum with the bung. Has anyone tried that? Does it work?
yes you can do that, your instructions are mistaken. the RB arm tube does not have an anodised finish.
if your going to do it that way then tin the end of the wire (this stops the bare copper oxidising) enough to go along the length of the bung and flatten out with pliers, you can put a little 'lip' on the end to stop it being pulled through when inserting the bung again.
if your going to do it that way then tin the end of the wire (this stops the bare copper oxidising) enough to go along the length of the bung and flatten out with pliers, you can put a little 'lip' on the end to stop it being pulled through when inserting the bung again.
What do we think about soldering the new ground wire to the shield of the phono cable, and then soldering the other end of the shield to the ground of the RCA plug, allowing the arm to be grounded through the amp?
If that works, it would eliminate the need for the ground lug, right?
If that works, it would eliminate the need for the ground lug, right?
- Status
- Not open for further replies.
- Home
- Source & Line
- Analogue Source
- Rega RB300 Rewire