Hi, Bohanna,
Sorry for not replying sooner. I've been very busy at work (I'm now actually working at a PC shop full time again.)
Basically, it's best to retrofit a projector with a decent (ie. VERY bright) HID lamp to get the best out of it. The first step for modding is to fake the ballast signals and then the hard part of fitting the new lamp and ballast begins.
As for doing these mods as an ongoing thing, I think it's a good idea, but I've looked into this and it's not quite as simple as it sounds. A big drawback of modding projectors with new lamps is getting the focus point of the bulb in the correct position for best brightness and uniformity. The original lamps are aligned very well and it's difficult to match the performance. There is a large amount of info on new bulbs and ballasts from YWH on the other thread.....
http://www.diyaudio.com/forums/showthread.php?s=&postid=1394834#post1394834
I've bought quite a few bulbs from YWH now and they are of very good quality for the price. I still have two projectors with the bulbs fitted and they're still going strong. I found that by far the easiest way of fitting the bulbs (you'll need an original reflector ideally) is to use "fire cement" to hold the bulbs in place.
I don't have a decent method of finding the best focus point, so a bit of trial-and-error is involved. If you're not as fussy as me when it comes to brightness uniformity etc. then it's not too difficult at all to get a good image out of it.
If you're looking to bypass a specific projector's ballast etc. Just post some photos of the ballast board and connections and I'll see if I can help when I get chance to reply.
OzOnE.
Hey Ozone thanks for getting Back to me .
It sounds Like its as simple as Jumping a wire on the Little three Pin connector that runs from the Little front Board(1AA4B10C1150B)to the Ballast, Leaving the Little fan connected and then Unplugging the Ballast Power wires. Is it really that simple?
It appears the way to disable the Lamp awarness and shutdown circut on many of these LCD Projectors is to Jump or trick out the Ballast reporting controls.
I am working on a List of questions in a FYI form to Put to this group that Hopefully will give us some of the Knowledge we need to get started with the various Mods. It is designed to give the Novice an educated guess as to How and what to expect when dealing with Modding a Projector. This is Pretty important since we are dealing with HIgh Voltages. Because there is little or NO comparison in the quality between a single LCD type DIY Projector and a 3 seperate RGB LCD Mod. I believe that the 3 LCD's will win. Especially as the DIYer Progresses. Because of this and with all the older LCD Projectors available on the Market tricking out the Lamp circut is going to be the Main thing Holding People Back. Once that is done the Projector lends itself to all Kinds of Possibilities!!
Give me a couple of days or so and I will Post the List of questions. Even if some of the question seem stupid and answers self evident to some. I beleive it will make it easier for the DIY Modder to understand rather than have to trool through hundreds and hundreds of forum Threads. THE One thing that has become Painfully clear is that we are Playing a hit or miss game in these forums and everybody seems to be trying to reinvent the wheel over and over and over and over again.
there are More thread that die or are left twisting in the wind than in a Hurricane. Many thanks in advance.
Feel free to Email me directly at stuffyhead1@aol.com
Bohanna
😎
I just scored a Proxima dp5900ug!!!!
Hi,
A friend happened to see an ad in a local bargain finder paper for a Proxima dp5900ug projector today and sent me the contact info. A quick google search found a very good review
http://www.encyclopedia.com/doc/1G1-19987921.html
When introduced in late 1997, this baby retailed for $9,000.00 US!
The owner`s manual is available here,
http://www.askproxima.com/service/dp5900/downloads/dp5900ug.pdf
The story being it was a very well kept one owner boardroom projector that had essentially gone through it`s first lamp and it sounded like the internal timer was now preventing the unit from operating. The PO ran the unit with the `REPLACE LAMP` light lit for some time until one day it would not come on.
I decided for the very reasonable asking price ($100) that it was a good gamble. This thing is spotless and mint. It comes in a hardshell travelling luggage case with wheels and telescoping handle to hustle around in airports and hotels with ease. This case was alone worth my admission price.
Two hour`s round trip drive to fetch and it is now home. I tried to fire it up and it came on properly, there was dim light out of the lens caused by what I assume the high voltage ignition sequence, followed by a surge in brightness as power supply DC was applied to the lamp and immediate shut down within maybe 400 mSec. During the brief time of light there was a blue screen and the graphic of the name Proxima projected onto the wall a few feet away from my lens.
I am going to assume that the lamp timer has run out of hours and it may well be this that is preventing the lamp from coming on full. There is apparently a reset button somewhere that can reset the lamp timer, to be done only when the lamp is replaced with a new one. If I reset this and the set operates properly I`ll know that I am just a new lamp away from a useable PJ.
I`d like to save the big money that a new 125 watt metal halide lamp assembly costs. Towards this end the idea of removing the existing ballast, fooling the PJ into thinking it is in and AOK, and installing a xenon short arc lamp in my old reflector assembly and wiring in an appropriate ballast is tempting!
I`ll keep this thread appraised of anything I learn and do.
The Lamp timer has NOthing to do with the the unit starting up.
My First opinion ,,, It appears to me Like the Lamp is your Problem. The sanyo Projectors are VERY VERY sensitive to lamp circuts. If the Lamp is on the way out than it is shutting down during the start Up/ countdown cycle. You get the dim light then the Brighter Blue Light starts up then it goes dead.
If I were you I would Buy a New Lamp and Make SURE it is a Philips UHP. This is a fantastic Projector. BY todays standards it would be about 1000 to 1200 Lumens and the quality is superb!.
If you want to try jumping the Ballast to see if if you can keep it running, there is a thread in here that decribes doing just that.
the Board that connects to the Ballast is Located Under the Main top Board to the right of the Lens if you are Looking at it from the front. Be very carefull if you remove the LCD ribbons to make sure the little tabs on the connectors are seperated correctly. You have to pull them out a a few MM's evenly with your fingernails. I am Planning on trying this myself with one of the units I have. I just have to decide which Pins to Jump. and since I am not an electrionic tech,, I am a Bit hesitant
Let Me KNow what you decide. good Luck
Please reply here and Feel free to Email Me Directly
at Stuffyhead1@aol.com
Bohanna
Two hour`s round trip drive to fetch and it is now home. I tried to fire it up and it came on properly, there was dim light out of the lens caused by what I assume the high voltage ignition sequence, followed by a surge in brightness as power supply DC was applied to the lamp and immediate shut down within maybe 400 mSec. During the brief time of light there was a blue screen and the graphic of the name Proxima projected onto the wall a few feet away from my lens.
I am going to assume that the lamp timer has run out of hours and it may well be this that is preventing the lamp from coming on full. There is apparently a reset button somewhere that can reset the lamp timer, to be done only when the lamp is replaced with a new one. If I reset this and the set operates properly I`ll know that I am just a new lamp away from a useable PJ.
I`d like to save the big money that a new 125 watt metal halide lamp assembly costs. Towards this end the idea of removing the existing ballast, fooling the PJ into thinking it is in and AOK, and installing a xenon short arc lamp in my old reflector assembly and wiring in an appropriate ballast is tempting!
I`ll keep this thread appraised of anything I learn and
Hi,
I think Bohanna may be right - usually if the lamp timer has expired the projector won't attempt to ignite the lamp at all. The reason the lamp probably shuts down is that it is worn out....
Most lamps are simply an arc gap - when the electrodes wear down the gap becomes wider. The lamp then requires more voltage / current to ignite.
The projector generally has no way of knowing the power needed to start the lamp until the first sparks jump the gap, so if the lamp is worn, the PJ will still pulse the lamp for a short time before shutting down. (ie. the lamp timer is only an estimate of the true lamp "health", the lamp can of course wear out before or after the timer expires.)
If you're looking for a cheap replacement for the lamp, you can't go wrong with the bulbs from YWH. Yes, they need the original reflector, and can be tricky to fit etc. but they're cheap enough just to get one to "play" with. If your original lamp was a UHP, then you would just need a JYd AC bulb (with the same wattage) to replace it.
I've used a few of these bulbs now and I only had a problem with a JYd DC bulb because I was using plaster back then and some of it got on the globe part of the bulb. This caused the bulb to fracture when in use (probably due to the differences in expansion rates of the glass / plaster). In other words, you MUST keep the bulb part clean!
As long as your ballast board looks the same, you should be able to get the PJ to stay on by just connecting the "lamp lit" signal to the Ground pin like in my post here.....
http://www.diyaudio.com/forums/showthread.php?postid=954813#post954813
It's best to disconnect the ballast board altogether and just short the corresponding two pins on the small signal plug.
!!!! Make sure this is the signal plug and not the power plug !!!!
The problem here is that this won't bypass the lamp timer if it has expired because this is usually stored in an eeprom chip on the main board. Or, on some projectors they use a small fuse on the lamp holder itself which is purposely "popped" when a new bulb is first installed. (Sometimes there are buton combinations to reset the lamp timer, or you have to access the service menu first.)
If you do get the PJ running without the ballast / lamp. You could try a small halogen lamp and external PSU but it'll probably give a very dim image.
If you're looking for projectors, you could take a chance on an eB*y one - most of the faulty ones just have blown lamps but you could still end up with a proper broken PJ of course. I generally like to aim for an XGA resolution DLP because the extra resolution is well worth it IMHO (compared to SVGA). I don't tend to buy second-hand LCD projectors purely because I've bought many in the past with worn LCD panels (the blue ones often fail first due to UV damage.)
So in summary, it's not too difficult to bypass the ballasts in most PJ's, but it does require some basic knowledge and possibly soldering skills. Most PJ's I've seen use a simple "lamp lit" signal, but other ballasts send out a voltage which corresponds to the current drawn by the lamp as it "heats up".
Also, nearly all PJ's use Opto-couplers / Opto-isolators to isolate the high voltage side of the ballast from the rest of the projector. I can usually work out most PJ's by downloading the datasheets for the optos (try G**gle), then tracing the tracks to the signal cable.
OzOnE.
P.S. Again, please don't take any chances with this high-voltage stuff as I wouldn't want anyone to fry for the sake of a big screen!
It worked!!!!
Hey Ozone you are a freaking Genius!!!
It worked !! I used a Little stripped trash Bag twist tie as a conduit and Jumped between the Lamp Lit and Gnd pin slots on the end of the tiny connector as you suggested
I then Unplugged the two wire (Black and white) Power cable from the Ballast and Put the Ballast back in Place.
I also Put small spacer slug in the (indented) Lamp holder cover plate power switch and taped over it.
The thing has fired up!! and STAYS fired up!!! I will Post a few Pictures of this set up soon.
This was a trial unit that had several optical Problems.
Now that I know this works I will be trying it on a Projector that I know is working correctly.
BTW
The Heavy Brown and Blue Main AC power Lines and the Backside of the indented cover switch is attached to the end of the Ballast so it is Better to Leave the Ballast in Place and Just disable it by unplugging the Black and white Ballast Power connector.
So far SOOOOO GOOOOOOOOD!!
Thanks again Man
Bohanna
Stuffyhead1@aol.com
Hi, Bohanna,
Glad to hear it's working OK!
It is a strange feeling to have a projector's main boards running without the worry of the lamp's UV / IR / high voltage. It's also nice to start playing with different replacement lamps once you have the projector running.
Of course there are still dangerous voltages to watch out for, but some PJs keep the PSUs enclosed which makes things much like working with a PC (ie. things can still be shorted out, but you're less likely to get fried yourself.)
If you try using high-power LEDs in the projector (for example), you might find that you'll hit a limit as to how many LEDs you can add when trying to make the image brighter. This is due to an optical factor called etendue....
I think LCD projectors are more forgiving in this area (I've never really tried with LCD), but in DLP projectors the light source needs to come from as small a "point source" as possible. If you try to add more light sources in an array, the brightness efficiency will go down and the image sharpness will probably suffer too.
My basic way of thinking of etendue is that there's basically a narrow path through the PJ which all the light has to "fit through" for it to be light efficient. I'd be interested to see how an LCD PJ copes with multiple light sources. The advantage of LCD is that there are three LCD panels, so you could put a light source behind each panel (with the correct optics).
OzOnE.
Bohanna or anyone else?
I have been looking at those three very fragile ribbon cable connectors that go from the main board down into the LCD light valves and am quite afraid of touching them. Some one here actually reported breaking one of these connectors while trying. Is there any way of accessing the lamp ballast control wiring cable (to disconnect and bridge) and AC power input lines (to disconnect) without physically removing the top main ckt board?
I have been looking at those three very fragile ribbon cable connectors that go from the main board down into the LCD light valves and am quite afraid of touching them. Some one here actually reported breaking one of these connectors while trying. Is there any way of accessing the lamp ballast control wiring cable (to disconnect and bridge) and AC power input lines (to disconnect) without physically removing the top main ckt board?
Just to make sure Is this the DP5900 we are talking about??
Bohanna
Bohanna
rcavictim said:Bohanna or anyone else?
I have been looking at those three very fragile ribbon cable connectors that go from the main board down into the LCD light valves and am quite afraid of touching them. Some one here actually reported breaking one of these connectors while trying. Is there any way of accessing the lamp ballast control wiring cable (to disconnect and bridge) and AC power input lines (to disconnect) without physically removing the top main ckt board?
When removing the TOP MAIN BOARD !!
The three ribbon cables that connect the top board to the 3 LCD's are held in Place By a little slide in clip that stays permantly connected to the top Main Board. It is kind of touchy !! you only have to slide it less than 1/16th of an inch to disinengage it from the ribbon cable. Use your fingernails to pry it away . MAKE SURE that you slide or Pull Both sides evenly out at the same time. Once it has traveled the 1/16th of an inch you pull the ribbon cables straight out. The Only other thing you really need to be concerned with is the two connectors on the rear right underside of the top Board (Looking down) near the VGA and svideo input board. They connect the top Board to the projector input Ports. So be carefull . You pry them straight up . Make sure that when you put the unit Back together they (the two connectors) are seated on their slots correctly before screwing the top Plate down. These are touchy connectors that fit Male on the top to female on the Bottom/VGA Board they are white with multiple silver connections you can't see them at first Glance you can only see then when you Pry then straight up.
Although Most of the connectors are keyed for resembbely
Make sure to take Pictures of the ENTIRE set up before you take it apart so you know what went where in case you have a Problem afterwards putting it Back together.
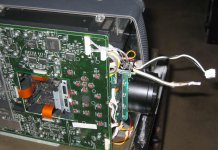
Here are two Photos of the Ballast and the connectors that need to be unplugged to disable the Ballast. this is the Ballast with the cover/shield removed so you can see it.
the Little cable bottom left is the optical sensor cable that has to be removed/unplugged and the two Pins jumped . The Bigger black and white plug is the one that actually powers the Ballast.
you unplug it as well. the second photo is the t wo cables out of the unit for refrence Purposes
It if is just a lamp you are trying to retro fit I would do that with a new Lamp before trying to work with disableing the Ballast. YWH
has these Lamps for sale
Good Luck
Bohanna
The three ribbon cables that connect the top board to the 3 LCD's are held in Place By a little slide in clip that stays permantly connected to the top Main Board. It is kind of touchy !! you only have to slide it less than 1/16th of an inch to disinengage it from the ribbon cable. Use your fingernails to pry it away . MAKE SURE that you slide or Pull Both sides evenly out at the same time. Once it has traveled the 1/16th of an inch you pull the ribbon cables straight out. The Only other thing you really need to be concerned with is the two connectors on the rear right underside of the top Board (Looking down) near the VGA and svideo input board. They connect the top Board to the projector input Ports. So be carefull . You pry them straight up . Make sure that when you put the unit Back together they (the two connectors) are seated on their slots correctly before screwing the top Plate down. These are touchy connectors that fit Male on the top to female on the Bottom/VGA Board they are white with multiple silver connections you can't see them at first Glance you can only see then when you Pry then straight up.
Although Most of the connectors are keyed for resembbely
Make sure to take Pictures of the ENTIRE set up before you take it apart so you know what went where in case you have a Problem afterwards putting it Back together.
Here are two Photos of the Ballast and the connectors that need to be unplugged to disable the Ballast. this is the Ballast with the cover/shield removed so you can see it.
the Little cable bottom left is the optical sensor cable that has to be removed/unplugged and the two Pins jumped . The Bigger black and white plug is the one that actually powers the Ballast.
you unplug it as well. the second photo is the t wo cables out of the unit for refrence Purposes
It if is just a lamp you are trying to retro fit I would do that with a new Lamp before trying to work with disableing the Ballast. YWH
has these Lamps for sale
Good Luck
Bohanna
Attachments

This Photo is a shot of the Projector tricked out with the two cables removed from the Ballast and still connected to the projector.
The Little one (originally from the Ballast Optics) is Jumped with a bent staple.
the Larger one is the one that was originally connected to the Ballast. It reguires NO JUMPING!. It stays unplugged.
Good Luck
Bohanna
BTW I an on vacation in Florida so if I don't get Back to you guys too quickly bear with me
Attachments
Hi,
Just to second that - do NOT short out the power cable (thicker black / white two wires). If you're "lucky", it would just blow the fuse, but is more likely to blow components up or worse !!
OzOnE.
Just to second that - do NOT short out the power cable (thicker black / white two wires). If you're "lucky", it would just blow the fuse, but is more likely to blow components up or worse !!
OzOnE.
OzOne_2k3
Reading another thread, you said you repaired a PG-M15x power supply, I have the same projector and it seems the power supply has died. Can you send me any information you can in how you fixed it, I would email you privately but I am a new member and don't have enough post yet to email others.
Thanks
Bohanna said:Just to make sure Is this the DP5900 we are talking about??
Bohanna
Yes it absolutely IS a DP5900. I will read your next posts now. Thanx.
BTW
to avoid any confusion the Ballast supply Pictures in the Beginning of this Thread show a red and Black wire connected to the Ballast power supply. In My Photos it shows a Black and white wire. They are the same connectors and wires just different colors. I don't know if is because it is a sanyo 8800N I am using or that they changed colors during Production of these units. Also it seems Like the Picture views of mine and the first pictures in this thread are turned 180 degrees or upside down from each other even though they are the same Ballast Board. Any questions twist you neck upside down and Look at the Board
best wishes
Bohanna
Hi, lewkev,
Sorry, I must have missed your first post....
I just had a quick look at my PSU (easy to take this PJ apart luckily). I know I replaced the main switching IC - the main IC quite likely to fail first as it does a fair amount of work. The IC is an ST "VIPer 100". You can get one from RS....
http://uk.rs-online.com/web/search/...searchProducts&searchTerm=VIPer+100&x=16&y=12
It looks like I also replaced the optocoupler, a small transistor near the main IC, and one of the rectifier diodes....
There are three diodes (one for each output voltage 3.3V, 5V + 13V). Each diode has a different voltage rating. ie. one is IR3F, one is IR3J. I don't know what third one was, as this was the one I replaced (with a normal sized round diode.) I can't read the numbers on the replaced diode, but you just need something that can handle the voltage / current on that output.
Here's the datasheet for the output diodes, page 5 shows the voltage / current ratings....
http://www.ortodoxism.ro/datasheets/irf/15mq040n.pdf
First thing to do is to test each diode for a short-circuit (with the power off!)
If the VIPer IC has blown, it might have taken something else with it, so it might not be straightforward to repair. Are there any burnt components and is the main fuse blown?
OzOnE.
I opened the case, and everything looked very packed in, so I wanted to know if this would be an easy fix or not. I guess there is no loss since I'm not gonna pay someone, I'll just trash it if nothing can be done. I guess I'll try to take apart and start testing, but first where is the main fuse?
Hi,
I'm not sure where the main fuse would be (at work atm.) The main PSU is at the front of the case next to the lens. There's only one screw which needs to be undone on the plastic bracket which holds the PSU. You will probably need to disconnect the three plugs (small white one, black one with clip, and long white one.) You should then be able to get the whole PSU out.
If there are any obvious burnt components, then you know it's the PSU. Does the projector do anything at all when plugged in? (any lights etc.)?
OzOnE.
Am I missing something here??? Are we talkiing about the 5900??
If so there is a fuse/reset Button inside the Projector right on the top of the lamp chamber. The second Picture in this thread actually show's it complete with the Little Button
good Luck
Bohanna
If so there is a fuse/reset Button inside the Projector right on the top of the lamp chamber. The second Picture in this thread actually show's it complete with the Little Button
good Luck
Bohanna
lewkev said:I opened the case, and everything looked very packed in, so I wanted to know if this would be an easy fix or not. I guess there is no loss since I'm not gonna pay someone, I'll just trash it if nothing can be done. I guess I'll try to take apart and start testing, but first where is the main fuse?
- Status
- Not open for further replies.
- Home
- General Interest
- Everything Else
- The Moving Image
- DIY Projectors
- proxima 5900 MOD HELP PLZZ