Sploo like you I wondered about the warning on the tin or wood hardener. I actually rang Ronseal tech support and talked it over with them. They said basically it's just intended for use on rotting real wood, not MDF. He couldn't really say why it's not a surface treatment other than it's for damaged patches of wood rather than big areas.
However, it won't stop me using it as the results are good. It's just a shame it's so expensive.
I'd be really interested in how you get on with the epoxy again. Maybe instead of the West Systems (which is expensive?) you could try normal stuff used by car bodyshops. You can get it from Halfords, in yellow tins.
richie00boy said:Sploo like you I wondered about the warning on the tin or wood hardener. I actually rang Ronseal tech support and talked it over with them. They said basically it's just intended for use on rotting real wood, not MDF. He couldn't really say why it's not a surface treatment other than it's for damaged patches of wood rather than big areas.
However, it won't stop me using it as the results are good. It's just a shame it's so expensive.
I'd be really interested in how you get on with the epoxy again. Maybe instead of the West Systems (which is expensive?) you could try normal stuff used by car bodyshops. You can get it from Halfords, in yellow tins.
Rich, has any of the MDF ever cracked with the Ronseal Hardener. When I say cracks I mean tiny almost hair line fractures in the MDF as you look at the crosssection rather than face.
I say this because I have the first test piece I tried this out on in the garage still and came across it a month or so ago and discovered lots of these fractures. I've got older bits of untreated MDF up there and they're fine. I can only assume its something to do with the hardener and the climate. I never noticed this problem on the Perceives though.
I'm wondering if thats what the tech support and warning labels were trying to get at?
BTW I used the Bonda stuff but it looks to be the same thing as the Ronseal.
richie00boy said:...However, it won't stop me using it as the results are good. It's just a shame it's so expensive....
...I'd be really interested in how you get on with the epoxy again...
Well, I'll give it a go and see what happens.
The West System epoxy isn't cheap - 16 quid for about 600g. However, the coverage is pretty reasonable. I don't have the figures in front of me right now, but I think it was something like 6-8m^2 per kilo.
Hadn't thought about getting something from Halfwits. Will have to take a look the next time I visit.
ShinOBIWAN said:...I say this because I have the first test piece I tried this out on in the garage still and came across it a month or so ago and discovered lots of these fractures....
Did you coat it completely, or just one side? I'm wondering if stabilising only part of a section of MDF results in moisture changes (from the other side) which then causes cracking on the side that's 'fixed'.
BTW I'm reading through your 'LGT' Construction Diary, and I'm stunned at the stuff you're doing without any CNC gear. I still make plenty of foul-ups, but it's a little easier now that I'm running a CNC router.
Originally posted by sploo Did you coat it completely, or just one side? I'm wondering if stabilising only part of a section of MDF results in moisture changes (from the other side) which then causes cracking on the side that's 'fixed'.
I did all side except for the rear face. Your probably right about the moisure getting through the untreated part and causing the MDF to expand at different rates. That would quickly and easily explain the fractures.
I never observed anything like that with a fully treated cabinet though, which adds further weight to what your saying.
BTW I'm reading through your 'LGT' Construction Diary, and I'm stunned at the stuff you're doing without any CNC gear. I still make plenty of foul-ups, but it's a little easier now that I'm running a CNC router.
Thanks, most of the stuff you can do with CNC can be done with good handtools its just that the accuracy isn't always as good and the setup time for guide rails, measurements, markings etc. all add up, so you need a fair bit a patience and diligence.
I coated both sides, and it's maybe not been long enough to for faults to show yet. Also the cabs have been kept in the house so maybe big moisture changes have not been seen.
Handy to know somebody with a CNC router 😉
Handy to know somebody with a CNC router 😉
sorry just a small question rather than a new thread richie00boy
did u upload that program yet ?
did u upload that program yet ?
You would have been better just posting again on the thread in question, it then shows up to me that a new reply is there 😉
No I said I would do you a design if you gave me the details I asked for, as the program was not at a stage I was happy to release.
No I said I would do you a design if you gave me the details I asked for, as the program was not at a stage I was happy to release.
ok thats cool. was not to make anything with just see how it work but anyway different subject back to priming lol
ShinOBIWAN said:...I never observed anything like that with a fully treated cabinet though, which adds further weight to what your saying.
I'm hoping that might be the same reason I'm seeing some small lines on my original test pieces - as I didn't coat the bottom of the stacks. Will make sure they get completely coated this time.
ShinOBIWAN said:Thanks, most of the stuff you can do with CNC can be done with good handtools its just that the accuracy isn't always as good and the setup time for guide rails, measurements, markings etc. all add up, so you need a fair bit a patience and diligence.
Tell me about it. I built a set of five speakers a couple of years back, and it took weeks. I even have a decent router table I made, but it's all the measuring (as opposed to the cutting) that eats up the hours.
These days, I can get home from work, draw a few lines and circles in a CAD package, wander into the garage, and have something cut, all in a couple of hours. Well, apart from when I make one of about 500 different type of mistakes (I'm very inventive - always working out a new way to screw up 😀).
richie00boy said:I coated both sides, and it's maybe not been long enough to for faults to show yet. Also the cabs have been kept in the house so maybe big moisture changes have not been seen.
Handy to know somebody with a CNC router 😉
Sounds like the right thing to do (a full coat). I'll see what happens in time.
The CNC gear is useful (took me long enough to save up for it)! I'm based in Oxfordshire, so if you're after stuff cutting, then I'm quite happy to discuss the possibility.
richie00boy said:Thanks, it would likely be odd smallish panels really. Stuff that would be hard to do by hand.
Sure. Just PM me if you've got something you're after.
I've mostly been cutting MDF, and a little plywood. So far I've not found a setup that cuts plywood to my satisfaction (upcut spiral bits tend to produce a bit too much tearout), but the MDF is OK.
BTW Ant - I've been reading through your LGT and Perceive v2.0 diaries. What can I say... simply stunning work.
Two things that caught my attention. I see you are a believer of room acoustics correction. Me too:
http://spikyfish.com/acoustics/
http://spikyfish.com/acoustics/panels.html
I also notice that you're creating lots (and lots) of MDF dust. Be careful with that stuff - it's very bad for your health. I put together a decent extraction system (linked below) but I do still wear an MDF certified canister mask for some jobs (and feel far better than I did before!)
http://spikyfish.com/DustExtraction/
Well thanks again Sploo.
I love the dust extraction system. I was expecting a hose attached to a huge vacuum cleaner or something like that. But that really is something else.
I do use a respirator at all times but as you say the dust is mega and a PITA to clean up.
I love the dust extraction system. I was expecting a hose attached to a huge vacuum cleaner or something like that. But that really is something else.
I do use a respirator at all times but as you say the dust is mega and a PITA to clean up.
sploo your email button is not enabled, please can you enable it in your UserCP, or contact me via my email button 🙂
OK, here's an update on my priming experiments.
The first set of test pieces I primed are now a month old, and all but the epoxy coated block are clearly showing the glue lines.
After painting the blocks (black cellulose) and flatting, I put a few coats of lacquer (from a can, as I didn't have any for the HVLP gun) onto the epoxy coated piece. This block was then finished using the instructions from ShinOBIWAN's "A 'how to' for High Gloss Finishing" thread.
Whilst not showing a hugely deep shine (due to the thin lacquer from the can) this epoxy block has been sitting in my living room, with no signs of creeping or sinking of the finish.
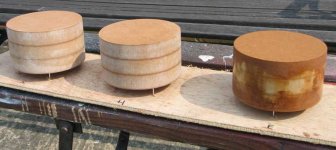
I did another three test blocks, coating one with shellac, one with wood hardener (which I didn't try last time) and another with epoxy. This time, all the blocks were left in my living room for a few days before sealing, and were completely sealed (i.e. not just the sides and top).
Before applying the sealer, I also filled any holes/lines with Plastic Padding PP100 filler.
You can see the test blocks in the attached photo.
More to come shortly...
The first set of test pieces I primed are now a month old, and all but the epoxy coated block are clearly showing the glue lines.
After painting the blocks (black cellulose) and flatting, I put a few coats of lacquer (from a can, as I didn't have any for the HVLP gun) onto the epoxy coated piece. This block was then finished using the instructions from ShinOBIWAN's "A 'how to' for High Gloss Finishing" thread.
Whilst not showing a hugely deep shine (due to the thin lacquer from the can) this epoxy block has been sitting in my living room, with no signs of creeping or sinking of the finish.
I did another three test blocks, coating one with shellac, one with wood hardener (which I didn't try last time) and another with epoxy. This time, all the blocks were left in my living room for a few days before sealing, and were completely sealed (i.e. not just the sides and top).
Before applying the sealer, I also filled any holes/lines with Plastic Padding PP100 filler.
You can see the test blocks in the attached photo.
More to come shortly...
Attachments
...I then flatted the three blocks (applying a second epoxy coat as per the instructions, and more shellac/hardener to the other two). After another flatting, the blocks were sprayed with black cellulose.
Very strange result; this time, the glue lines became immediately visible on the epoxy block - as if the paint had managed to 'eat' only into those areas. I've still not worked out why that happened, as it didn't the first time I used the epoxy.
The other two blocks also showed the lines, in the case of the shellac, pretty much the same as before.
After flatting the paint, I was able to remove all traces of the lines on the blocks.
This time, I had some proper lacquer, and sprayed around six coats using the HVLP gun. This showed the lines on the epoxy block again (though to a slightly lesser extent)! Weird. 😕
I left the blocks for a week and performed a finish sanding/polishing as before, and this managed to get a very good finish on the epoxy block (it wasn't too hard to flat out the lines again).
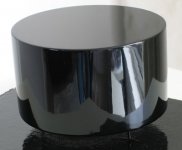
After another week sitting in my living room, the epoxy coated block still looks fine, but the lines are starting to appear on the other two.
Attached is a photo of the epoxy block.
Conclusions:
1) Epoxy is the only coating I've yet found that will prevent glue lines reappearing (not even 2k high build automotive primer will do it).
2) Leaving the blocks inside to 'equalise' the moisture content to that of the intended room placement didn't appear to help that much.
3) The lacquer I used was a single pack product, and is still soft after two weeks (easy to put a fingernail into it). As a result, during final flatting/polishing you end up leaving fingerprints and marks as you handle the block. Unfortunately, it looks like I'm going to have to buy (or at least hire) a compressor and airfed mask, so I can spray 2k lacquers.
4) Shin's gloss finishing thread gives you great results, and probably saved me weeks of experimentation - many thanks.
Very strange result; this time, the glue lines became immediately visible on the epoxy block - as if the paint had managed to 'eat' only into those areas. I've still not worked out why that happened, as it didn't the first time I used the epoxy.
The other two blocks also showed the lines, in the case of the shellac, pretty much the same as before.
After flatting the paint, I was able to remove all traces of the lines on the blocks.
This time, I had some proper lacquer, and sprayed around six coats using the HVLP gun. This showed the lines on the epoxy block again (though to a slightly lesser extent)! Weird. 😕
I left the blocks for a week and performed a finish sanding/polishing as before, and this managed to get a very good finish on the epoxy block (it wasn't too hard to flat out the lines again).
After another week sitting in my living room, the epoxy coated block still looks fine, but the lines are starting to appear on the other two.
Attached is a photo of the epoxy block.
Conclusions:
1) Epoxy is the only coating I've yet found that will prevent glue lines reappearing (not even 2k high build automotive primer will do it).
2) Leaving the blocks inside to 'equalise' the moisture content to that of the intended room placement didn't appear to help that much.
3) The lacquer I used was a single pack product, and is still soft after two weeks (easy to put a fingernail into it). As a result, during final flatting/polishing you end up leaving fingerprints and marks as you handle the block. Unfortunately, it looks like I'm going to have to buy (or at least hire) a compressor and airfed mask, so I can spray 2k lacquers.
4) Shin's gloss finishing thread gives you great results, and probably saved me weeks of experimentation - many thanks.
Attachments
PVA mixed with water, painted on and let dry thoroughly before sanding isn't the right approach?
I used it before for the back edges of my cabinets which I paint flat black, and it seemed to have worked for me. I was not attempting the level of finish you are, however.
Good thread.
Paul
I used it before for the back edges of my cabinets which I paint flat black, and it seemed to have worked for me. I was not attempting the level of finish you are, however.
Good thread.
Paul
- Status
- Not open for further replies.
- Home
- Loudspeakers
- Multi-Way
- Priming MDF boxes