Here are couple of REW measurements (all done with 1/48 graph smoothing):
a) Measurement #1:
- It shows raw response of the drivers installed in box => so no DSP applied, only cross-over at 600Hz.
My comments:

b) Measurement #2:

a) Measurement #1:
- It shows raw response of the drivers installed in box => so no DSP applied, only cross-over at 600Hz.
My comments:
- There is sharp peak on bass reflex port tuning frequency (which is around 68Hz),
- There is clear evidence how horn influences mid-frequencies on fullrange drivers => from 600Hz to 2.5kHz output level is almost 10dB higher than with two woofers,
- On 3kHz, output from horn drops sharply to 4kHz (about -13dB), and then from 4kHz to 13Hz is relatively flat until large notch on 15kHz,
- After notch, frequency raises again, to about same level as from 4-13kHz, all the way to 20kHz.
b) Measurement #2:
- After three different DSP adjustments & measurements, I've managed to get roughly +/- 3dB response (from 92dB @ 1kHz reference line) in most of the frequency spectrum, but with couple of exceptions:
- there is drop on 150Hz (drops -10dB, to 82dB), which is probably from floor reflection,
- I didn't used delay on woofers, as frequency response is smooth around 600Hz cross-over frequency, even without delay,
- there is cancellation notch on 15kHz (drops sharply -14dB to 78dB), which can't be compensated.

One day I've decided to test my portable MEH to see how loud it can play before distortion level is too high.
As I said previously, this test cabinet with single H280 horn & my old 6.5" car woofer drivers was never intended to play extremely loud because:
a) both woofers are relatively low sensitivity (88db @1W/1m),
b) their T/S parameters are not suitable for vent box, as they are designed for closed box applications (aka car doors installation),
c) and they have limited membrane size & limited X-max when compared with my actual plan (only two 6.5" woofers compared to four 8" woofers).
But anyway, I charged fully my 21V Li-Ion batteries on my portable bluetooth MEH, took fully charged laptop with REW, took USB MIC , all cables required and few cardboard boxes, and drove my car to flat, empty area where such test can be performed.
So first I wanted to see actual REW measurements on maximum volume => so I've placed portable MEH on two cardboard boxes, and at 1m distance from MEH I placed USB mic also on few cardboard boxes.
I've connected USB cable from "Arylic" plate amp to laptop, so I can use USB audio format for my REW sweeps.
Then turned up "Arylic" plate amp to maximum volume, adjusted all other volumes in Windows to maximum, and adjusted REW volume output to -12dB.
After that I made a quick test sweep, but distortion was already too high, not only in REW software but audibly as well.
So I've decreased REW output in -1dB steps , and try couple of sweeps, until distortion was acceptable => around -15dB output produced loudest possible output with acceptable distortion.
REW measurements showed that with my 4th version of DSP settings, maximum continuous output on bass frequencies was around 100dB on 1 meter ,and average sound output was around 97dB.
Please note that I purposely reduced mid/high frequencies in 4th DSP version, to about -3dB compared to bass levels, as in closed spaces fully flat DSP setting has too much mid/high frequencies for my taste.
What is interesting, in these few sweeps I noticed that now there was large & wide peak on 480Hz which wasn't present with my prior DSP settings, here are couple of REW screenshots:

Hm, I was a little bit disappointed with measured numbers, even though I am aware that this is just temporary box, and that I will build twin H280 horn box that should have larger output.
But, when the speaker is already here, in open space, I wanted to hear actual sound from various distances, so I found some psy trance mix, took my cell phone, and at 40m distance I started to record video.
What surprised me first , was clarity of the sound from that distance => from 40m distance I could easily identify all sounds, without details missing.
Second thing is that it was sufficiently loud from 40m distance in fully open space => even though the measured sound output was (only) up to 100db/1m.
Third thing is that mid/high frequencies are not completely lost from axis center => horizontal & vertical coverage is quite good, even though speaker was located very low, only 50-60cm from floor.
Here is the video and short description:
a) From beginning of video and up to 1:20 mins, it was recorded from 40m distance,
b) Then , I moved to 50m distance for short time,
c) After that, I slowly walked towards the speaker, and stopped at around 10m distance from speaker.
As I said previously, this test cabinet with single H280 horn & my old 6.5" car woofer drivers was never intended to play extremely loud because:
a) both woofers are relatively low sensitivity (88db @1W/1m),
b) their T/S parameters are not suitable for vent box, as they are designed for closed box applications (aka car doors installation),
c) and they have limited membrane size & limited X-max when compared with my actual plan (only two 6.5" woofers compared to four 8" woofers).
But anyway, I charged fully my 21V Li-Ion batteries on my portable bluetooth MEH, took fully charged laptop with REW, took USB MIC , all cables required and few cardboard boxes, and drove my car to flat, empty area where such test can be performed.
So first I wanted to see actual REW measurements on maximum volume => so I've placed portable MEH on two cardboard boxes, and at 1m distance from MEH I placed USB mic also on few cardboard boxes.
I've connected USB cable from "Arylic" plate amp to laptop, so I can use USB audio format for my REW sweeps.
Then turned up "Arylic" plate amp to maximum volume, adjusted all other volumes in Windows to maximum, and adjusted REW volume output to -12dB.
After that I made a quick test sweep, but distortion was already too high, not only in REW software but audibly as well.
So I've decreased REW output in -1dB steps , and try couple of sweeps, until distortion was acceptable => around -15dB output produced loudest possible output with acceptable distortion.
REW measurements showed that with my 4th version of DSP settings, maximum continuous output on bass frequencies was around 100dB on 1 meter ,and average sound output was around 97dB.
Please note that I purposely reduced mid/high frequencies in 4th DSP version, to about -3dB compared to bass levels, as in closed spaces fully flat DSP setting has too much mid/high frequencies for my taste.
What is interesting, in these few sweeps I noticed that now there was large & wide peak on 480Hz which wasn't present with my prior DSP settings, here are couple of REW screenshots:
Hm, I was a little bit disappointed with measured numbers, even though I am aware that this is just temporary box, and that I will build twin H280 horn box that should have larger output.
But, when the speaker is already here, in open space, I wanted to hear actual sound from various distances, so I found some psy trance mix, took my cell phone, and at 40m distance I started to record video.
What surprised me first , was clarity of the sound from that distance => from 40m distance I could easily identify all sounds, without details missing.
Second thing is that it was sufficiently loud from 40m distance in fully open space => even though the measured sound output was (only) up to 100db/1m.
Third thing is that mid/high frequencies are not completely lost from axis center => horizontal & vertical coverage is quite good, even though speaker was located very low, only 50-60cm from floor.
Here is the video and short description:
a) From beginning of video and up to 1:20 mins, it was recorded from 40m distance,
b) Then , I moved to 50m distance for short time,
c) After that, I slowly walked towards the speaker, and stopped at around 10m distance from speaker.
In the moment, I will stop experiments with test box & old 6.5" woofer drivers, as I already extracted close to maximum from these old drivers, and will proceed with design of twin H280 horn with four 8" woofers and two fullrange drivers.
As four SB Acoustics 8" woofers would require some room to breathe, I don't want to put them in tiny box, as it will require heavy equalization, which will require much more amp power that "Arylic" plate amp can provide.
But in the end, I want portable box (even though portable is relative term), so some kind of compromise is to keep dimensions to about roughly same size as the biggest commercially available portable bluetooth speakers.
One example is "Soundboks" Gen 3 => this speaker is around 98L gross volume, so my box will be around +/- 110L gross, and around 94L net volume.
This will translate to about 23.5L per each 8" woofer.
To mount two 8" woofers on H280 horn is doable, though there is no much room to play => the 8" woofer is tight fit between horn throat flange and internal edge of the horn mouth.
Each two woofer injection ports are designed to have combined surface area between 10 and 12% of one woofer membrane surface, to avoid excessive compression.
Both woofer ports are, slightly elongated, and are positioned close to H280 horn edges, and close to woofer center as possible.
For attaching woofers to H280 horn I will again use two wood plates:
a) Plate that will be permanently glued to H280 horn (and that will be used as a jig for cutting woofer injection ports in ABS horn),
b) Second removable plate where actual 8" Woofer will be mounted, which will be attached to first plate with fasteners (bolts + t-nuts).
This second plate will have deep recess to allow for membrane movement (11mm height => Xmax * 2), plus I will try to implement cone fillers (that will be cut on CNC machine).
Couple of 3D renderings:


The box will be designed similar to "wedge monitors", so that it can be positioned on the side if required, and that both horns will be directed towards listeners:

As four SB Acoustics 8" woofers would require some room to breathe, I don't want to put them in tiny box, as it will require heavy equalization, which will require much more amp power that "Arylic" plate amp can provide.
But in the end, I want portable box (even though portable is relative term), so some kind of compromise is to keep dimensions to about roughly same size as the biggest commercially available portable bluetooth speakers.
One example is "Soundboks" Gen 3 => this speaker is around 98L gross volume, so my box will be around +/- 110L gross, and around 94L net volume.
This will translate to about 23.5L per each 8" woofer.
To mount two 8" woofers on H280 horn is doable, though there is no much room to play => the 8" woofer is tight fit between horn throat flange and internal edge of the horn mouth.
Each two woofer injection ports are designed to have combined surface area between 10 and 12% of one woofer membrane surface, to avoid excessive compression.
Both woofer ports are, slightly elongated, and are positioned close to H280 horn edges, and close to woofer center as possible.
For attaching woofers to H280 horn I will again use two wood plates:
a) Plate that will be permanently glued to H280 horn (and that will be used as a jig for cutting woofer injection ports in ABS horn),
b) Second removable plate where actual 8" Woofer will be mounted, which will be attached to first plate with fasteners (bolts + t-nuts).
This second plate will have deep recess to allow for membrane movement (11mm height => Xmax * 2), plus I will try to implement cone fillers (that will be cut on CNC machine).
Couple of 3D renderings:
The box will be designed similar to "wedge monitors", so that it can be positioned on the side if required, and that both horns will be directed towards listeners:
Nice, I like where this is going! The better mids will change max output by quite a bit I suppose. Did you think about adding some splay to those horns so they cover a wider area and reduce comb filtering? Nice modeling work btw.. which software do you use?
Quick tip - I see a bit of pull out on the cnc cuts. You might like to try a down spiral flute cutter. They will provide a near perfect cut and also help to push the work on to the table. Straight flutes are okay for wood too, but up spiral flutes are only for metal.
Just the first I found on Ali -
https://a.aliexpress.com/_EzavHaX
Nice work 👏
Just the first I found on Ali -
https://a.aliexpress.com/_EzavHaX
Nice work 👏
Thanks, I am also curious to hear it once when it is completed 🙂Nice, I like where this is going! The better mids will change max output by quite a bit I suppose. Did you think about adding some splay to those horns so they cover a wider area and reduce comb filtering? Nice modeling work btw.. which software do you use?
Regarding drivers:
-This box will have larger number of better quality drivers, so maximum output should be definitely improved.
Regarding adding splay:
- I was thinking a lot regarding of horn placement , in relation to comb filtering =>I was thinking about twin box, but with angled front panel, or separate wedge boxes, placed side-by-side by an angle, but then I decided to try simple layout first, try it / measure it and then to build new design if it is absolutely required.
Regarding modeling software:
- I use "Onshape" for all 3D modelling work = >to me it has many benefits (one of them that it is fully cloud-based) , and it is my favorite after I tried almost all well-known 3D modelling softwares (Catia, Solidworks, Inventor, etc.)
2 Tenson:
Yes, you spotted that right!👍
On the first cuts, I used my standard 2-flute , down cut bit for for wood, but due some unknown error (probably one left over piece was loose, and wedged to router bit, then caused bit breakage) I broke my last down cut bit.😡
Then I used 2-flute up cut for aluminum which is not the optimum but can get the work done, and only on last pieces I switched to 2-flute chip breaker bit, which offered much better edge finish that I expected.
Hmmm, so I tried to optimize volume & layout little bit more from my initial sketch, so here is the REV1 version:
a) Reduced internal volume from 84L to 68 L cca,
b) Lowered bass reflex tuning frequency to 42Hz,
c) Added flared 100mm port on the rear,
d) Added revision hatches (two per side, four total), for mounting 8" woofers).
e) Added "Arylic Plate Amp".


NOTES:
1. Horn mouth is now very close to "Arylic Plate Amp" =>this should be checked/changed (maybe by extending total height of the speaker, we'll see),
2. I will try to add internal straightening panel, that will connect front, sides and rear, but it will have large openings in order to fit correctly,
3. I will add two round plastic handles on bottom & top panel.
a) Reduced internal volume from 84L to 68 L cca,
b) Lowered bass reflex tuning frequency to 42Hz,
c) Added flared 100mm port on the rear,
d) Added revision hatches (two per side, four total), for mounting 8" woofers).
e) Added "Arylic Plate Amp".
NOTES:
1. Horn mouth is now very close to "Arylic Plate Amp" =>this should be checked/changed (maybe by extending total height of the speaker, we'll see),
2. I will try to add internal straightening panel, that will connect front, sides and rear, but it will have large openings in order to fit correctly,
3. I will add two round plastic handles on bottom & top panel.
I've tried once more to design twin H280 box with splay angle between horns, just to see what can be done if I go into this direction.
Here are couple renderings, this could be fun speaker:


Couple of notes:
1. Internal NET volume is around 73 liters.
2. Splay angle between two horns is 90° => this should be sufficient to get some separation of higher frequencies.
2. I've added two 100mm bass reflex ports with flared ends => in rendering they are shorter then required for my tuning frequency (42Hz).
3. I've added four hatches for driver access =>two on the top panel, two on the bottom panel.
As I will be using 9mm plywood, which is quite thin, I intend to cut reinforcing pieces, which will be mounted from inside of each hatch opening for mounting T-nuts/ threaded inserts.
4. I've calculated weight of the whole assembly, so here is preliminary calculation (if I use 9mm phenolic birch anti slip plywood):
a) Wood for cabinet construction: 7.61 kg
b) Wood for woofer/fullrange mounting: 2.57 kg
c) Speaker drivers & horns: 7.88 kg
d) Electronics (plate amp, battery board w. batteries):1.49 kg
TOTAL weight: 19.55kg
If I decide to switch to extra light Okume 10mm plywood, total weight will be reduced to 17.11 kg.
Here are couple renderings, this could be fun speaker:
Couple of notes:
1. Internal NET volume is around 73 liters.
2. Splay angle between two horns is 90° => this should be sufficient to get some separation of higher frequencies.
2. I've added two 100mm bass reflex ports with flared ends => in rendering they are shorter then required for my tuning frequency (42Hz).
3. I've added four hatches for driver access =>two on the top panel, two on the bottom panel.
As I will be using 9mm plywood, which is quite thin, I intend to cut reinforcing pieces, which will be mounted from inside of each hatch opening for mounting T-nuts/ threaded inserts.
4. I've calculated weight of the whole assembly, so here is preliminary calculation (if I use 9mm phenolic birch anti slip plywood):
a) Wood for cabinet construction: 7.61 kg
b) Wood for woofer/fullrange mounting: 2.57 kg
c) Speaker drivers & horns: 7.88 kg
d) Electronics (plate amp, battery board w. batteries):1.49 kg
TOTAL weight: 19.55kg
If I decide to switch to extra light Okume 10mm plywood, total weight will be reduced to 17.11 kg.
I was quite busy last few months but finally have some spare time to continue with the "Twin H280 Bluetooth MEH" project.
During that period, I was listening my portable single H280 box (which sits next to my working desk) , as often as I could and did some minor DSP tweaking.
After lot of listening, I can definitely conclude that even with sub-optimal drivers , cheap D-class amp, this speaker has two main properties which I like:
a) It has nicely balanced sound,
b) It is enjoyable to listen for prolonged hours.
But, also during that period, I received SB Acoustics 8" woofers, so I wanted to hear them with "Arylic" plate amp, before my project box is completed.
So, I quickly made improvised test box from chipboard leftovers (about 35 L internal size), and installed two 8" woofers in this box, and connected them in parallel.
On top of the box I just placed H280 horn, with some unknown fullrange driver mounted on the mouth flange.

Also I drilled one hole for bass reflex port, and place port outside, so I can adjust bass reflex port length.
After that, I powered "Arylic" amp, adjusted DSP, and played with settings => due fact that small "Arylic" amp could only provide around 40W total for both 8" woofers (as they are 8 Ohms & in parallel), I was concerned that they will have less output than my single H280 box.
But the maximum sound output was higher, even with less power => hmmm, after few listening tests, I was definitely curious to check what can be extracted from amplifier with higher power - if I decide to swap "Arylic" with more powerful amplifier board.
Couple of weeks later, after some searching, checking, reading, I decided to go with following amp/power supply section:
a) Two "TPA3255" IC based, 2-channel boards (with bluetooth & line-in option),
b) Two 21V Li-Ion Battery boards (with 26650 cells, 6000mAh).
Here are my reasons:
1) TPA 3255 is proven IC, can provide more than sufficient power for my drivers and to still have some headroom.
2) Two 21V boards will offer me 42V DC power supply when connected in series.
With 6000mAh cells , I will have 252 Wh power source, which is higher than on most of PA battery powered speakers - for example:
3) With two separate battery boards, I can wire switch in order to choose parallel or series connection:
Anyway, these changes required some modifications in my Twin H280 box design, but after many hours, I am getting close to completion - this will be REV3 box, and here are main changes:
1.) Added large removable panel on back of the speaker (so that different amp boards/battery boards, etc. can be tested & installed,
2.) Added plexiglass panel with two 21V Li-Ion battery boards mounted side by side (tight fit ,as it can be seen on renderings),
3.) Removed "Arylic" plate amp and added two TPA3255 boards (above two battery boards),
4.) Removed service hatches on top & bottom panels => with new removable back panel, access to driver during installation is much better .
Instead hatches, I decided to install plastic handles => two on top panel, two on bottom panel.
5.) Considering that I should be able to reach continuous 120 dB/1m with new setup , I decided to add flange for 35mm PA speaker stands, so speaker could be mounted on standard speaker tripods (if required).
6.) Bass reflex ports are 100mm dia each, and considering that they are relatively close to amp & battery boards, I hope that some bass reflex air flow will pass above electronics.
Here are latest renderings of REV 3 box:


During that period, I was listening my portable single H280 box (which sits next to my working desk) , as often as I could and did some minor DSP tweaking.
After lot of listening, I can definitely conclude that even with sub-optimal drivers , cheap D-class amp, this speaker has two main properties which I like:
a) It has nicely balanced sound,
b) It is enjoyable to listen for prolonged hours.
But, also during that period, I received SB Acoustics 8" woofers, so I wanted to hear them with "Arylic" plate amp, before my project box is completed.
So, I quickly made improvised test box from chipboard leftovers (about 35 L internal size), and installed two 8" woofers in this box, and connected them in parallel.
On top of the box I just placed H280 horn, with some unknown fullrange driver mounted on the mouth flange.
Also I drilled one hole for bass reflex port, and place port outside, so I can adjust bass reflex port length.
After that, I powered "Arylic" amp, adjusted DSP, and played with settings => due fact that small "Arylic" amp could only provide around 40W total for both 8" woofers (as they are 8 Ohms & in parallel), I was concerned that they will have less output than my single H280 box.
But the maximum sound output was higher, even with less power => hmmm, after few listening tests, I was definitely curious to check what can be extracted from amplifier with higher power - if I decide to swap "Arylic" with more powerful amplifier board.
Couple of weeks later, after some searching, checking, reading, I decided to go with following amp/power supply section:
a) Two "TPA3255" IC based, 2-channel boards (with bluetooth & line-in option),
b) Two 21V Li-Ion Battery boards (with 26650 cells, 6000mAh).
Here are my reasons:
1) TPA 3255 is proven IC, can provide more than sufficient power for my drivers and to still have some headroom.
2) Two 21V boards will offer me 42V DC power supply when connected in series.
With 6000mAh cells , I will have 252 Wh power source, which is higher than on most of PA battery powered speakers - for example:
- "JBL" Eon One MK2 has 97,2 Wh capacity,
- "Soundboks" 4 has 100Wh capacity,
3) With two separate battery boards, I can wire switch in order to choose parallel or series connection:
- With series connection I will get maximum amp power from batteries,
- And with parallel connection , I can have extra long play time on lower loudness (if required) as I will extend total capacity to 12Ah.
Anyway, these changes required some modifications in my Twin H280 box design, but after many hours, I am getting close to completion - this will be REV3 box, and here are main changes:
1.) Added large removable panel on back of the speaker (so that different amp boards/battery boards, etc. can be tested & installed,
2.) Added plexiglass panel with two 21V Li-Ion battery boards mounted side by side (tight fit ,as it can be seen on renderings),
3.) Removed "Arylic" plate amp and added two TPA3255 boards (above two battery boards),
4.) Removed service hatches on top & bottom panels => with new removable back panel, access to driver during installation is much better .
Instead hatches, I decided to install plastic handles => two on top panel, two on bottom panel.
5.) Considering that I should be able to reach continuous 120 dB/1m with new setup , I decided to add flange for 35mm PA speaker stands, so speaker could be mounted on standard speaker tripods (if required).
6.) Bass reflex ports are 100mm dia each, and considering that they are relatively close to amp & battery boards, I hope that some bass reflex air flow will pass above electronics.
Here are latest renderings of REV 3 box:
So now the fun starts - the woodworking part 🙂
First I created G-code files in CAM software, and then start to cut boards on three pieces of 9mm non-slip plywood (size of each piece is 1250 x 830 mm):


After couple of broken router bits later, all the parts were cut, and I've clean the edges and checked all parts to see eventual design errors => so far so good no major flaws were found:


First I created G-code files in CAM software, and then start to cut boards on three pieces of 9mm non-slip plywood (size of each piece is 1250 x 830 mm):
After couple of broken router bits later, all the parts were cut, and I've clean the edges and checked all parts to see eventual design errors => so far so good no major flaws were found:
Working with MDF again quickly reminded me why I hate this material => except annoying fine dust that goes everywhere, it splits easily , so I played quite some time to install threaded metric inserts, which will be used for mounting SB Acoustics 8" woofers:


Woofer mounting plate (the larger one) doesn't fit directly on lower plate, but that was already identified during CAD design => the larger board will require some chamfering plus, one reinforcement rib will be removed from the H280 throat.
First step was to glue lower board to flat area on H280 horn => I roughen surface of both horn and lower MDF board to enable better glue adhesion:


I use polyurethane 1-component glue as it is tough, but still elastic, and it seals well.

Woofer mounting plate (the larger one) doesn't fit directly on lower plate, but that was already identified during CAD design => the larger board will require some chamfering plus, one reinforcement rib will be removed from the H280 throat.
First step was to glue lower board to flat area on H280 horn => I roughen surface of both horn and lower MDF board to enable better glue adhesion:
I use polyurethane 1-component glue as it is tough, but still elastic, and it seals well.
As this glue is quite slippery when is not dried, I've had to secure lower plate in position => simplest thing was to dab few drops of hot melt glue:

Of course , during working on new bluetooth MEH speaker, you listen music from the old bluetooth MEH speaker 😎

The worst part was drilling & milling woofer tap holes => this is always tricky, but I found relatively smooth method:
1. Once when the both lower MDF boards were glued, and glue is hardened, I use this board to firmly secure horn to work table,
2. Then I drill two large holes with 15mm wood drill bit on tap positions,
3. Then I take 12mm router bit (with guiding bearing) and enlarge the holes in plastic horns, by using MDF holes as a guide.
One small MDF board was a little bit off, so the tap holes were not perfectly centered, but I doubt that this will make considerable issues.


Of course , during working on new bluetooth MEH speaker, you listen music from the old bluetooth MEH speaker 😎
The worst part was drilling & milling woofer tap holes => this is always tricky, but I found relatively smooth method:
1. Once when the both lower MDF boards were glued, and glue is hardened, I use this board to firmly secure horn to work table,
2. Then I drill two large holes with 15mm wood drill bit on tap positions,
3. Then I take 12mm router bit (with guiding bearing) and enlarge the holes in plastic horns, by using MDF holes as a guide.
One small MDF board was a little bit off, so the tap holes were not perfectly centered, but I doubt that this will make considerable issues.
Im convinced this wil be the dopest bluetooth speaker alive once finished. Thanks for sharing al this stuff!!
2 lex brejis:
It will at least be quite different than any commercially available bluetooth speaker 😀
Today I started with gluing parts together - I used small wood screw to attach all parts together, as it is quite hard to precisely hold angled butt joints, slippery from glue, without some jig (now when I am thinking, I could simply design & cut angle joint jig on CNC🙁).
Also, I chamfered MDF woofer boards, and removed reinforcement ribs from H280 throats:
Check out this carpenter trick for that problem its simply brilliant
2 lex brejis:
Not to go off topic too much:
Thanks for sending this video => I agree that this is nice trick, but I think it is more suitable when you have relatively thick wooden studs, which are placed on flat surface horizontally.
In my case, I have two thin, relatively flexible (9mm) plates, which are standing vertical, surface area for the glue is minimal, and I can't use standard vice as there are no parallel surfaces.
I designed simple wooden jig like on my pic down below, that can hold firmly two boards at exact angle while you can drill holes precisely in center of the board (but I was too lazy "cough, cough" to make it 🤓):
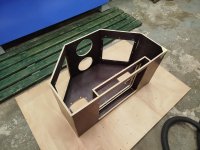
Some progress with box assembly: I glued rear panel, with opening for removable back panel:


After all side panels were glued to the bottom piece, I noticed that there is some unevenness between different side panels - some of them are slightly different height.
Hm, I could use belt sander, but with such thin material , it will remove too much material very quickly, and in the end it would be very hard to flatten surface precisely,
I choose different approach => to mount hand held router vertically, just slightly above all side panels, and to attach firmly router to work table.
Then, to adjust 2-flute router bit to desired height, and to start the router => then, I moved my glued work piece and slide carefully all side panels underneath router bit, until all side panels are shaved for desired amount.
To decrease friction during work piece sliding, I added dishwasher liquid on work table surface.
This method worked relatively well, though if I had surfacing router bit it would leave better edge finish probably:


Here are some comparison of new twin H280 horn box vs. my single H280 prototype => new box will be about twice as large:


After all side panels were glued to the bottom piece, I noticed that there is some unevenness between different side panels - some of them are slightly different height.
Hm, I could use belt sander, but with such thin material , it will remove too much material very quickly, and in the end it would be very hard to flatten surface precisely,
I choose different approach => to mount hand held router vertically, just slightly above all side panels, and to attach firmly router to work table.
Then, to adjust 2-flute router bit to desired height, and to start the router => then, I moved my glued work piece and slide carefully all side panels underneath router bit, until all side panels are shaved for desired amount.
To decrease friction during work piece sliding, I added dishwasher liquid on work table surface.
This method worked relatively well, though if I had surfacing router bit it would leave better edge finish probably:
Here are some comparison of new twin H280 horn box vs. my single H280 prototype => new box will be about twice as large:
Attachments
The box is now almost fully assembled, so I started to play with H280 horn and two MDF boards:
a) One board is already glued to the horn with polyurethane adhesive (I call it "Glued Board")
b) Second removable board will be attached with four M6 allen bolts (I call it "Woofer Board")
Between two boards I required some sealing => I could cut removable seal, but I decided to glue permanently seal to board that is attached to the H280 horn, to simplify installation.
For seal material, I used yoga/fitness mat leftovers, approx. 4mm thick, that were cut to rough shape, and glued to MDF board with polyurethane adhesive.
To enable uniform pressure during hardening of the adhesive, I simply attached woofer board and tighten it with M 6 studs and nuts:

After adhesive hardening, I took two 8" "SB Acoustics" woofers and test mount them to horn, to check for eventual clashes => so far so good, it is tight fit, but everything seems as per latest revision of my 3D design:


After that, I checked woofer ports (tap holes) => they required some smoothing, so I created simple tool, consisting of 8mm threaded rod, on which I rolled couple of turns of 80 grit sandpaper.
Then I attached this "tool" in battery drill, and started to grind ports to smooth sharp edges:


a) One board is already glued to the horn with polyurethane adhesive (I call it "Glued Board")
b) Second removable board will be attached with four M6 allen bolts (I call it "Woofer Board")
Between two boards I required some sealing => I could cut removable seal, but I decided to glue permanently seal to board that is attached to the H280 horn, to simplify installation.
For seal material, I used yoga/fitness mat leftovers, approx. 4mm thick, that were cut to rough shape, and glued to MDF board with polyurethane adhesive.
To enable uniform pressure during hardening of the adhesive, I simply attached woofer board and tighten it with M 6 studs and nuts:
After adhesive hardening, I took two 8" "SB Acoustics" woofers and test mount them to horn, to check for eventual clashes => so far so good, it is tight fit, but everything seems as per latest revision of my 3D design:
After that, I checked woofer ports (tap holes) => they required some smoothing, so I created simple tool, consisting of 8mm threaded rod, on which I rolled couple of turns of 80 grit sandpaper.
Then I attached this "tool" in battery drill, and started to grind ports to smooth sharp edges:
Finally, the end is near - here is the short summary of last month progress:
a) The speaker box is now fully completed & painted ,
b) All internal MDF boards (glued board & woofer mount board) are also completed,
c) New plywood flange adapter was machined on CNC,
d) New box hardware arrived => 100mm flanged bass reflex ports (2 pcs) & plastic handles (4 pcs),
e) New DSP amp boards (based on TPA3255) arrived => but USB programming cable has to be ordered separately, so I can't use them in the moment 🙁
f) New, additional 26650 battery board arrived => but 26650 Li-Ion cells will be shipped on 26th December (!) , so I can't get 42 V DC required 🙁
g) New "SB acoustics" fullrange drivers didn't arrived as they were on backorder, so I will order them this week, and hopefully, I will get them on beginning of December 2024.
Here are some pics:


Regarding internal components, I decided to perform two modifications on MDF plates:
a) I've reshaped woofer mounting plates, by cutting extra material (trying to save few grams of weight),
b) I've cover all MDF surfaces with diluted PVA (to seal MDF and to prevent moisture issues).
After that, I've spend quite some time to cut & glue all gaskets correctly, and then I tightened each 8" woofer to dedicated woofer plate.
My idea is to install each woofer plate with woofer driver already attached to glued MDF plates, as it is easier to attach four M6 bolts (for mounting woofer plate) then to center and attach eight small M4 bolts that hold driver itself.
According to my 3D design, it should be feasible to install complete woofer plate & driver assembly, as I left some small clearance around horn mouth, but we'll see in practice.


a) The speaker box is now fully completed & painted ,
b) All internal MDF boards (glued board & woofer mount board) are also completed,
c) New plywood flange adapter was machined on CNC,
d) New box hardware arrived => 100mm flanged bass reflex ports (2 pcs) & plastic handles (4 pcs),
e) New DSP amp boards (based on TPA3255) arrived => but USB programming cable has to be ordered separately, so I can't use them in the moment 🙁
f) New, additional 26650 battery board arrived => but 26650 Li-Ion cells will be shipped on 26th December (!) , so I can't get 42 V DC required 🙁
g) New "SB acoustics" fullrange drivers didn't arrived as they were on backorder, so I will order them this week, and hopefully, I will get them on beginning of December 2024.
Here are some pics:
Regarding internal components, I decided to perform two modifications on MDF plates:
a) I've reshaped woofer mounting plates, by cutting extra material (trying to save few grams of weight),
b) I've cover all MDF surfaces with diluted PVA (to seal MDF and to prevent moisture issues).
After that, I've spend quite some time to cut & glue all gaskets correctly, and then I tightened each 8" woofer to dedicated woofer plate.
My idea is to install each woofer plate with woofer driver already attached to glued MDF plates, as it is easier to attach four M6 bolts (for mounting woofer plate) then to center and attach eight small M4 bolts that hold driver itself.
According to my 3D design, it should be feasible to install complete woofer plate & driver assembly, as I left some small clearance around horn mouth, but we'll see in practice.
- Home
- Loudspeakers
- Multi-Way
- Portable Bluetooth MEH project (based on "SB Acoustics" H280 horn)