straight cut blade and bearing at the tip
That would be a 'Flush Cut' - the bit to follow templates has the bearing above the flutes 😉
Voids should be filled with you preferred material -dried (dried) silver sand, anti-bacterial cat-litter, lead shot, expanding foam or whatever.
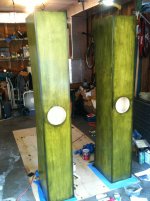
Thanks 2sound for the options. I ended up making a template and cutting the boards with a jigsaw. I am glad I invested in a good jigsaw. It was easy. Next I will put all 4 boards together and sand so the curves are pretty much the same.
Thanks Scott for the void fill material.
Thanks Scott for the void fill material.
Yes Scott thanks for the void material suggestions.
I used sand. It took quite a bit more than I would have thought. 2 bags of 0.5 cu ft/14L sand. 3/4 bag per speaker roughly. For the Vulcan.
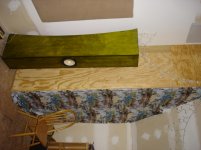
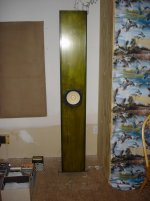
I have glued up one speaker completely now and wanted to share one thing that helped. I like to apply glue to both surfaces to be glued. I used masking tape sticky side up laid out on the panel pieces and then laid the top down. Picked it up and voila it worked. Nice pattern to draw a pencil line so I could follow lines with glue. I spread the glue with a sponge brush to spread it so it would not run while tilting/turning the panel.
I used sand. It took quite a bit more than I would have thought. 2 bags of 0.5 cu ft/14L sand. 3/4 bag per speaker roughly. For the Vulcan.
I have glued up one speaker completely now and wanted to share one thing that helped. I like to apply glue to both surfaces to be glued. I used masking tape sticky side up laid out on the panel pieces and then laid the top down. Picked it up and voila it worked. Nice pattern to draw a pencil line so I could follow lines with glue. I spread the glue with a sponge brush to spread it so it would not run while tilting/turning the panel.
I have completed the Vulcans. Yea!!! I need to get a pic of the rear since I painted it candy apple red. They have a bomber feel to them and feet supports are bare steel. I may need to get a little wider with the front support but overall very happy. The cabinets and speaker sound spectacular. Next up is a proper tube amp to go with them. The solid state one I have is actually pretty nice with them so I can only imagine for now what set will do. I listened to the same speaker in the fostex design with my ss amp and it sounded nice except very little bass. Scott's design is producing more bass than the original speakers I had even with the ss. I had to get a hand truck to be able to move these things around.
Eric
Eric
Attachments

2sounds,
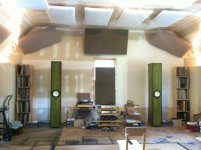
Looking good in your big room (it looks like a fairly large space)... handsome build and unique finish.
Enjoy!
Looking good in your big room (it looks like a fairly large space)... handsome build and unique finish.
Enjoy!
Eric,
Congratulations! Looks like an excellent build. I am glad you are liking the sound of them.
I am at the gluing stage with my Valiants. I think the Valiants are big I can't imagine the Vulcan. I am finding it a long process but fun.
🙂
Congratulations! Looks like an excellent build. I am glad you are liking the sound of them.
I am at the gluing stage with my Valiants. I think the Valiants are big I can't imagine the Vulcan. I am finding it a long process but fun.
🙂
Those are nice looking 2sounds. I just found this thread and I have a question.
Would your decision to build the Vulcans have been influenced by that steel statue on the hillside? You know, the one with the huge steel a$$? Haha
Would your decision to build the Vulcans have been influenced by that steel statue on the hillside? You know, the one with the huge steel a$$? Haha
I showed these to my wife, along with the frugal horn and the metronome, and she said no thanks to the big ones. She wasn't so keen on the FH either so I guess I'll stick with the mets for now.
Look really nice, I'd be interested in your opinion when you get a tube amp.
Look really nice, I'd be interested in your opinion when you get a tube amp.
They are big. There is a hand-truck on the left side of the picture not for decoration. I am really pleased with the result and would definitely say build them. You need a second person for the long cuts on a table saw. At least for the front piece because it has to match the width to all the internal cuts to glue up correctly. Other than that the finishing was the hardest and I had ok results. I think I over sanded the front piece because I changed plans and the stain I was using.
I would build these again for sure and my wife loves them. In the end anyway. She's not real keen on me coming home spending time with a table saw and glue. The green dye was supposed to be a base color for a brown stain but we liked the green so much we stopped there. Also would suggest wearing latex powder free something gloves when handling the wood especially during sanding. I have some finger marks that around speaker opening and one known streak on the front where my fingers were.
Thanks for the help and encouragement. This has been a blast and will hopefully start my son's speakers in a month or so.
Eric
The tube amp will be diy. Bottlehead Stereomour 2a3 kit. It's going to be tweaked with film instead of electrolytic caps in the power supply section so the size is going to change substantially. Plus it'll up the soldering ante and I've never soldered. So a good challenge. That'll make it more diy and less kit like. I'm thankful for Bottlehead's help. I also cut ply for my son's speakers yeserday. Pensil 10.3. He and I should be gluing them today.
Pic is back of Vulcan
Pic is back of Vulcan
Attachments

Wow- just looked at my first post. 9 months ago.
Theoretical question on speaker positioning the BLH. Regarding corner loading and the design of the speaker. Is there a distance from the back wall I should not go closer to. I am thinking (dangerous) that I may be increasing the load the speaker sees as the mouths get closer and therefore not get as much bass. In my head since the channels through the speaker doubles with each turn and the last turn having 6 inches between the channels I should be around 12 inches from the back wall. Except the back then is basically joining the upper and lower sections creating a long channel (the length of the speaker) at the back of the speaker as it sends the sound to the wall. So if the back wall/corner is an extension of the horn then should be more like 6 inches because of the 2x channel length.
Man I hope that's not too confusing to imagine. The reason for asking is that in my situation just positioning the speakers for best sound is complicated by the fact that I have built my SET amp and therefore playing with different caps. So I need some kind of fixed variable of roughly where the speaker should be positioned so I can see if one cap is really doing more or less than the other and the improvements.
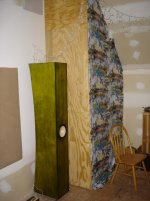
If you compare the pic to original pic you'll see I built a wall to bring the speakers closer together. The room is about 22ft front wall x 25 ft. I made the walls with 3/4 ply and 2x4 studs. Pretty solid.
Theoretical question on speaker positioning the BLH. Regarding corner loading and the design of the speaker. Is there a distance from the back wall I should not go closer to. I am thinking (dangerous) that I may be increasing the load the speaker sees as the mouths get closer and therefore not get as much bass. In my head since the channels through the speaker doubles with each turn and the last turn having 6 inches between the channels I should be around 12 inches from the back wall. Except the back then is basically joining the upper and lower sections creating a long channel (the length of the speaker) at the back of the speaker as it sends the sound to the wall. So if the back wall/corner is an extension of the horn then should be more like 6 inches because of the 2x channel length.
Man I hope that's not too confusing to imagine. The reason for asking is that in my situation just positioning the speakers for best sound is complicated by the fact that I have built my SET amp and therefore playing with different caps. So I need some kind of fixed variable of roughly where the speaker should be positioned so I can see if one cap is really doing more or less than the other and the improvements.
If you compare the pic to original pic you'll see I built a wall to bring the speakers closer together. The room is about 22ft front wall x 25 ft. I made the walls with 3/4 ply and 2x4 studs. Pretty solid.
Attachments

I moved the walls in so the walls are about 12 ft apart and speakers are now about 10 ft apart at present. I am open to criticism as well as long as I'm not cussed. haha! The made walls are screwed together so I can always take them down too. Thanks for your time.
Eric
Eric
I think you need a more comfy chair. And why is it every DIY system looks like that, mine included?
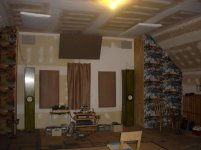
yeah... scraps. My son stuck on the foam thinking it would make it more comfortable. sad really. I'm reposting the pics so they are not sideways.
Attachments

Last edited:
After I built the speakers originally I put in just under !/2 inch wool sound insulation whose density was about 2.5-3 wrapped in fleece. It sounded dull. I removed that and put in 1 layer of fleece on the wall behind the speaker and 2 layers on the side walls. It livened the speaker. I decided perhaps I had standing waves inside from too little damping and that that was resulting in my bass problem and not so much a positioning issue. Today I put in right at 1/2 inch wool insulation but this time an 8 # density with very thin acrylic/wool fabric to hold it in place. Much better bass and I don't have the mids coming out of the mouths like I did before. I placed the speakers 18.5 in from side walls (saw a post where Scott had suggested that to a poster) and 9 inches from from front wall. Life is great and the speakers are lifelike, articulate, and good clear bass lines.
Still the same chair
Thanks
Eric
Still the same chair
Thanks
Eric
- Status
- Not open for further replies.
- Home
- Loudspeakers
- Full Range
- Planning to build Kirishima or Vulcan