Hey all,
I've been reading your site for months and now joined. Thanks for all you guys do here. I will start my first speaker build with the Fostex fe206en. Second build will be with my son in a month or two.
Questions are:
1. is there anything to add or update on the current plans for the Kirishima using 18mm ply from the frugal-horn site? I am using 18mm BB so just wanted to ask before I start cutting.
So before I start cutting I am intrigued by the Vulcan design also. Except the curved back which seems a bit daunting. I do have a buddy that has built before so that helps. Is there any preference Vulcan vs Kirishima?
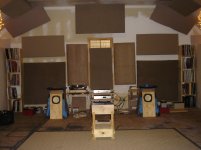
Sorry had to ask. I have a dedicated listening room with acoustic panels and some diffusion. The room is 22ft wide x 25ft long x 10ft high. Currently my speakers are about 8 ft into room and chair is about 8 ft in front of speakers. I have a somewhat unusual problem in that I need to have the speakers at least 5 ft from the front wall so I can access my turntable which is mounted to the wall.
Perhaps it wouldn't be a good idea also to have the bass coming out the back in front of the turntable. I may have just figured that I shouldn't consider the Vulcan while typing. Not sure. The sound is moving around anyway.
The question after the rambling is
Does the Vulcan plan include a layout for 18mm ply?
Thanks
Eric
I've been reading your site for months and now joined. Thanks for all you guys do here. I will start my first speaker build with the Fostex fe206en. Second build will be with my son in a month or two.
Questions are:
1. is there anything to add or update on the current plans for the Kirishima using 18mm ply from the frugal-horn site? I am using 18mm BB so just wanted to ask before I start cutting.
So before I start cutting I am intrigued by the Vulcan design also. Except the curved back which seems a bit daunting. I do have a buddy that has built before so that helps. Is there any preference Vulcan vs Kirishima?
Sorry had to ask. I have a dedicated listening room with acoustic panels and some diffusion. The room is 22ft wide x 25ft long x 10ft high. Currently my speakers are about 8 ft into room and chair is about 8 ft in front of speakers. I have a somewhat unusual problem in that I need to have the speakers at least 5 ft from the front wall so I can access my turntable which is mounted to the wall.
Perhaps it wouldn't be a good idea also to have the bass coming out the back in front of the turntable. I may have just figured that I shouldn't consider the Vulcan while typing. Not sure. The sound is moving around anyway.
The question after the rambling is
Does the Vulcan plan include a layout for 18mm ply?
Thanks
Eric
I built the kirishima ( 2 pairs) mainly for the ease of build. They are a great sounding speaker, that is fairly easy to build. Don't know about the vulcan
I have to be careful since I charge a small sum for one, and I'm not here to sell things but as a DIYer. However, re the questions:
-Yes, the Vulcan planset is drawn in several popular sheet material thicknesses, including 18mm
-It is technically the superior design. If it wasn't, I wouldn't charge for it. However, the slight caveat it that it is intended for boundary loading. If your cabinets need to be pulled at least 5ft away from boundaries, you won't get as much help on that score. Some may still actually prefer that, but IMO Kirishima would probably be better suited given that particular condition.
Last edited:
Thank you both for the input. I will plan to go with Kirishima plan. I hope to post some pics. It's been encouraging to get into the diy speaker building encouraged by a friend and you guys. I hope to do same for others.
Good luck with your project. I built a pair of Kirishimas last year and am really pleased with the sound. Construction wasn't difficult but you do need to get the cutting as accurate as possible if they are going to seal properly. If you haven't built horns before then get lots of clamps (preferably the kind you can operate with one hand). I needed eight for the sides.
Fostex full range drivers don't sound great straight out of the box. They are ok after a few days of use but it takes months to run them in properly. Planet 10 phase plugs are a worthwhile upgrade as is glueing felt and and damping material to the metal baskets.
Fostex full range drivers don't sound great straight out of the box. They are ok after a few days of use but it takes months to run them in properly. Planet 10 phase plugs are a worthwhile upgrade as is glueing felt and and damping material to the metal baskets.
Construction wasn't difficult but you do need to get the cutting as accurate as possible if they are going to seal properly.
Indeed I recommend to make a cutting plan for all the panels out of a big sheet so that many of them are guaranteed to have the same width, much like is done in the official Fostex enclosure designs.
Don't underestimate: the Kirishimas will look massive in your living room, so far in front of the wall.
As a less massive alternative,a German diy magazine tried and measured the FE206E in the enclosure of the FE208EZ. It was in fact better in the bass than the classic official FE206E enclosure, and it looks quite a bit better as well.
Another alternative, if you don't have the speakers in hand yet, are the Markaudio A12P in SuperPensil enclosure. To my taste they sound a level more refined than the FE206En.
Not much of a surprise (re the magazine findings). I've been suggesting that the 206 can be used in the 208ESigma horn for the best part of a decade, here & elsewhere, with superior results to the cabinet nominally recommended for the 206. For a while it was quite a popular option (in the context of relatively small back-horns for the 206). There are several threads where I did some comparative models of the different cabinets to illustrate this. I believe Puffin did a writeup in AffordableAudio back in June '07 on his build.
+1 to talaert's closing sentence in above post - even though the Pensils or Avebury for 12P are not tiny boxes, the former are certainly a much simpler build than either of the BLH designs, and refined / nuanced would certainly be a good description for the salient difference between the Fostex and Alpair drivers (actually across the current entire FExx6 line, IMO)
Just an update. I picked up some new BB plywood yesterday and have also decided to go with the Vulcan design. After completing the build I can rearrange my gear to get them 1/4 - 1/8 loaded. I have 2 record shelves that are mounted to the wall probably in the exact spot the Vulcans will want to live. Or I may use them as a pseudo wall. Time will tell. Thanks Scott for the prompt delivery of the Vulcan plans. I made the first cuts yesterday to cut down the 4x8 and cut the sides and rough cut the front with the circular saw. The width cuts will all be done with a table saw.
Good luck with the building 2sounds.
I look forward to seeing pictures of your Vulcans. I purchased the plans for the Valiants from Scott. I have yet to start!
I look forward to seeing pictures of your Vulcans. I purchased the plans for the Valiants from Scott. I have yet to start!
Regarding the Vulcan schematic- it looks like a 45 degree cut on the hole for the speaker. Is that correct?
Thanks
Eric
Thanks
Eric
45dg bevel on rear side of driver through hole is pretty much standard on all of Scott and Dave's designs.
I use a router chamfer bit, and set depth of cut to leave a small contact area ( approx 1/8") for bearing near front surface of baffle .
I use a router chamfer bit, and set depth of cut to leave a small contact area ( approx 1/8") for bearing near front surface of baffle .
Last edited:
I have so far glued up the internals of the Vulcan. It's coming together nicely. My wife really likes the radius cut out on the back. Regarding the box/space that is formed by the back panel and the panel directly behind the speaker do you suggest filling it with any dampening material or just leave it as a space. I do know to dampen the panel/side behind the speaker and to not impede the throat areas. I'll begin sealing panel seams hopefully tomorrow after all the glue cures.
Another question. Any tricks on sealing internal seams after the last side panel goes on and you can't get to everything where the side panel is glued to the internal panels and front piece? With 38 mm between the first inside panel and front it's a little tight for my hands. I was thinking of a spray but haven't come across any yet.
Another question. Any tricks on sealing internal seams after the last side panel goes on and you can't get to everything where the side panel is glued to the internal panels and front piece? With 38 mm between the first inside panel and front it's a little tight for my hands. I was thinking of a spray but haven't come across any yet.
Attachments

Hey 2sounds,
Looks good. I am almost at the same point with my Valiants. I have yet to do the radius cut for the side panels. I am thinking of buying a 8ft sheet of 1/8" mdf and using that to get the cut mark. I will be using a jigsaw. Do you mind if I ask you how you did the radius cut.
Thanks! Good building ...Dave
the path my brain was going down for filling the box/space is lead shot or Great Stuff expanding foam that's very firm and would pack it.
Yes wullymc i am about to leave for a bit and kids are in the car so im cramped on time but i will get back tonight or am about my experience with the radius cut. It was the most challenging part so far but not bad at all. just my nervousness
Yes wullymc i am about to leave for a bit and kids are in the car so im cramped on time but i will get back tonight or am about my experience with the radius cut. It was the most challenging part so far but not bad at all. just my nervousness
My advice for the radius cut is based on
1. I have never cut an arc before. Well 8.5x11 paper and scissors with the kids sure.
2. I had 0 experience with a jig saw, router, or table saw before this.
I tried several things that didn't work before I was convinced that what I was about to mark on the wood was exact.
This is what I ended up doing.
I screwed an eyehook horizontally into a 2x4 of the wall in our garage and measured out the specified distance. From the end of the eyehook. Ideally you want the eyehook to also be level or super close with where you are measuring. Horizontal was key. Anytime I used a vertical mount position with the eyehook or a nail there was flex introduced into the measurement. With the nail scenario I only put about half the nail in the floor so some flex do to that. In the end the horizontal eyehook was dependable.
I ended up using braided fishing line I had handy and tied a pencil to it at the specified distance. I used a scrap piece of wood to hold it 90 deg to the wood. I did my best to not vary tension as I marked. I moved with the marking of the wood. Be one with the pencil. I was also on concrete so I used knee pads. Helped this whole project actually. Unless you have a big table. The braided line didn't stretch and got the same results every practice run. If I did it again I might use the braided line again. I have tried to come up with other stuff but the line was not stretchy and it didn't retain any memory from the spool like wire will do. With tension on wire though it shouldn't matter. The main thing for the material though is that it can't be stretchy at all. Just not a variable to deal with. Another thing I would do is drill a hole for the pencil in an aluminum right angle to use as the guide. Probably drill from the bottom so you don't have a rough edge to mess with. Or just file the hole smooth. The aluminum slides nice and would hold it better than the piece of wood set up I used. Or sand the wood really smooth so it slides. Mine was rough.
I used a jig saw also. My suggestion based on warning 2. Practice on some scraps getting into the wood and check your speed of blade and your movement speed based on the hardness of the wood.
I went angled into the wood and had to turn into it a bit to get the cut started. Now I would say I should have cut into the wood with a wood file at least 1cm and make it wide enough for the blade to easily line up with the arc line to start the cut. I didn't do a great job on getting into the wood. The edge of the ply won that battle. And once it was going I ended up with the blade angled a bit during the cut. Not bad but I needed to sand it quite a bit to get rid of the angle. I didn't show much skill on getting the cut going but it's good now.
I am using 13 ply baltic birch it is pretty hard and I should have practiced more than one cut on blade speed and me moving the jig saw through a cut. I only practiced on the Lowe's birch and the two are different.
If you are planning on staining and using baltic birch it has really tight fibers and about 120 grit is about as fine as you want to sand initially. Also gel stains work better/easier on the tight grains. Less prone to smudges. Unless you have done staining before then your experience may dictate better/easier of course. I haven't decided on stain or clear. The buddy who's been encouraging and really the reason I started this project, which was just to get a fostex fe206en, in the beginning suggested candy apple red for these big *****.
This has been a totally doable fun project. I can now say I have used a jig saw, router, and table saw. Plus my 9 yr old son has used a circular saw. Successfully.
Table saw a must. All cuts for width have to match even if they were measured wrong.
Forgot-
Yes I would also do a template cut out instead of marking the main board. You can shape it up nicely afterwards. I thought I would be perfect and smooth. Haha. I dont know if there is 1/8 mdf though. But yeah if so great or a 8 foot 1x6. The cut doesn't remove a lot of wood. You would need a second piece of wood to go under the panel to make it level too. If you are using a template though I would use the router with a straight cut blade and bearing at the tip. Then just set the depth so the bearing rides the template. Be sure to clamp the panel and template together. It would be much faster and more precise I think than the jig saw. I would have done the template thing too but I didn't have access to a router at the time. Sorry if any of this was said below your skill level. Mine was 0 and now it is 0.1. Thanks
Yes I would also do a template cut out instead of marking the main board. You can shape it up nicely afterwards. I thought I would be perfect and smooth. Haha. I dont know if there is 1/8 mdf though. But yeah if so great or a 8 foot 1x6. The cut doesn't remove a lot of wood. You would need a second piece of wood to go under the panel to make it level too. If you are using a template though I would use the router with a straight cut blade and bearing at the tip. Then just set the depth so the bearing rides the template. Be sure to clamp the panel and template together. It would be much faster and more precise I think than the jig saw. I would have done the template thing too but I didn't have access to a router at the time. Sorry if any of this was said below your skill level. Mine was 0 and now it is 0.1. Thanks
Last edited:
- Status
- Not open for further replies.
- Home
- Loudspeakers
- Full Range
- Planning to build Kirishima or Vulcan